
You can use Jinjava in Automation to provide context or work with parameters.


<div class="admonition admonition-important"><div class="admonition-icon"><svg xmlns="http://www.w3.org/2000/svg" fill="none" viewBox="0 0 24 24" stroke="currentColor" stroke-width="2.5"><path stroke-linecap="round" stroke-linejoin="round" d="M12 8v4m0 4h.01M21 12a9 9 0 11-18 0 9 9 0 0118 0z" /></svg></div><div class="admonition-body"><div class="admonition-content">

Segmentation, expression, and aggregate definitions are cached for 20 minutes after a node with the analysis is activated in a journey.<br>
When another journey in the Automation Hub requests a result of the same analysis in that period, the cached definition is used to calculate the results. This means that if you edit a segmentation, aggregate, or expression used in a workflow, it takes 20 minutes for the new version to start being used in journeys.<br>
This includes definitions of segmentations, expressions, and aggregates nested in other analyses and used in Inserts.

</div></div></div>


<div class="admonition admonition-tip"><div class="admonition-icon"><svg xmlns="http://www.w3.org/2000/svg" fill="none" viewBox="0 0 24 24" stroke="currentColor" stroke-width="2.5"><path stroke-linecap="round" stroke-linejoin="round" d="M9.663 17h4.673M12 3v1m6.364 1.636l-.707.707M21 12h-1M4 12H3m3.343-5.657l-.707-.707m2.828 9.9a5 5 0 117.072 0l-.548.547A3.374 3.374 0 0014 18.469V19a2 2 0 11-4 0v-.531c0-.895-.356-1.754-.988-2.386l-.548-.547z" /></svg></div><div class="admonition-body"><div class="admonition-content">

If you use Visual Studio Code as your editor, you can use code snippets to speed up working with inserts.  
You can find the snippets in our Github repository: [https://github.com/Synerise/jinja-code-snippet](https://github.com/Synerise/jinja-code-snippet)

</div></div></div>


## Where can Jinjava be used in Automation?
- All action nodes
- Outgoing integrations
- Templates of communications sent from Automation
- Profile filters
- the [Audience node](/docs/automation/triggers/audience-node)

## Common tags available in Automation

You can use all tags from [Insert usage](/developers/inserts/insert-usage).

## Profile attributes

Profile attributes in automation can be retrieved in two ways:
- using the `{{ customer.attribute }}` syntax.
    If the attribute does not exist, an empty string is used in its place.  
    If the attribute name contains special characters, use `{{ customer['attribute'] }}`
- using the `{% customer attribute %}` syntax.  
    If the attribute does not exist, the insert isn't rendered and the node isn't processed (for example, an event isn't generated, a webhook request isn't made).  
    This syntax does not allow special characters in attribute names.


<figure><img src="/api/docs/image/54176ad07f146575310749eba44b7c2f42c1b327/developers/inserts/_gfx/automation-client-param.png" class="medium" alt="Example send email node"><figcaption>A <strong>Send Email</strong> node with the profiles's first name in the subject</figcaption></figure>

## Event parameters

Event parameters store additional information, such as og:tags. Some of them are required, but you can also create custom parameters. When you use the syntax below, you can:
- retrieve event data ([context](#context)) from the indicated event trigger or **Event Filter**.
- refer to event parameters when using Schema Builder and communication templates included in an automation workflow.

**Syntax:**  
`{{ automationPathSteps['nodeName'].event.params.paramName }}`  
- `nodeName` is the title of the node whose data you want to refer to   
- If the property name contains special characters, use `{{ automationPathSteps['nodeName'].event.params['paramName'] }}`  

  <figure><img src="/api/docs/image/54176ad07f146575310749eba44b7c2f42c1b327/developers/inserts/_gfx/node-name.png" class="medium" alt="The title of the node"><figcaption>The node title to be used as `nodeName`</figcaption></figure>


  You can use dot notation to access properties nested in objects.

  **Example:**  
  Event saved in the database:

  <pre><code class="language-json">{
    "createDate": 1695989087498,
    "action": "product.addToCart",
    "params": {
        "source": "MOBILE",
        "finalUnitPrice": "3.25",
        "brand": "exampleBrand",
        "revenue": 9.75,
        "eventCreateTime": "2023-09-29T12:04:47.498322032Z",
        "ip": "13.93.68.194",
        "quantity": 3,
        "sku": "189784563455",
        "currency": "USD"
    }
  }</code></pre>


  Examples of output:
- `{{ automationPathSteps['Node123'].event.params.brand }}` outputs `"exampleBrand"`
- `{{ automationPathSteps['Node123'].event.params.sku }}` outputs `"189784563455"`

### Context

1. The context, defined through the [Trigger](/docs/automation/triggers) or [Event Filter](/docs/automation/conditions/client-event-filter-node) node, remains consistent and does not change with the [Action nodes](/docs/automation/actions) (**Outgoing Webhook**, **Send Event**, **Send Email**, and so on).
3. At the beginning of the workflow, `<event.params>` holds the context of an event from the trigger; it can be kept throughout the whole workflow and referred to at any moment unless the workflow contains Event Filter (which is the only node that changes the context).
4. Then, `<event.params>` takes over the event context from the **Event Filter** node.
5. You can refer to event context from **Profile Event** or **Event Filter** in the workflow.


<figure>
<img src="/api/docs/image/54176ad07f146575310749eba44b7c2f42c1b327/docs/automation/_gfx/event-context-explanation.png" alt="Context switch in a workflow" class="full">
<figcaption> Context switch in a workflow </figcaption>
</figure>

### Example


<figure>
<img src="/api/docs/image/54176ad07f146575310749eba44b7c2f42c1b327/docs/automation/_gfx/event-params-example-journey.png" alt="Exemplary workflow that uses the event context" class="full">
<figcaption> Exemplary workflow that uses the event context </figcaption>
</figure>

The example presents a workflow in which the node which executes the action of updating a profile information retrieves the data for the update from the event context from the webhook executed earlier in the workflow (further details provided in the ["Modify customer data with info received from response"](#modify-customer-data-with-info-received-from-response)) section in this document.  


The workflow is triggered by a particular customer activity (event), as a result a webhook is sent to the external tool. Synerise waits until it gets the response from the tool. If so, the customer attribute is updated with information received through the webhook response.

#### Select a trigger
---
1. Add the **Profile Event** node.
2. Click the node twice and select the event.  
3. Confirm by clicking **Apply**.  
    **Result**: The selected event launches a workflow.
3. Click **THEN**.  

#### Send a webhook to an external tool
---
1. From the dropdown list, select **Outgoing Integration**.
2. Click the node twice and define the settings of the node.  
    
   <div class="admonition admonition-tip"><div class="admonition-icon"><svg xmlns="http://www.w3.org/2000/svg" fill="none" viewBox="0 0 24 24" stroke="currentColor" stroke-width="2.5"><path stroke-linecap="round" stroke-linejoin="round" d="M9.663 17h4.673M12 3v1m6.364 1.636l-.707.707M21 12h-1M4 12H3m3.343-5.657l-.707-.707m2.828 9.9a5 5 0 117.072 0l-.548.547A3.374 3.374 0 0014 18.469V19a2 2 0 11-4 0v-.531c0-.895-.356-1.754-.988-2.386l-.548-.547z" /></svg></div><div class="admonition-body"><div class="admonition-content">

   Read more about [Outgoing Integration](/docs/automation/integration/outgoing-webhook).

   </div></div></div>

3. Enter the title of the node.
3. In the upper right corner of the pop-up, select the **Custom** tab.
4. Select [the authentication method](/docs/automation/actions/webhook-node#set-up-a-connection).
7. Define the webhook configuration settings according to the instructions in the ["Define the endpoint" section](/docs/automation/actions/webhook-node#define-the-endpoint).  
8. Confirm by clicking **Apply**.  
    **Result**: Right after the event occurrence defined in the trigger node, a webhook is sent to the external tool.

#### Check if the response is received
---
8. On the **Outgoing Integration** node, click **THEN**.
9. From the dropdown list, select **Event Filter**.
10. Click the **Event Filter** node.
9. Leave the **Check** option at default (**without limits**).
11. From the **Choose event** dropdown list, select the action name from the **Outgoing integration** node. By default, it's `webhook.response`.  
    <figure>
    <img src="/api/docs/image/54176ad07f146575310749eba44b7c2f42c1b327/docs/automation/_gfx/webhook-response.png" alt="Webhook response selected" class="large">
    <figcaption> Webhook response selected </figcaption>
    </figure>
12. Confirm by clicking **Apply**.  
    **Result**: When the workflow launches and the webhook is sent, the system checks if a webhook response is received (the outgoing integration response event is visible on the customer's card in **Behavioral Data Hub > Profiles**). If so, the customer continues the workflow. 

#### Modify customer data with info received from response
---
13. Click the plus icon on the **Event Filter** node.
14. From the dropdown list, select the **Update Profile** node. 
15. Click the node.
16. Select the customer attribute to be modified.
17. Select the **Change** option.  
    **Result**: A field appears.
18. In the field, enter: `{{ automationPathSteps['nodeName'].event.params['paramName']` (replace  `nodeName` with the title of the Outgoing integration node and `paramName` with the actual name of the parameter).
    <figure>
    <img src="/api/docs/image/54176ad07f146575310749eba44b7c2f42c1b327/docs/automation/_gfx/update-client-event-context.png" alt="Event context used in Update Profile" class="large">
    <figcaption> Event context used in Update Profile </figcaption>
    </figure>
19. Confirm by clicking **Apply**.  
20. Click the plus button on the **Update Profile** node.
21. Select **End**.  


### Best practices
---

- You can put a parameter name in square brackets: `{{ automationPathSteps['nodeName'].event.params['paramName']`. It is helpful when a parameter name contains special characters, like in `og:url` or `$orderStatus`, the Jinjava formula for these parameters is as follows: `{{ automationPathSteps['nodeName'].event.params['og:url'] }}` and `{{ automationPathSteps['nodeName'].event.params['$orderStatus'] }}`.
- It is a good practice to use `{{ automationPathSteps['nodeName'].event.params }}` wherever you can instead of using aggregates, filters, and any other elements that require a call to the database.
- If you want to set `{{ automationPathSteps['nodeName'].event.params }}` as a variable in your Jinjava code, you must omit the brackets: `{{ }}`.  
Example: 


<pre><code class="language-jinja">{% set foo = event.params.example %}</code></pre>


## Data context
The tag allows referencing the context of data retrieved through nodes that fetch data (e.g., Get Statistics, SFTP - Get File), and then using this data in:
- [Integration nodes](/docs/automation/integration) which don't require a data input file
- [SMS Alert](/docs/automation/actions/sms-alert-node) nodes
- [Email Alert](/docs/automation/actions/send-email-alert-node) nodes

  The data is accessed as rows. You can retrieve up to 10000 rows.


  <div class="admonition admonition-note"><div class="admonition-icon"><svg xmlns="http://www.w3.org/2000/svg" fill="none" viewBox="0 0 24 24" stroke="currentColor" stroke-width="2.5"><path stroke-linecap="round" stroke-linejoin="round" d="M13 16h-1v-4h-1m1-4h.01M21 12a9 9 0 11-18 0 9 9 0 0118 0z" /></svg></div><div class="admonition-body"><div class="admonition-content">

  Referencing many nodes by using the insert multiple times may result in longer rendering times. Keep this in mind to avoid timeouts.

  </div></div></div>


  **Syntax:**


  <pre><code class="language-jinja">{% datareference node='nodeName' maxRows=10000 %}
    {{ datareference_result}}
  {% enddatareference %}</code></pre>


  where:
- `node` is the name of the node whose data you want to access.  
    <figure><img src="/api/docs/image/54176ad07f146575310749eba44b7c2f42c1b327/developers/inserts/_gfx/node-name.png" class="medium" alt="Location of the node name field"><figcaption>Location of the node name field in an example SFTP - Get File node</figcaption></figure>
- `maxRows` (optional parameter) is the number of rows you want to retrieve. The default is 10000.
- `datareference_result` is the list of data rows. You can iterate over this list (see example below).  
    The column names are case-sensitive. For example, if the column name is `productName` and your insert uses `productname` as a reference, it renders and empty string (`""`).

### Example

In this example:
- The automation is set to run once a day.
- The "Get statistics" node generates the statistics of yesterday's email campaigns.
- The ["Upload data to a spreadsheet"](/docs/automation/integration/google-sheets/upload-data-to-spreadsheets) node uses the `datareference` insert the statistics to a spreadsheet.

  <figure><img src="/api/docs/image/54176ad07f146575310749eba44b7c2f42c1b327/developers/inserts/_gfx/sheets-datacontext.png" class="large" alt="Automation example"><figcaption>The "Upload data to a spreadsheet" node uses data from "Get Statistics"</figcaption></figure>

  In the "Upload data to a spreadsheet" node:
1. As the **Dimension**, select **Rows**.
2. In **Values**, paste the Jinjava that loops over the results of the "Get Statistics" node:  
    
   <pre><code class="language-jinja">[ {%- datareference node='Campaigns sent yesterday' maxRows=10 -%}
   {%- for r in datareference_result -%}
   ["{{ r.campaignHash }}", "{{ r.campaignTitle }}", "{{ r.campaignType }}", "{{ r.clickCount }}", "{{ r.clickRate }}", "{{ r.openCount }}", "{{ r.openRate }}", "{{ r.sendCount }}", "{{ r.sendingTime }}", "{{ r.uniqueCappingCount }}", "{{ r.uniqueSendCount }}", "{{ r.utm.campaign }}", "{{ r.utm.content }}", "{{ r.utm.medium }}", "{{ r.utm.source }}", "{{ r.utm.term }}"] {%- if not(loop.last) -%},{%- endif -%}
   {%- endfor -%}
   {%- enddatareference -%} ]</code></pre>

    The `{%- if not(loop.last) -%},{%- endif -%}` condition prevents adding a comma after the last row.
    
  <div class="admonition admonition-important"><div class="admonition-icon"><svg xmlns="http://www.w3.org/2000/svg" fill="none" viewBox="0 0 24 24" stroke="currentColor" stroke-width="2.5"><path stroke-linecap="round" stroke-linejoin="round" d="M12 8v4m0 4h.01M21 12a9 9 0 11-18 0 9 9 0 0118 0z" /></svg></div><div class="admonition-body"><div class="admonition-content">

- The Jinjava doesn't create column headers.
- Column names are case-sensitive.

</div></div></div>


## Request context
---
These tags let you reference the parameters of request headers and body from [Incoming integrations](/docs/automation/integration/incoming-webhook-node) which are used in [Business Event node](/docs/automation/triggers/businees-event-trigger).

**Syntax**:
- For the parameters in the request headers, use `{{request.headers.headerName}}`
- For the parameters in the request body, use `{{request.body.paramName}}`

### Example

Prepare a simple integration which is triggered by an incoming request received by the [Business Event](/docs/automation/triggers/businees-event-trigger) node. The data received in the request is used in a structure that is required to send a profile event.

<figure>
<img src="/api/docs/image/54176ad07f146575310749eba44b7c2f42c1b327/docs/automation/_gfx/incoming-webhook-workflow.png" alt="Example of use" class="full">
<figcaption>Example of a workflow</figcaption>
</figure>

1. Add a **Business Event** trigger node. In the configuration of the node, select the **Incoming integration** prepared according to the instructions described in [Incoming integration](/docs/automation/integration/incoming-webhook-node). Configure the incoming integration so it receives data about products in the cart and the email as the identifier.  
    
   <details class="accordion"><summary>Click to see example data received from external service</summary><div class="accordion-content"><pre><code class="language-json">{ "body": { "customer_email": "example@example.com", "order_number": "111111111", "products": [ { "name": "Earwax", "category": "Hygiene", "id": "abcdefgh", "image_url": "http://exampleimage.url", "product_url": "http://exampleproduct.url", "group_id": "groupid" } ] } "endpointId": "XXXX-XXXX-XXXX-XXXX-XXXXXXXXXX", "eventId": "XXXXX-XXXX-XXXX-XXXX-XXXXXXXXXXXX", "headers": { "X-Request-ID": "XXXXXXXXXXXXXXXXXXX", "X-Forwarded-Host": "example host", }, "time": 1583206296408 }</code></pre></div></details>

2. Connect the **Business Event** trigger node with the **Outgoing Integration** node. In the configuration of node:  
    1. Select the [authentication method](/docs/automation/actions/webhook-node#set-up-a-connection).
    1. In **Webhook name**, enter the value that will be displayed in the name parameter of the event which will be generated when a request from this node will be executed.
    2. In **Webhook event name**, from the dropdown list, select the name of the event that will be generated when a request from this node will be executed.  
        If the list lacks the event, at the bottom of the list, click **Create new event** and perform the instructions from ["Adding event definitions - in the Web application section"](/docs/assets/events/event-definitions#in-the-web-application).
    2. Select the **POST** method.
    3. Enter the endpoint URL: `https://{SYNERISE_API_BASE_PATH}/v4/events/custom`  
    The value of `{SYNERISE_API_BASE_PATH}` depends on where your instance of Synerise is hosted:- `https://api.synerise.com` for Microsoft Azure EU environment
                                                                                                 - `https://api.azu.synerise.com` for Microsoft Azure USA environment
                                                                                                 - `https://api.geb.synerise.com` for Google Cloud Platform environment  
    4. In the request body, enter the JSON of a custom event. With this JSON, you will retrieve information from the **Business Event** node by referencing the parameter names received in that node.
        
       <div class="admonition admonition-tip"><div class="admonition-icon"><svg xmlns="http://www.w3.org/2000/svg" fill="none" viewBox="0 0 24 24" stroke="currentColor" stroke-width="2.5"><path stroke-linecap="round" stroke-linejoin="round" d="M9.663 17h4.673M12 3v1m6.364 1.636l-.707.707M21 12h-1M4 12H3m3.343-5.657l-.707-.707m2.828 9.9a5 5 0 117.072 0l-.548.547A3.374 3.374 0 0014 18.469V19a2 2 0 11-4 0v-.531c0-.895-.356-1.754-.988-2.386l-.548-.547z" /></svg></div><div class="admonition-body"><div class="admonition-content">

       If you want to get a full list of parameters you retrieve in the **Business Event** node, you can go to **Automation Hub > Incoming** and go to the preview of the incoming integration selected in the **Business Event** node.

       </div></div></div>


        - To pass the values of parameters from the body and products object received in the **Business Event** node, use the following syntax in the request body:
            - for customer email, use `{{request.body.customer_email}}`  
            - for product name, use `{{request.body.name}}`
            - for image URL, use `{{request.body.image_url}}`
            - for product URL, use `{{request.body.product_url}}`
            - for product group ID, use `{{request.body.group_id}}`
        - To pass the values of the parameters from the headers object, use the following syntax: 
            - for X-Request-ID header, use `{{request.headers["X-Request-ID"]}}`  
            - for X-Forwarded-Host header, use `{{request.headers["X-Forwarded-Host"]}}`


       <details class="accordion"><summary>Click to see example request body</summary><div class="accordion-content"><pre><code class="language-json">{ "action": "goal.achieve", "label": "goal.achieve", "client":{ "email": "{{request.body.customer_email}}" }, "params":{ "created_at": "2021-04-28T14:09:27.000Z", "group_id": "{{request.body.group_id}}", "image_url": "{{request.body.image_url}}", "name": "{{request.body.name}}", "product_url": "{{request.body.product_url}}", "X-Request-ID": "{{request.headers["X-Request-ID"]}}", "X-Forwarded-Host": "{{request.headers["X-Forwarded-Host"]}}" } }
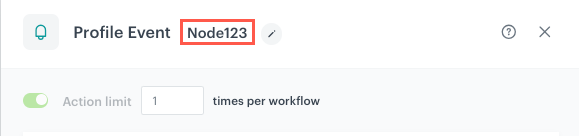
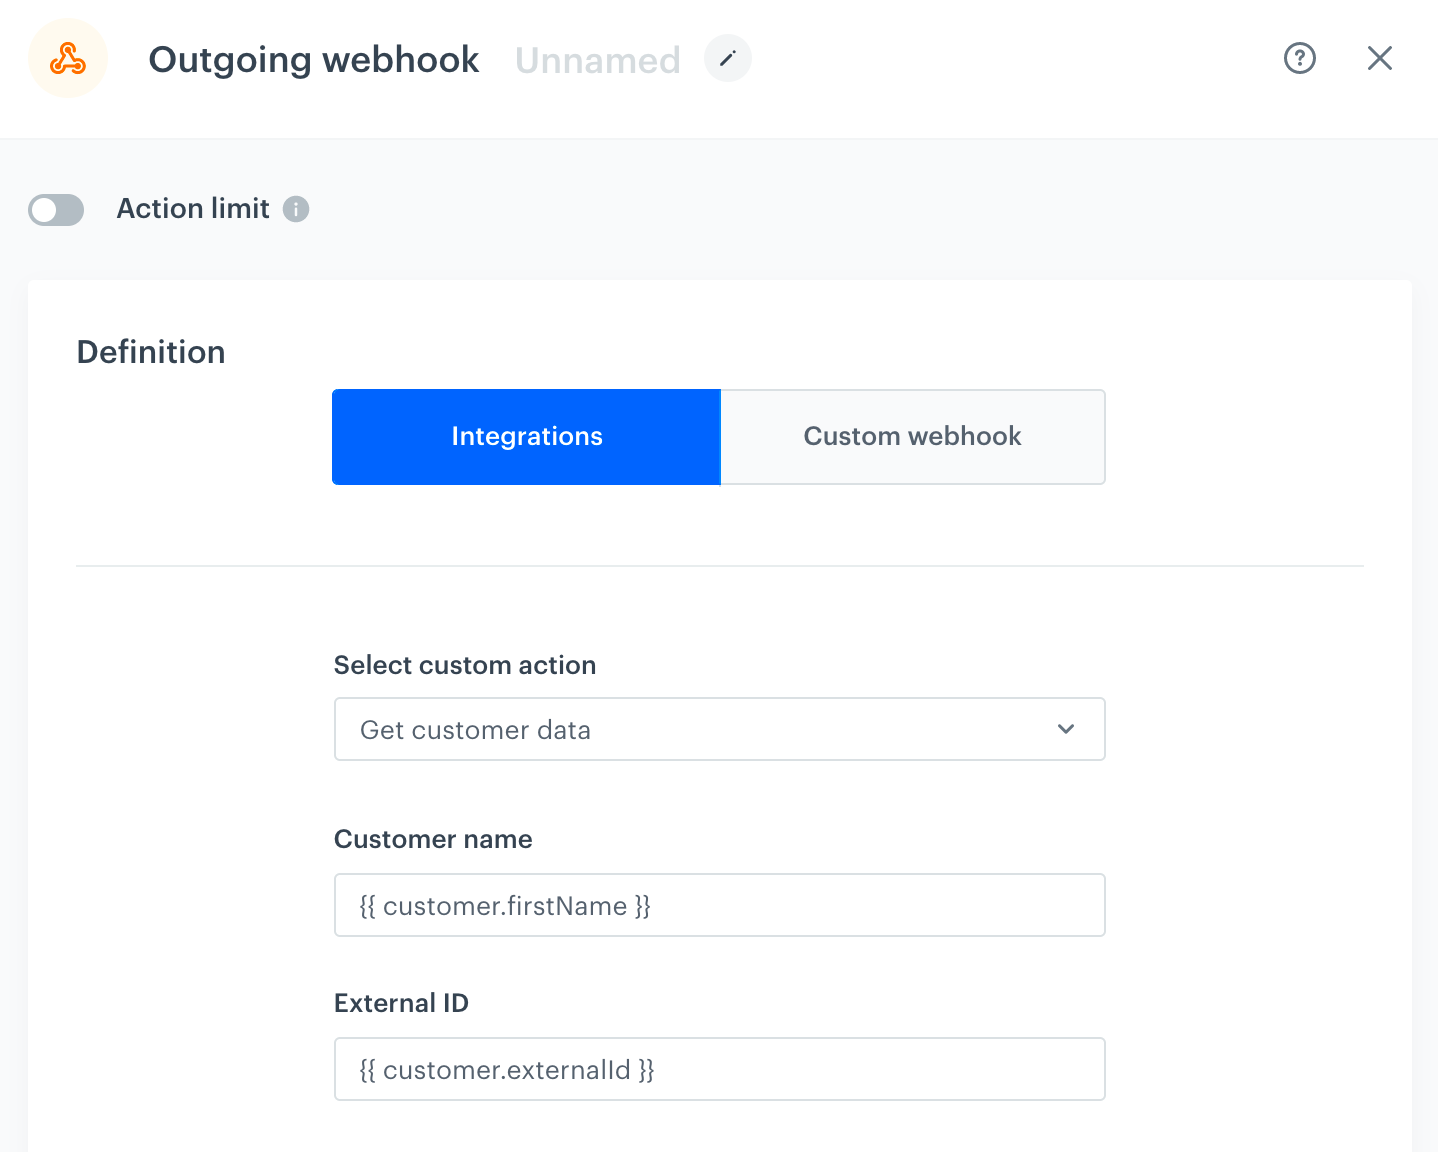
</code></pre></div></details>
 

    5. Select the appropriate authorization method.  
    <figure>
    <img src="/api/docs/image/54176ad07f146575310749eba44b7c2f42c1b327/docs/automation/_gfx/incoming-webhook-action.png" alt="Example of use" class="large">
    <figcaption>Example configuration of Outgoing webhook node </figcaption>
    </figure>
     
    
3. Connect the **Outgoing Integration** with the **End** node.  
    **Result**: A custom event is generated on a customer's profile.

## Aggregates

If an aggregate includes dynamic values (for example, from an expression or another aggregate), you must create an expression from that aggregate and refer to it in the automation using the [expression tag](/developers/inserts/insert-usage#expressions).


<div class="admonition admonition-note"><div class="admonition-icon"><svg xmlns="http://www.w3.org/2000/svg" fill="none" viewBox="0 0 24 24" stroke="currentColor" stroke-width="2.5"><path stroke-linecap="round" stroke-linejoin="round" d="M13 16h-1v-4h-1m1-4h.01M21 12a9 9 0 11-18 0 9 9 0 0118 0z" /></svg></div><div class="admonition-body"><div class="admonition-content">

It is recommended to use event parameters and profile attributes instead of aggregates/expressions, if possible.<br>For example, if you want to send an email with a satisfaction survey after a profile makes a transaction, it is better to trigger the automation with that transaction and use its ID as a param than to retrieve the ID using an aggregate that points to the latest transaction.

</div></div></div>


## Managing parameters with schemas 

If you use an [outgoing integration](/docs/automation/integration/outgoing-webhook) in the workflow, that integration must use a [schema](/docs/assets/schema-builder/introduction-to-schema-builder). The schema dictates the kind of data that must be provided to the outgoing integration.  
You can fill in the fields in the integration with variables from the profile/event context, but also with other data available using Jinjava, such as aggregate or expression results.

Using schemas and outgoing integrations is more convenient than manually entering the payload with variables in a node definition, especially in webhooks that are re-used often, have large payloads, or many variables in the payload.

**Syntax:**  
`{% context fieldId %}`  

`fieldId` is the unique ID of the field, **not** the label used as the name of the column on the UI.


<div class="admonition admonition-important"><div class="admonition-icon"><svg xmlns="http://www.w3.org/2000/svg" fill="none" viewBox="0 0 24 24" stroke="currentColor" stroke-width="2.5"><path stroke-linecap="round" stroke-linejoin="round" d="M12 8v4m0 4h.01M21 12a9 9 0 11-18 0 9 9 0 0118 0z" /></svg></div><div class="admonition-body"><div class="admonition-content">

The domain of an outgoing integration cannot be a variable.

</div></div></div>

### Example

The following example is a POST webhook that updates a profile's name in an external database.  

1. Create a schema for profile data. One of the fields is the profile's ID in an external database, the other is the profile's name.
    <figure><img src="/api/docs/image/54176ad07f146575310749eba44b7c2f42c1b327/developers/inserts/_gfx/schema-example.png" class="large" alt="Example schema"><figcaption>Example schema. The <code>fieldId</code>s are <code>external-id</code> and <code>customer-name</code> (not shown in the screenshot).</figcaption></figure>
    
   <div class="admonition admonition-note"><div class="admonition-icon"><svg xmlns="http://www.w3.org/2000/svg" fill="none" viewBox="0 0 24 24" stroke="currentColor" stroke-width="2.5"><path stroke-linecap="round" stroke-linejoin="round" d="M13 16h-1v-4h-1m1-4h.01M21 12a9 9 0 11-18 0 9 9 0 0118 0z" /></svg></div><div class="admonition-body"><div class="admonition-content">

   This schema doesn't need to store any records. In this example, it is used only to define the data from a profile that must be entered in a webhook.

   </div></div></div>

1. Create an outgoing integration that uses the external ID in the URL and includes the updated profile's name in the payload.
    <figure><img src="/api/docs/image/54176ad07f146575310749eba44b7c2f42c1b327/developers/inserts/_gfx/outgoing-example.png" class="large" alt="Example outgoing integration"><figcaption>An outgoing webhook with a variable in the URL. The profile's name is used in the payload, not visible in the screenshot.</figcaption></figure>
    Example payload:  

    ```
    {
        "newName": "{% context customer-name %}"
    }
    ```
2. Use the outgoing integration in an automation workflow. You can now use the context of the workflow to fill in the data in the webhook.
    <figure><img src="/api/docs/image/54176ad07f146575310749eba44b7c2f42c1b327/developers/inserts/_gfx/webhook-node.png" class="large" alt="Example webhook node"><figcaption>The integration from step 2 is used in this outgoing webhook node. The data to fill in the schema (and then to be used in the webhook's URL and payload) is retrieved from the profile who is the context of the workflow.</figcaption></figure>

    **Result:**  
    For a profile whose `externalId` attribute is `lue42`, the node makes a request to `https://example.com/customers/lue42`, and the `firstName` attribute is included in the payload.

## Workflow metadata
You can insert properties of workflow and the current step (a step is the occurrence of a profile entering a node in the progress of a workflow).

**Syntax:**
```
{{currentStep.PROPERTYNAME}}
```
The available property names are:
| Property | Description |
| --- | --- |
| `journeyId` | The unique ID of the workflow where this step occurred<br>If the Profile has a workflow in progress and enters it again, `journeyId` is the same, because it's the same workflow. <br>A new ID will be generated if the workflow ends and then is triggered again. |
| `actionId` | Unique ID of this step (NOT the unique ID of a node. Steps only exist when the profile progresses through a workflow, and their IDs are different for each workflow) |
| `businessProfileId` | Workspace ID |
| `diagramId` | ID of the workflow definition |
| `clientId` | ID of the profile |
| `clientUUID` | UUID of the profile (may change, for example due to switching devices or browsers) |

You can use the insert in:
- Request URL
- Query parameters
- Request headers
- Request body
- Login or password (in the **Basic workspace authentication** method)

**Example:**
1. You use automation to send data to an external system with Outgoing Integrations.
2. You add a `deduplicationKey` header and set the value to `{{currentStep.journeyId}}`.
    This inserts the unique ID of the journey into the header.
3. Your external system can use `journeyId` to recognize requests from the same workflow and perform deduplication.

## Audience node syntax limitations
---
- `"` is forbidden as it will be misinterpreted by Jinja, use `'` instead
- If you want to use the `IN` operator in the conditions to check if a string occurs in an array, you must join the array by using `join('","')`, for example:
    
  <pre><code class="language-jinja">{% set arr = [] %}{% do arr.append('6678347477') %}{% do arr.append('4551874894')%}{{ arr | join('","') }}</code></pre>

    It's the only case when `"` is allowed

## Encrypting and decrypting AES keys

To use this tag, you must first [create an encryption key in Synerise](/docs/settings/data-exchange-encryption#adding-an-encryption-key).  
You can retrieve the value for key name from the **Name** column on the list of encryption keys in **Settings > Data encryption**.

### Encrypt

For an AES key, it will return the input data encrypted with the AES-GCM algorithm using the secret encryption key.  

The output is: `base64encode([IV] + [Encrypted Text] + [Authentication Tag])`

| Type | Required | Description |
| :--- | :--- | :--- |
| string | yes | The name of the encryption key |

**Example:**  

<pre><code class="language-jinja">{{ variable | encrypt('aes-web-key-1') }}</code></pre>


### Decrypt

For an AES key, it expects input in the form returned by the [encrypt filter](#encrypt) and performs decryption on the data. The filter returns text data.  

| Type | Required | Description |
| :--- | :--- | :--- |
| string | yes | The name of the decryption key |

**Example:**  

<pre><code class="language-jinja">{{ encryptedData | decrypt('aes-web-key-1') }}</code></pre>


## Encrypting and decrypting data

To use this tag, you must first [create an encryption key in Synerise](/docs/settings/data-exchange-encryption#adding-an-encryption-key).  
You can retrieve the value for key name from the **Name** column on the list of encryption keys in **Settings > Data encryption**.

### Encrypt data

The following example takes the following value: `data-to-encrypt` and encrypts it with the following encryption key: `encryptionKey1`.  


<pre><code class="language-jinja">{% encryptdata keyName=encryptionKey1 %}data-to-encrypt{% endencryptdata %}</code></pre>


### Decrypt data


<div class="admonition admonition-important"><div class="admonition-icon"><svg xmlns="http://www.w3.org/2000/svg" fill="none" viewBox="0 0 24 24" stroke="currentColor" stroke-width="2.5"><path stroke-linecap="round" stroke-linejoin="round" d="M12 8v4m0 4h.01M21 12a9 9 0 11-18 0 9 9 0 0118 0z" /></svg></div><div class="admonition-body"><div class="admonition-content">

You can use this tag only with the AES keys.

</div></div></div>


The following snippet takes the encrypted value: `dadadaweer23==2323` and decrypts it using the following encryption key: `encryptionKey1`.


<pre><code class="language-jinja">{% decryptdata keyName=encryptionKey1 %}dadadaweer23==2323{% enddecryptdata %}</code></pre>
