
<div class="admonition admonition-important"><div class="admonition-icon"><svg xmlns="http://www.w3.org/2000/svg" fill="none" viewBox="0 0 24 24" stroke="currentColor" stroke-width="2.5"><path stroke-linecap="round" stroke-linejoin="round" d="M12 8v4m0 4h.01M21 12a9 9 0 11-18 0 9 9 0 0118 0z" /></svg></div><div class="admonition-body"><div class="admonition-content">

This feature is available in a private preview mode and accessible only on selected workspaces. To get access, contact your account manager or the Synerise support.

</div></div></div>


This article explains how to configure an AI Shopping Assistant. The assistant is a conversational tool embedded in your store that lets customers describe what they are looking for in natural language and receive matching products straight away, without scrolling through long product lists.

The assistant supports a range of capabilities:

- **Profile context** - the assistant has access to the profile of the customer, so its responses can be personalized to that specific person.
- **Conversation history** - customers can view their past conversations from up to two weeks back and pick up where they left off.
- **Product page context** - the assistant is aware of the product page the customer is currently on, so it can answer contextual questions like "show me accessories that go with this product."
- **Persona and tone of voice** - you can give the assistant a name, a motto, and a specific tone to match your brand identity.
- **Engagement level** - you can control how inquisitive the assistant is, that is, how intensively it asks the customer follow-up questions to clarify their needs before responding.
- **Recommendation models as tools** - you can connect [AI recommendation campaigns](/docs/ai-hub/recommendations-v2) to the assistant. Each campaign has its own filtering and boosting rules, which gives you control over what products the assistant shows.
- **Brickworks schemas as tools** - you can attach a [Brickworks schema](/docs/assets/brickworks) as a tool. This allows the assistant to pull data from Synerise objects like [aggregates](/docs/crm/aggregates) or [expressions](/docs/crm/expressions), or from external services.
- **MCP tools** - you can connect the assistant to any MCP (Model Context Protocol) server to give it access to external tools and data.
- **Custom actions** - you can define a tool that returns a specific action payload during a conversation. Your frontend can then handle this action in any way you choose.  

This feature generates events described in [Customer AI Assistant events](/docs/assets/events/event-reference/customer-ai-assistant).


## Prerequisites

1. To configure Shopping Assistant you must be granted user permissions.
2. Upload and configure an item feed:
    - If you use Google Merchant feed, configure pulling it from an URL as described in [Configure AI engine for your item feed](/docs/settings/configuration/ai-engine-configuration/engine-configuration-for-search).
    - If you want to use a Synerise catalog, through [API request](https://hub.synerise.com/api-reference/data-management#tag/Catalogs/operation/addItemsBatchAsync) or through [a workflow](/use-cases/import-product-feed-to-catalog) and then [configure the AI engine for your item feed](/docs/settings/configuration/ai-engine-configuration/engine-configuration-for-search).

3. [Configure AI engine for your item feed](/docs/settings/configuration/ai-engine-configuration/engine-configuration-for-search). If you use Google Merchant Feed, in this step, you can launch pulling the feed from the URL. 
4. Go to **AI Hub > AI Search** and [create an index](/docs/ai-hub/ai-search/create-index). In the configuration of the index, you must:  
    - add the `category` attribute to facetable attributes.
    - set the [Matching words option](/docs/ai-hub/ai-search/define-search-method-and-ranking#matching-words) to **At least one word must match**.

## Configuration

### Creating an AI Assistant

1. Go to <img src="/api/docs/image/8aa18695b9ddf90415ab9b9c2fdf6e90734cca60/icons/ai-hub-icon.svg" alt="AI Hub icon" class="icon" > **AI Hub > AI Assistant > New AI Assistant**.  
    **Result**: A configuration form with four sections displays.
        <figure><img src="/api/docs/image/8aa18695b9ddf90415ab9b9c2fdf6e90734cca60/docs/ai-hub/_gfx/shopping-assistant-blank.png" class="medium" alt="The AI Assistant configuration form with the Brand, Assistant, Products, and Tools sections"><figcaption>The AI Assistant configuration form with four sections</figcaption></figure>


### Brand

This section defines your brand identity. The assistant uses this information to understand the business context and adjust its responses accordingly.  

<figure><img src="/api/docs/image/8aa18695b9ddf90415ab9b9c2fdf6e90734cca60/docs/ai-hub/_gfx/shopping-assistant-brand.png" class="medium" alt="The Brand section with Brand name and Business description fields"><figcaption>The Brand section</figcaption></figure>

1. In the **Brand** section, click **Define**.
2. In the **Brand name** field, enter the name of your brand or business.
3. In the **Business description** field, enter a description of your brand or business. This is used as additional context that affects the assistant's behavior.
4. Confirm the settings in this section by clicking **Apply**.

### Assistant

This section defines the persona, tone of voice, and behavior of the assistant.  

<figure><img src="/api/docs/image/8aa18695b9ddf90415ab9b9c2fdf6e90734cca60/docs/ai-hub/_gfx/shopping-assistant.png" class="medium" alt="The Assistant section with persona, tone of voice, and behavior fields"><figcaption>The Assistant section</figcaption></figure>

1. In the **Assistant** section, click **Define**.
2. In the **Persona name** field, enter the name the assistant uses to introduce itself to customers.
3. In the **Motto** field, enter a short tagline for the assistant.
4. In the **Tone of voice** field, describe how the assistant should sound in its responses, for example homely, enthusiastic, reactive, or friendly.
5. In the **Style Guide** field, enter guidelines for the assistant's communication style.
6. In the **Assistant job** field, describe the assistant's role and how it should help customers, for example recommending products or asking about their needs.
7. In the **Response words limit** field, enter the maximum length of the assistant's responses, in words.
8. Optional: Under **Suggestions**, click **Add suggestion** to add a quick prompt shown to the customer in the chat interface. You can add up to 10.
9. Confirm the settings in this section by clicking **Apply**.

### Products

This section configures the product catalog the assistant uses to find and return items.  

<figure><img src="/api/docs/image/8aa18695b9ddf90415ab9b9c2fdf6e90734cca60/docs/ai-hub/_gfx/shopping-assistant-products.png" class="medium" alt="The Products section with Search index and IQL Filter fields"><figcaption>The Products section</figcaption></figure>

**Search index**

Click **Select index** to choose which AI Search index the assistant will use. After selecting one, you can click **Change** to pick a different index or remove the current selection. Selecting an index unlocks the attribute mapping and filter options below.

**Attribute mapping**

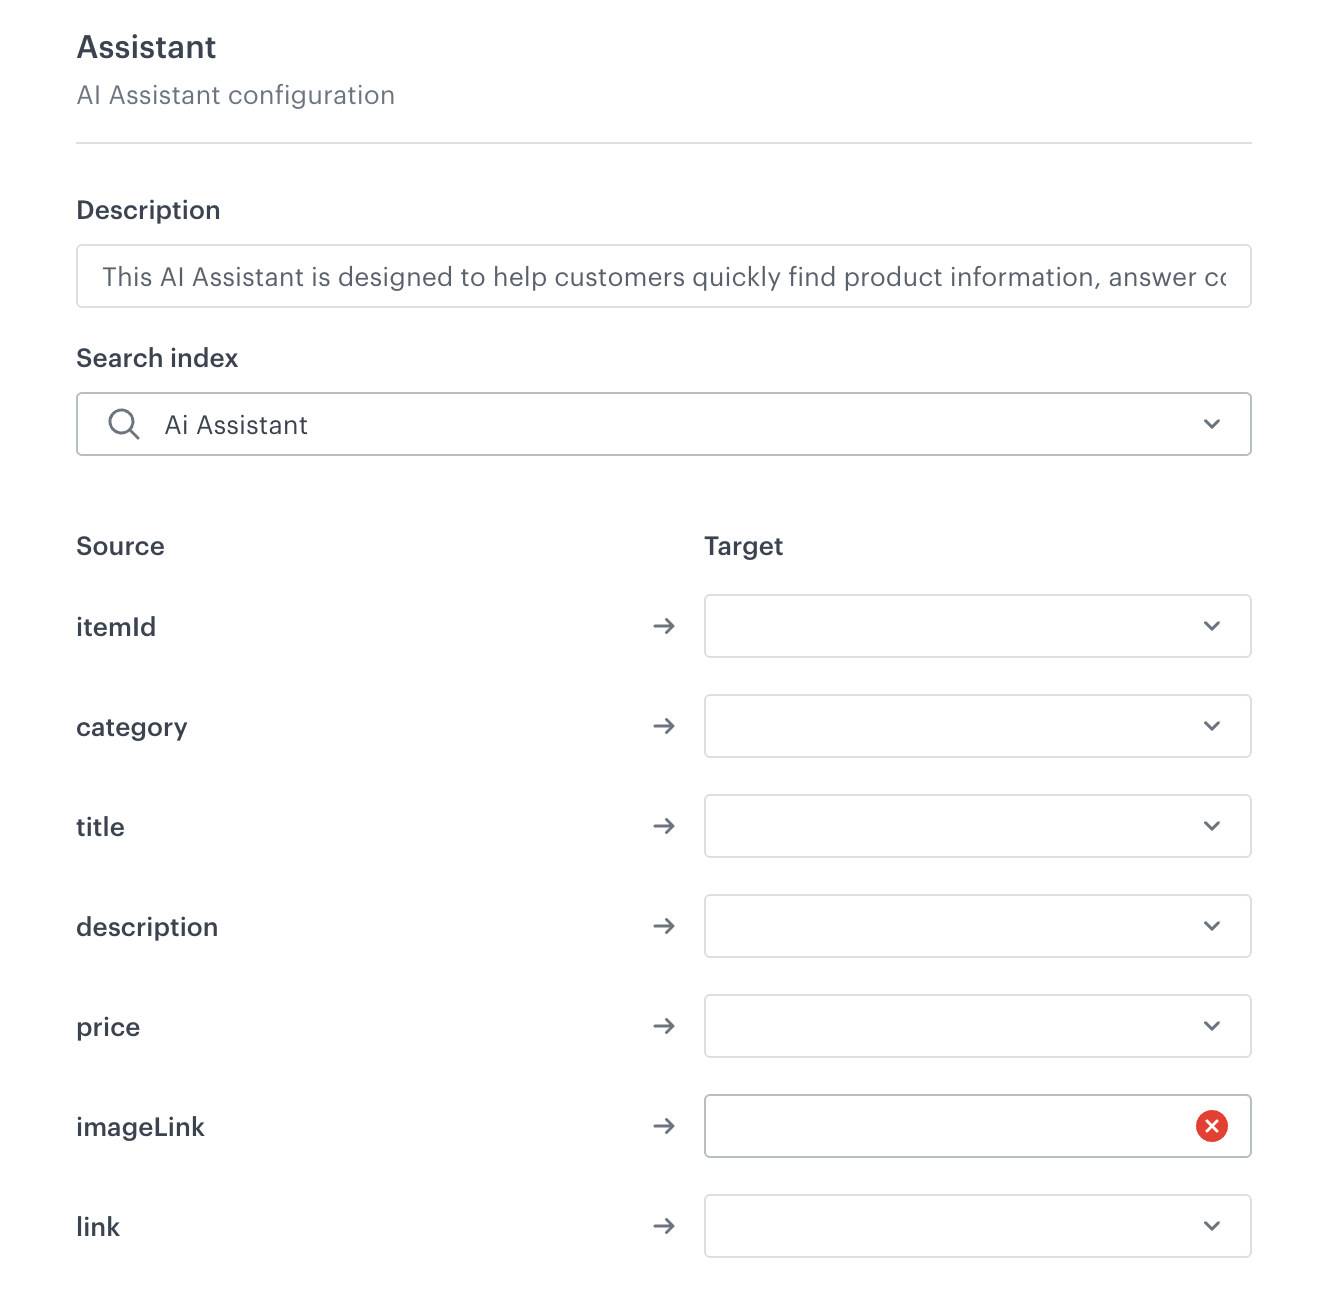
After selecting a search index, map its attributes to the assistant's built-in product attributes so it knows which field to use for each one, for example, which field holds the price or the image link. The table has two columns:

- **Source** - the fixed built-in attributes the assistant needs, for example `itemId`, `category`, `title`, `description`, `price`, `imageLink`, `link`. 
- **Target** - the corresponding attribute from the selected search index, chosen from the dropdown.

<figure><img src="/api/docs/image/8aa18695b9ddf90415ab9b9c2fdf6e90734cca60/docs/ai-hub/_gfx/ai-assistant-mapping.png" class="large" alt="The Products section with attribute mapping"><figcaption>The Products section with attribute mapping</figcaption></figure>

**IQL Filter**

Click **Define filter** to add an [IQL](/docs/ai-hub/recommendations-v2/recommendation-filters#iql-query) expression that limits which products the assistant returns. This option is available only after you select a search index.

### Tools (optional)

This section extends the assistant with additional capabilities. Click **Add tool** and select a type from the menu. You can add multiple tools. Each tool appears as a card with a delete and info icon.

<figure><img src="/api/docs/image/8aa18695b9ddf90415ab9b9c2fdf6e90734cca60/docs/ai-hub/_gfx/shopping-assistant-tools.png" class="medium" alt="The Tools section with the Add tool menu open, showing Recommendation, Brickworks schema, Custom action, and MCP Server options"><figcaption>The Tools section with the Add tool menu open</figcaption></figure>

#### Recommendation

Links an [AI recommendation campaign](/docs/ai-hub/recommendations-v2) to the assistant. The campaign can include its own filtering and boosting rules.

1. Click **Add tool** and select **Recommendation**.
2. In the **Tool name** field, enter a name for the tool. Maximum 100 characters.
3. In the **Instructions** field, describe when and how the assistant should use this tool. Maximum 2000 characters.
4. In the **Recommendation** field, select the recommendation campaign from the dropdown.
5. Confirm the settings in this section by clicking **Apply**.

#### Brickworks schema

Gives the assistant access to a [Brickworks schema](/docs/assets/brickworks). This allows it to pull data from Synerise objects like [aggregates](/docs/crm/aggregates) or [expressions](/docs/crm/expressions), or from external services.

1. Click **Add tool** and select **Brickworks schema**.
2. In the **Tool name** field, enter a name for the tool. Maximum 100 characters.
3. In the **Instructions** field, describe when and how the assistant should use this schema. Maximum 2000 characters.
4. In the **Brickworks schema** field, select the schema from the dropdown.
5. Confirm the settings in this section by clicking **Apply**.

#### Custom action

Returns a specific action payload during the conversation. Your frontend application can handle this action in any way you choose.

1. Click **Add tool** and select **Custom action**.
2. In the **Tool name** field, enter a name for the tool. Maximum 100 characters.
3. In the **Instructions** field, describe when and how the assistant should trigger this action. Maximum 2000 characters.
4. In the **Custom action name** field, enter the name of the action returned in the payload, which your frontend uses to identify it. Maximum 100 characters.
5. Confirm the settings in this section by clicking **Apply**.

#### MCP Server

Connects the assistant to an external MCP (Model Context Protocol) server so it can use external tools and data.

1. Click **Add tool** and select **MCP Server**.
2. In the **Tool name** field, enter a name for the tool. Maximum 100 characters.
3. In the **Instructions** field, describe when and how the assistant should use this MCP tool. Maximum 2000 characters.
4. In the **Connection** field, select the MCP connection from the list.  

    This list loads the [connections](/docs/settings/tool/connections) defined in **Settings > Connections**. You can also create a new connection directly from this field: click **Select connection**, then **Add connection** in the list that appears. A connection created this way is automatically assigned to the **HTTPS** category.  
5. In the **URL** field, enter the URL of the MCP server endpoint. Maximum 2000 characters. Example: `https://example.com/mcp`.
6. In the **MCP tool name** field, enter the name of the tool on the MCP server. Maximum 200 characters.
7. Confirm the settings in this section by clicking **Apply**.

### Saving your configuration

In the upper-right corner, click **Save**.

### Testing the AI Assistant


<div class="admonition admonition-note"><div class="admonition-icon"><svg xmlns="http://www.w3.org/2000/svg" fill="none" viewBox="0 0 24 24" stroke="currentColor" stroke-width="2.5"><path stroke-linecap="round" stroke-linejoin="round" d="M13 16h-1v-4h-1m1-4h.01M21 12a9 9 0 11-18 0 9 9 0 0118 0z" /></svg></div><div class="admonition-body"><div class="admonition-content">

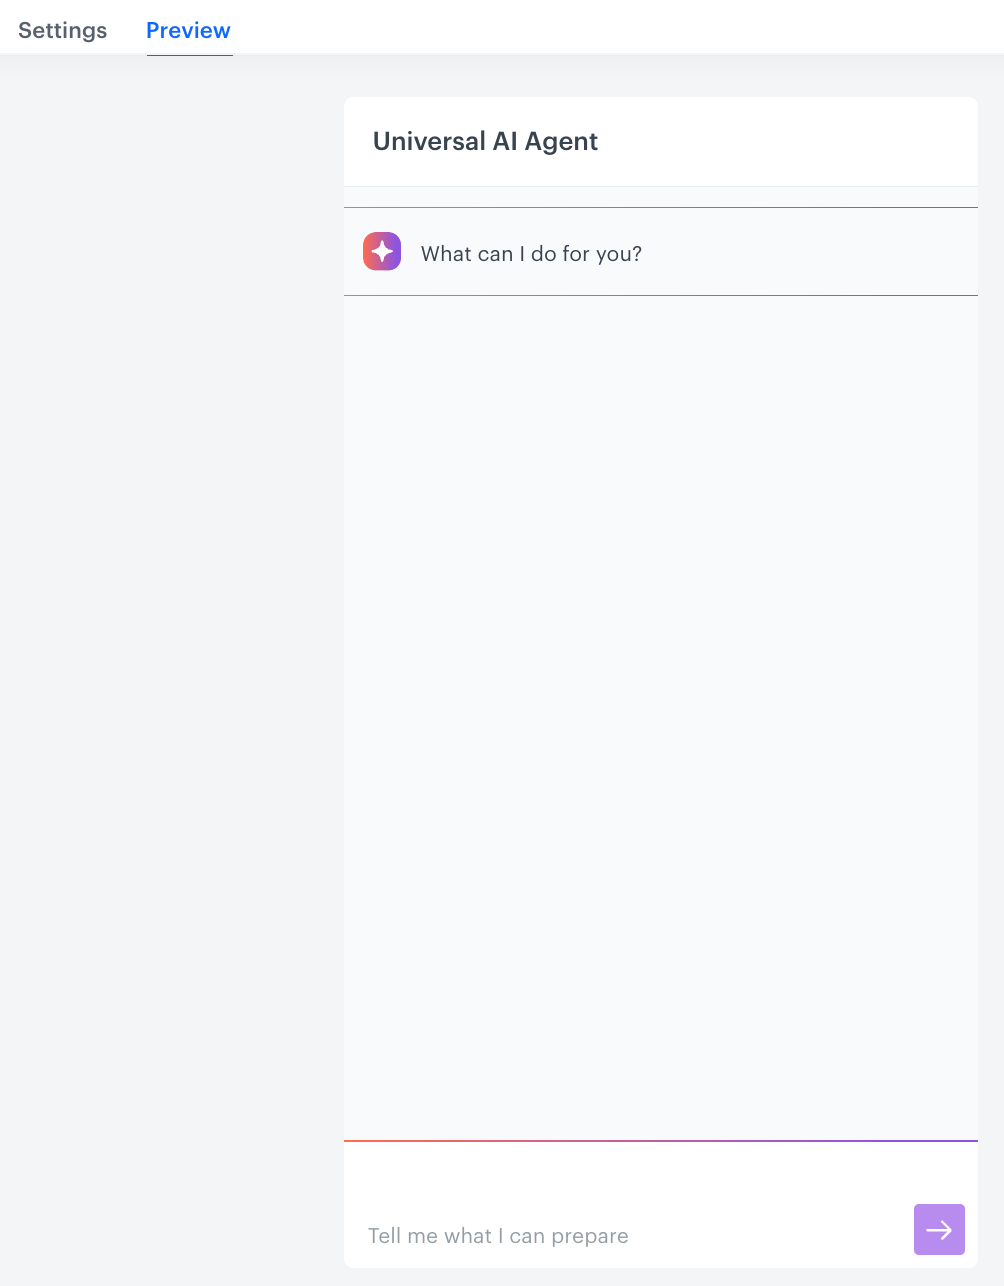
If you're creating a new assistant, the **Preview** tab appears only after you save the configuration for the first time.

If you're editing an existing assistant, click **Save** in the upper-right corner again after making changes — the **Preview** tab only reflects your last saved configuration, not unsaved edits.

</div></div></div>


In the **Preview** tab, you can send test messages to see how the assistant responds. Check that it handles your queries correctly and adjust the configuration if needed before going live.

<figure><img src="/api/docs/image/8aa18695b9ddf90415ab9b9c2fdf6e90734cca60/docs/ai-hub/_gfx/ai-assistant-preview.png" class="medium" alt="Preview mode of the AI assistant"><figcaption>Preview mode of the AI assistant</figcaption></figure>