
Promotions let you prepare customized, special offers for your customers which you can distribute in your mobile application, interactive kiosk or print out on receipts. 

The output of a promotion in Synerise is a code snippet sent to the medium on which you want to display the promotion. This medium must interpret the code with the logic implemented in the medium.

Some settings — such as the promotion code format, cashback rules, basket pricing, and security options — apply to all promotions workspace-wide and can be configured in [Loyalty](/docs/settings/configuration/loyalty).

## Requirements
---

- Import a [product feed](/use-cases/import-product-feed-to-catalog) into Synerise.
- Optionally, you can import a list of stores to [Catalogs](/docs/assets/catalogs), which will let you select stores where the promotion is active.
- If you want to limit the promotion to customers with a certain loyalty score, verify with your administrator that loyalty points are being calculated. 
   
  <div class="admonition admonition-note"><div class="admonition-icon"><svg xmlns="http://www.w3.org/2000/svg" fill="none" viewBox="0 0 24 24" stroke="currentColor" stroke-width="2.5"><path stroke-linecap="round" stroke-linejoin="round" d="M13 16h-1v-4h-1m1-4h.01M21 12a9 9 0 11-18 0 9 9 0 0118 0z" /></svg></div><div class="admonition-body"><div class="admonition-content">

  You can find the example expression that counts loyalty points [here](/docs/analytics/expressions/loyalty-point-count).

  </div></div></div>

- If you want to use [promotion tags](/docs/ai-hub/promotions/promotion-tags), the tags must be in a `promotion`-type folder.

## Promotion statuses
---

When you create a promotion in Synerise user interface, it gets a status which describes the progress of a promotion campaign:

- **Draft** - The promotion isn't published.
- **Published** - The promotion has been published and the system automatically [assigns](/docs/ai-hub/promotions/introduction-to-promotions#assigned) the promotion to the customers who meet its conditions.
- **Hidden** - The promotion is published, but it is not visible in the channels it's distributed through.

<figure><img src="/api/docs/image/54176ad07f146575310749eba44b7c2f42c1b327/docs/ai-hub/promotions/_gfx/promotions-list.png" alt="A fragment of the promotion list" class="full"><figcaption>A fragment of the promotion list</figcaption></figure>

## Promotion limits
---
### Global limit
This sets a cap on how many times the promotion can be activated, regardless of individual usage. Once this global limit is reached, the promotion becomes unavailable to everyone.

- This event is generated when a [mobile SDK](/developers/mobile-sdk/loyalty#working-with-single-promotions) or [API](https://developers.synerise.com/LoyaltyandEngagement/LoyaltyandEngagement.html#tag/Promotions) method is used to try activating a promotion that reached its global limit.    
      
  <div class="admonition admonition-note"><div class="admonition-icon"><svg xmlns="http://www.w3.org/2000/svg" fill="none" viewBox="0 0 24 24" stroke="currentColor" stroke-width="2.5"><path stroke-linecap="round" stroke-linejoin="round" d="M13 16h-1v-4h-1m1-4h.01M21 12a9 9 0 11-18 0 9 9 0 0118 0z" /></svg></div><div class="admonition-body"><div class="admonition-content">

  The list of endpoints to which the request generates this event is listed in the ["Active" section](/docs/ai-hub/promotions/introduction-to-promotions#active).

  </div></div></div>
 
- Changing global limits on an active promotion:  
    - Changing the limit type (**unlimited**, **lifetime**, **relative date**) resets limit counter, and counting will start fresh from the time of the change.
    - Changing the limit value within a limit type is allowed and doesn't reset the counter.
- The limit counter has a 365-day time-to-live, so activations beyond 365 days ago are excluded from the count.


### Per customer
- Single - For promotions that can only be used once per activation. With this logic, you can set a maximum number of times a customer can activate a promotion.
- Multibuy - For promotions that can be used a defined number of times per activation. With this logic, you can set limit on activations and how many times a promotion can be used within one activation.

Full instruction on imposing promotion limits is described in the ["Types & limits" section](#type--limits).


## Procedure
---

For your reading convenience, the procedure is divided into sections according to the UI. 

If you want to save a draft for later completion, click the **Finish later** button in the upper-right corner of the page. You can do this at any point of the procedure.

<div class="admonition admonition-warning"><div class="admonition-icon"><svg xmlns="http://www.w3.org/2000/svg" fill="none" viewBox="0 0 24 24" stroke="currentColor" stroke-width="2.5"><path stroke-linecap="round" stroke-linejoin="round" d="M12 9v2m0 4h.01m-6.938 4h13.856c1.54 0 2.502-1.667 1.732-2.5L13.732 4c-.77-.833-1.964-.833-2.732 0L4.082 16.5c-.77.833.192 2.5 1.732 2.5z" /></svg></div><div class="admonition-body"><div class="admonition-content">

If you click **Finish later** while working on a published promotion, it returns to draft status.

</div></div></div>


### Creating a new promotion
1. Go to <img src="/api/docs/image/54176ad07f146575310749eba44b7c2f42c1b327/icons/ai-hub-icon.svg" alt="Image presents the AI Hub icon" class="icon" > **AI Hub > Regular Promotions**.
2. In the upper-right corner of the page, click **Add promotion**.
   <figure><img src="/api/docs/image/54176ad07f146575310749eba44b7c2f42c1b327/docs/ai-hub/promotions/_gfx/promotion-type-selection.png" alt="Selection of the promotion scope" class="large"><figcaption>Selection of the promotion scope</figcaption></figure>
3. Enter a name for the promotion.<br>
4. To inform other users about the purpose of the promotion, enter a description.
5. Select the **For selected items** option.  
   **Result:** The default settings are applied to the promotion.
   <figure><img src="/api/docs/image/54176ad07f146575310749eba44b7c2f42c1b327/docs/ai-hub/promotions/_gfx/promotion-empty-items.png" alt="A blank promotion" class="large"><figcaption>A blank promotion</figcaption></figure>

### Audience

Select an audience for the promotion by performing one of the following actions:

- If you want to create a promotion for everyone (default setting), no actions are required.
- If you want to create a promotion for one or more customer segments:
   1. In the **Audience** section, click **Change**.
   2. Select **Segment**.
   3. Click the **Select segment** button.
   4. In the pop-up that opens, select the checkboxes of the segments that you want to include.
   5. Click **Apply**.  
      The pop-up closes.
   6. Click **Apply**.


### Content

In this section, you can define the basic settings related to the design of the promotion such as the description of an item, image, price before discount, and any other element you want to define in the form of a JSON frame. 

6. In the **Content** section, click **Define**.
7. **Optional:** In the **Promotion code**, modify the default promotion code.  
   The default code is unique. If you enter a new code, it must be unique too.
   
   <div class="admonition admonition-important"><div class="admonition-icon"><svg xmlns="http://www.w3.org/2000/svg" fill="none" viewBox="0 0 24 24" stroke="currentColor" stroke-width="2.5"><path stroke-linecap="round" stroke-linejoin="round" d="M12 8v4m0 4h.01M21 12a9 9 0 11-18 0 9 9 0 0118 0z" /></svg></div><div class="admonition-body"><div class="admonition-content">

   If you use Synerise as [loyalty engine](/docs/ai-hub/promotions/introduction-to-promotions#full-variant), the POS uses this code to redeem the promotion.

   </div></div></div>

8. In the **Price** field, enter `0`. This field is deprecated.
9.  In the **Price before discount** field, enter the price that will be displayed as the original price.
10. In the **Display name** field, enter a customer-visible name for the promotion.
11. In the **Description** field, enter a customer-visible description for the promotion.
12. Add thumbnails in one of the following ways:
    - If you want to add thumbnails from the database, click **Media manager** and choose a file from the list that opens.
    - If you want to upload a file, drag and drop the file to the **Thumbnails** field or click **browse** and choose a file from your local storage.
13. Add images in one of the following ways:
    - If you want to add thumbnails from the database, click **Media manager** and choose a file from the list that opens.
    - If you want to upload a file, drag and drop the file to the **Images** field or click **browse** and choose a file from your local storage.
14. To add tags to the promotion, click **Add tag** and choose a tag.
15. To add JSON code with advanced params, click **Advanced options** and paste the JSON code into the text box that appears.
16. Click **Apply**.

### Type & limits


<div class="admonition admonition-important"><div class="admonition-icon"><svg xmlns="http://www.w3.org/2000/svg" fill="none" viewBox="0 0 24 24" stroke="currentColor" stroke-width="2.5"><path stroke-linecap="round" stroke-linejoin="round" d="M12 8v4m0 4h.01M21 12a9 9 0 11-18 0 9 9 0 0118 0z" /></svg></div><div class="admonition-body"><div class="admonition-content">

If Synerise is not used by your infrastructure as the promotion engine (which means calculating the amount to be deducted from the price), the settings defined here don't impact the logic of the promotion which, in such case, is implemented in the point of sales.

</div></div></div>


17. In the **Type & limits** section, click **Change**.
18. From the **Type** drop-down list, select the promotion type.    
      
    <div class="admonition admonition-important"><div class="admonition-icon"><svg xmlns="http://www.w3.org/2000/svg" fill="none" viewBox="0 0 24 24" stroke="currentColor" stroke-width="2.5"><path stroke-linecap="round" stroke-linejoin="round" d="M12 8v4m0 4h.01M21 12a9 9 0 11-18 0 9 9 0 0118 0z" /></svg></div><div class="admonition-body"><div class="admonition-content">

    Except for the **Handbill** promotion type, this categorization is only used for easier promotion management.

    </div></div></div>


      - **General** promotions are available to all customers.
      - **Custom** promotions not covered by the other types, for example loyalty rewards
      - **Members only** promotions are available to customers who joined a loyalty program.
      - **Handbill** promotions which can only be selected by the [AI promotion engine](/docs/ai-hub/personalized-promotions/introduction-to-ai-promotions) for a customer.  
19. Enter a priority for the promotion.  
   Priority defines the order of display in the customer's view. 1 is the highest priority. If two or more promotions applicable to a customer have the same priority, the order of display is determined by the date of creation. The one that was created earlier takes the priority over the other promotion.  
20. Choose the promotion logic:
    - For promotions that can only be used once per activation, choose **Single**. With this logic, you can set a maximum number of times a customer can activate a promotion.
    - For promotions that can be used a defined number of times per activation, choose **Multibuy**. With this logic, you can set limit on activations and how many times a promotion can be used within one activation.
22. In the **Limit per profile** field:
      - for **Single** promotion logic, enter how many times the promotion can be activated. A promotion can be used once per activation. Redemption settings will be defined in the further part of the process, in the **Redemption type** field.  
      
        <details class="accordion"><summary>Click here to see example scenario and its configuration</summary><div class="accordion-content"><table> <thead> <tr> <th>Scenario</th> <th>Configuration</th> </tr> </thead> <tbody><tr> <td>A customer can activate the promotion three times. During each activation, the customer can apply a 10% discount to an item once. The promotion will be redeemed after the first usage, however, the customer will still have two more activations available for use.
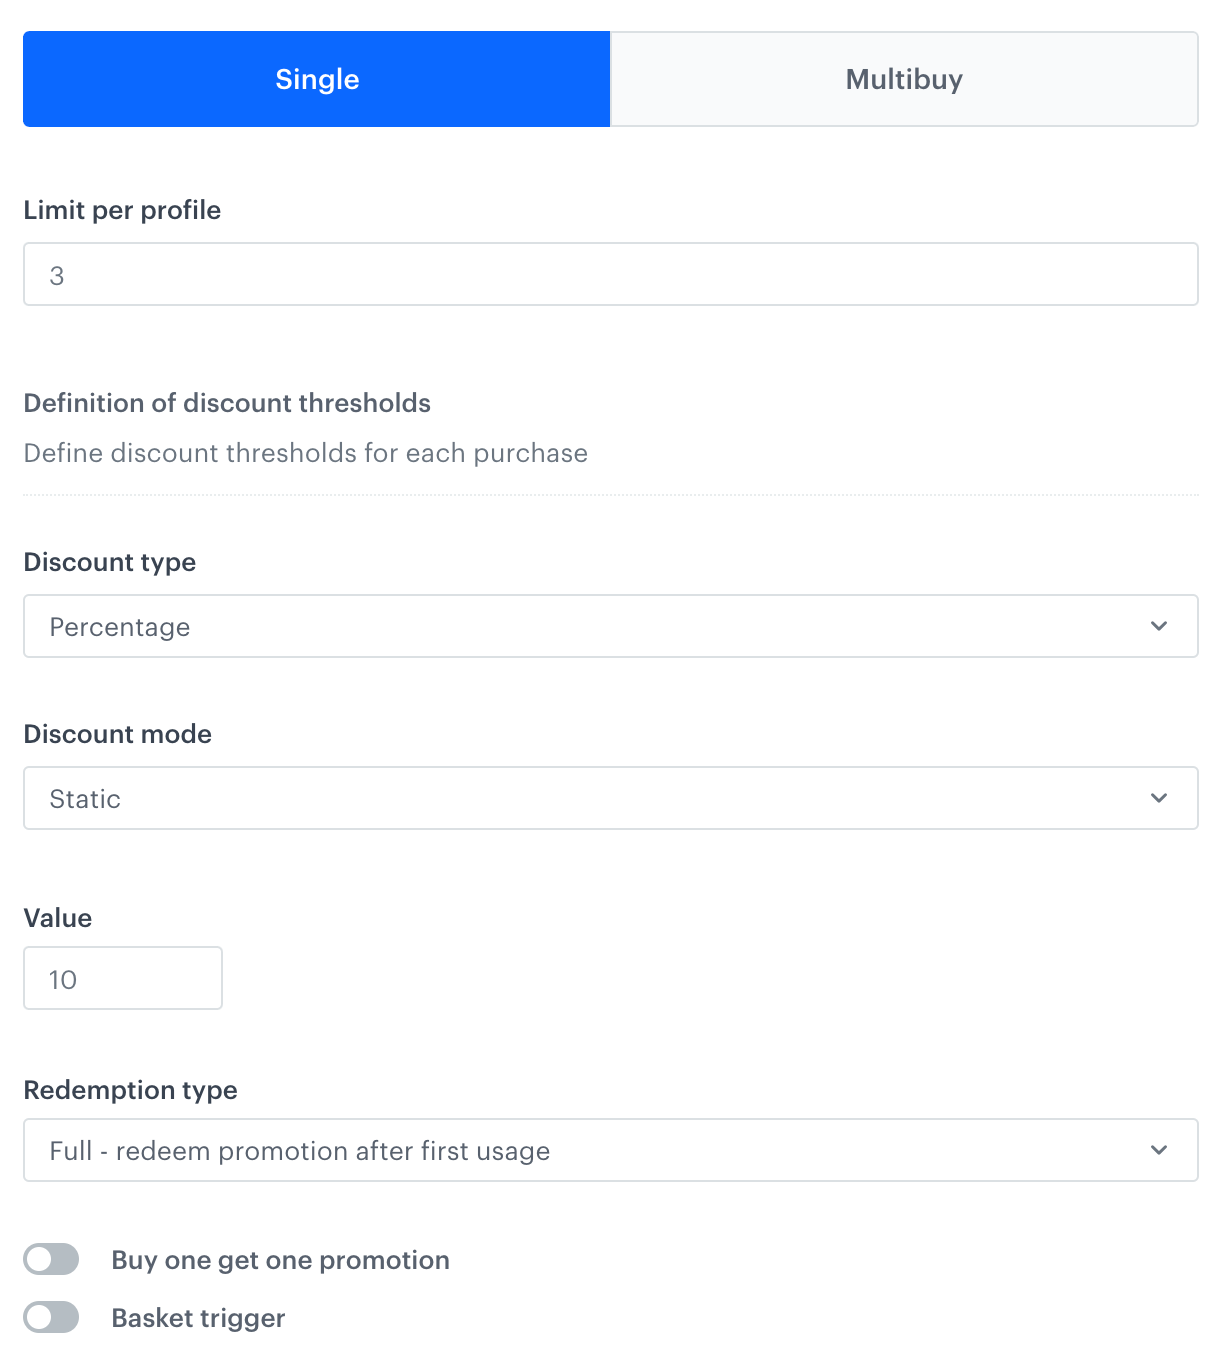
</td> <td><figure><img src="/api/docs/image/54176ad07f146575310749eba44b7c2f42c1b327/docs/ai-hub/promotions/_gfx/single-full-item.png" class="medium" alt="Example configuration of Single promotion logic"><figcaption>Example configuration of the Single promotion logic </figcaption></figure></td> </tr> </tbody></table></div></details>
  

      - for **Multibuy** promotion logic, define how many times the promotion can be activated. In the **Number of usage per activation** field, enter the number of times the promotion can be used in a single activation. Redemption settings will be defined in the further part of the process, in the **Redemption type** field. 
      
        <details class="accordion"><summary>Click here to see example scenarios and its configurations</summary><div class="accordion-content"><table> <thead> <tr> <th>Scenario</th> <th>Configuration</th> </tr> </thead> <tbody><tr> <td>
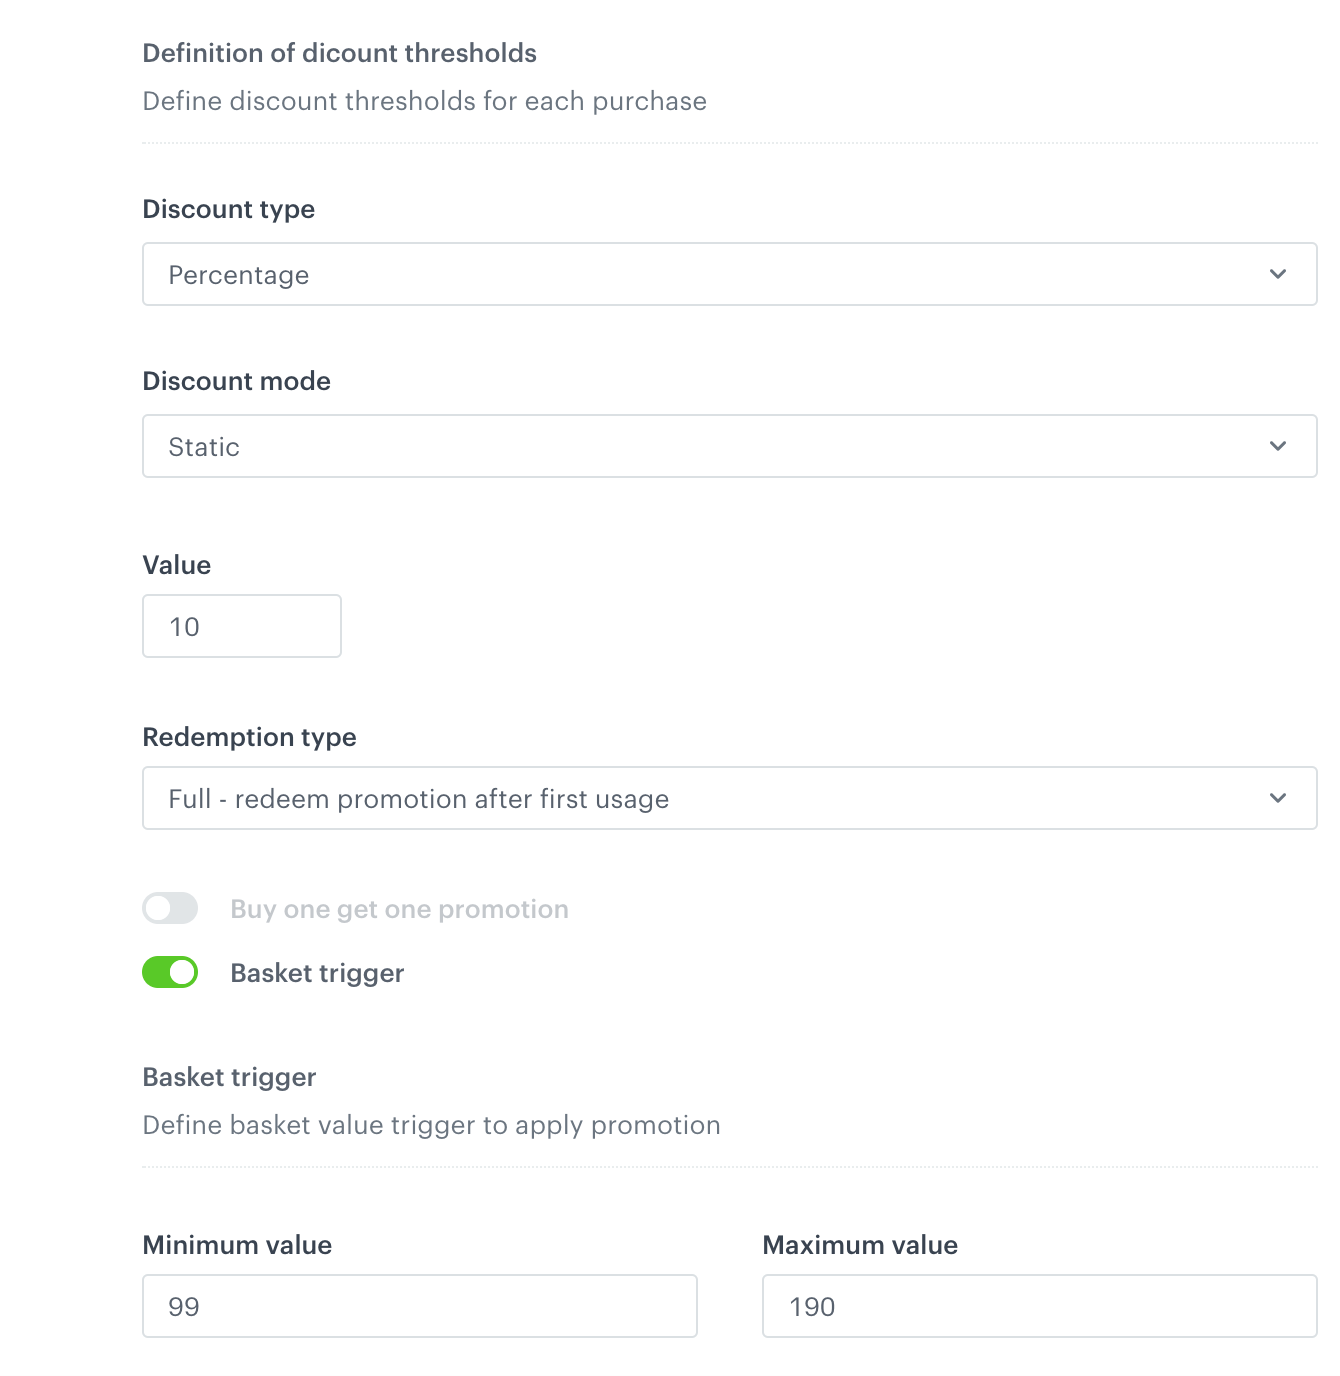
A customer can activate the promotion two times. During each activation, the customer can apply a $10 discount to the item. The promotion will be redeemed after it has been used a total of four times (resulting from two activations with two promotion uses per activation).</td> <td><figure><img src="/api/docs/image/54176ad07f146575310749eba44b7c2f42c1b327/docs/ai-hub/promotions/_gfx/multibuy-partial-item.png" class="medium" alt="Example configuration of Multibuy promotion logic"><figcaption>Example configuration of Multibuy promotion logic - partial redemption</figcaption></figure></td> </tr> <tr> <td>
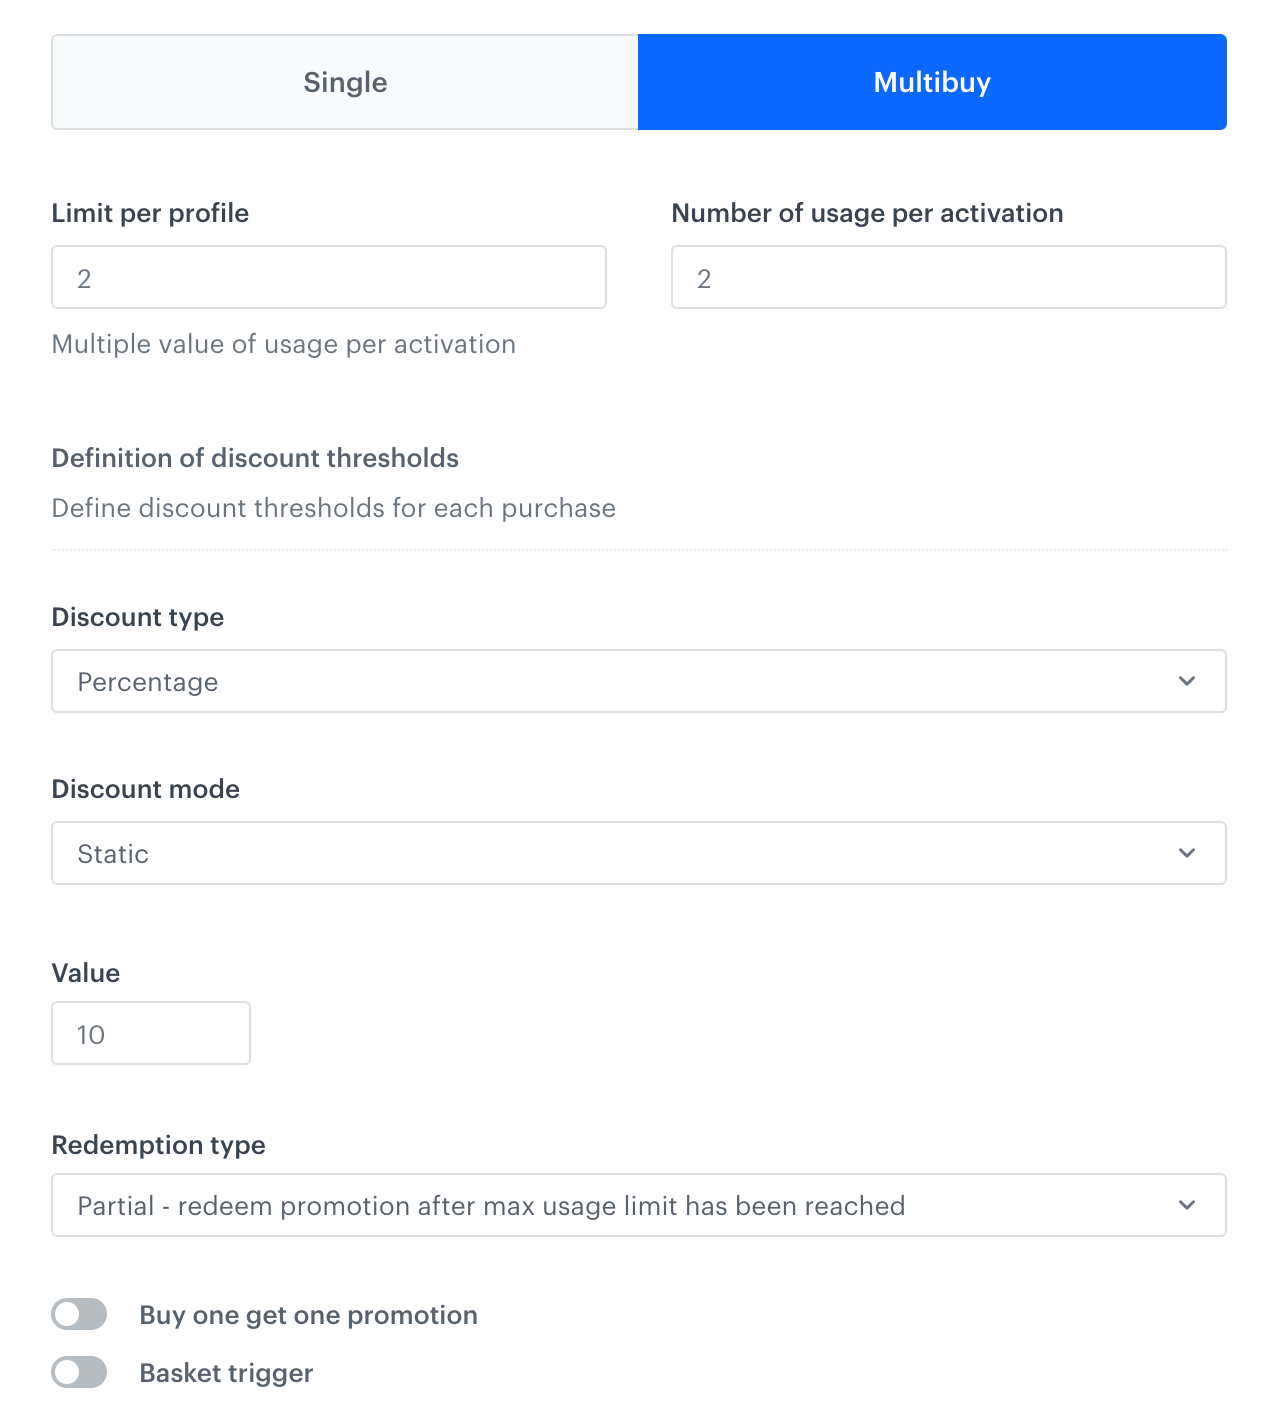
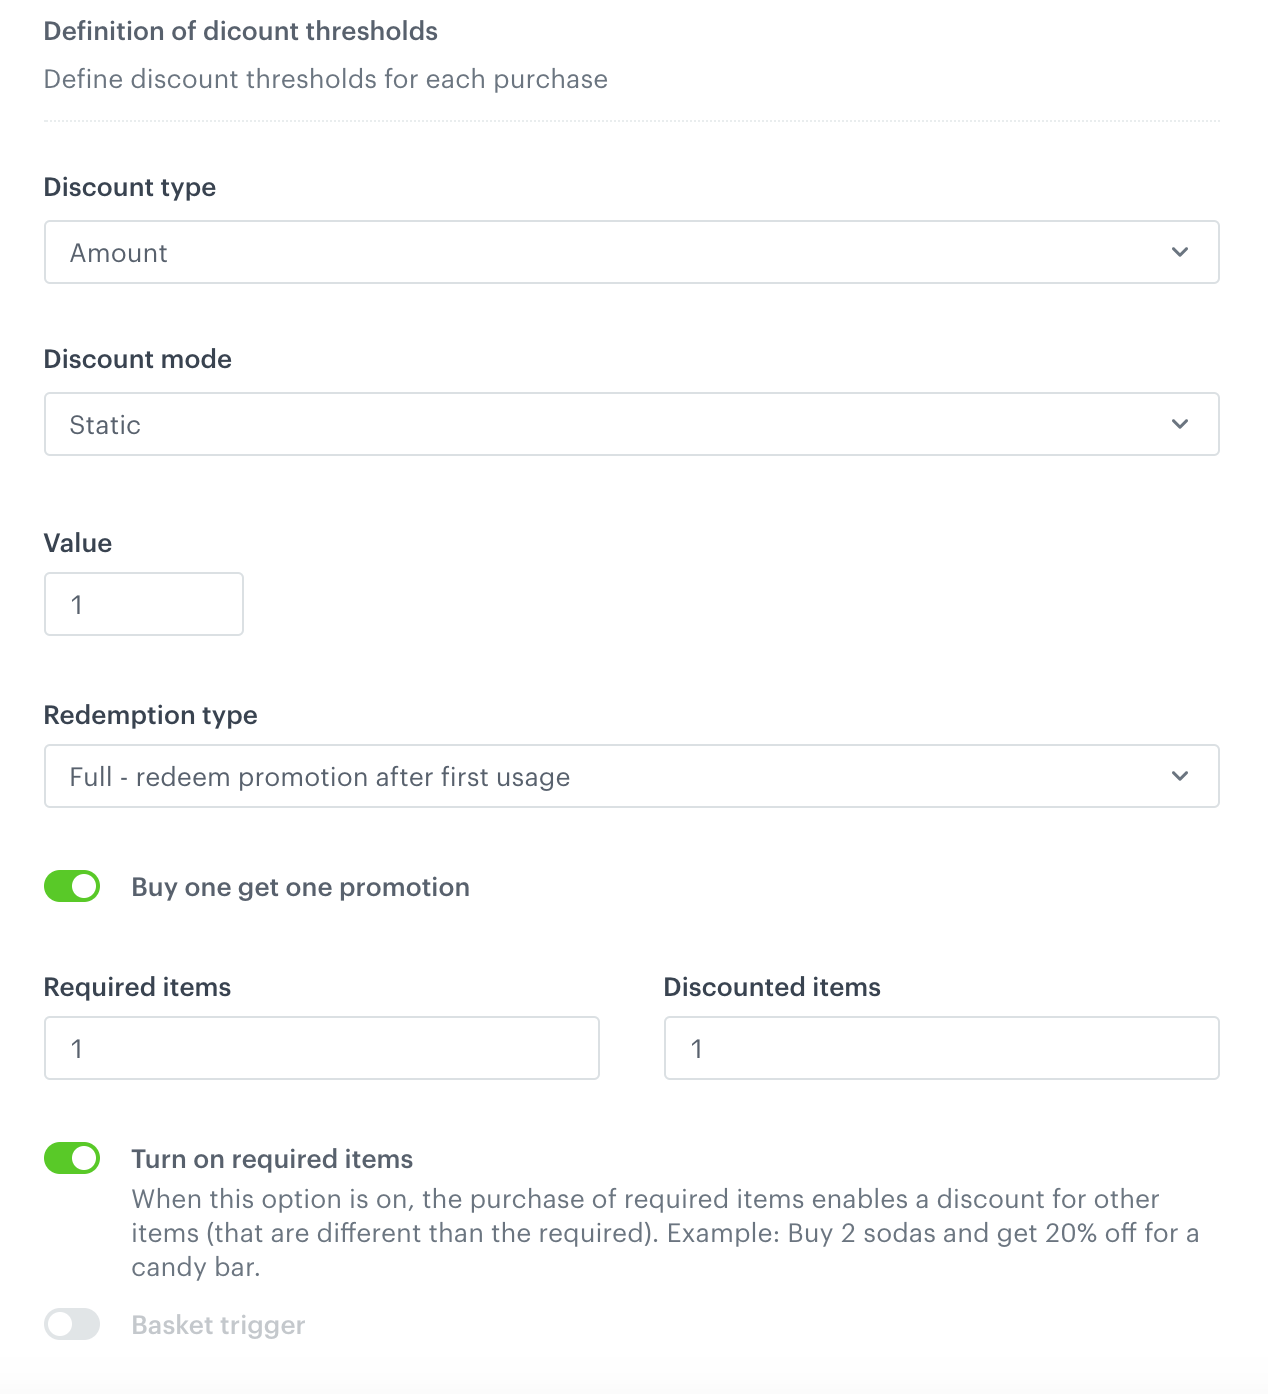
A customer can activate the promotion twice. Within each activation, the customer can employ a 10% discount to the item. The promotion is considered redeemed after the first usage; however, the customer will still have two more activations available for use.
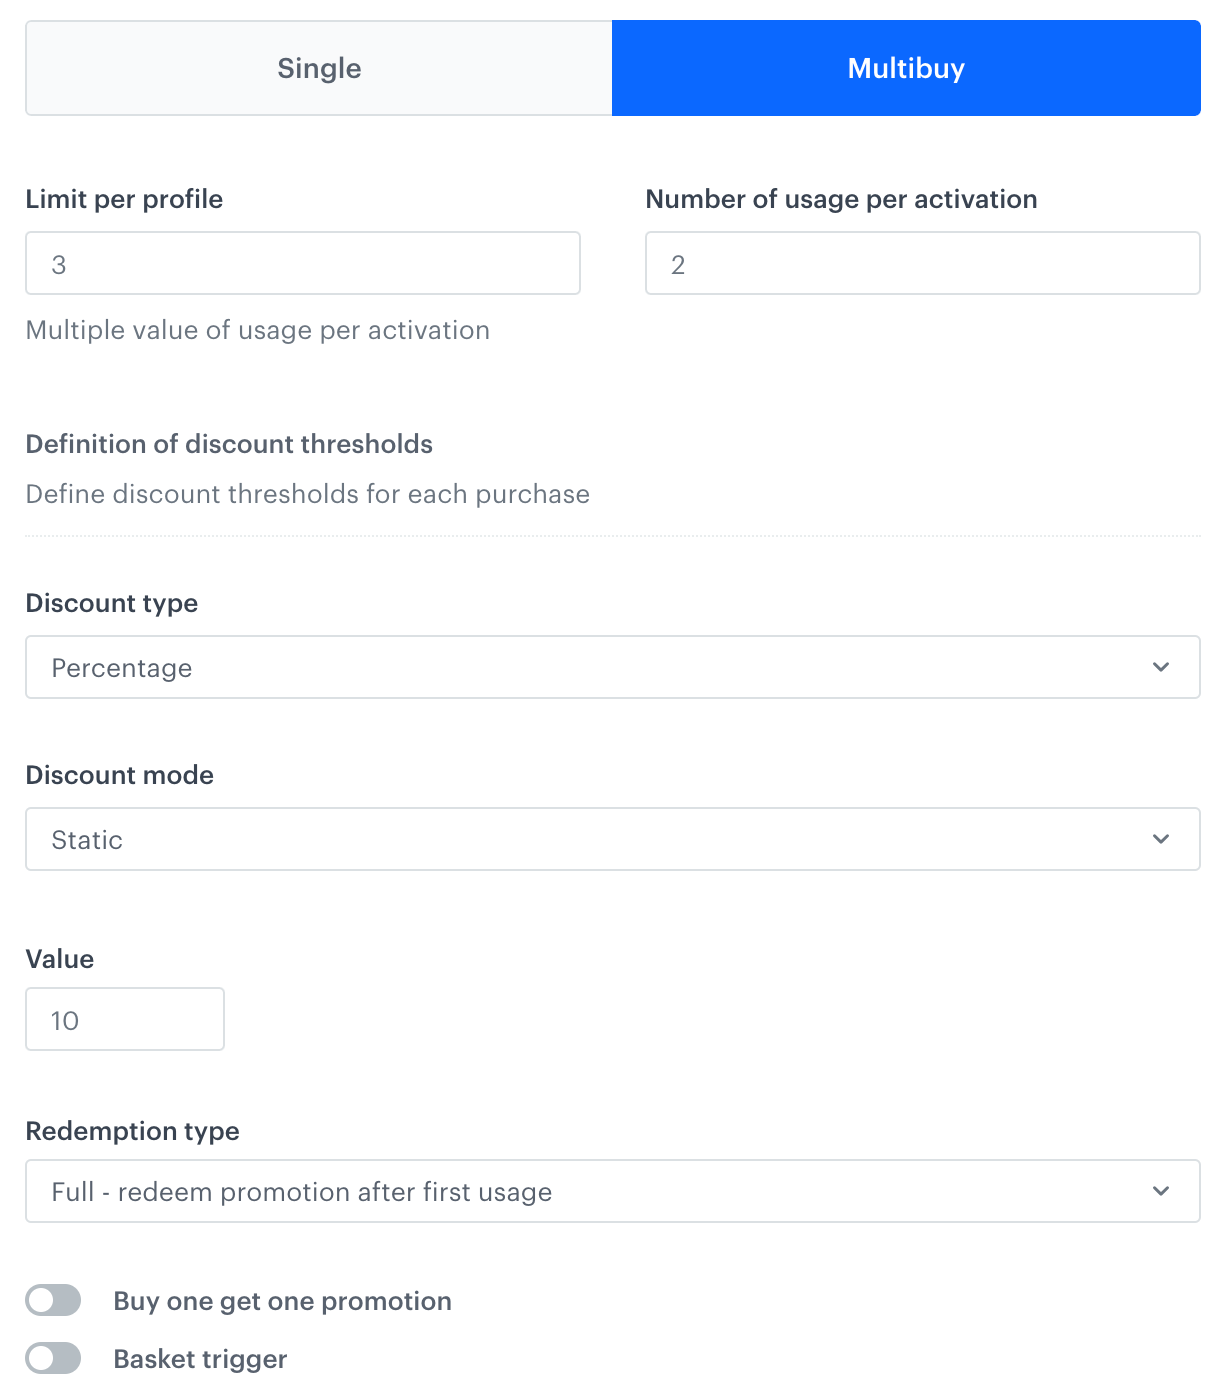
</td> <td><figure><img src="/api/docs/image/54176ad07f146575310749eba44b7c2f42c1b327/docs/ai-hub/promotions/_gfx/multibuy-full-item.png" class="medium" alt="Example configuration of Multibuy promotion logic"><figcaption>Example configuration of Multibuy promotion logic - full redemption</figcaption></figure></td> </tr> </tbody></table></div></details>


25. In the **Promotion global limits** section, define the [promotion global limits](#global-limit).  
    - Changing the limit type (**unlimited**, **lifetime**, **relative date**) resets limit counter, and counting will start fresh from the time of the change.
    - Changing the limit value within a limit type is allowed and doesn't reset the counter.
    - The limit counter has a 365-day time-to-live, so activations beyond 365 days ago are excluded from the count.
    1. Select one of the following tabs:  
        - **Unlimited** - to set the promotion without an activation limit. This is the default setting. No further configuration is needed.   
       - **Lifetime** - to set a limit without time range. In the **Activation global limit** field, enter the number of times a promotion can be activated by all profiles collectively.
       - **Relative** - Sets a limit that applies within a time window relative to each activation (for example, counting activations within a day of each activation request). This means the system checks how many promotions have been activated within a defined time window before the current activation attempt.
            1. In the **Activation global limit** field, enter the number of time a promotion can be activated by all profiles collectively.
            2. In **Time range**, choose the period for counting the limit.  
            **EXAMPLE**: 
                - **Activation time**: October 12, 2025, 10:00 AM
                - **Limit window:** 1 day  
            When activating the promotion, the system checks how many activations occurred from October 11, 2025, 10:00 AM to October 12, 2025, 10:00 AM. If this number exceeds the global limit, activation is blocked.

24. From the **Discount type** drop-down list, select one of the following discount types: 
      - **Percentage** sets the discount amount as a percentage of the original price.  
         Example: if the original price is 1.00 USD and **Value** is `20`, the final price is 0.80 USD.
      - **Points** awards loyalty points for redeeming the promotion.
      - **2 for 1** allows a customer to receive a second, identical product for free.
      - **Exact price** sets a fixed price for the product.
      - **Amount** sets a fixed discount amount to subtract from the original price.
      - **Multibuy** is currently unused.
25. In the **Value** field, enter a value for the type selected in **Discount type**.
26. **Multibuy only:** From the **Redemption type** dropdown, select whether the promotion is redeemed after one or more activations.
28. From the **Discount mode** dropdown list, select one of the options:  
      - **Static** - it's a fixed amount of discount (the unit depends on the selected type of promotion)
      - **Steps** - allows you to increase the discount amount as the number of transactions grows 
         
    <div class="admonition admonition-important"><div class="admonition-icon"><svg xmlns="http://www.w3.org/2000/svg" fill="none" viewBox="0 0 24 24" stroke="currentColor" stroke-width="2.5"><path stroke-linecap="round" stroke-linejoin="round" d="M12 8v4m0 4h.01M21 12a9 9 0 11-18 0 9 9 0 0118 0z" /></svg></div><div class="admonition-body"><div class="admonition-content">

    Steps can be used only for **Percentage**, **Amount**, and **Exact price** discount types.

    </div></div></div>

27. Only for **Percentage**, **Amount**, and **Exact price** discount types, you can use the following options:
      - **Buy one get one** - You can enable a promotion that allows you to give a discount for an item after the purchase a specific item (for example, buy one and get one 20% off or buy one and get one for $1).  
      <figure>
      <img src="/api/docs/image/54176ad07f146575310749eba44b7c2f42c1b327/docs/campaign/_gfx/bogo-example.png" alt="Example configuration of buy one get one" class="large"><figcaption>Example configuration of buy one get one promotion. In this configuration, a customer gets an item for $1 after the purchase of a specified item. </figcaption>
      </figure>
      
      - **Basket trigger** - This option allows you to create a promotion that can be used only if the basket value exceeds a threshold.  
      <figure>
      <img src="/api/docs/image/54176ad07f146575310749eba44b7c2f42c1b327/docs/campaign/_gfx/basket-trigger-promotion-example.png" alt="Example configuration of basket triggered promotion" class="large"><figcaption>Example configuration of basket triggered promotion. In this configuration, a customer gets a 10% discount when their basket value exceeds $99. </figcaption>
      </figure>  

26. Click **Apply**.

### Schedule

In this section, you can define the time range when:
- a regular promotion is available and visible
- handbill-type promotions (for personalized promotions) are available to be drawn by the AI engine

1. In the **Schedule** section, click **Change**.
2. In the **Display time** sub-section, choose when the promotion becomes visible to customers.
   
   <div class="admonition admonition-important"><div class="admonition-icon"><svg xmlns="http://www.w3.org/2000/svg" fill="none" viewBox="0 0 24 24" stroke="currentColor" stroke-width="2.5"><path stroke-linecap="round" stroke-linejoin="round" d="M12 8v4m0 4h.01M21 12a9 9 0 11-18 0 9 9 0 0118 0z" /></svg></div><div class="admonition-body"><div class="admonition-content">

   A promotion must be published to be visible. Publishing the promotion is the last step in this procedure, after all the settings are made. "Immediately" means "immediately after publishing".

   </div></div></div>

3. **Scheduled promotions only**: Set the time when the promotion is visible to customers by picking dates in the **Start** and **End** fields.
4. In the **Activity time** sub-section, define the time when the promotion can be activated:
   - If you want the time to be the same as the visibility time, select the **Same as display time** checkbox.
   - If you want to set a date range, pick the dates in the **Start** and **End** fields.
5. In the **Lasting** field, enter the time (in seconds) that a promotion remains redeemable after it is activated.  
   `0` is interpreted as `infinity`.
6. Click **Apply**.

### Stores

Optionally, you can select the stores where the promotion can be used.

1. In the **Stores** section, click **Define**.
2. From the **Select stores** drop-down list, select a catalog of stores.
3. Choose a set of stores:
   - If you want to apply the promotion to all stores in the catalog, select the **Entire catalog** radio button.
   - If you want to apply the promotion to particular stores from the catalog:
      1. Click **Select stores**.
      2. In the pop-up that opens, select the checkboxes of the stores where you want to apply the promotion.
      3. Click **Apply**.  
         The pop-up closes.
4. Click **Apply**.

### Items

In this section, select the discounted items. 

1. In the **Items** section, click **Define**.
2. From the **Select items** drop-down list, select a catalog of items.
3. Choose a set of items:
   - If you want to apply the promotion to all items in the catalog, select the **Entire catalog** radio button.
   - If you want to apply the promotion to particular items from the catalog:
      1. Click **Select items**.
      2. In the pop-up that opens, select the checkboxes of the items that you want to include in the promotion.
      3. Click **Apply**.  
         The pop-up closes.
4. Click **Apply**.

### Loyalty

To limit the promotion to customers with a certain loyalty score, verify with your administrator that loyalty points are being calculated. 
   
<div class="admonition admonition-note"><div class="admonition-icon"><svg xmlns="http://www.w3.org/2000/svg" fill="none" viewBox="0 0 24 24" stroke="currentColor" stroke-width="2.5"><path stroke-linecap="round" stroke-linejoin="round" d="M13 16h-1v-4h-1m1-4h.01M21 12a9 9 0 11-18 0 9 9 0 0118 0z" /></svg></div><div class="admonition-body"><div class="admonition-content">

You can find the example expression that counts loyalty points [here](/docs/analytics/expressions/loyalty-point-count).

</div></div></div>


1. In the **Loyalty** section, click **Change**.
2. If you want to enable the promotion only to customers who gathered a certain number of loyalty points, perform the following actions:
   1. Select the **Minimum loyalty score** checkbox.
   2. In the **Value** field, enter the number of required points.
3. Click **Apply**.

### Add voucher codes
---

Optionally, in the **Voucher pool** section, you can select a voucher pool to assign voucher codes to profiles. The voucher code will be available to get in the contents of the promotion object and the code can be used on the selected items to be included in the promotion. Each time the promotion is activated, a new voucher code is assigned.

How and when the voucher code appears or is used depends on the promotion setup and the platform (for example, a mobile app or a website).

We strongly recommend monitoring your voucher pool levels as explained in [Monitor Voucher Pool Levels and Receive Alerts for Replenishment](/use-cases/voucherpools).


<div class="admonition admonition-note"><div class="admonition-icon"><svg xmlns="http://www.w3.org/2000/svg" fill="none" viewBox="0 0 24 24" stroke="currentColor" stroke-width="2.5"><path stroke-linecap="round" stroke-linejoin="round" d="M13 16h-1v-4h-1m1-4h.01M21 12a9 9 0 11-18 0 9 9 0 0118 0z" /></svg></div><div class="admonition-body"><div class="admonition-content">

To learn about code types, how to create a voucher pool, and how to add, assign, and distribute codes, see [Voucher pools](/docs/assets/code-pools).

</div></div></div>


1. On the **Voucher pool** section, click **Define**.  
2. From the **Voucher Pool** dropdown list, select a voucher pool from which the voucher codes will be retrieved.  
    **Result**: You are shown a voucher pool summary - the number of voucher codes available for assignment (**Available vouchers**), the number of voucher codes in total in a voucher pool (**pool size**).  
3. Use the **Enable voucher pool integration** toggle to enable or disable voucher assignment to a profile. By default, voucher assignment is enabled. When this option is disabled, you can still activate a promotion for a profile, but a voucher code won't be assigned (the code will not be returned).
4. To allow users other than the assigned end-user to redeem the voucher code, enable the **Allow voucher transfer** toggle.  
    This option is supported **only** by the [`promotions/voucher/batch-redeem`](https://developers.synerise.com/LoyaltyandEngagement/LoyaltyandEngagement.html#tag/Promotions/operation/BatchRedeemVouchers) and [`promotions/voucher/batch-redeem-for-profile`](https://developers.synerise.com/LoyaltyandEngagement/LoyaltyandEngagement.html#tag/Promotions/operation/BatchRedeemVouchersForProfile) endpoints.    
    - When this option is **disabled**, voucher codes are assigned to specific profiles and cannot be redeemed by other end-users. 
    - When this option is **enabled**, and a voucher is redeemed, the following events are generated on the profile of the voucher code owner (the end-user to whom the voucher code was initially assigned):
        - [`client.removePoints`](/docs/assets/events/event-reference/loyalty#clientremovepoints) with the `beneficiaryClientUUid` parameter which contains the UUID of the end-user who redeemed the voucher,
        - [`voucherCode.redeemed`](/docs/assets/events/event-reference/loyalty#vouchercoderedeemed); 
4. Confirm the settings by clicking **Apply**.

### Saving a draft or publishing

- If you want to publish the promotion, click **Publish**.  
   **Result:** If the schedule was set to "Immediately", the promotion becomes visible after you click **Publish**. If it was scheduled for a date, it becomes visible at that date.

- If you want to save the promotion as a draft or return a published promotion to draft status, click **Finish later**.  