

<div class="admonition admonition-note"><div class="admonition-icon"><svg xmlns="http://www.w3.org/2000/svg" fill="none" viewBox="0 0 24 24" stroke="currentColor" stroke-width="2.5"><path stroke-linecap="round" stroke-linejoin="round" d="M13 16h-1v-4h-1m1-4h.01M21 12a9 9 0 11-18 0 9 9 0 0118 0z" /></svg></div><div class="admonition-body"><div class="admonition-content">

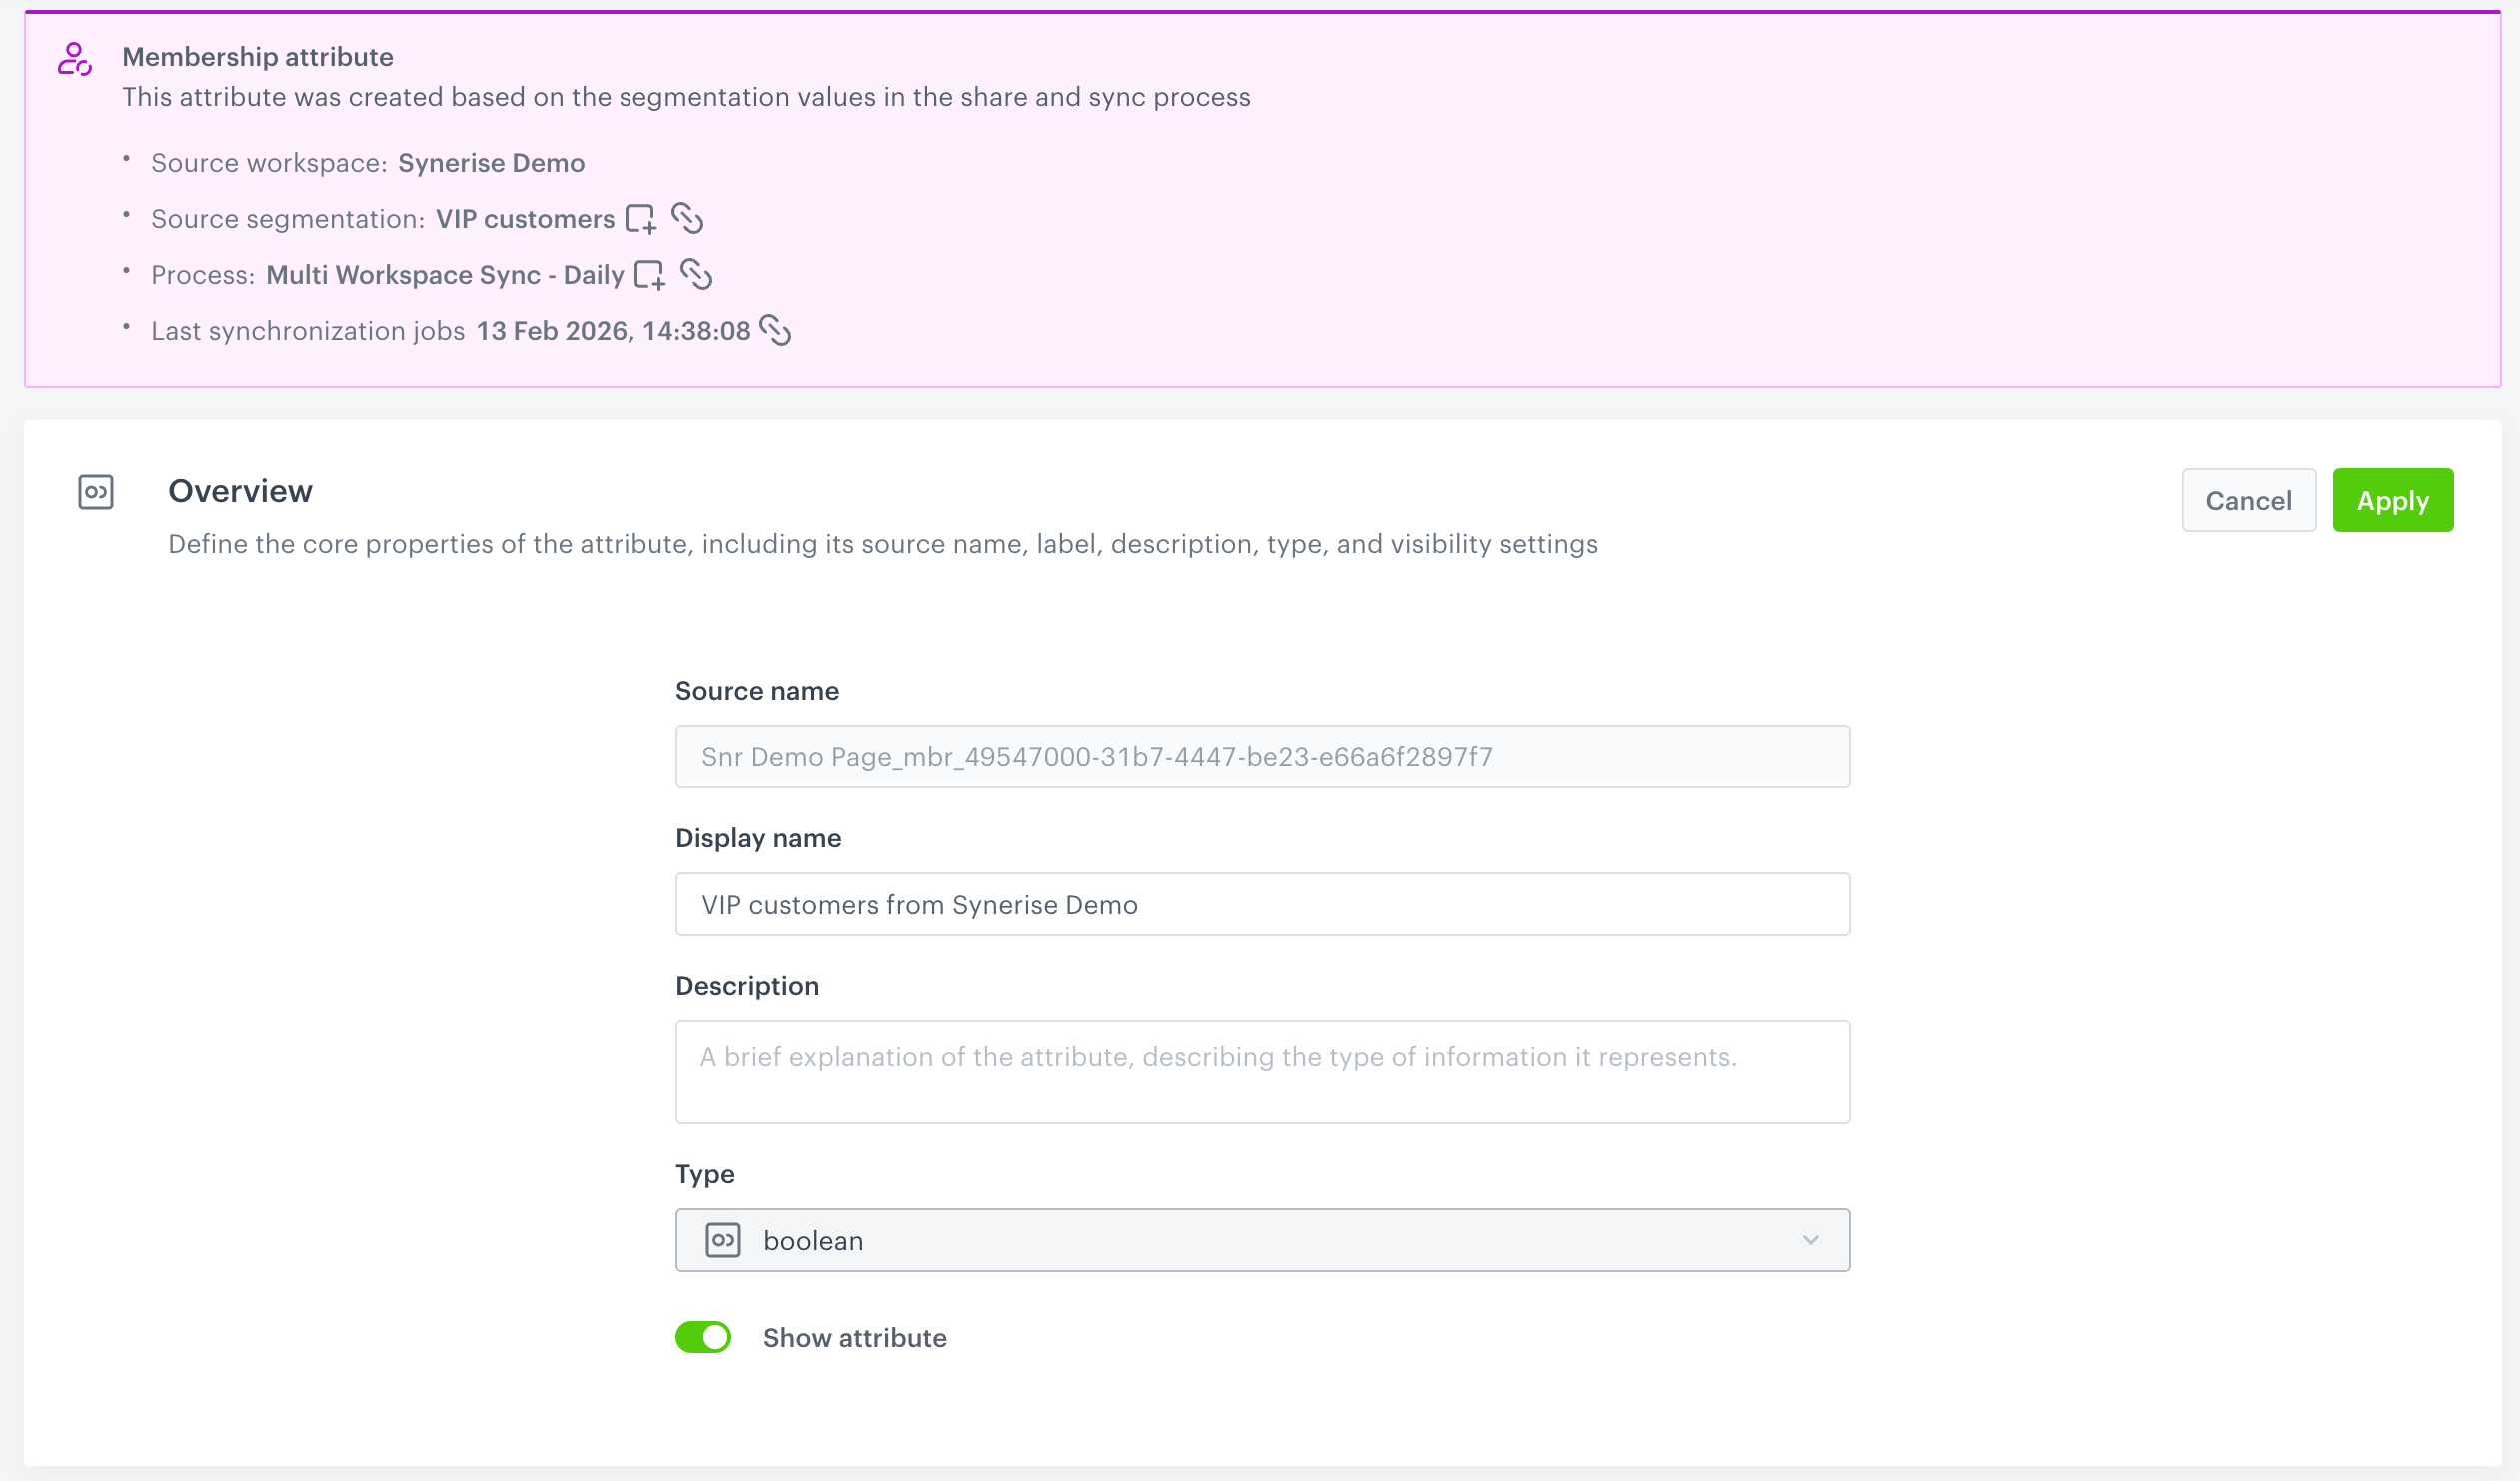
This article explains how to save a segmentation result as an attribute and assign it to profiles from the segmentation within your current workspace. If you want to mark the same profiles with an attribute across a group of workspaces, see [Sharing segmentation results to a workspace group](/docs/settings/workspace/multibrand-workspaces/sharing-segmentation-results) which is a part of [Co-Brand Decisioning Layer](/docs/settings/workspace/multibrand-workspaces).

</div></div></div>


Sharing segmentations lets you save the results of a segmentation as a [membership attribute](/docs/crm/customer-properties#managing-membership-attributes)—a true or false value—assigned to profiles who are in the segmentations in a currently used workspace.  

When you save segmentation results to a membership attribute in a workspace (you are logged in), you can track how these attributes change over time. This helps you see when profiles start matching the segmentation and when they stop.  

Besides creating the membership attribute, the system updates the attribute on a set schedule—either every 6 hours or once a day. During each update, it checks the source segmentation(s) for any changes and only updates the profiles that have changed since the last run. This way, the process runs regularly but only works on profiles that need updating.

## Generated events and attributes
---
- [Membership attributes](/docs/crm/customer-properties#managing-membership-attributes) - One for each segmentation selected. The attribute is created during the first synchronization and then regularly updated. These are visible on the profile card, and you can find all membership attributes in your workspace under **Behavioral Data Hub > Attributes**.  
- [`profile.updated`](/docs/assets/events/event-reference/profiles#profileupdated) events:
    - Generated on both the source and target workspaces.
    - Occur once per synchronization process.
    - For every profile update:
        - On the first run, all profiles that are members of at least one shared segmentation are updated.
        - On subsequent runs, only profiles with changes in membership for at least one shared segmentation are updated.
        - If multiple membership attributes for a profile are updated, these are batched together and a single event is generated. 
- [`profile.MembershipAttributeUpdated`](/docs/assets/events/event-reference/profiles#profilemembershipattributeupdated) events:
    - Every change or creation of membership attribute generates the event on the current workspace or target workspace(s).
    - On the first synchronization run, all profiles that are members of at least one shared segmentation will be generated the events.
    - On subsequent runs, an event is generated for every change in membership attributes for profiles in at least one shared segmentation.

These attributes and events help you keep your segmentation data accurate and up to date, making it easier to target your profiles well. They also let you analyze how often profiles are added or removed from a shared segmentation.

## Start sharing and synchronizing
---
1. Go to <img src="/api/docs/image/54176ad07f146575310749eba44b7c2f42c1b327/icons/decision-hub-icon.svg" alt="Image presents the Decision Hub icon" class="icon"> **Decision Hub > Segmentations**.  
2. On the top bar on the segmentation list, click **Share as**.  
    **Result**: A pop-up appears.  
3. If the workspace you're working on is a [co-brand workspace](/docs/settings/workspace/multibrand-workspaces/about), the pop-up contains the synchronization type selection. To share segmentation results to one workspace only, select **Workspace Sync**.    
4. From the **Process frequency** dropdown list, select how often membership attributes will be synchronized. 
    - **Daily** - The process will start once a day at a random time between 4 A.M. and 6 A.M.
    - **Every 6 hours** - The process will start every hour every six hours.
5. Click **Go to sharing process**. 
6. On the pop-up, select the segmentations whose results will be shared and synchronized to the workspace you're logged in. The results will be saved as membership attributes. 
7. Become familiar with the summary of the configured process:  
    - The number of unique profiles that meet the criteria of at least one selected segmentation and have the specified profile ID. Each profile is counted only once, even if it appears in multiple segmentations. Become familiar with [limits](/docs/settings/workspace/multibrand-workspaces/limits-and-constraints). 
    - The list of attributes which will be created and/or synchronized
8. To start the process, click **Apply**.
9. Confirm by clicking **Yes, start**.  
    **Result**: The first synchronization job starts immediately. Other will occur according to the schedule.


## What's next

### Checking synchronization status

To view the status of synchronization processes go to the details of the membership attribute (**Behavioral Data Hub > Attributes > Membership attributes**) and find the link to the synchronization process where you will find logs and statuses. 

<figure><img src="/api/docs/image/54176ad07f146575310749eba44b7c2f42c1b327/docs/crm/_gfx/membership-attribute-multiworkspace.png" class="medium" alt="Preview of membership attribute details shared across a workspace group, accessible in Behavioral Data Hub > Attributes > Membership attributes"><figcaption>Preview of membership attribute details shared across a workspace group, accessible in Behavioral Data Hub > Attributes > Membership attributes</figcaption></figure>

#### Job stages

Synchronization takes three steps:
- Fetching segmentations - Collecting groups of data based on specific criteria.
- Attribute mapping - Linking data fields from the source to the correct fields in the destination
- Queueing for materialization - Adding tasks to a waiting list to be processed and finalized.


#### Job statuses

You can monitor synchronization job statuses for each step and download job files for debugging purposes. Job statuses include:

- **Success** – Job completed successfully.
- **Processing** – Job is currently in progress.
- **Warning** – Job completed with partial success, some issues may need attention.
- **Failed** – Job ended with failure.

### Managing synchronization processes

You can only add or remove segmentations from active processes. Other changes require creating a synchronization process.

1. Go to <img src="/api/docs/image/54176ad07f146575310749eba44b7c2f42c1b327/icons/behavioral-data-hub-icon.svg" alt="Behavioral Data Hub icon" class="icon"> **Behavioral Data Hub > Membership Attributes Sync**.
2. Select the **Processes** tabs.
3. Open the details of a synchronization process.
4. Add or remove segmentations from the process.
5. Confirm changes by clicking **Apply**.  
    **Result**: The synchronization process with the change is launched immediately. Other jobs will be performed as scheduled through the **Process frequency** option.

### I want to edit synchronization process

- **Frequency and location cannot be edited for existing processes**  
To change the frequency or sharing location, you must create a new synchronization process.

- **Segmentations can be added or removed from existing processes**  
Changes will take effect:
  - immediately for synchronizations scheduled every 6 hours - subsequent runs will be performed according to the schedule.
  - on the next scheduled run for daily synchronizations.

- **Stopping synchronizations**  
To stop synchronizing, remove segmentations from the process.

### I want to manage membership attributes in a workspace

- [Previewing attribute details](/docs/crm/customer-properties#viewing-attribute-details)
- [Changing display name and attribute description](/docs/crm/customer-properties#changing-display-name-and-description)
- [Changing attribute visibility across filters](/docs/crm/customer-properties#changing-membership-attribute-visibility)


### I want to analyze how profiles joined and left segmentations

The analysis will be based on the `profile.updated` event, which captures changes to membership attributes. Since the state of a membership attribute indicates whether a profile belongs to the segmentation it was created from, analyzing the `profile.updated` event ensures reliable results.

1. Create a formula metric which will deduct the count of `profile.updated` events with the membership attribute value set to true from the count of `profile.updated` events with the membership attribute value set to false.
    1. Go to <img src="/api/docs/image/54176ad07f146575310749eba44b7c2f42c1b327/icons/decision-hub-icon.svg" alt="Image presents the Decision Hub icon" class="icon"> **Decision Hub > Metrics > New metric**. 
    2. Select **Formula metric**.  
    3. Select **Event**.
    4. Select `profile.updated`.
    5. Click **+ where**.  
    6. From the dropdown list, select the attribute with the name of a membership attribute.  
    7. Set the condition to `is true`.  
        <figure><img src="/api/docs/image/54176ad07f146575310749eba44b7c2f42c1b327/docs/analytics/_gfx/mbr-attr-first.png" class="medium" alt="The first part of the formula"><figcaption>The first part of the formula - a profile.updated event with the parameter that signifies a membership attribute set to true</figcaption></figure>  
    2. Create the second part of the operation:
        <figure><img src="/api/docs/image/54176ad07f146575310749eba44b7c2f42c1b327/docs/analytics/_gfx/mbr-attr-second.png" class="medium" alt="The first part of the formula"><figcaption>The first part of the formula - a profile.updated event with the parameter that signifies a membership attribute set to false</figcaption></figure> 
    3. Save the metric.
2. Create a histogram on the basis of the metric you created.  
    1. Go to <img src="/api/docs/image/54176ad07f146575310749eba44b7c2f42c1b327/icons/decision-hub-icon.svg" alt="Image presents the Decision Hub icon" class="icon"> **Decision Hub > Histograms > New histogram**. 
    2. Select the metric you created in the previous step.
    3. Save the histogram.  
3. Create a dashboard which displays the histogram results.
    1. Go to <img src="/api/docs/image/54176ad07f146575310749eba44b7c2f42c1b327/icons/decision-hub-icon.svg" alt="Image presents the Decision Hub icon" class="icon"> **Decision Hub > Dashboards > Add dashboard**.
    2. Click the <img src="/api/docs/image/54176ad07f146575310749eba44b7c2f42c1b327/icons/histogram-icon.png" alt="Image presents the Histogram icon" class="icon"> icon on the dashboard.
    3. Select the histogram you created in the previous step.
    4. Click the histogram widget which has been added to the dashboard.  
    5. On the right panel, select the **Style** tab.  
    6. Select the following visualization type:  
        <figure><img src="/api/docs/image/54176ad07f146575310749eba44b7c2f42c1b327/docs/analytics/_gfx/mbr-attr-histogram-visualisation.png" class="medium" alt="The Style tab of the histogram widget in the settings of the dashboard"><figcaption>The Style tab of the histogram widget in the settings of the dashboard</figcaption></figure> 


### How do I know my segmentation based on membership attributes is fresh?

Go to the [details of the membership attribute](/docs/crm/customer-properties#viewing-attribute-details) based on which your segmentation is created, open its details, and check **Last synchronization jobs**.

