
A schema acts as a template for [creating and organizing records](/docs/assets/brickworks/quick-start/creating-a-record), ensuring consistency and structure across your data sets.  

In this article, you will walk through the process of creating a schema (**Products**) that includes the following fields:
- the name of the item
- the ID of the item
- information about the item
- recommendations which will return similar items to the defined item  
    The details of the item will be provided while [creating a record](/docs/assets/brickworks/quick-start/creating-a-record).

This example demonstrates how Synerise objects, specifically a catalog and an AI recommendation, can be utilized within a schema. While [creating a record](/docs/assets/brickworks/quick-start/creating-a-record) you will specify the item and will be able to preview recommendation results.  


<div class="admonition admonition-tip"><div class="admonition-icon"><svg xmlns="http://www.w3.org/2000/svg" fill="none" viewBox="0 0 24 24" stroke="currentColor" stroke-width="2.5"><path stroke-linecap="round" stroke-linejoin="round" d="M9.663 17h4.673M12 3v1m6.364 1.636l-.707.707M21 12h-1M4 12H3m3.343-5.657l-.707-.707m2.828 9.9a5 5 0 117.072 0l-.548.547A3.374 3.374 0 0014 18.469V19a2 2 0 11-4 0v-.531c0-.895-.356-1.754-.988-2.386l-.548-.547z" /></svg></div><div class="admonition-body"><div class="admonition-content">

Before creating a schema for your business scenario, we recommend you become familiar [Limits and constraints](/docs/assets/brickworks/limits) as it may affect implementation of the scenario.

</div></div></div>


<figure><img src="/api/docs/image/54176ad07f146575310749eba44b7c2f42c1b327/docs/assets/_gfx/brickworks-schema-final.png" class="large" alt="The example schema configuration"><figcaption>The example schema configuration</figcaption></figure>


## Procedure
--- 

1. Go to <img src="/api/docs/image/54176ad07f146575310749eba44b7c2f42c1b327/icons/data-modeling-hub-icon.svg" alt="Data Modeling Hub icon" class="icon"> **Data Modeling Hub > Schemas > New schema**.
2. Select one of the following schema options:  
    - **Managed schema** 
    - **Simple schema**  
    - **Singleton schema**
    See the ["Schema types" section](/docs/assets/brickworks/quick-start#schema-types) for an explanation for each type.  
3. On the pop-up, provide the following data:  
    - In **Display name**, enter `Products`  
    In this field, you must provide the schema name; value in this field is displayed on the list of schemas only (<img src="/api/docs/image/54176ad07f146575310749eba44b7c2f42c1b327/icons/data-modeling-hub-icon.svg" alt="Data Modeling Hub icon" class="icon"> **Data Modeling Hub > Schemas**).
    - In **API name**, the value is pre-filled (`products`), if you want to change it, provide your own API name variant.  
        The value in this field is the unique identifier used to reference this schema in API requests.
    - In **Description**, describe the schema’s purpose to help workspace users understand its function, for example, `Products with Synerise recommendations`  
        This description will display on the list of schemas only.  
4. Confirm by clicking **Apply**. 

### Adding schema fields

In this part of the process, you will add [fields](/docs/assets/brickworks/schema-field-types) to the schema. The schema will contain various field types: [strings](/docs/assets/brickworks/schema-field-types#string) and [Synerise objects](/docs/assets/brickworks/synerise-objects) (a [catalog](/docs/assets/catalogs) and [AI recommendation based on the similar item model](/docs/ai-hub/recommendations-v2/recommendation-types#similar-items)).  

This procedure focuses on the configuration of the fields. Later on, you will fill out the schema fields with the actual values, which is described in the [Creating a record](/docs/assets/brickworks/quick-start/creating-a-record) article.

<figure><img src="/api/docs/image/54176ad07f146575310749eba44b7c2f42c1b327/docs/assets/_gfx/create-schema-blank.png" class="medium" alt="A blank configuration form of a schema"><figcaption>A blank configuration form of a schema; that's how the starting point for creating a schema looks like</figcaption></figure>

#### Field with the product name

Add the [string field](/docs/assets/brickworks/schema-field-types#string) which will contain the product name. 

1. Click **Add new field**.  
2. From the dropdown list, select **String**.  
3. Fill out the following fields:  
    - **Display name**, enter the title of the field (`Product name`) which will display in the [record](/docs/assets/brickworks/core-concepts#record).
    - **Description**, optionally provide a purpose of the field to help other workspace coworkers understand the purpose of the field.
4. Select the **Required field** checkbox.
5. Confirm by clicking **Apply**.

#### Field with the product ID

Add the [string field](/docs/assets/brickworks/schema-field-types#string) which will contain the product identifier. 

1. Click **Add new field**.  
2. From the dropdown list, select **String**.  
3. Fill out the following fields:  
    - **Display name**, enter the title of the field (`Product ID`) which will display in the [record](/docs/assets/brickworks/core-concepts#record).
    - **Description**, optionally provide a purpose of the field to help other workspace coworkers understand the purpose of the field.
4. Select the **Required field** checkbox.
5. Select the **Unique value** checkbox.
5. Confirm by clicking **Apply**.

#### Field with product information

Add the [catalog field](/docs/assets/brickworks/synerise-objects#catalog) - it will let you select a catalog which will be the source of product information.  


<div class="admonition admonition-important"><div class="admonition-icon"><svg xmlns="http://www.w3.org/2000/svg" fill="none" viewBox="0 0 24 24" stroke="currentColor" stroke-width="2.5"><path stroke-linecap="round" stroke-linejoin="round" d="M12 8v4m0 4h.01M21 12a9 9 0 11-18 0 9 9 0 0118 0z" /></svg></div><div class="admonition-body"><div class="admonition-content">

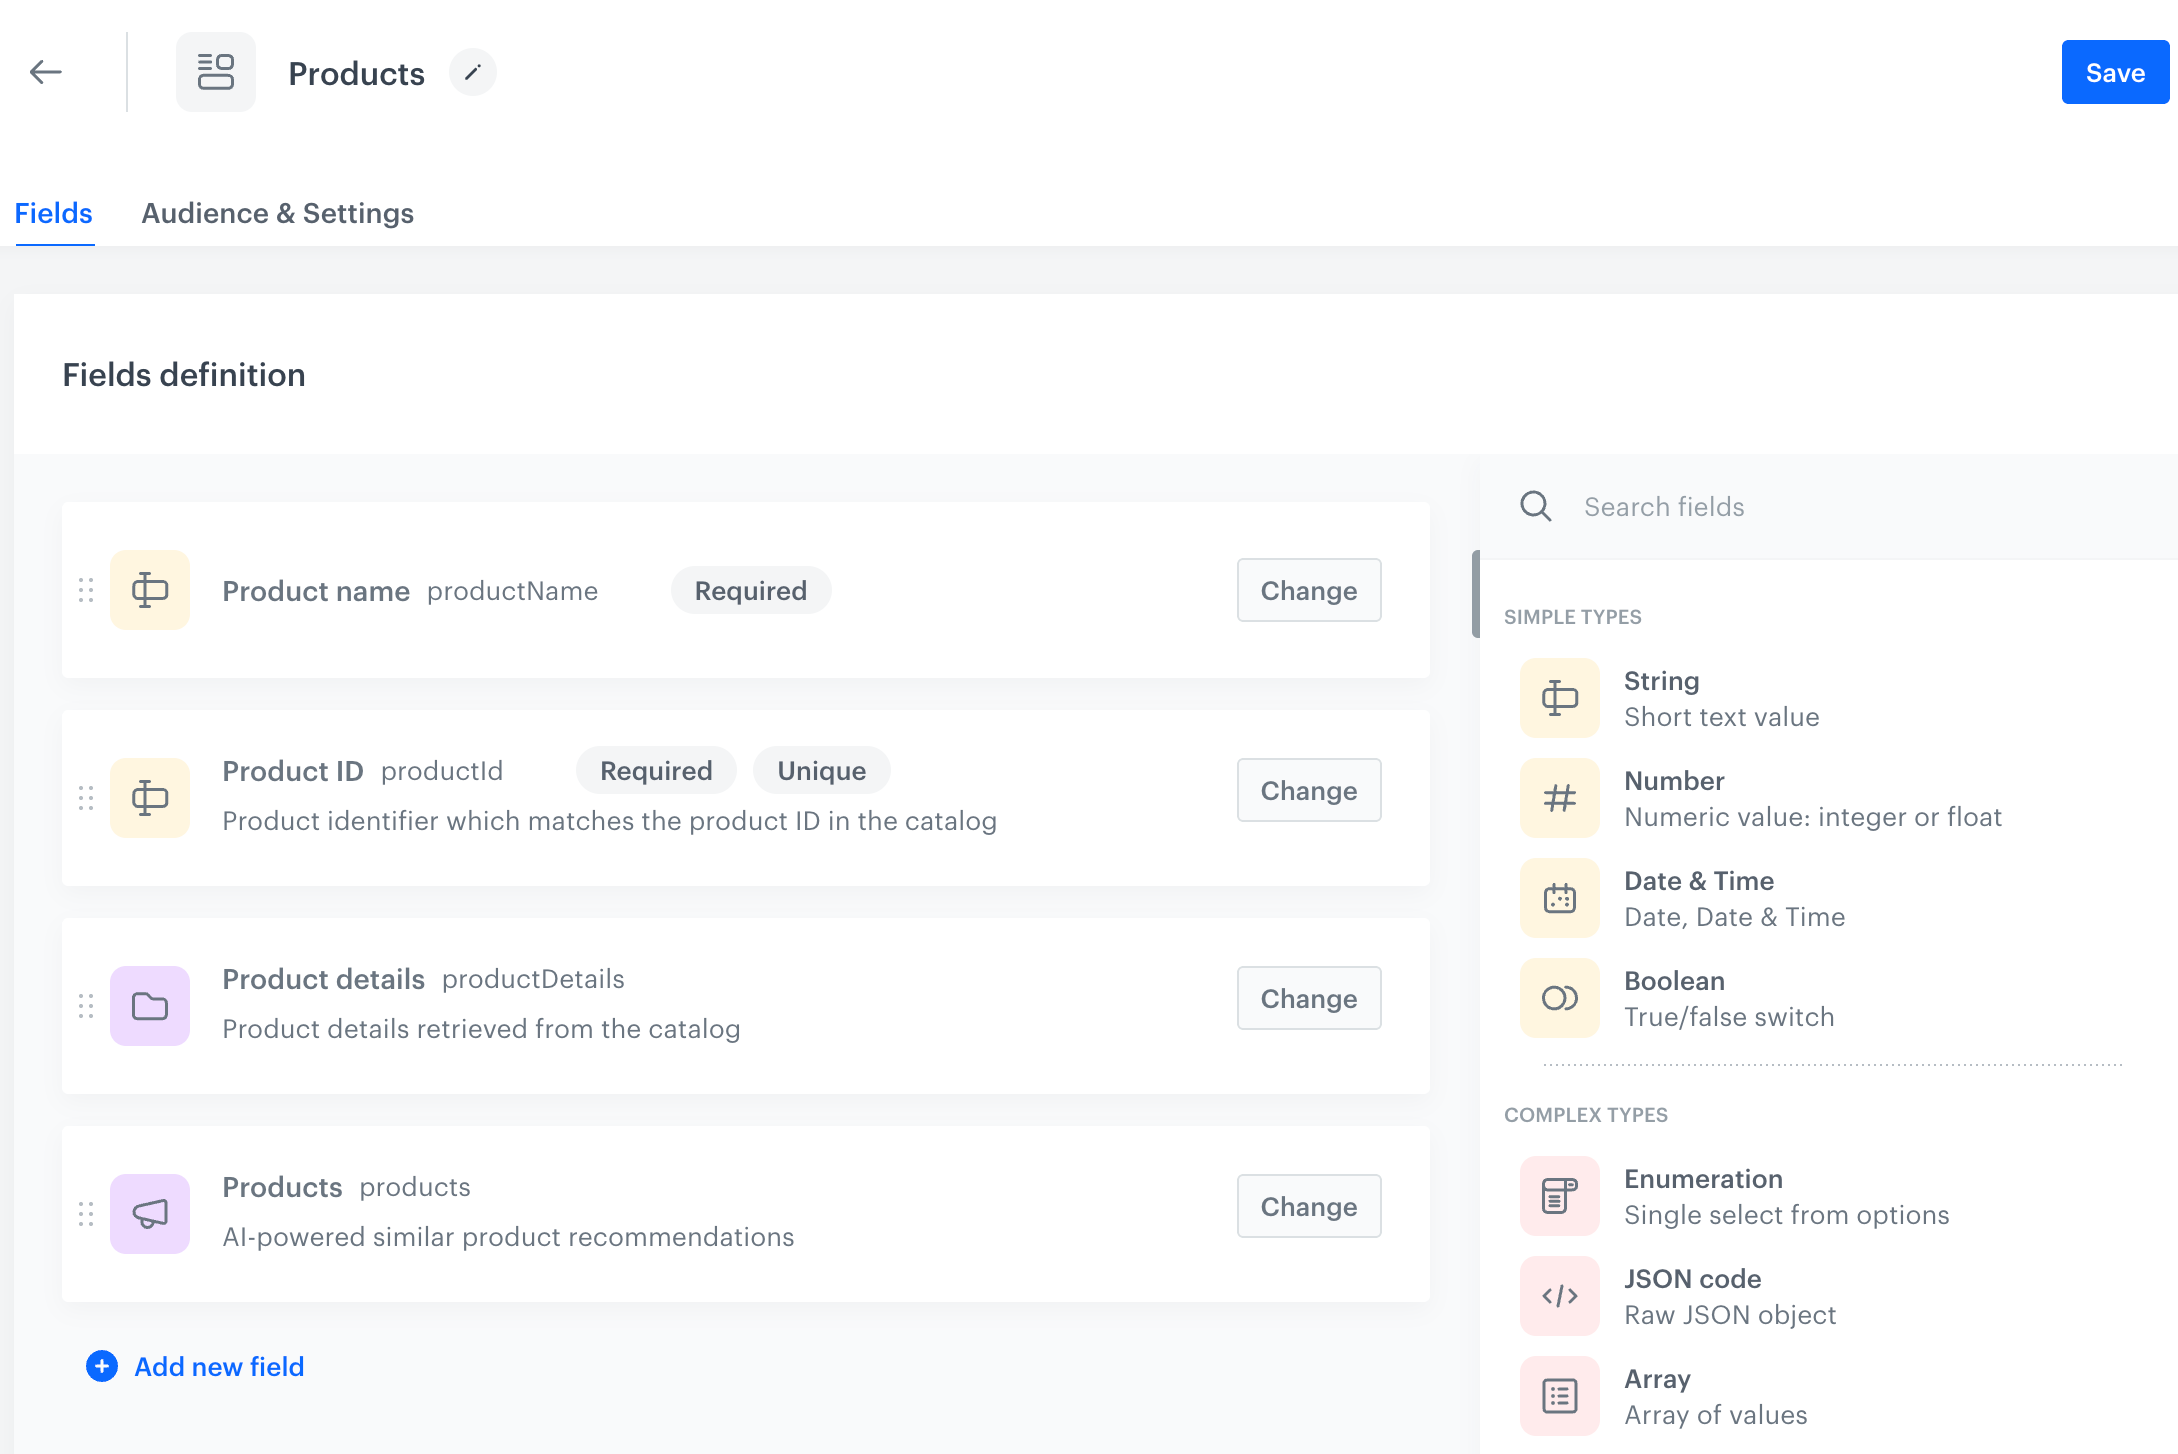
When creating a catalog, you select a primary key column whose values serve as unique identifiers for the catalog entries. In the [catalog field](/docs/assets/brickworks/synerise-objects#catalog) settings, you can specify how to provide the primary key value: either statically (by manually entering the value) or dynamically, by using [Brickwork Jinjava `{{ context }}` insert](/docs/assets/brickworks/brickworks-jinjava-inserts). In the scenario described in this article, we will use a static primary key value.

</div></div></div>


1. Click **Add new field**.  
2. From the dropdown list, select **Catalog**.  
3. Fill out the following fields:  
    - **Display name**, enter the title of the field (`Product details`) which will display in the [record](/docs/assets/brickworks/core-concepts#record).
    - **Description**, optionally provide a purpose of the field to help other workspace coworkers understand the purpose of the field.
4. From the **Catalog** dropdown list, select the catalog in which you store the item feed.
5. Confirm by clicking **Apply**.

#### Field with recommendations

Add the [AI recommendation field](/docs/assets/brickworks/synerise-objects#ai-recommendation) and select the AI recommendation campaign whose results will be returned in the [record](/docs/assets/brickworks/core-concepts#record). 


<div class="admonition admonition-important"><div class="admonition-icon"><svg xmlns="http://www.w3.org/2000/svg" fill="none" viewBox="0 0 24 24" stroke="currentColor" stroke-width="2.5"><path stroke-linecap="round" stroke-linejoin="round" d="M12 8v4m0 4h.01M21 12a9 9 0 11-18 0 9 9 0 0118 0z" /></svg></div><div class="admonition-body"><div class="admonition-content">

Some recommendation models based on which you can create [AI recommendation campaigns require item context](/docs/ai-hub/recommendations-v2/recommendation-types#recommendation-model-summary) based on which the results are generated. In the [AI recommendation field type](/docs/assets/brickworks/synerise-objects#ai-recommendation) settings, you can specify how to provide the item context (item identifier): either manually (by entering the item identifier) or dynamically by using [Brickwork Jinjava `{{ context }}` insert](/docs/assets/brickworks/brickworks-jinjava-inserts). In the scenario described in this article, we will use a static item context value.

</div></div></div>


1. Click **Add new field**.  
2. From the dropdown list, select **Catalog**.  
3. Fill out the following fields:  
    - **Display name**, enter the title of the field (`Products`) which will display in the [record](/docs/assets/brickworks/core-concepts#record).
    - **Description**, optionally provide a purpose of the field to help other workspace coworkers understand the purpose of the field.
4. From the **Recommendation** dropdown list, select the recommendation whose results will be displayed in the [record](/docs/assets/brickworks/core-concepts#record)
5. Confirm by clicking **Apply**.

### Defining schema audience

Defining [an audience for a schema](/docs/assets/brickworks/quick-start#schema-and-record-audience) ensures that the schema’s structure and data apply meaningfully and securely to the intended group of users.


<div class="admonition admonition-note"><div class="admonition-icon"><svg xmlns="http://www.w3.org/2000/svg" fill="none" viewBox="0 0 24 24" stroke="currentColor" stroke-width="2.5"><path stroke-linecap="round" stroke-linejoin="round" d="M13 16h-1v-4h-1m1-4h.01M21 12a9 9 0 11-18 0 9 9 0 0118 0z" /></svg></div><div class="admonition-body"><div class="admonition-content">

This part of the process is optional. If skipped, the schema audience defaults to everyone.

</div></div></div>


1. Click the **Audience & Settings** tab.  
    **Result**:  
    <figure><img src="/api/docs/image/54176ad07f146575310749eba44b7c2f42c1b327/docs/assets/_gfx/brickworks-schema-audience.png" class="large" alt="The Audience & Settings section"><figcaption>The Audience & Settings section</figcaption></figure>

2. On the **Audience** section, click **Define**. 
3. Choose the schema recipients:  
    - **Everyone** - Everyone you have in [Profiles](/docs/crm). 
    - **Segmentations** - Profiles in selected [segmentations](/docs/analytics/segmentations) will be schema recipients.  
        1. Click **Segmentations**.  
        2. On the pop-up, select the segmentations.  
        3. Confirm by clicking **Apply**.  
    - **New audience** - Create audience by defining the conditions profiles must meet to be recipients of selected schema. 
4. In the **Audience** section, click **Apply**. 

### Reviewing schema settings

In the **Audience & Settings** tab, you can preview the **API name** and schema description you defined at the beginning of the process. You can only edit the description at this stage. 

### Saving schema

In the upper-right corner, click **Save**.  

<figure><img src="/api/docs/image/54176ad07f146575310749eba44b7c2f42c1b327/docs/assets/_gfx/brickworks-schema-final.png" class="full" alt="The final configuration of a schema"><figcaption>The final configuration of a schema</figcaption></figure>

## Next steps
---
As the next step, you will [create a record](/docs/assets/brickworks/quick-start/creating-a-record) out of the created schema. 

### Editing schemas

When editing existing schemas, keep the following points in mind:

- Modifying schema does NOT affect existing records. If the field has a default value, that value will be applied when content is generated from the record.  
- Removing a field from a schema does NOT remove it from existing records; but when content is generated from such a record, that value is ignored.
- You can't open and view unpublished records created from a previous version of a schema.