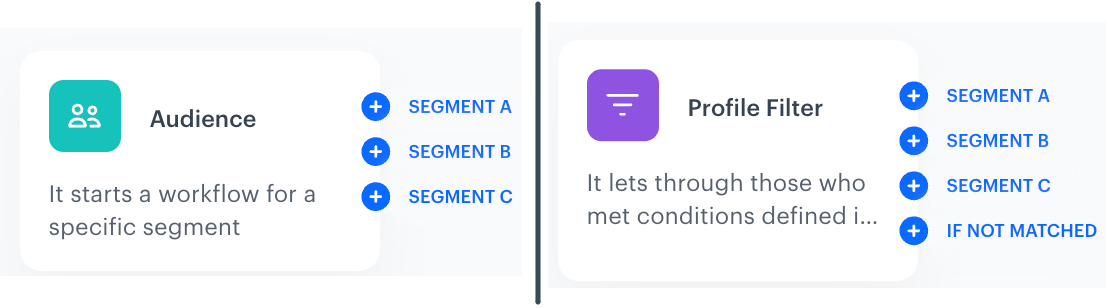
The **Profile Filter** node lets you control which profiles (such as customers) continue through your workflow based on specific criteria. It can only be used in profile-oriented workflows, where the workflow’s actor is an individual profile. This node is essential for refining the flow of profiles in your workflow, enabling precise targeting and branching based on customer attributes or behaviors.
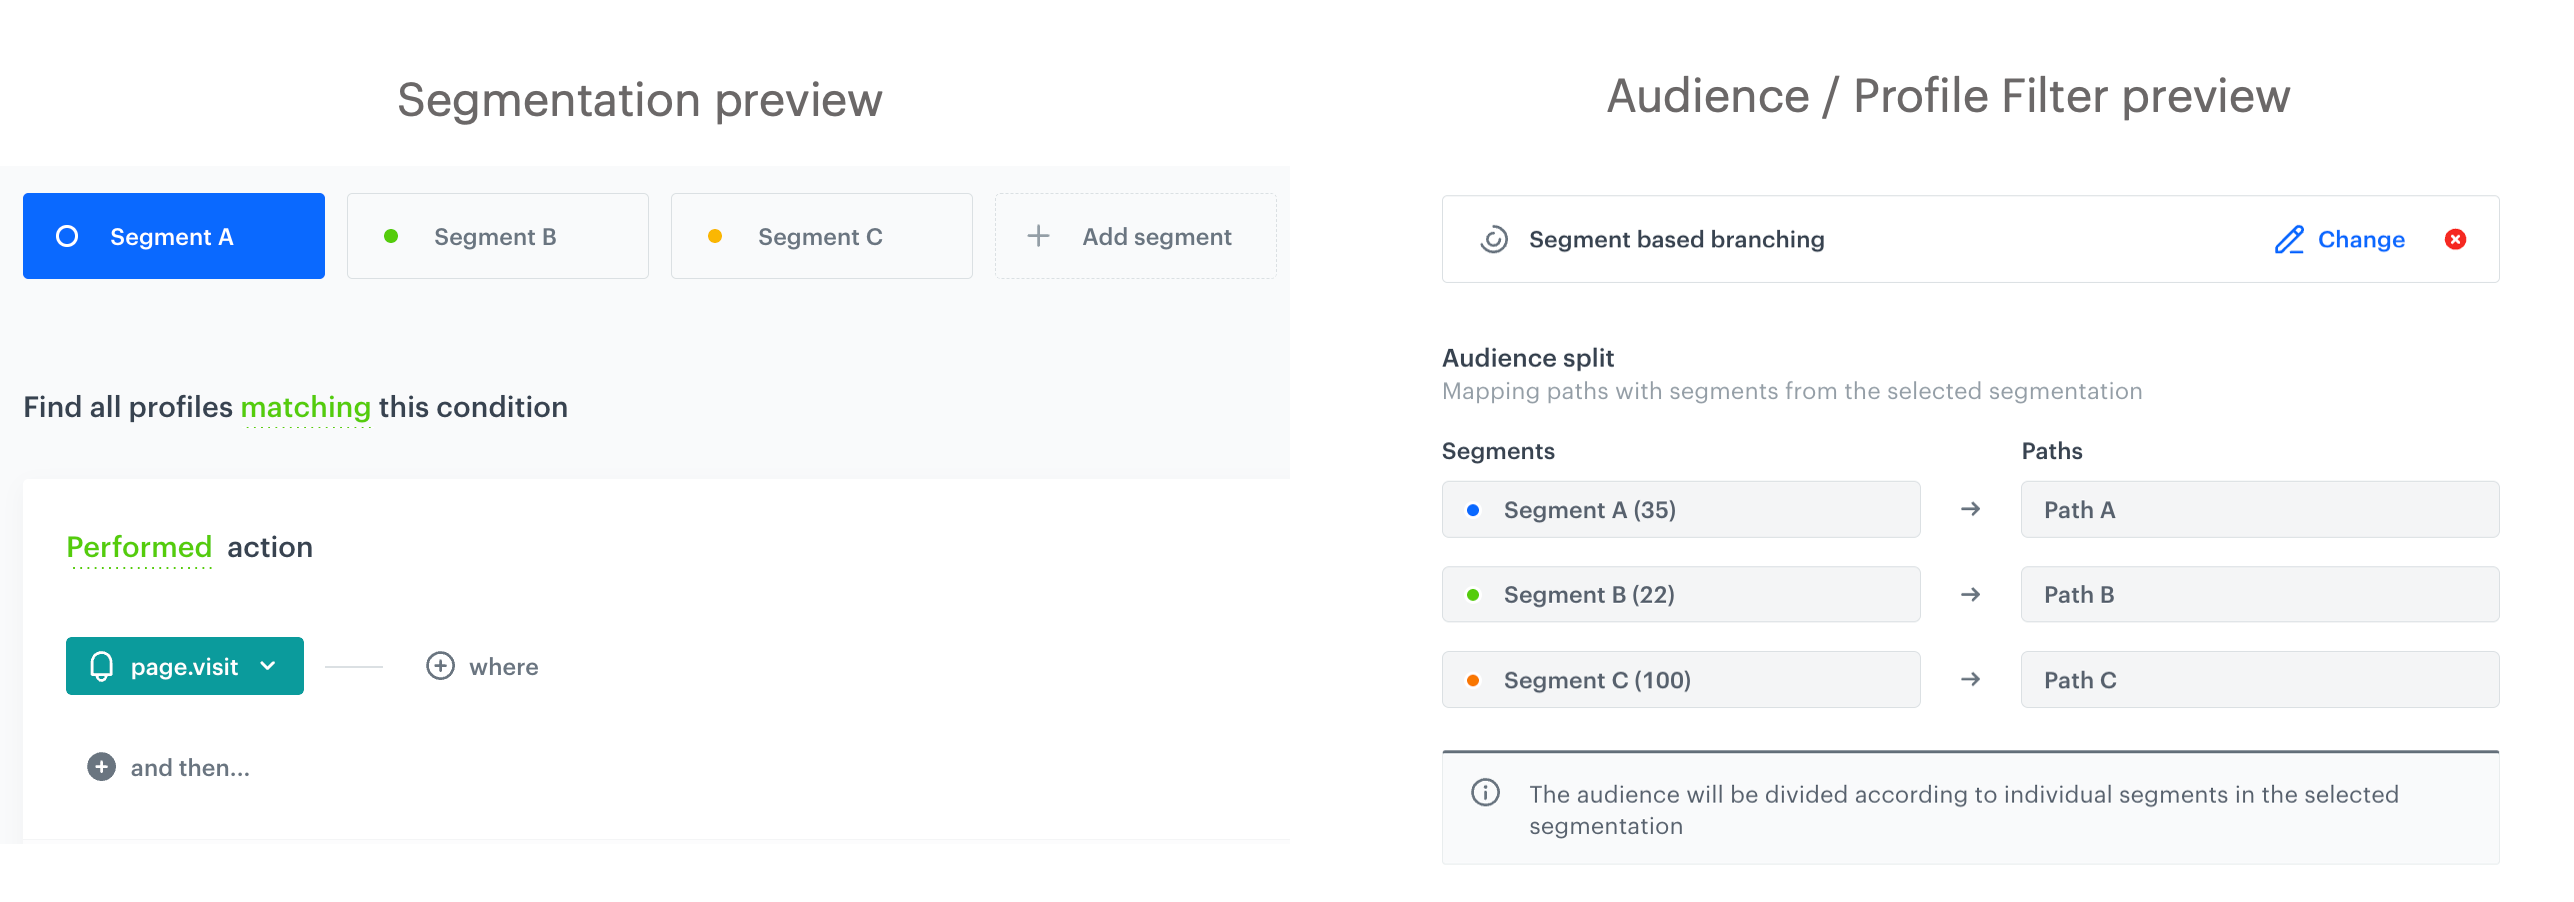
Within the node’s settings, you can select an existing segmentation or create a new one. If the existing segmentation includes multiple segments, you can split the workflow into separate paths for each of them ([segment-based branching](#segment-based-branching)), allowing for better personalization.
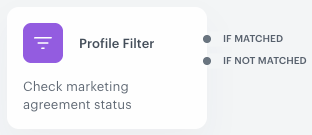
Additionally, the node always provides a default output path labeled **If not matched**. This path is for profiles that do not meet any of the segmentation conditions, ensuring they can follow a specific alternative flow or be handled differently.
### Segment-based branching
Segment-based branching lets you create a separate workflow [path](/docs/automation/automation-dictionary#path) (named after its corresponding segment) for each segment in a segmentation selected in the node. This option in the settings of the node (available in the **Split audience** tab), lets you:
- Manage multiple audience segments within a single workflow, reducing the need to create and maintain separate workflows for each segment.
- Easily branch campaigns based on distinct audience segments, allowing personalized messaging and actions for each group.
- Adapt to segmentation changes without rebuilding workflows, supporting dynamic campaign strategies as audiences evolve.
- Build a process for prioritizing communication for the selected segmentation, based on the order (priority) of segments in the segmentation.
**How it works**
When you select the **Split audience** option in the node, the segments from the segmentation are mapped to the workflow paths in the following way (these are default segment names, you can change them in the settings of the segmentation):
- Segment A > Path A
- Segment B > Path B
- Segment C > Path C
Default segment path mapping in the settings of the Audience/Profile Filter node
This mapping is active when the workflow status is Active or Paused. When a workflow is in Draft, initial output management is handled through connections between nodes. Refer to the table below to see how the mapping can be changed in specific scenarios. The table shows how changes to an example segmentation with three segments — Segment A, Segment B, and Segment C —affect the connections for Split audience mode when a workflow is active.
| Scenario | Description |
|------------------------------|------------------------------------------------------------------------------------------------------------------------------------|
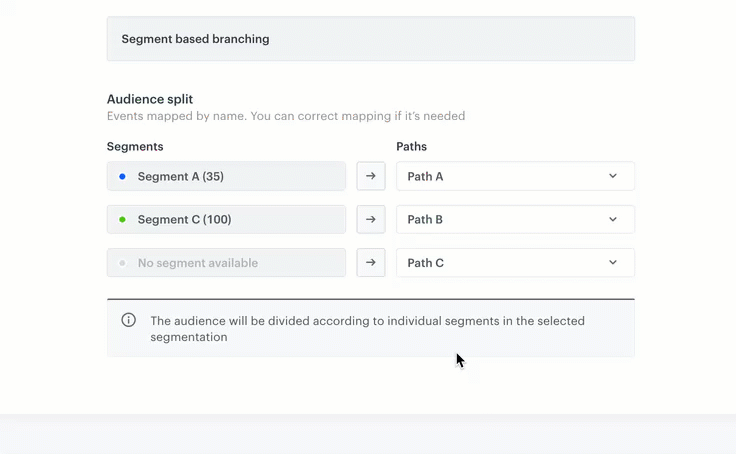
| **Segment deletion** | Removing segment B in the segmentation settings leaves branches for segments A and C in the workflow. Segment C shifts to branch B’s position and Segment C follows the path originally assigned to the deleted segment. In such situation, you can disable any path and change path mapping for remaining segments: Disabling path in the settings of the Audience/Profile Filter node
You can disable paths and/or change path mapping only in active and paused workflows.
|
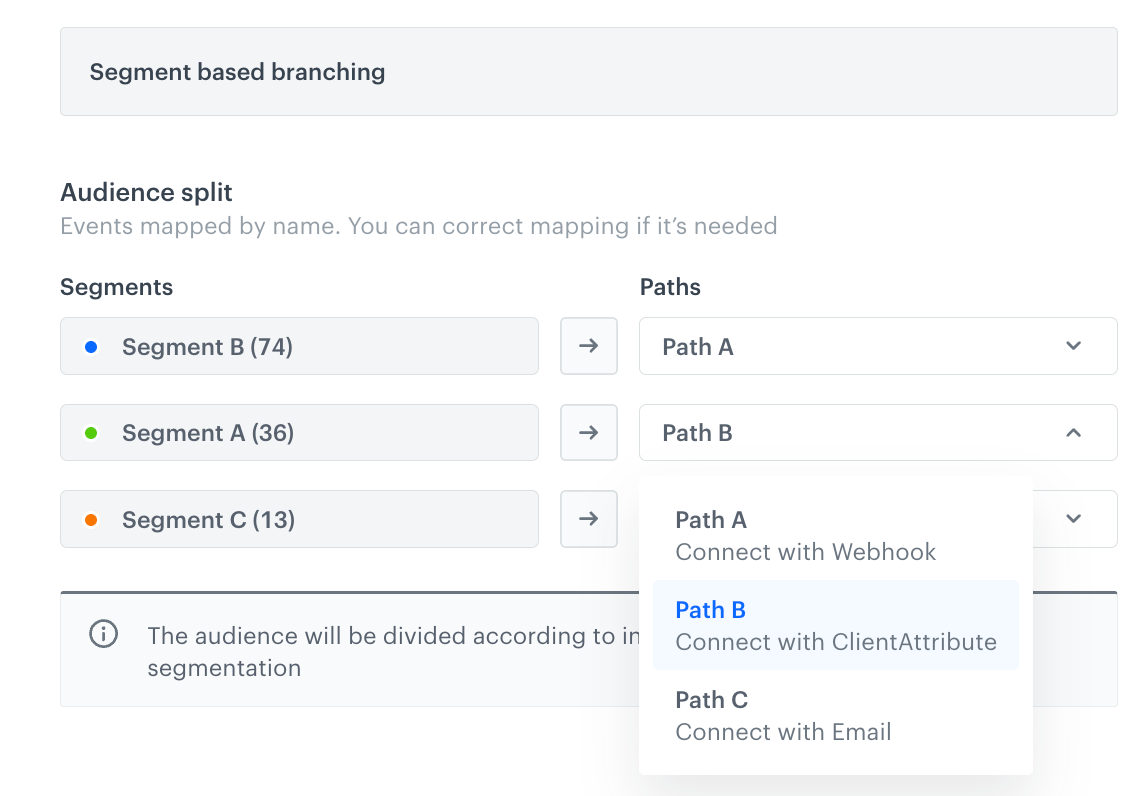
| **Segment reordering** | If the order of segments in a segmentation changes after launching the workflow, you can edit the mapping of the paths for each segment in a workflow: Change path mapping for segments in the Audience/Profile Filter node
You can disable paths and/or change path mapping only in active and paused workflows.
|
| **Segment addition** | If a new segment D is added, but the workflow still only has branches for A, B, and C, users matching segment D cannot proceed through the workflow as there is no corresponding branch. Then, the [`automation.clientPathAborted` event](/docs/assets/events/event-reference/automation#automationclientpathaborted) is generated for profiles who belong to the D segment. |
Path outputs from the Audience and Profile Filter nodes
#### Limits
- When configuring segment-based branching, there is a limit of 10 output connections available. Although the segmentation can include more than 10 segments, the system will display only the first 10 connections.
- If the segmentation contains more segments than outgoing connections, then profiles matching the segments that do not have an outgoing connection will be expelled from the workflow and the [`automation.clientPathAborted` event](/docs/assets/events/event-reference/automation#automationclientpathaborted) will be generated on their activity list.
- You can't use segmentations for which the [multi-match option](/docs/analytics/segmentations/creating-segmentations#multi-match) is enabled.
## Requirements
---
- You must implement the tracking code into your website.
- You must have customers in your database.
## Configuration
---
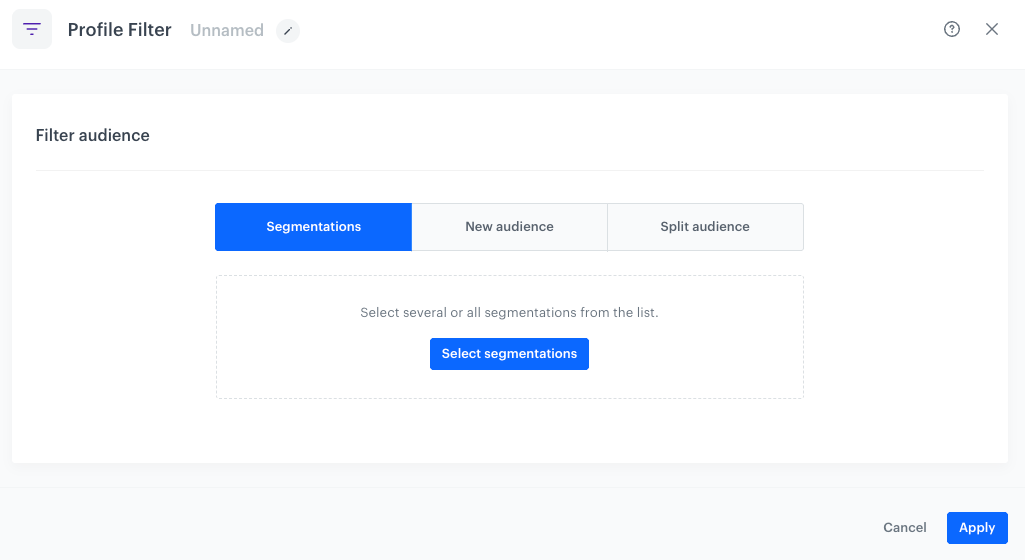
1. To define the node settings, click the node.
**Result**: A pop-up opens.
A blank configuration form of the Profile Filter node
2. Select one of the following tabs:
- **Segmentations** - Choose from the list of existing segmentations. You can select any number of segmentations. When you use this option, the node outputs two paths:
- **If matched** - for profiles that match the conditions of at least one selected segmentation.
- **If not matched** - for profiles that don't match any of the selected segmentations.
- **New audience** - Define a new group of profiles by specifying filter conditions.
- All filter fields that require manual input accept [snippets](/docs/assets/snippets) or [inserts](/developers/inserts). These fields are marked with the icon and it lets you select a snippet.
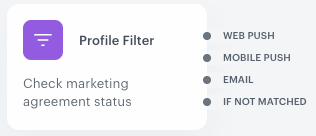
- **Split audience** - When a segmentation includes multitple segments, you can use this option to create separate paths in your workflow for each segment for more granular targeting and actions.
4. Confirm your choice by clicking the **Apply** button.
**Result**:
- if you selected the **Segmentations** or **New audience** tabs:
Profile Filter outputs after selecting segmentations or adding new on the spot
- if you selected the **Split audience** tab:
Profile Filter outputs after selecting the Split audience tab and a segmentation with multiple segments
## Example of use
---
### Regular outputs from the node
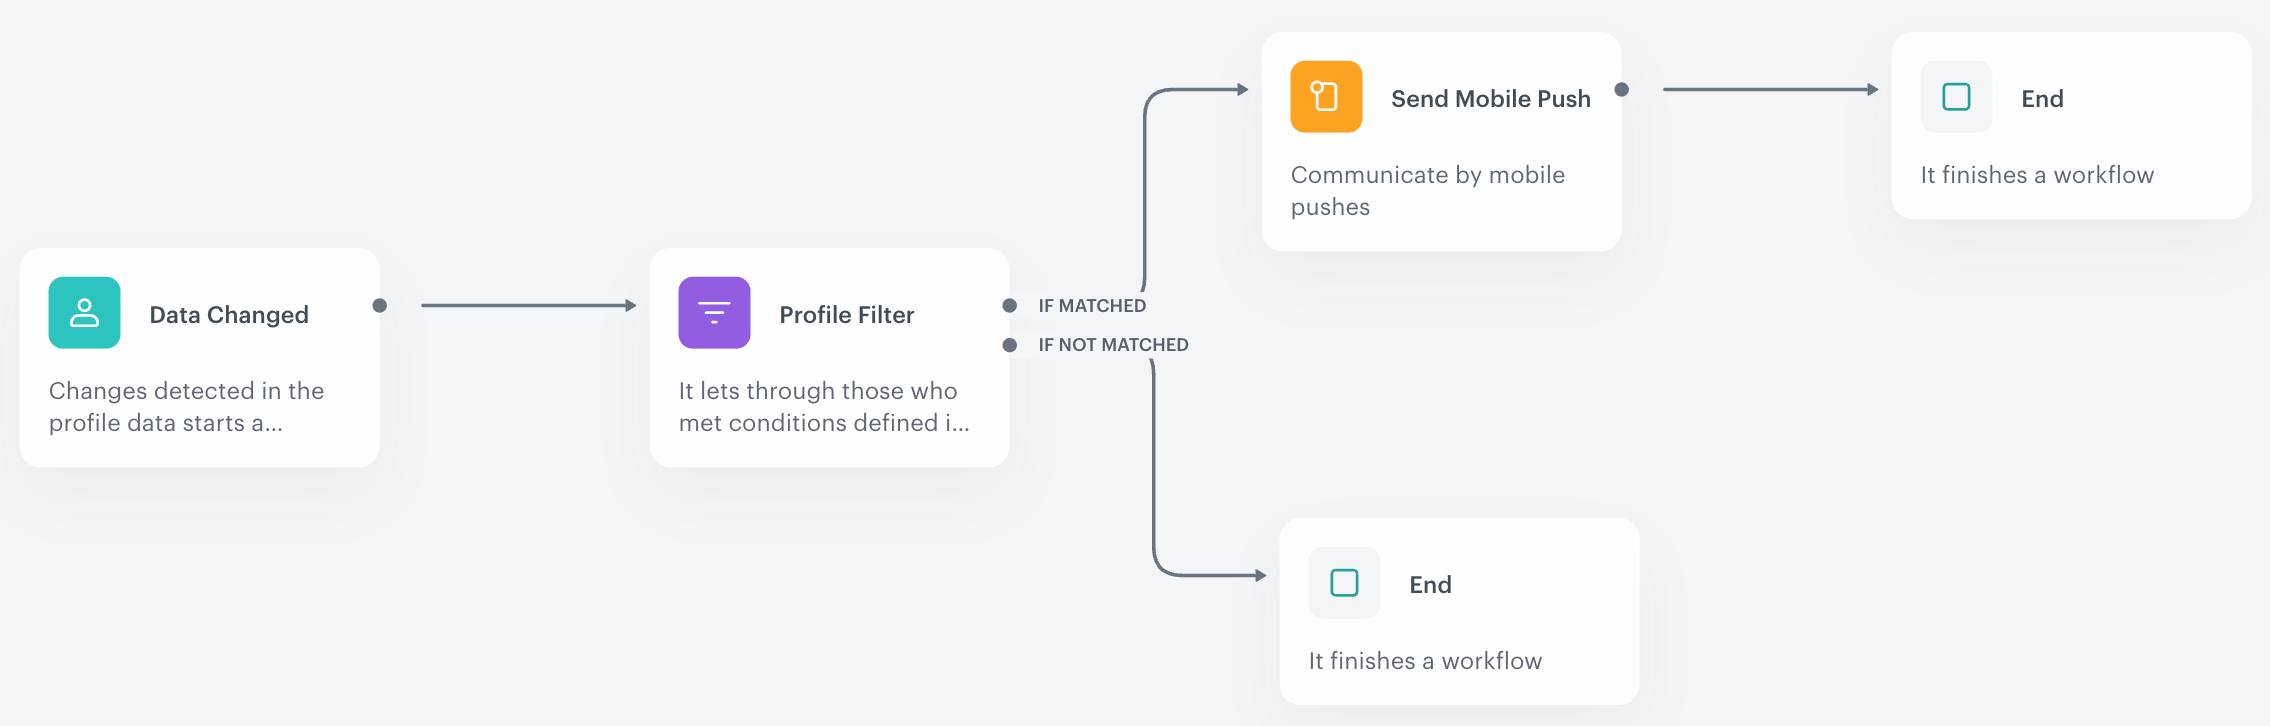
The purpose of this workflow is to send a mobile push notification with a welcome message informing about access to special discount.
1. In the **Data Changed** trigger node, select the event that indicates a change in the subscription status.
2. In the **Profile Filter** condition node, choose a segmentation that groups customers who have recently upgraded their subscription plan.
3. To the **If matched** branch, add the **Send Mobile Push** node.
Customers who belong to this segmentation will receive a mobile push notification introducing the new feature.
4. Add **End** nodes after the **Send Mobile Push** node and to the **If not matched** branch.
**Result**:
Example of a workflow that uses the Profile Filter condition
### Segment branching output from the node
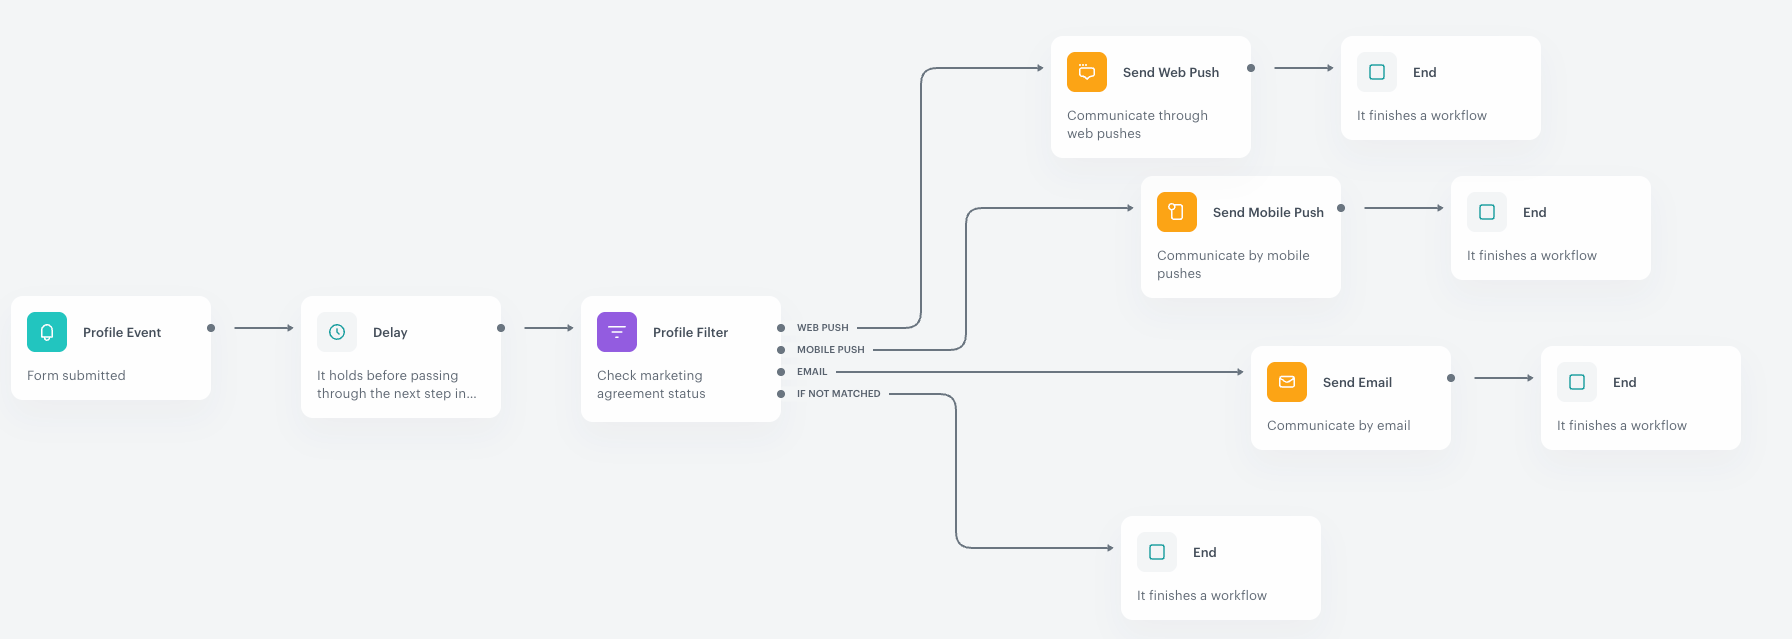
In this example, a workflow is triggered when a customer submits a form. The workflow then checks the customer’s marketing agreements to determine which communication channel can be used to contact them. Based on this, a confirmation message about the form submission is sent through the appropriate channel. If the customer does not have any active marketing agreements, the workflow will end for that individual.
The segmentation used in this example includes three segments: web push, mobile push, and email. Although a customer may have consented to multiple channels, this segmentation has the multi-match option disabled. This means that even if a customer qualifies for more than one segment, they will be assigned to only one segment based on the defined conditions.
1. In the **Profile Event** node, select the event that corresponds to the form submission.
2. In the **Profile Filter** node, go to the **Split audience** tab and choose a segmentation that identifies which communication channel the customer has agreed to receive messages through.
3. For each segment branch, add a node that sends the message through the respective communication channel.
4. Add an **End** node after each message-sending node, as well as after the **If not matched** output branch.
**Result**:
Example of a workflow that uses the Profile Filter with the possibility of segment branching