# Split Path node
Several nodes let you define two workflow paths for the cases when specific conditions are met (for example, [Condition nodes](/docs/automation/conditions)). To increase the number of branches in a diagram among elements, use the **Split Path** node.
When a workflow contains the **Split Path** node, the workflow can branch out up into 5 branches after the **Split Path** node. The nodes that follow the **Split Path** node are executed simultaneously. The process from the branch that first arrives at any **End** node in the workflow stops all the remaining processes in a workflow that are in progress unless you define otherwise in the configuration of the **End** nodes. You can find more information in the documentation of the [End node](/docs/automation/flow-control/end-node).
#### Example
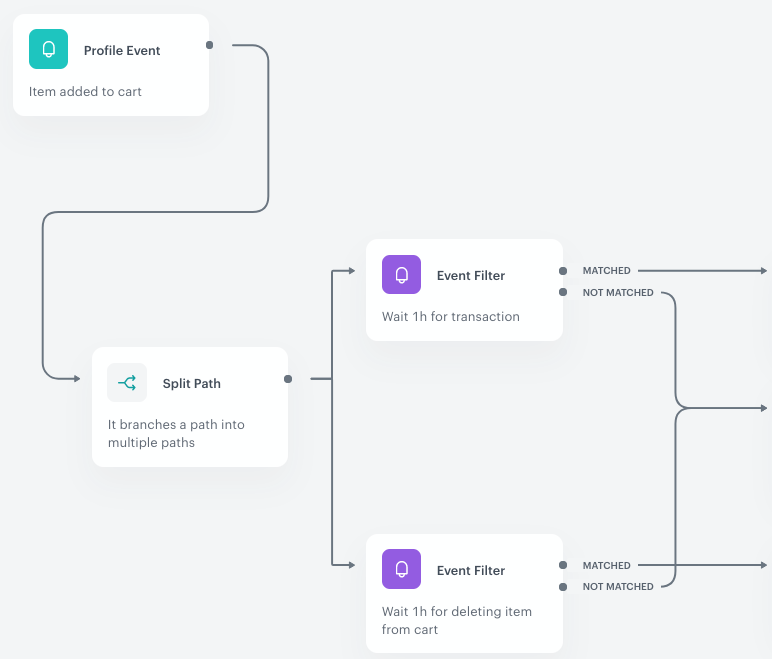
Example of a workflow that uses the Split Path node
In this example, a profile starts a path in a workflow as they add an item to a cart. The path of the workflow splits into two **Event Filters**, which means a profile is in those two nodes at the same time. The workflow waits for the occurrence of two events defined in the **Event Filter** nodes (purchase or deleting an item from the cart) for one hour.
The remaining part of this example is fully described in the [Example of use](#example-of-use) section.
## Node usage in workflow
---
The following instructions explain how to add the **Split Path** node to a workflow diagram. Once added, this node does not require any additional configuration.
1. Click **THEN** on the node after which you want to place the **Split Path** node.
**Result**: A dropdown list opens.
2. From the dropdown list, select **Split Path**.
3. Add nodes (up to 5) to the **Split Path** by clicking the icon.
## Example of use
---
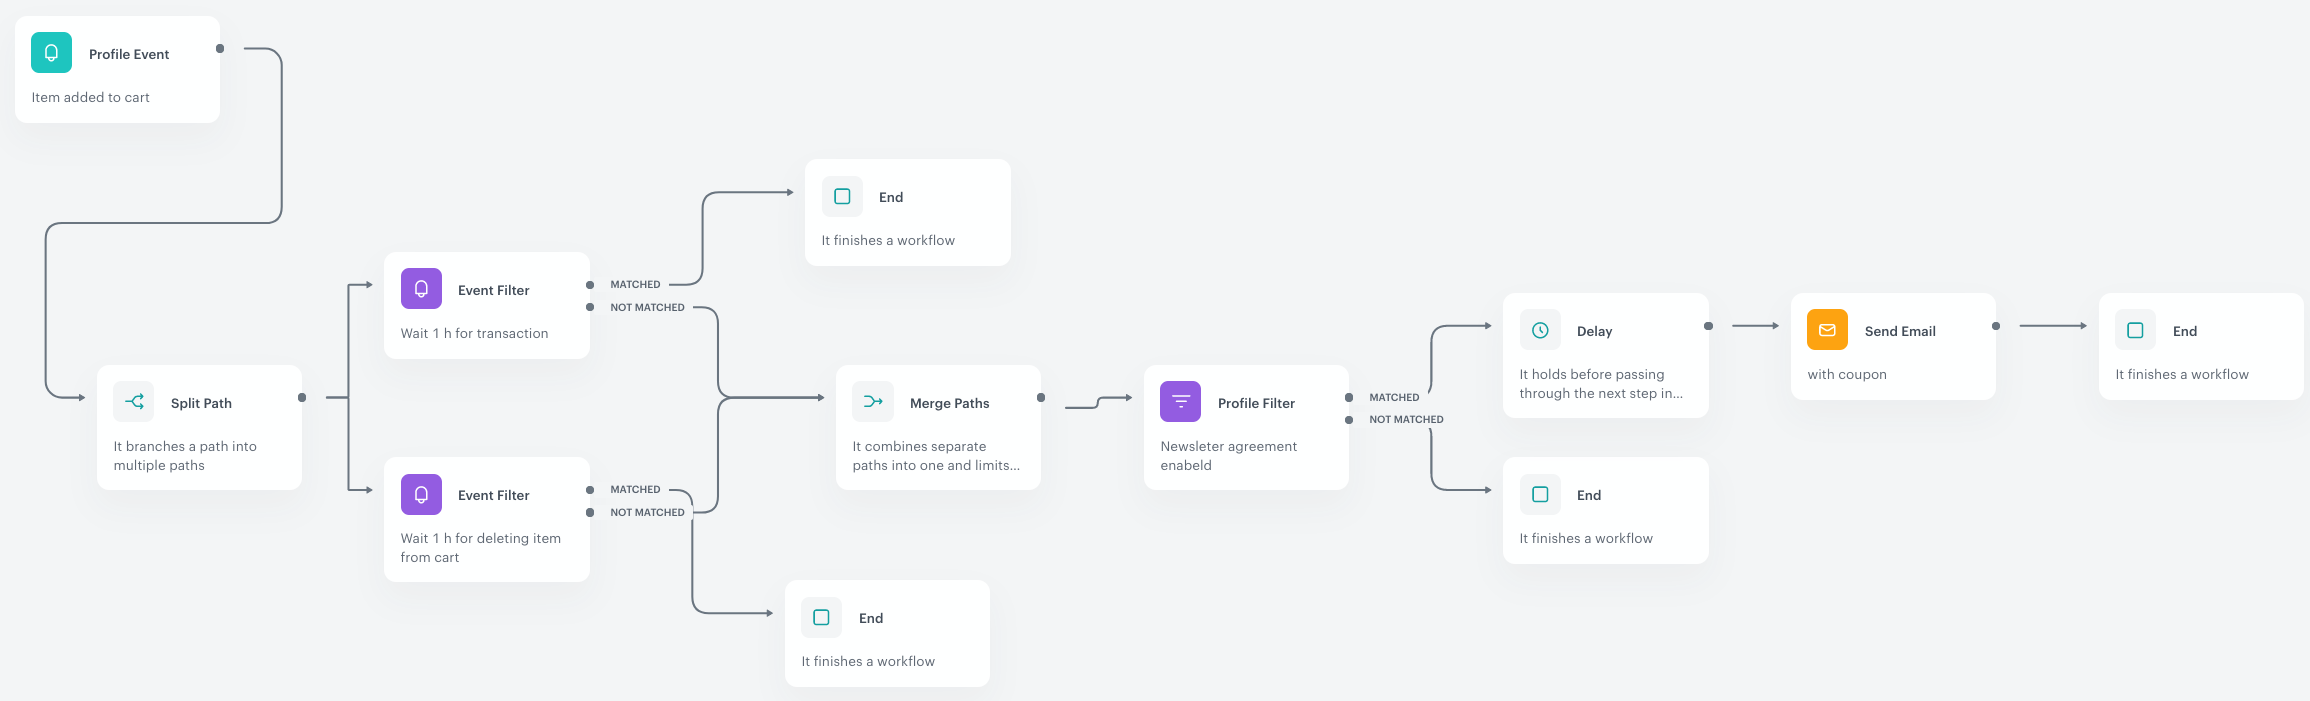
Example of a workflow that uses the Split Path node
In this example, a workflow is launched by adding an item to a cart. The profile who enters this workflow will proceed to both **Event Filter** nodes at the same time, which means waiting for the occurrence of one of two events (purchase or deleting an item from the cart). If the customer completes the transaction and their marketing agreement is enabled, an email with coupon is sent after 5 minute delay. In other cases such as abandoning the cart or deleting items from the cart, the workflow is finished.
This workflow has two **Event Filter** nodes after the **Split Path** node. If the conditions of both filters are met within the allowed time range, the nodes that come after each **Event Filter** might be executed more than once. That is why managing limits (in this example, limits of [Merge Paths node](/docs/automation/flow-control/merge-paths-node) and workflow capping) and/or defining terminating all [remaing paths](/docs/automation/introduction-to-automation#workflow-and-path) of the workflow in the **End** node is crucial for the successful implementation of business assumptions within the workflow, ensuring that no errors or edge cases occur. More information about Automation Hub limits is available in the [Limits](/docs/automation/automation-capping) article.
1. Add a **Profile Event** trigger node. In the settings of the trigger node, select the event that signifies adding a product to the cart.
2. Add the **Split Path** node.
2. Add two **Event Filter** nodes. In the configuration of these nodes, define the following conditions:
- Wait for an hour for the transaction event
- Wait for an hour for the event of deleting items from the cart
3. At the **Matched** paths of both event filters, add **End** nodes.
3. Add the **Merge Paths** node to the **Not matched** path of one of the event filters and then connect the **Not matched** path of the other filter to this node.
If any of the filter conditions is met, the workflow ends. If any filter is not matched, the customer proceeds to the next step of the workflow, the Merge Paths node. It's possible for both filters to not be matched, which activates the Merge Paths node twice. This may result in executing the defined actions twice towards the customer. To prevent this, set a limit in the configuration form of the Merge Paths node.
3. After the **Merge Paths** node, add the **Profile Filter** node. In the conditions of the node, set the marketing agreement to `enabled`.
5. To the **Not matched** path, add the **End** node.
4. To the **Matched** path, add the **Delay** node.
9. In the configuration of the **Delay** node, define the length of the delay period.
8. After the **Delay** node, add **Send Email**.
6. Configure the settings of the **Send Email** node according to instructions available in the [Send Email node](/docs/automation/actions/send-email) article.
7. After the **Send Email** node, add the **End** node.