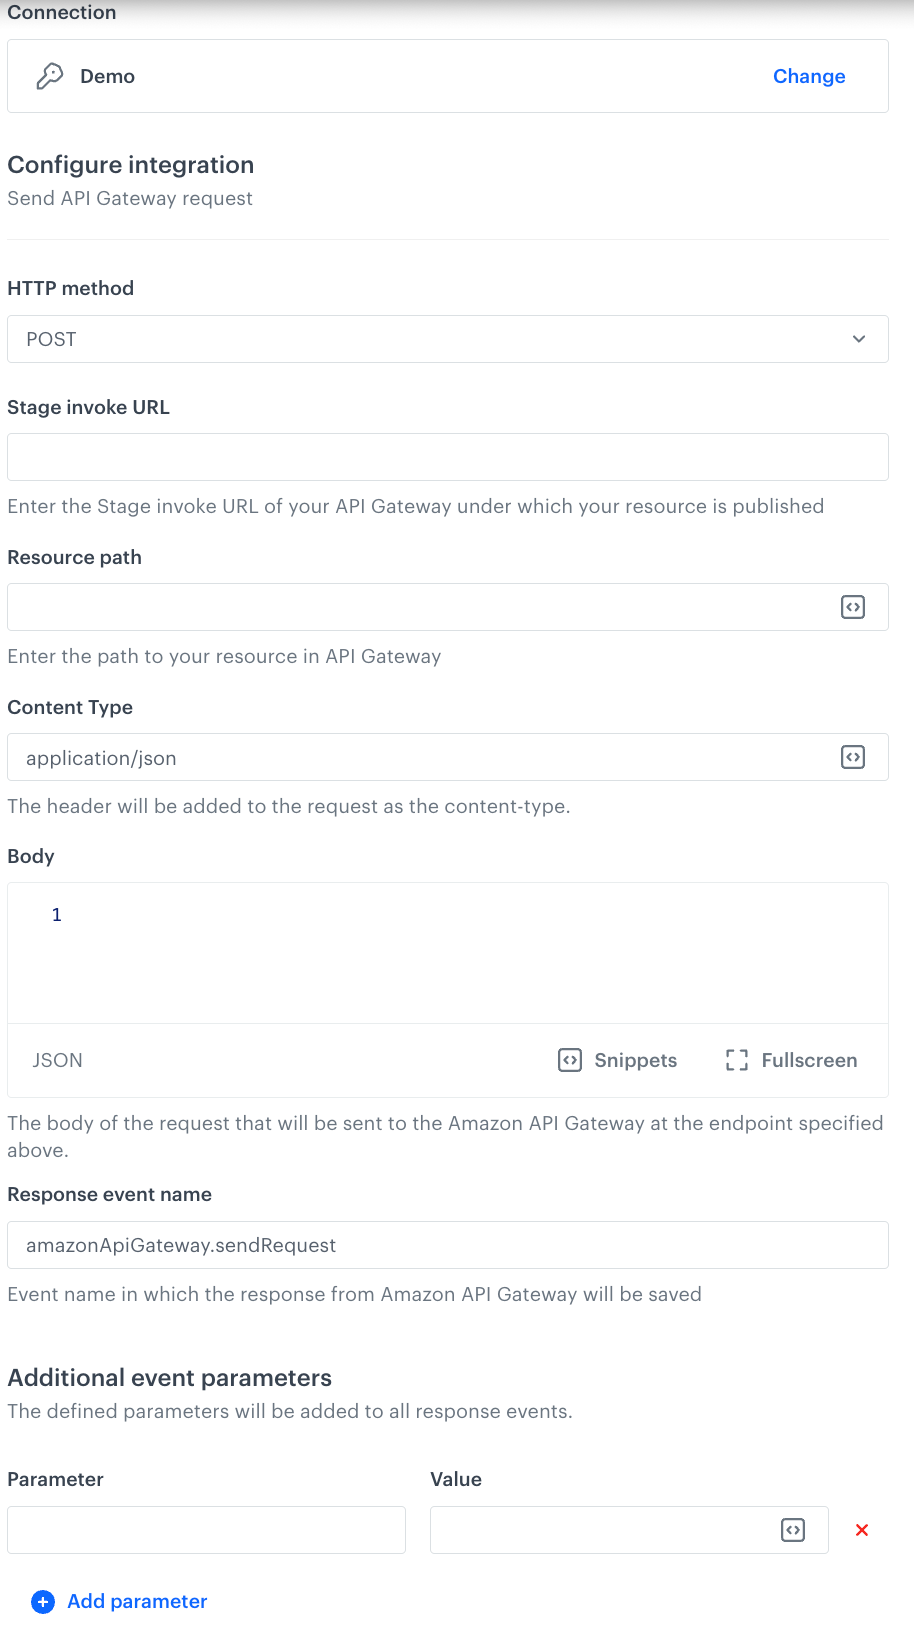
Amazon API Gateway allows developers to create, publish, maintain, and secure APIs at any scale. By integrating with a specific endpoint, users can trigger AWS Lambda functions, forward message to Amazon SQS, interact with backend services, or access AWS resources through an HTTP request. The integration between Synerise and Amazon API Gateway allows you to send any requests from Synerise.

This node can be used in customer-oriented and business workflows. A reponse from the endpoint generates the [`amazonApiGateway.sendRequest` event](/docs/assets/events/event-reference/integration#amazonapigatewaysendrequest). The name of the event is customizable in the configuration form of this node.


## Prerequisites
---
- [Set up API keys using the API Gateway console - Amazon API Gateway](https://docs.aws.amazon.com/apigateway/latest/developerguide/api-gateway-setup-api-key-with-console.html).

## Node configuration
---
1. To create a workflow that sends a request to Amazon API Gateway, go to **Automation Hub > Workflows > New workflow**.  
2. Start the workflow with a trigger node, (for example, ["Scheduled Run" node](/docs/automation/triggers/scheduled-run)).
3. On the trigger node, click **THEN**.
1. Click **Amazon API Gateway > Send request**. 
2. Click **Select connection**.  
3. From the dropdown list, select the connection.  
   - If no connections are available or you want to create a new one, see [Create a connection](#create-a-connection).
   - If you selected an existing connection, proceed to [defining the integration settings](#define-the-integration-settings).

### Create a connection
To allow the data exchange, establish a connection between Synerise and Amazon API Gateway.  

1. At the bottom of the **Select connection** dropdown list, click **Add connection**.  
2. In the **Connection name** field, enter the name of the connection.  
    It will only be visible on the list of connections and will help you recognize it on the list.
2. In the **API key** field, enter your Amazon API key which lets you receive external requests.
3. Confirm by clicking **Apply**.

### Define the integration settings
In this step, fill in the form that allows you to send data from Synerise to Amazon API Gateway.  

<figure><img src="/api/docs/image/54176ad07f146575310749eba44b7c2f42c1b327/docs/automation/_gfx/api-gateway-request-node.png" class="large" alt="Blank configuration form of the Send request node"><figcaption>Blank configuration form of the Send request node</figcaption></figure>  


<div class="admonition admonition-note"><div class="admonition-icon"><svg xmlns="http://www.w3.org/2000/svg" fill="none" viewBox="0 0 24 24" stroke="currentColor" stroke-width="2.5"><path stroke-linecap="round" stroke-linejoin="round" d="M13 16h-1v-4h-1m1-4h.01M21 12a9 9 0 11-18 0 9 9 0 0118 0z" /></svg></div><div class="admonition-body"><div class="admonition-content">

Fields marked with the <img src="/api/docs/image/54176ad07f146575310749eba44b7c2f42c1b327/icons/snippet-icon.png" alt="Snippet icon" class="icon" > icon accept [snippets](/docs/assets/snippets) or [inserts](/developers/inserts). This integration allows usage of profile-related inserts.

</div></div></div>


1. Select a **HTTP method** from the dropdown list.
2. In the **Stage invoke URL** field, enter the URL of your API Gateway under which your resource is published.
    This is the base URL used to invoke your deployed API at a specific stage (for example, dev, prod). It’s the entry point for calling your API, the resource path is added in the next field. Example value: `https://abc123.execute-api.us-east-1.amazonaws.com/prod`
3. In the **Resource path** field, enter the path which is added to the stage URL to access a particular resource or endpoint.   
    Example values: `/users/create`; `/orders/{orderId}`
4. In the **Content Type** enter the value of the Content-Type header.
5. In the **Body** field, enter the request body.
2. In the **Response event name** field, enter the event name in which the response to the requests will be saved. By default, it's [`amazonApiGateway.sendRequest`](/docs/assets/events/event-reference/integration#amazonapigatewaysendrequest). We recommend customizing the event name per each business case.
    The event will be generated only for the customer-oriented workflows on the profile cards of the customers who participated in the workflow.
3. In the **Additional event parameters** section, you can add parameters (key-value) which will be added to the event with the request response. It should be noted that:
    - You can add up to 10 parameters
    - The parameter name cannot exceed 128 characters
    - The parameter name cannot contain special characters

4. Confirm by clicking **Apply**.  
    **Result**: When the Send Request node is executed, an [`amazonApiGateway.sendRequest` event](/docs/assets/events/event-reference/integration#amazonapigatewaysendrequest) (or an event with the custom name defined in the **Response event name** field) is generated on the activity list of the profile who is the actor in the workflow.

### Test integration
---

You can run a test request. If the request body contains a dynamic reference to a profile attribute and/or an event data from preceding nodes, then you can define the context using [test profile data](/docs/settings/configuration/test-profiles). 


<div class="admonition admonition-note"><div class="admonition-icon"><svg xmlns="http://www.w3.org/2000/svg" fill="none" viewBox="0 0 24 24" stroke="currentColor" stroke-width="2.5"><path stroke-linecap="round" stroke-linejoin="round" d="M13 16h-1v-4h-1m1-4h.01M21 12a9 9 0 11-18 0 9 9 0 0118 0z" /></svg></div><div class="admonition-body"><div class="admonition-content">

Complete description of the feature is available in [Testing outgoing integrations](/docs/automation/test-requests-for-outgoing-integrations).

</div></div></div>


1. In the **Test integration** section, click **Send test request**.  
    **Result**: A test request builder opens. If:
    - a request body contains dynamic references, the request preview appears after you select the context of test profiles and events.
    - a request body contains static data, the preview of the body request appears immediately.
    <figure><img src="/api/docs/image/54176ad07f146575310749eba44b7c2f42c1b327/docs/automation/_gfx/test-request-builder-empty.png" class="large" alt="An empty test request builder"><figcaption>An empty test request builder</figcaption></figure>
2. If your request contains dynamic references (otherwise, the options aren't available):   
    - From the **Test profile** dropdown, select a test profile in the context of whom the test request will be performed.  
    - From the **Event context** dropdown list, you can select a particular occurrence of an event  whose values/information will be used for the test request.  
        1. Select a test profile.  
            **Result**: A history of test profile events appears.  
            <figure><img src="/api/docs/image/54176ad07f146575310749eba44b7c2f42c1b327/docs/automation/_gfx/event-stream-test-profile.png" class="large" alt="A stream of events of a test profile"><figcaption>A stream of events of a test profile</figcaption></figure> 
        2. From the list of events, select one whose data you want use as a context. If there is no event you can use, in the upper-right corner of the pop-up, click **Define own event** and provide the body of the event.
        3. Confirm by clicking **Apply**. 
3. Verify the request body. If there is something you want to change, come back to the node settings from previous steps.  
3. If the request body is ready to test, in the upper-right corner, click **Send request**.  
    **Result**: The response section appears and the **Update response event** button becomes active.  
4. Optionally, you can update response event with new parameters by clicking **Update response event** in the upper-right corner.

## Example of use
---

In this example, let's assume you already have your own email marketing tool, and Synerise serves as your primary data hub. By using real-time customer segmentation and analytics in Synerise and your email tool, you can benefit from both systems through the integration of Synerise and this tool via Amazon API Gateway.

The workflow will start at the defined date for selected group of customers. Information about these customers will be retrieved by the **Send request** node and exported to Amazon API Gateway. Jinjava will retrieve parameter values for each customer.

The data after sending the request will be available in Amazon SQS for further use in the Amazon email marketing tool.


1. Start with the **Audience** node.  
2. In the configuration of the node: 
    1. In the **Run trigger** section define the frequency and/or date and time when this node will be triggered.  
    2. In the **Define audience** section, select an existing segmentation (the **Segments** tab) or define the conditions a customer must meet to be included in the node (the **New audience** tab).  
    3. Confirm the settings by clicking **Apply**.  
3. Add the **Send request** node. In the configuration of the node, fill out the fields according to the instructions in the ["Node configuration" section](#node-configuration).  
    Below, you can find an example request body:  
    
   <pre><code class="language-json">{
     "firstName": "{% customer firstname %}",
     "email": "{% customer email %}",
     "lastPurchasedItem": "{% aggregate %} UUID {% endaggregate %}"
   }</code></pre>

    The values of these parameters will be replaced with the data of customers who arrive at the **Send request** node. The value of the `lastPurchasedItem` parameter is the result of an aggregate which returns the name of the last purchased item by the customer.  
4. Finish the node by adding the **End** node.  
    **Result**: 
    <figure><img src="/api/docs/image/54176ad07f146575310749eba44b7c2f42c1b327/docs/automation/_gfx/amazon-send-request-example.png" class="full" alt="Final workflow configuration"><figcaption>Final workflow configuration</figcaption></figure> 


