The following instructions will show you how to configure a native integration with Google Ads that lets you remove customers stored in Google Ads customer list.
Depending on the configuration of the **Scheduled Run** trigger, you may create different types of workflows that remove customers from the customer lists:
- **one time** that removes a single set of customers from the Google Ads list on demand,
- **cyclical** that runs periodically.
Taking the above into account, you may remove contacts that belong to the specific [segmentation](/docs/automation/actions/synerise-integrations/get-profiles), a [static file with contacts](/docs/automation/operation/local-file-node) or contact list fetched from [the external service](/docs/automation/integration).
## Prerequisites
---
Access to a Google Ads Account that meets the requirements to access [Customer Match](https://support.google.com/adspolicy/answer/6299717).
## Node configuration
---
1. To create a workflow that lets you remove customers from the customer list in Google Ads, go to Automation Hub > Workflows > New workflow.
2. Select one of the business trigger nodes, for example [Scheduled Run](/docs/automation/triggers/scheduled-run).
3. Click **THEN > Google Ads > Remove From Customer List**.
2. Familiarize yourself with the required data to be provided, then click **Next**.
3. Click **Select connection**. From the dropdown list, select the connection.
- If no connections are available or you want to create a new one, see [Create a connection](#create-a-connection).
- If you selected an existing connection, proceed to [defining the integration settings](#define-the-integration-settings).
### Create a connection
To allow the data exchange, establish a connection between Synerise and Google Ads.
1. At the bottom of the **Select connection** dropdown list, click **Add connection**.
2. On the pop-up, click **Sign in with Google**.
3. Select a Google Ads Account that meets the requirements to access [Customer Match](https://support.google.com/adspolicy/answer/6299717).
4. Follow the instructions on the interface.
5. After the successful authentication, click **Next**.
6. In the **Connection name** field, enter the name of the connection.
It's used to find the connection on the list.
7. Click **Apply**.
**Result**: A connection is created and selected.
### Define the integration settings
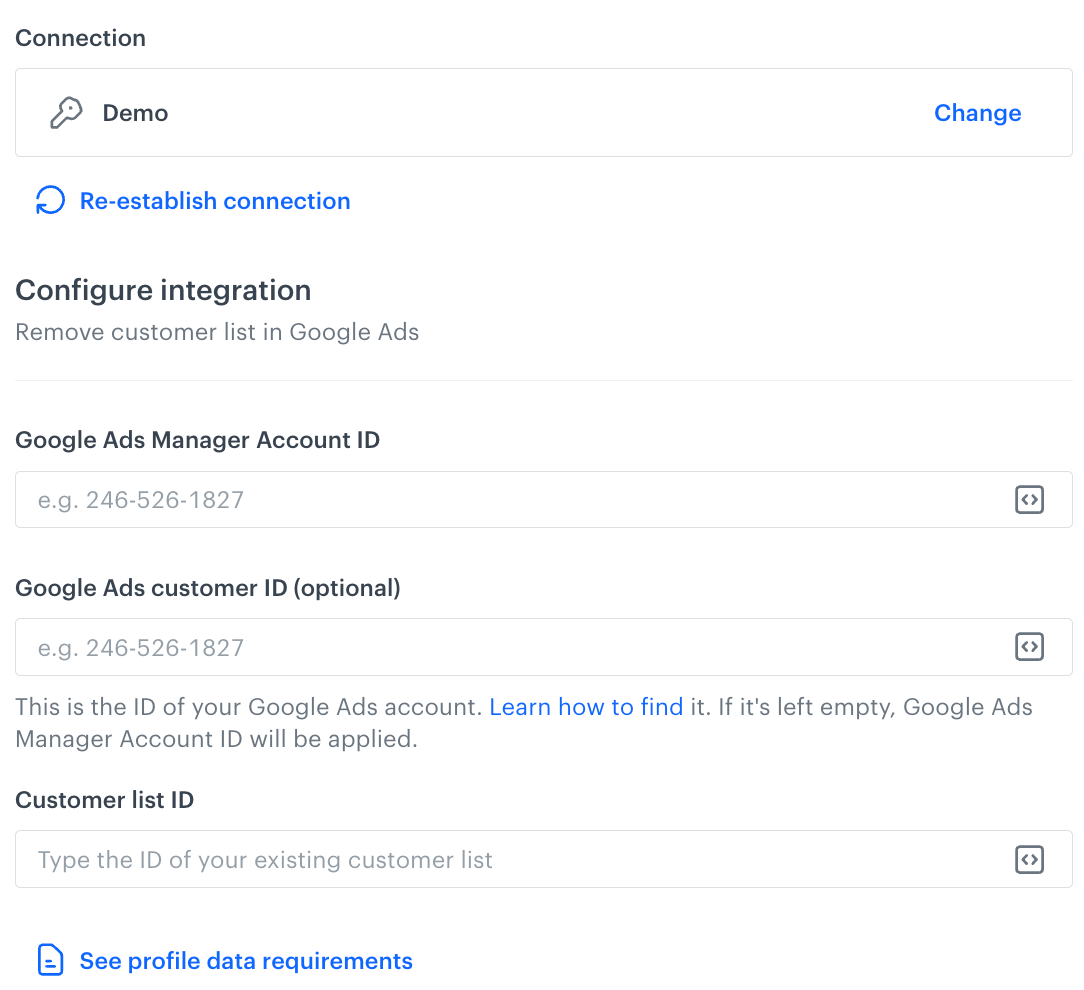
In this step, fill in the form that allows you to remove customers from the Google Ads customer list.
A blank configuration form in Remove from New Customer List (Google Ads)
Fields marked with the icon accept [snippets](/docs/assets/snippets) or [inserts](/developers/inserts). But, you can’t use profile-related inserts.
1. In the **Google Ads Manager Account ID** field, provide the manager account number.
2. In the **Google Ads customer ID (optional)** field, provide the number of your Google Ads account. If it's left empty, Google Ads Manager Account ID will be applied. Learn how to find a [Google Ads customer ID](https://support.google.com/google-ads/answer/1704344).
3. In the **Customer list ID** field, enter the identifier of the customer list from which would like to remove customers.
4. Confirm by clicking **Apply**.
## Example of use
---
The workflow demonstrates the process of removing customers from Google Ads customer list. Initially, a static file containing the customer list is provided to the workflow. Next, the file is sent to the Google Ads list, from which the listed customers will be deleted.
### Prerequisites
1. [A customer list must exist in your Google Ads account](https://support.google.com/google-ads/answer/6276125?hl=en).
2. Create a file with customers to be removed. The file must meet the following formatting guidelines in order to be accepted.
- the file must be in the CSV format with comma-separated values,
- the file must contain one of the required ID listed below:
- **Email address matching**: Use `Email` as the column header name in your data file.
- **Phone matching**: Use `Phone` as the column header name in your data file.
- **Mobile Device ID matching**: Use `mobileDeviceId` as the only column header in your data file.
Regardless of the method of providing a file (using local file to export contacts or [fetching contacts from the specific segmentation](/docs/automation/actions/synerise-integrations/get-profiles)), you may use [Data Transformation rules](/docs/automation/data-transformation-and-imports/creating-data-transformation) to adjust your file to the required specification, for example by changing column names.
### Process
Create a one-time workflow that sends the file with contacts to the customer list in Google Ads.
1. Start the workflow with the **Scheduled Run** node. In the configuration of the node:
1. Set the **Run trigger** option to **one time**.
2. Select the **Immediately** tab.
2. As the next node, select **Local File**. In the configuration of the node:
1. Upload the file.
2. Confirm by clicking **Apply**.
4. To send the file with customers data, add **Google Ads > Remove From Customer List**. Fill in the configuration form in the node.
5. Add the **End** node.
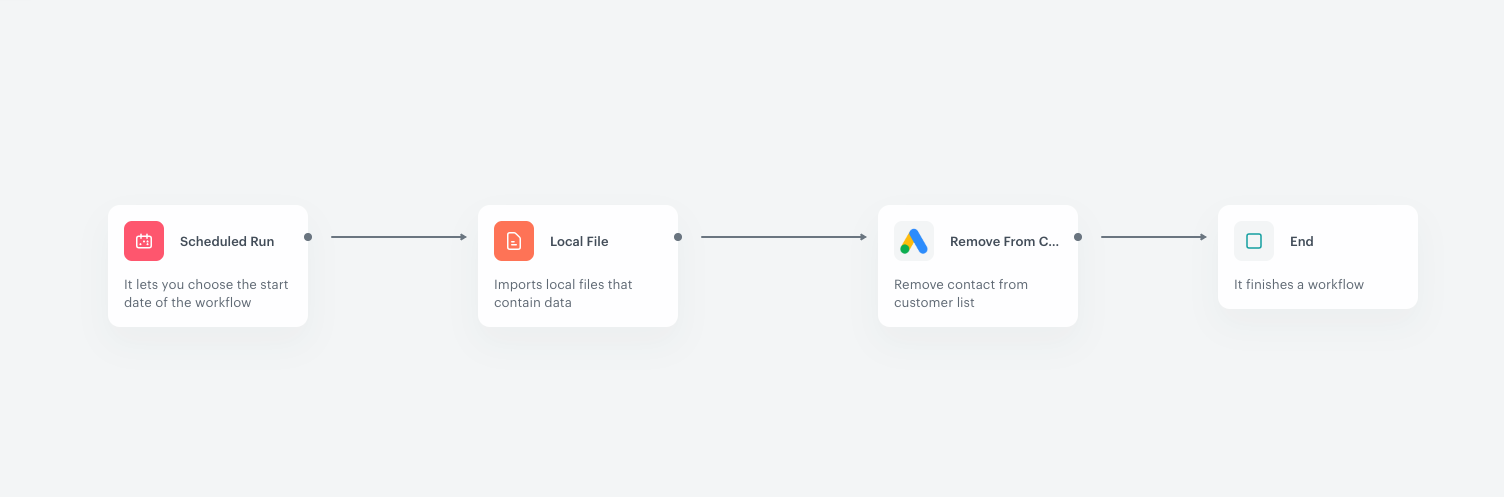
**Result**:
Final configuration of the workflow