
In Synerise, you can collect information about offline conversion after clicking an ad and send such data to Google Ads. This way, you can get the full picture of customer journey and find out who sees ads online but ultimately completes an offline transaction with your business by buying after visiting your brick and mortar shop or speaking with a salesperson by phone.


<div class="admonition admonition-note"><div class="admonition-icon"><svg xmlns="http://www.w3.org/2000/svg" fill="none" viewBox="0 0 24 24" stroke="currentColor" stroke-width="2.5"><path stroke-linecap="round" stroke-linejoin="round" d="M13 16h-1v-4h-1m1-4h.01M21 12a9 9 0 11-18 0 9 9 0 0118 0z" /></svg></div><div class="admonition-body"><div class="admonition-content">

You define what conversion is, it may be a purchase but also submitting a form, and so on.

</div></div></div>


Through the **Send Offline Conversion** node, you will send the following data to Google Ads:
- the ID of your Google Ads account,
- the value of the `gclid` parameter - In order to send the value of the `gclid` parameter for each profile who will go through a workflow, you can extract it from the `page.visit` event by [an expression](#create-an-expression) and then [an aggregate](#create-an-aggregate) which extracts the `gclid` value from the `page.visit`. 
- the conversion action ID, 
- the date when the conversion occurred,
- the value of the conversion for the advertiser (optional),
- currency (optional).


## Prerequisites
---
- [Implement SDK to a website](/developers/web/installation-and-configuration) to which a profile is referred after clicking the ad.
- [Implement sending events about completing offline conversion](https://developers.synerise.com/DataManagement/DataManagement.html#operation/CustomEvent).
- Create a Google Ads account.
- Launch an ad campaign through Google Ads.


## Create an expression
---
In this part of the process, you can create an [event expression](/docs/analytics/expressions/creating-event-expression) for the page.visit event (an event generated after a visit of a profile to the website) to extract the `gclid` parameter from the URL of visited website. After saving the expression, it becomes a parameter of the `page.visit` event, which can be used while creating other analyses. This expression will be used in the [next part of the process](#create-an-aggregate) in which the value of the `gclid` parameter will be retrieved from the specific `page.visit` event.

1. Go to <img src="/api/docs/image/54176ad07f146575310749eba44b7c2f42c1b327/icons/behavioral-data-hub-icon.svg" alt="Behavioral Data Hub icon" class="icon"> **Behavioral Data Hub > Expressions > New expression**.  
2. Enter the name of the expression.  
3. Set the **Expression for** option to **Event**.  
4. From the **Choose event** dropdown list, select an event generated after a visit to the page.
5. In the **Formula definition** dashboard, click **Select**.  
6. From the dropdown list, select **Functions > Regexp**.  
7. Click the left **Select** node.  
8. From the dropdown list, select **Event attribute**.  
9. Click the **Unnamed** node.  
10. From the **Choose parameter** dropdown list, select the parameter that signifies URL address.
11. Click the right **Select** node.  
12. From the dropdown list, select **Constant**.  
13. Click the **0** node.  
14. In the text field, enter the following formula: `(?<=gclid=)(.+?)(?=$)`
    <figure><img src="/api/docs/image/54176ad07f146575310749eba44b7c2f42c1b327/use-cases/all-cases/_gfx/gclid-expression.png" class="full" alt="The configuration of the expression that retrieves the value of gclid parameter from the URL"><figcaption>The configuration of the expression that retrieves the value of gclid parameter from the URL</figcaption></figure>
15. Click **Publish**.


## Create an aggregate
---
In this part of the process, you can create an aggregate that retrieves the value of the `gclid` parameter from the latest page visit to your website. This way, you can inject the result of the aggregate in the form of a Jinjava tag in step 2 in the [Define the integration settings](#define-the-integration-settings) in which you must provide the value of the `gclid` parameter. 

1. Go to <img src="/api/docs/image/54176ad07f146575310749eba44b7c2f42c1b327/icons/behavioral-data-hub-icon.svg" alt="Behavioral Data Hub icon" class="icon"> **Behavioral Data Hub > Live Aggregates > Create aggregate**.  
2. Enter the name of the aggregate.  
3. Set the **Aggregate** option to **Last**.  
    
   <div class="admonition admonition-note"><div class="admonition-icon"><svg xmlns="http://www.w3.org/2000/svg" fill="none" viewBox="0 0 24 24" stroke="currentColor" stroke-width="2.5"><path stroke-linecap="round" stroke-linejoin="round" d="M13 16h-1v-4h-1m1-4h.01M21 12a9 9 0 11-18 0 9 9 0 0118 0z" /></svg></div><div class="admonition-body"><div class="admonition-content">

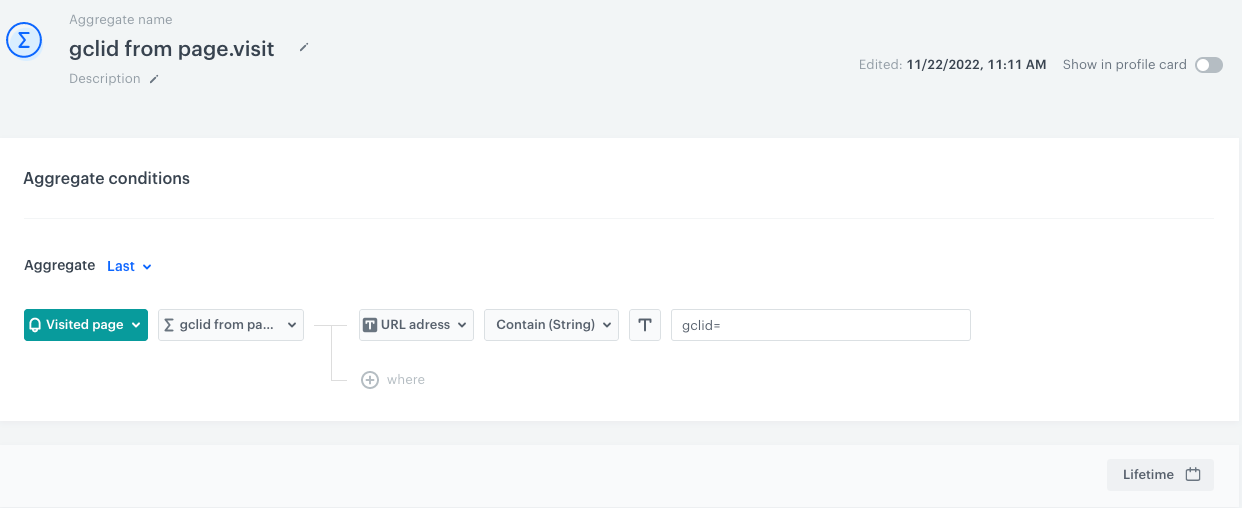
   The choice of an aggregator depends on your business needs. The aggregator you choose in this step will define which clicked ad you will attribute the conversion to. For example, by selecting the **Last** aggregator, the conversion will be attributed to the last ad clicked before the conversion. You can additionally modify the conditions of the aggregate by specifying a specific time period or date of a specific event.

   </div></div></div>


4. From the **Choose event** dropdown list, select an event generated after a visit to the page.
5. From the **Choose parameter** dropdown list, click <img src="/api/docs/image/54176ad07f146575310749eba44b7c2f42c1b327/icons/threedoticon.png" alt="Three dot icon" class="icon" > **> Expressions** and select [the expression you created in the previous part of the process](#create-an-expression).
6. Click **+ where**.  
7. From the **Choose parameter** dropdown list, select the parameter that signifies URL address.  
8. As the logical operator, select **Contain (String)**.  
9. In the text field, enter `gclid=`.
10. In the right bottom corner, click the calendar icon and set the date range to **Lifetime**.  
    <figure><img src="/api/docs/image/54176ad07f146575310749eba44b7c2f42c1b327/use-cases/all-cases/_gfx/gclid-aggregate.png" class="full" alt="The configuration of the aggregate that retrieves the value of gclid parameter from the latest visit to the page"><figcaption>The configuration of the aggregate that retrieves the value of gclid parameter from the latest visit to the page </figcaption></figure>
11. Click **Save**. 


## Node configuration
---

1. Click **Google Ads > Send Offline Conversion**. 
2. Click **Select connection**.  
3. From the dropdown list, select the connection.  
   - If no connections are available or you want to create a new one, see [Create a connection](#create-a-connection).
   - If you selected an existing connection, proceed to [defining the integration settings](#define-the-integration-settings).

### Create a connection
To allow the data exchange, establish a connection between Synerise and Google Ads.  

1. At the bottom of the **Select connection** dropdown list, click **Add connection**.  
2. On the pop-up, click **Sign in with Google**.
3. Select a Google account which has access to the Google Ads account that you want to use.
4. Follow the instructions on the interface.
5. After successful authentication, click **Next**.  
6. In the **Connection name** field, enter the name of the connection.  
    It's used to find the connection on the list.
7. Click **Apply**.  
        **Result**: A connection is created and selected. 


### Define the integration settings  

<figure><img src="/api/docs/image/54176ad07f146575310749eba44b7c2f42c1b327/docs/automation/_gfx/google-ads-send-offline-transactions.png" class="medium" alt="A blank configuration form in Send Offline Conversion"><figcaption>A blank configuration form in Send Offline Conversion (Google Ads)</figcaption></figure>  


<div class="admonition admonition-note"><div class="admonition-icon"><svg xmlns="http://www.w3.org/2000/svg" fill="none" viewBox="0 0 24 24" stroke="currentColor" stroke-width="2.5"><path stroke-linecap="round" stroke-linejoin="round" d="M13 16h-1v-4h-1m1-4h.01M21 12a9 9 0 11-18 0 9 9 0 0118 0z" /></svg></div><div class="admonition-body"><div class="admonition-content">

Fields marked with the <img src="/api/docs/image/54176ad07f146575310749eba44b7c2f42c1b327/icons/snippet-icon.png" alt="Snippet icon" class="icon" > icon accept [snippets](/docs/assets/snippets) or [inserts](/developers/inserts). This integration allows usage of profile-related inserts.

</div></div></div>


1. In the **Google Ads customer ID** field, enter the number of the Google Ads account. It can't contain dashes. [Learn how to find this number](https://support.google.com/google-ads/answer/1704344?hl=en).
2. In the **The Google click ID (GCLID) associated with this conversion** field, enter the part of the URL that starts with `?gclid=`.  
    For that purpose, you can enter a Jinjava tag that inserts the value of the [aggregate you created in the previous part of the process](#create-an-aggregate): `{% aggregate AGGREGATE_ID %}{{ aggregate_result[0] }}{% endaggregate %}`. Replace the `AGGREGATE_ID` with an actual ID of the aggregate, you can find it in the URL while previewing the aggregate.
5. In the **Conversion action ID** field, enter the ID of the conversion. You can find it in the Google Ads panel. When you go to conversion action details, the URL contains the “ctld” parameter (for example, “ctId=123456789") whose value is the conversion action ID. [Learn more about conversion action in Google Ads](https://support.google.com/google-ads/answer/6032150?hl=en).
6.  In the **Conversion time** field, enter the time of the conversion in the following format: `yyyy-mm-dd hh:mm:ss+|-hh:mm`.  
    For that purpose, you can use [a Jinjava code](/developers/inserts/automation) that inserts date of conversion dynamically. For example, `{{ event.params.time|timestamp_to_time|datetimeformat('%y-%m-%d %H:%M:%S+2:00') }}`.
    
7. Optionally, in the **Conversion value** field, enter the value. For that purpose, you can use [a Jinjava code](/developers/inserts/automation) that inserts the value dynamically.
8. Optionally, in the **Currency of the conversion value** field, enter the currency. For that purpose, you can use [a Jinjava code](/developers/inserts/automation) that inserts the value dynamically.
9. In **Customer match consent import script**, provide a static value (`GRANTED`, `DENIED`, `UNSPECIFIED`, `UNKNOWN`) or a Jinjava code that retrieves a consent value from your database.
10. In **Ad Personalization consent import source**, provide a static value (`GRANTED`, `DENIED`, `UNSPECIFIED`, `UNKNOWN`) or a Jinjava code that retrieves an ad personalization consent value from your database.
9. Confirm the settings by clicking **Apply**.  
    **Result**:  When the Send Offline Conversion node is executed, a [`googleAds.sendOfflineConversion` event](/docs/assets/events/event-reference/integration#googleadssendofflineconversion) is generated on the activity list of the profile who is the actor in the workflow.

### Test integration
---

You can run a test request. If the request body contains a dynamic reference to a profile attribute and/or an event data from preceding nodes, then you can define the context using [test profile data](/docs/settings/configuration/test-profiles). 


<div class="admonition admonition-note"><div class="admonition-icon"><svg xmlns="http://www.w3.org/2000/svg" fill="none" viewBox="0 0 24 24" stroke="currentColor" stroke-width="2.5"><path stroke-linecap="round" stroke-linejoin="round" d="M13 16h-1v-4h-1m1-4h.01M21 12a9 9 0 11-18 0 9 9 0 0118 0z" /></svg></div><div class="admonition-body"><div class="admonition-content">

Complete description of the feature is available in [Testing outgoing integrations](/docs/automation/test-requests-for-outgoing-integrations).

</div></div></div>


1. In the **Test integration** section, click **Send test request**.  
    **Result**: A test request builder opens. If:
    - a request body contains dynamic references, the request preview appears after you select the context of test profiles and events.
    - a request body contains static data, the preview of the body request appears immediately.
    <figure><img src="/api/docs/image/54176ad07f146575310749eba44b7c2f42c1b327/docs/automation/_gfx/test-request-builder-empty.png" class="large" alt="An empty test request builder"><figcaption>An empty test request builder</figcaption></figure>
2. If your request contains dynamic references (otherwise, the options aren't available):   
    - From the **Test profile** dropdown, select a test profile in the context of whom the test request will be performed.  
    - From the **Event context** dropdown list, you can select a particular occurrence of an event  whose values/information will be used for the test request.  
        1. Select a test profile.  
            **Result**: A history of test profile events appears.  
            <figure><img src="/api/docs/image/54176ad07f146575310749eba44b7c2f42c1b327/docs/automation/_gfx/event-stream-test-profile.png" class="large" alt="A stream of events of a test profile"><figcaption>A stream of events of a test profile</figcaption></figure> 
        2. From the list of events, select one whose data you want use as a context. If there is no event you can use, in the upper-right corner of the pop-up, click **Define own event** and provide the body of the event.
        3. Confirm by clicking **Apply**. 
3. Verify the request body. If there is something you want to change, come back to the node settings from previous steps.  
3. If the request body is ready to test, in the upper-right corner, click **Send request**.  
    **Result**: The response section appears and the **Update response event** button becomes active.  
4. Optionally, you can update response event with new parameters by clicking **Update response event** in the upper-right corner.
