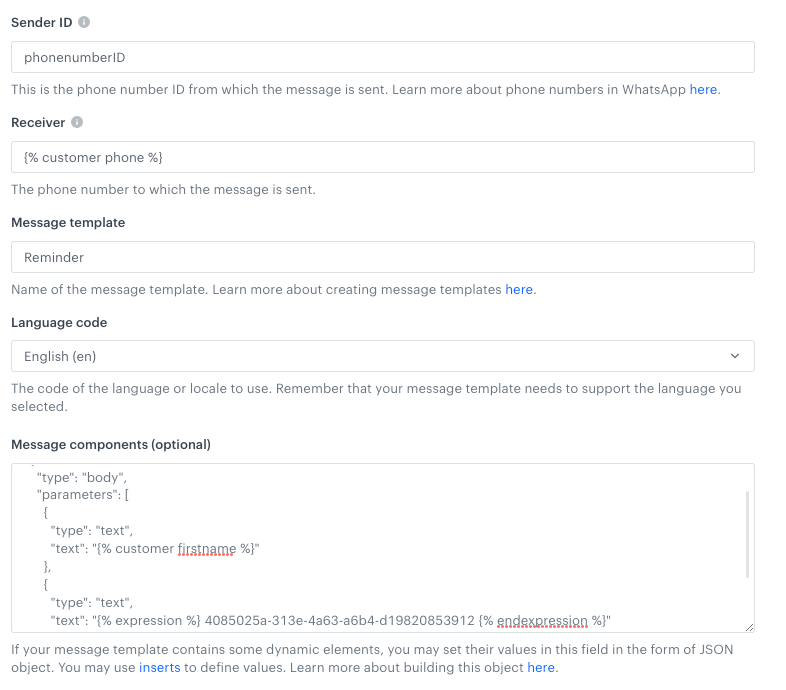
WhatsApp lets you easily send many message types to your customers. By combining it with the capabilities of Synerise, you can send [message templates (business-initiated conversations)](https://developers.facebook.com/docs/whatsapp/conversation-types#business-initiated-conversations) which are personalized based on the information about your customers collected in Synerise. 

If you prefer a simpler setup with less technical configuration, consider using the [WhatsApp partner integration](/docs/automation/integration/whatsapp-partner-integration/send-template-message).


<div class="admonition admonition-tip"><div class="admonition-icon"><svg xmlns="http://www.w3.org/2000/svg" fill="none" viewBox="0 0 24 24" stroke="currentColor" stroke-width="2.5"><path stroke-linecap="round" stroke-linejoin="round" d="M9.663 17h4.673M12 3v1m6.364 1.636l-.707.707M21 12h-1M4 12H3m3.343-5.657l-.707-.707m2.828 9.9a5 5 0 117.072 0l-.548.547A3.374 3.374 0 0014 18.469V19a2 2 0 11-4 0v-.531c0-.895-.356-1.754-.988-2.386l-.548-.547z" /></svg></div><div class="admonition-body"><div class="admonition-content">

Before you start working with this integration, get familiar with:
- [pricing and payment methods](https://developers.facebook.com/docs/whatsapp/cloud-api/get-started#pricing---payment-methods),
- [opt-in policy and methods](https://developers.facebook.com/docs/whatsapp/overview/getting-opt-in),
- [messaging limits](https://developers.facebook.com/docs/whatsapp/messaging-limits#messaging)

</div></div></div>


<figure><img src="/api/docs/image/54176ad07f146575310749eba44b7c2f42c1b327/docs/automation/_gfx/business-image-whatsapp.png" class="large no-frame" alt="Business image"></figure>  


### Prerequisites
---
- [Create an account in Meta for Developers](https://developers.facebook.com/docs/whatsapp/cloud-api/get-started)
- [Send a test message](https://developers.facebook.com/docs/whatsapp/cloud-api/get-started#sent-test-message)
- [Add the sender's phone number](https://developers.facebook.com/docs/whatsapp/cloud-api/get-started/add-a-phone-number)
- [Generate a permanent token](https://developers.facebook.com/blog/post/2022/12/05/auth-tokens/)
- [Create a message template](https://developers.facebook.com/docs/whatsapp/message-templates/guidelines)
- Make sure that the recipients' profiles in Synerise contain phone numbers in the format supported by WhatsApp.  
    Examples of supported formats:
    - `+1-212-345-6789`
    - `+1 (212) 345-6789`
    - `+1 212 345 6789`
    - `+1 (212) 345 6789` 
    
   <div class="admonition admonition-tip"><div class="admonition-icon"><svg xmlns="http://www.w3.org/2000/svg" fill="none" viewBox="0 0 24 24" stroke="currentColor" stroke-width="2.5"><path stroke-linecap="round" stroke-linejoin="round" d="M9.663 17h4.673M12 3v1m6.364 1.636l-.707.707M21 12h-1M4 12H3m3.343-5.657l-.707-.707m2.828 9.9a5 5 0 117.072 0l-.548.547A3.374 3.374 0 0014 18.469V19a2 2 0 11-4 0v-.531c0-.895-.356-1.754-.988-2.386l-.548-.547z" /></svg></div><div class="admonition-body"><div class="admonition-content">

   - If your audience profiles in Synerise have phone numbers in a format that's not supported by WhatsApp, you can transform them and import back to Synerise. You can read [this use case](/use-cases/schemaless-transformations-profiles) to get the idea how to do it.
   - If your audience profiles lack of phone numbers, you can [import them by uploading a file](/use-cases/clients-import) with phone numbers or [import it from SFTP](/use-cases/import-customers-data-from-sftp).

   </div></div></div>


### What is a template message?
Message templates are used to initiate conversations with your customers. You can send it when a customer has not sent you a message in 24 hours or more, or to those who have not initiated a conversation with you. Such a message is created in the Meta portal, which means you don't have to build any template in Synerise. In the configuration of the **Send template message** node, you only need the name of [the template created in Meta](https://developers.facebook.com/docs/whatsapp/message-templates/guidelines).

### How to personalize a message?
Dynamic elements are pieces of information available in your workspace in Synerise that let you make your message personalized, such as customer's name, size, number of loyalty points collected, name of the last purchased product, and so on. 

To append dynamic values to the message:
1. Create a message template in the Meta portal. In the body of the message, mark places where the dynamic elements will be added in the following way:   
`Hello, {{1}}! You have already collected {{2}} points, have you considered using them to purchase products in the current promotion?`  
Where `{{1}}` and `{{2}}` are markers that will be replaced with the dynamic values. This step will be done in Synerise.  
    <figure><img src="/api/docs/image/54176ad07f146575310749eba44b7c2f42c1b327/docs/automation/_gfx/inserting-markers-for-variables.png" class="full" alt="Creating template in the Meta portal"><figcaption>Creating template in the Meta portal. {{1}} and {{2}} are variables for which values will be defined in Synerise</figcaption></figure>  
2. In the configuration of the **Send Template Message** node:
    1. In the **Message template** field, enter the name of the message template you created in the Meta portal.
    2. In the **Message components** field, insert the body that contains the dynamic values **in the order defined in the message template**. For example:  

       <pre><code class="language-json">[
         {
           "type": "body",
           "parameters": [
             {
               "type": "text",
               "text": "{% customer firstname %}"
             },
             {
               "type": "text",
               "text": "{% expression %} 4085025a-313e-4a63-a6b4-d19820853912 {% endexpression %}"
             }
           ]
         }
       ]</code></pre>


where:
- The value of the `{% customer firstname %}` insert is used as the value of `{{1}}`, so the name of a customer can be displayed in the message.
- The value of the `{% expression %} 4085025a-313e-4a63-a6b4-d19820853912 {% endexpression %}` insert is used as the value of `{{2}}`. In this example, the expression returns the number of loyalty points.

### How to add images to your message?
---
You can add images to your message. Before that, you must upload them to a public server or to Synerise, so in the body of the message, you can make reference to a source where you keep images.

1. Create a message template in the Meta portal. In the body of the message, mark places where you want to add an image. For example:
   `Hello! Have you seen our latest promotion? {{1}}`  
   Where `{{1}}` will be replaced with the reference to a source where you keep the image. This step will be done in Synerise.  
  
   <div class="admonition admonition-tip"><div class="admonition-icon"><svg xmlns="http://www.w3.org/2000/svg" fill="none" viewBox="0 0 24 24" stroke="currentColor" stroke-width="2.5"><path stroke-linecap="round" stroke-linejoin="round" d="M9.663 17h4.673M12 3v1m6.364 1.636l-.707.707M21 12h-1M4 12H3m3.343-5.657l-.707-.707m2.828 9.9a5 5 0 117.072 0l-.548.547A3.374 3.374 0 0014 18.469V19a2 2 0 11-4 0v-.531c0-.895-.356-1.754-.988-2.386l-.548-.547z" /></svg></div><div class="admonition-body"><div class="admonition-content">

   For further information on creating a template with an image in WhatsApp, refer to the [documentation](https://developers.facebook.com/docs/whatsapp/cloud-api/guides/send-message-templates#media-based).

   </div></div></div>

2. In the configuration of the **Send a template message** node:
    1. In the **Message template** field, enter the name of the message template you created in the Meta portal.
    2. In the **Message components** field, insert the body that contains links to the source where the images are kept **in the order defined in the message template**. For example:  

       <pre><code class="language-json">{
          "type":"header",
          "parameters":[
             {
                "type":"image",
                "image":{
                   "link":"https://example.com"
                }
             }
          ]
       }</code></pre>


<div class="admonition admonition-note"><div class="admonition-icon"><svg xmlns="http://www.w3.org/2000/svg" fill="none" viewBox="0 0 24 24" stroke="currentColor" stroke-width="2.5"><path stroke-linecap="round" stroke-linejoin="round" d="M13 16h-1v-4h-1m1-4h.01M21 12a9 9 0 11-18 0 9 9 0 0118 0z" /></svg></div><div class="admonition-body"><div class="admonition-content">

If you want to use an image you store in Synerise, you can use [Jinjava insert](/developers/inserts/automation) as a value of the link parameter.

</div></div></div>


### What is the allowed phone number format for recipients?

Here are examples of supported phone number formats:

- `+1-212-345-6789`
- `+1 (212) 345-6789`
- `+1 212 345 6789`
- `+1 (212) 345 6789`


## Node configuration
---
1. Click **WhatsApp > Send message template**. 
2. Click **Select connection**.  
3. From the dropdown list, select the connection.  
   - If no connections are available or you want to create a new one, see [Create a connection](#create-a-connection).
   - If you selected an existing connection, proceed to [defining the integration settings](#define-the-integration-settings).

### Create a connection
To allow the data exchange, establish a connection between Synerise and WhatsApp.  

1. At the bottom of the **Select connection** dropdown list, click **Add connection**.  
2. In the **Permanent access token** field, enter the token you generated as a part of [prerequisites](#prerequisites).
6. In the **Connection name** field, enter the name of the connection.  
    It's used to find the connection on the list.
7. Click **Apply**.  
        **Result**: A connection is created and selected. 

### Define the integration settings
In this step, fill in the form that allows you to send a message template from Synerise to your customers.  

<figure><img src="/api/docs/image/54176ad07f146575310749eba44b7c2f42c1b327/docs/automation/_gfx/send-template-message.png" class="medium" alt="A blank configuration for Send Template Message node"><figcaption>A blank configuration for Send Template Message node</figcaption></figure>  


<div class="admonition admonition-note"><div class="admonition-icon"><svg xmlns="http://www.w3.org/2000/svg" fill="none" viewBox="0 0 24 24" stroke="currentColor" stroke-width="2.5"><path stroke-linecap="round" stroke-linejoin="round" d="M13 16h-1v-4h-1m1-4h.01M21 12a9 9 0 11-18 0 9 9 0 0118 0z" /></svg></div><div class="admonition-body"><div class="admonition-content">

Fields marked with the <img src="/api/docs/image/54176ad07f146575310749eba44b7c2f42c1b327/icons/snippet-icon.png" alt="Snippet icon" class="icon" > icon accept [snippets](/docs/assets/snippets) or [inserts](/developers/inserts). This integration allows usage of profile-related inserts.

</div></div></div>


1. In the **Sender ID** field, enter the phone number ID from which the message will be sent.  
  [You can find more information about phone number ID here](https://developers.facebook.com/docs/whatsapp/cloud-api/get-started/add-a-phone-number).  
2. In the **Receiver** field, enter the phone number of the customer who will receive this message.  
    We recommend using the `{% customer phone %}` insert, which inserts the phone number of an individual customer who goes through this node.  
3. In the **Template message** field, enter the name of the message template created in the Meta portal.  
4. From the **Language code** dropdown list, select the language used in the message.  
  In the Meta portal, you can create one template and create multiple language versions for it. In this field, you must declare the language version of your message. Remember to select an existing language version of your message.    
5. **Only if your message contains dynamic values**: In the **Message components** field, enter the contents of your message.
An example is shown in [Personalizing...](#how-to-personalize-a-message).
For more details and an explanation of all features, see [Facebook documentation](https://developers.facebook.com/docs/whatsapp/cloud-api/guides/send-message-templates). In the cURL examples shown in Facebook documentation, the value of the the `components` property is the part you need to enter in **Message components**.  
    <figure><img src="/api/docs/image/54176ad07f146575310749eba44b7c2f42c1b327/docs/automation/_gfx/whatsapp-config.png" class="full" alt="Filled in configuration form"><figcaption>Filled in configuration form</figcaption></figure>
6. Click **Apply**.  
  **Result**: After a profile completes the Send Template Message node, the [`whatsApp.sendTemplateMessage` event](/docs/assets/events/event-reference/integration#whatsappsendtemplatemessage) is generated on the activity list on the profile in the **Profiles** module. The event contains weather information in its parameters in accordance with the node configuration.  

### Test integration
---

You can run a test request. If the request body contains a dynamic reference to a profile attribute and/or an event data from preceding nodes, then you can define the context using [test profile data](/docs/settings/configuration/test-profiles). 


<div class="admonition admonition-note"><div class="admonition-icon"><svg xmlns="http://www.w3.org/2000/svg" fill="none" viewBox="0 0 24 24" stroke="currentColor" stroke-width="2.5"><path stroke-linecap="round" stroke-linejoin="round" d="M13 16h-1v-4h-1m1-4h.01M21 12a9 9 0 11-18 0 9 9 0 0118 0z" /></svg></div><div class="admonition-body"><div class="admonition-content">

Complete description of the feature is available in [Testing outgoing integrations](/docs/automation/test-requests-for-outgoing-integrations).

</div></div></div>


1. In the **Test integration** section, click **Send test request**.  
    **Result**: A test request builder opens. If:
    - a request body contains dynamic references, the request preview appears after you select the context of test profiles and events.
    - a request body contains static data, the preview of the body request appears immediately.
    <figure><img src="/api/docs/image/54176ad07f146575310749eba44b7c2f42c1b327/docs/automation/_gfx/test-request-builder-empty.png" class="large" alt="An empty test request builder"><figcaption>An empty test request builder</figcaption></figure>
2. If your request contains dynamic references (otherwise, the options aren't available):   
    - From the **Test profile** dropdown, select a test profile in the context of whom the test request will be performed.  
    - From the **Event context** dropdown list, you can select a particular occurrence of an event  whose values/information will be used for the test request.  
        1. Select a test profile.  
            **Result**: A history of test profile events appears.  
            <figure><img src="/api/docs/image/54176ad07f146575310749eba44b7c2f42c1b327/docs/automation/_gfx/event-stream-test-profile.png" class="large" alt="A stream of events of a test profile"><figcaption>A stream of events of a test profile</figcaption></figure> 
        2. From the list of events, select one whose data you want use as a context. If there is no event you can use, in the upper-right corner of the pop-up, click **Define own event** and provide the body of the event.
        3. Confirm by clicking **Apply**. 
3. Verify the request body. If there is something you want to change, come back to the node settings from previous steps.  
3. If the request body is ready to test, in the upper-right corner, click **Send request**.  
    **Result**: The response section appears and the **Update response event** button becomes active.  
4. Optionally, you can update response event with new parameters by clicking **Update response event** in the upper-right corner.
