An **Audience** node launches a workflow for a selected group of profiles. It allows you to automate scenarios based on the behavior or attributes of these profiles, making it an effective way to engage targeted audiences dynamically.
This node combines the functionality of triggering workflows at a defined frequency — similar to the [Scheduled Run](/docs/automation/triggers/scheduled-run) node — but with an important difference in context and use case: it's designed for profile-oriented workflows, where individual profiles are the actors. It triggers workflows for specific segments or audiences, scheduled at a chosen frequency.
#### Use cases for the Audience node
- **Single-use workflow with static segmentation conditions:**
Triggered once for a fixed audience.
- **Repeatable workflow with static segmentation conditions:**
Triggered repeatedly for the same audience conditions over time.
- **Single-use or repeatable workflows with segment-based branching:**
Separate paths for each [segment in a segmentation](#segment-based-branching).
- **Repeatable workflow with dynamic segmentation conditions:**
- Uses [Jinjava](/developers/inserts) templates to change segmentation conditions periodically.
- Each workflow repetition triggers for a different audience.
- Enables managing one workflow for multiple audiences instead of creating many workflows for each campaign segment.
## Segment-based branching
Segment-based branching lets you create a separate workflow [path](/docs/automation/automation-dictionary#path) (named after its corresponding segment) for each segment in a segmentation selected in the node. This option in the settings of the node (available in the **Split audience** tab), lets you:
- Manage multiple audience segments within a single workflow, reducing the need to create and maintain separate workflows for each segment.
- Easily branch campaigns based on distinct audience segments, allowing personalized messaging and actions for each group.
- Adapt to segmentation changes without rebuilding workflows, supporting dynamic campaign strategies as audiences evolve.
- Build a process for prioritizing communication for the selected segmentation, based on the order (priority) of segments in the segmentation.
**How it works**
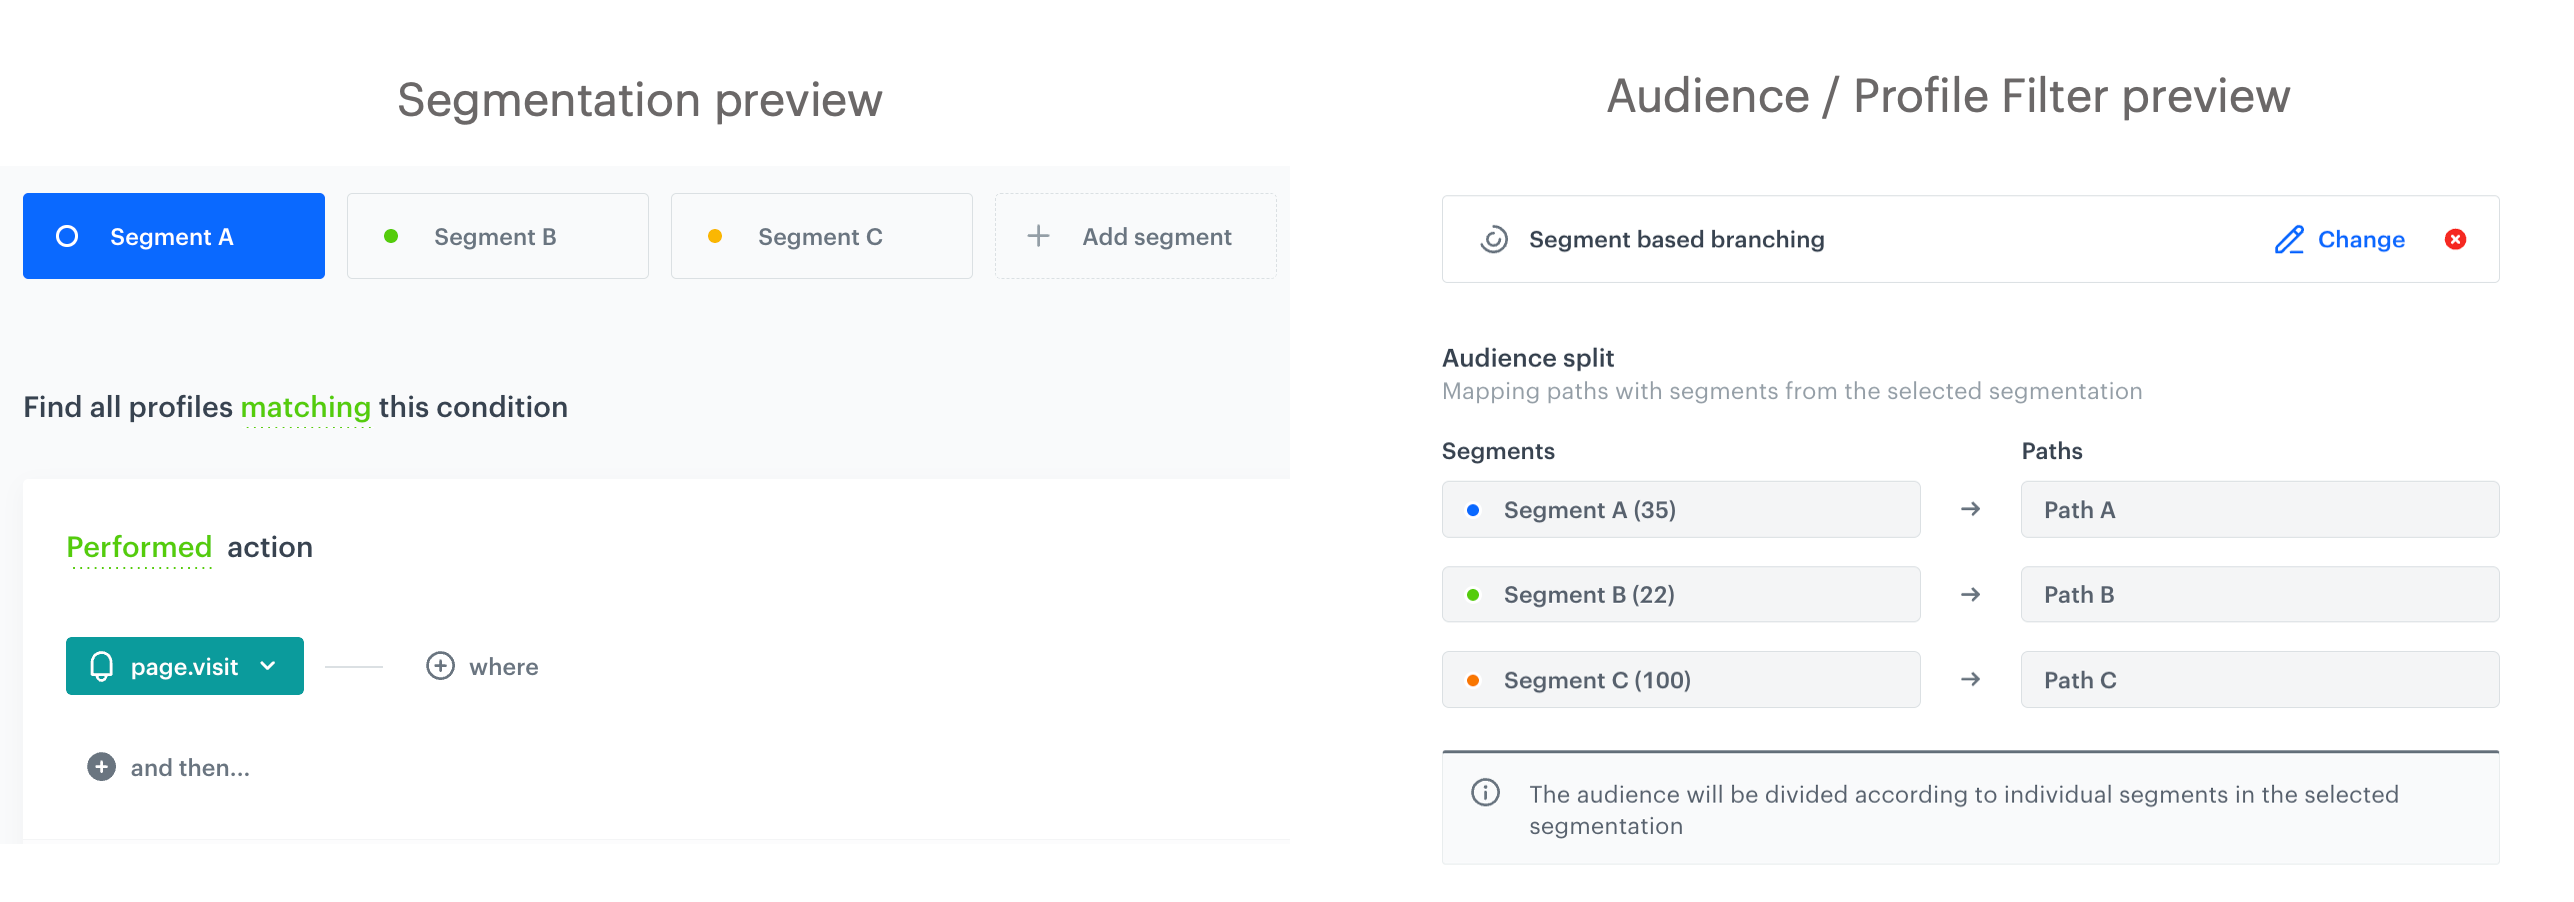
When you select the **Split audience** option in the node, the segments from the segmentation are mapped to the workflow paths in the following way (these are default segment names, you can change them in the settings of the segmentation):
- Segment A > Path A
- Segment B > Path B
- Segment C > Path C
Default segment path mapping in the settings of the Audience/Profile Filter node
This mapping is active when the workflow status is Active or Paused. When a workflow is in Draft, initial output management is handled through connections between nodes. Refer to the table below to see how the mapping can be changed in specific scenarios. The table shows how changes to an example segmentation with three segments — Segment A, Segment B, and Segment C —affect the connections for Split audience mode when a workflow is active.
| Scenario | Description |
|------------------------------|------------------------------------------------------------------------------------------------------------------------------------|
| **Segment deletion** | Removing segment B in the segmentation settings leaves branches for segments A and C in the workflow. Segment C shifts to branch B’s position and Segment C follows the path originally assigned to the deleted segment. In such situation, you can disable any path and change path mapping for remaining segments: Disabling path in the settings of the Audience/Profile Filter node
You can disable paths and/or change path mapping only in active and paused workflows.
|
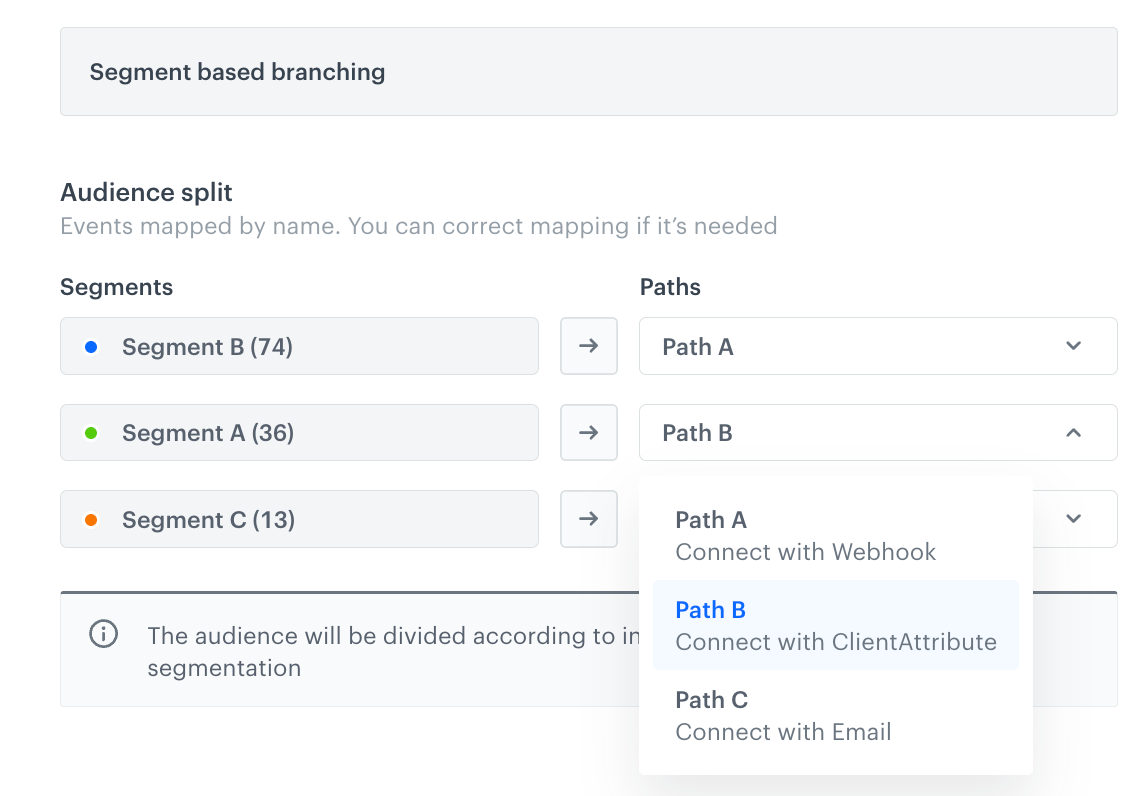
| **Segment reordering** | If the order of segments in a segmentation changes after launching the workflow, you can edit the mapping of the paths for each segment in a workflow: Change path mapping for segments in the Audience/Profile Filter node
You can disable paths and/or change path mapping only in active and paused workflows.
|
| **Segment addition** | If a new segment D is added, but the workflow still only has branches for A, B, and C, users matching segment D cannot proceed through the workflow as there is no corresponding branch. Then, the [`automation.clientPathAborted` event](/docs/assets/events/event-reference/automation#automationclientpathaborted) is generated for profiles who belong to the D segment. |
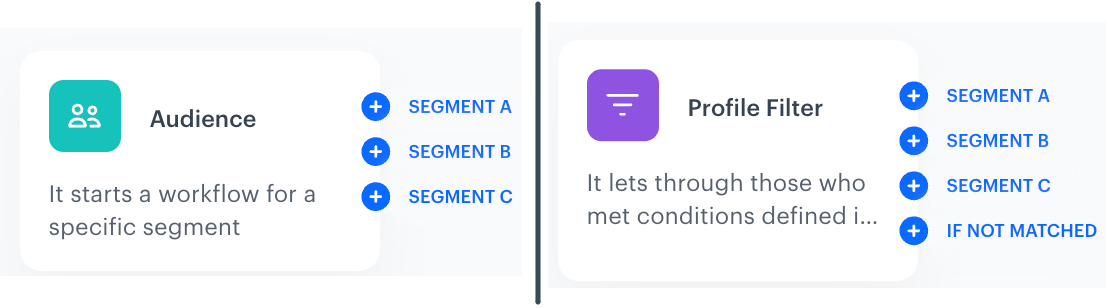
Path outputs from the Audience and Profile Filter nodes
### Limits
- When configuring segment-based branching, there is a limit of 10 output connections available. Although the segmentation can include more than 10 segments, the system will display only the first 10 connections.
- If the segmentation contains more segments than outgoing connections, then profiles matching the segments that do not have an outgoing connection will be expelled from the workflow and the [`automation.clientPathAborted` event](/docs/assets/events/event-reference/automation#automationclientpathaborted) will be generated on their activity list.
- You can't use segmentations for which the [multi-match option](/docs/analytics/segmentations/creating-segmentations#multi-match) is enabled.
## Important notes
---
| Remark | Details |
|-------------------------------------|----------------------------------------------------------------------------------------------------|
| **Dynamic conditions** | Work only for segmentations created within the Audience node. You can check an example application of dynamic conditions in the ["Dynamic conditions example use case" section](#dynamic-conditions-example-use-case). |
| **Dynamic query exceptions** | Familiarize yourself with [exceptions and limitations](/developers/inserts/automation#audience-node-syntax-limitations). |
| **Data dependency** | Workflows rely on dynamic data (for example, [Synerise catalogs](/developers/inserts/insert-usage#extracting-values-from-catalogs), [Synerise analyses](/developers/inserts/insert-usage#metrics)) and require monitoring to ensure accuracy. |
| **Processing delay** | It may take several minutes before the Audience node starts processing after the workflow is launched. |
| **Scheduling load management** | To maintain performance, spread your scheduled workflows over time rather than running many simultaneously. |
| **Workflow prioritization** | Schedule data synchronization or external integration workflows at times that do not interfere with communication workflows. |
## Workflow status
The status of the workflow changes to **Stopped** when (applies only to workflows triggered by **Audience**):
- it's been 62 days from the latest execution of the trigger,
- it is a one-off workflow and it is completed,
- the limit of repetitions in the trigger settings runs out
In the audit log, this change of the workflow status will be marked as a change done by `internal user`.
Activating a paused or stopped automation that starts with the Audience trigger results in restarting the automation for all profiles (also those who completed the automation before pausing or stopping it).
## Requirements
---
- You must have profiles in your database.
- You must implement a tracking code into your website.
- Optionally, you can [create a segmentation](/docs/analytics/segmentations/creating-segmentations) beforehand.
## Node configuration
---
1. Click the node.
**Result**: A pop-up shows up.
2. Select one of the following tabs to define the trigger schedule for the **Audience** node:
- **Run once** - This option lets you trigger the **Audience** node only once - either immediately after activating the workflow or at a scheduled date.
- **Repeat runs** - This option lets you trigger the **Audience** node repeatedly at a defined frequency.
1. If you select **Immediately**, proceed to step 3 (the **Audience** section).
2. If you select **Scheduled**, then:
1. From the **Timezone** dropdown list, select the timezone for executing a one-off workflow activation.
2. In the **Activate date** field, using the calendar, select the date and time when the workflow will be activated.
1. From the **Timezone** dropdown list, select the timezone for executing the Audience node repetitions.
2. You can:
- select **Everyday**, **Every week**, and **Every month** tabs if that's the frequency you want to run the trigger node, and then define the time at which the node will be triggered.
- create a custom frequency in the **Interval** tab.
1. In the **Interval** field, define the frequency of launching the node.
2. In the **Begin at** field, select the date when the first activation is scheduled.
**Example**: If a user selects the 2nd of February, 5.00 PM means that this is the date when the trigger is activated for the first time.
3. To define the number of times a trigger launch is repeated, switch the **Limit repetition** toggle on.
**EXAMPLE**: If the scheduled time is February 2; 5.00 PM, the interval is 1 day; and the repetition limit is 3, it means the trigger is activated for the first time at the February 2 at 5.00 PM, repeated on the February 3 at 5.00 PM and repeated the day after.
Because the number of profiles in a segmentation can change, the trigger may not be repeated exactly with the frequency defined in the schedule for all profiles. It can take longer to repeat the trigger launch as profiles rejoin segmentations. If a profile rejoins a segmentation after the trigger reaches the repetition limit for the profile, the trigger will not launch for this profile.
3. In the **Audience** section, select the segmentation with profiles for whom the workflow will be triggered:
- **Segments** - You can choose from the list of existing segmentations. There is no limit on the number of selected segmentations.
If you select several segments they are connected with the `OR` logic operator.
- **New audience** - You can select a new group of profiles by defining the filter conditions.
- All fields in the filter in which you must provide value manually accept [snippets](/docs/assets/snippets) or [inserts](/developers/inserts). These fields are marked with the icon and it lets you select a snippet.
- **Split audience** - You can choose a segmentation that consists of smaller segments and prepare separate path in a workflow for each of them.
4. Confirm the settings by clicking the **Apply** button.
- if you selected the **Segmentations** or **New audience** tabs:
Audience outputs after selecting segmentations or adding new on the spot
- if you selected the **Split audience** tab:
Audiencer outputs after selecting the Split audience tab and a segmentation with multiple segments
## Example of use
---
### Regular outputs from the node
---
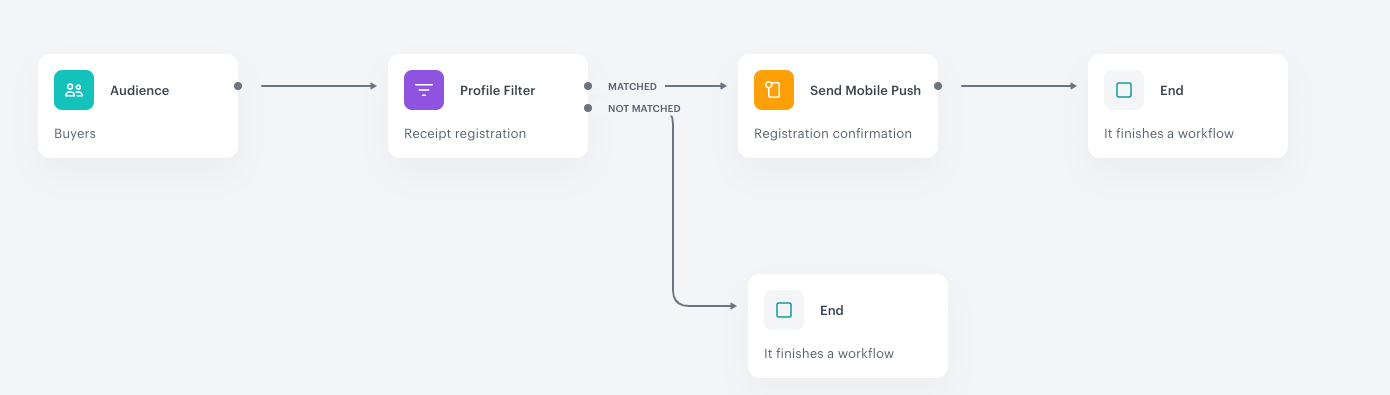
The assumption of the scenario is to allow the customers to register a receipt in a lottery directly after a purchase, but also to give this possibility to customers who made a transaction the week before.
1. Add an **Audience** trigger. In the settings of the trigger, add a segment (or several segments) of customers.
2. Add a **Profile Filter** condition which waits until customers register their receipts.
3. When the receipt registration is completed, a push notification is sent with information about joining the lottery.
4. When the push is sent, the workflow is completed.
**Result**:
Example of a workflow that uses the Audience trigger
### Segment branching output from the node
---
The assumption of the workflow is to send personalized marketing communications through preferred channels — email, web push, and mobile push — only to customers who have given their marketing agreement for each specific channel.
The segmentation used in this example includes three segments: web push, mobile push, and email. Although a customer may have consented to multiple channels, this segmentation has the multi-match option disabled. This means that even if a customer qualifies for more than one segment, they will be assigned to only one segment based on the defined conditions and the order of segments in a segmentation.
1. In the **Audience** node, choose **Split audience**, then select a segmentation that groups customers based on the marketing channels for which they have given consent.
2. For each segment branch, add a node that sends the message through the respective communication channel.
3. Add an **End** node after each message-sending node.
**Result**:
Example of a workflow that uses the Audience with the possibility of segment branching
### Dynamic conditions example use case
---
A marketing campaign sends a **daily email** promoting the *product of the day*.
- The audience is customers who added this product to their cart within the last month (dynamic segmentation).
- Each day, a different product is promoted via a schedule file imported into Synerise.
- The schedule file contains two columns: **date** and **product ID**.
- A dynamic query checks the current date and retrieves the corresponding product ID from the catalog.
- The audience changes daily as the product ID changes, ensuring the email targets the relevant customers for the promoted product.