
The **Scheduled Run** node lets you define the time and date of launching your workflow, providing flexible control over when your processes start. You can specify not only a single point in time for immediate or scheduled execution, but also configure recurring triggers that launch the workflow repeatedly at custom intervals you define. 

This node is intended for business-oriented workflows, often involving processes or system actors. This makes the node particularly useful for scenarios requiring ongoing automation, such as integrations, data imports, and exports.


Additionally, you can select the timezone in which the scheduled date and time are interpreted, ensuring that your workflows run accurately according to your regional or business time requirements. Whether you need to run a workflow once immediately, schedule it for a future date, or set up a recurring schedule (for example, every hour, daily, or weekly), this node offers the flexibility to tailor execution timings precisely to your needs.

This versatility makes the **Scheduled Run** trigger node ideal for automations that must align with time-sensitive business processes, data synchronization tasks, or any use case where consistent, scheduled execution is critical.

## Node configuration
---
1. Go to **Automation Hub > Workflows > New workflow**.
2. Click the node.  
    **Result**: A pop-up opens.  
3. Select one of the following options:  
    - **Run once** - It's the default option. This option lets you launch the workflow only once immediately or at the date defined in the settings of the node. 
    - **Repeat runs** -  It lets you set the workflow to be launched repeatedly at the frequency defined in the settings of the node.  

    For further instructions, select one of the tabs below:

    
      <div class="content-tabs" data-tab-group="tabgrp-1296">
      <div class="tab-buttons"><button class="tab-button" data-tab-id="tabgrp-1296-0" data-tab-group="tabgrp-1296" data-tab-active="true">Run once</button><button class="tab-button" data-tab-id="tabgrp-1296-1" data-tab-group="tabgrp-1296">Repeat runs</button></div>

      <div class="tab-panel" data-tab-id="tabgrp-1296-0" data-tab-group="tabgrp-1296" data-tab-active="true">

      <figure>
      <img src="/api/docs/image/54176ad07f146575310749eba44b7c2f42c1b327/docs/automation/_gfx/schedule-run-once.png" alt="The Run once option selected" class="full">
      <figcaption>The Run once option selected</figcaption>
      </figure>

      1. Select one of the options:  
          - **Immediately** - It allows you to launch the workflow at once after clicking **Save & Run**.  
          - **Scheduled** - It allows you to pick the date when the workflow will be launched.
      2. Only for **Scheduled**:  
          1. From the **Timezone** dropdown, select the timezone.
          2. In the **Activate date** field, select a date on the calendar and the exact time.
      3. Confirm by clicking **Apply**

      </div>

      <div class="tab-panel" data-tab-id="tabgrp-1296-1" data-tab-group="tabgrp-1296">

      <figure>
      <img src="/api/docs/image/54176ad07f146575310749eba44b7c2f42c1b327/docs/automation/_gfx/scheduled-run.png" alt="All time option on" class="full">
      <figcaption>The All time option on</figcaption>
      </figure>

      1. From the **Timezone** list, select the time zone.
      2. Select one of the following tabs:  
          - **Everyday** - It lets you launch the workflow every day at the defined time.  
          - **Every week** - It lets you select the week days and the exact time when the workflow is launched.  
          - **Every month** - It lets you define the days of the month and the exact time, when the workflow is launched. The workflow is repeated every month on the defined day(s) at the selected time.  
          - **Interval** - It lets you define a custom frequency of triggering the node and define the date and time when the interval begins (at this date and time the node is triggered for the first time).
      3. If you want to put a limit on the repetitions, enable **Limit repetitions** and enter the maximum number of allowed repetitions.


         <div class="admonition admonition-warning"><div class="admonition-icon"><svg xmlns="http://www.w3.org/2000/svg" fill="none" viewBox="0 0 24 24" stroke="currentColor" stroke-width="2.5"><path stroke-linecap="round" stroke-linejoin="round" d="M12 9v2m0 4h.01m-6.938 4h13.856c1.54 0 2.502-1.667 1.732-2.5L13.732 4c-.77-.833-1.964-.833-2.732 0L4.082 16.5c-.77.833.192 2.5 1.732 2.5z" /></svg></div><div class="admonition-body"><div class="admonition-content">

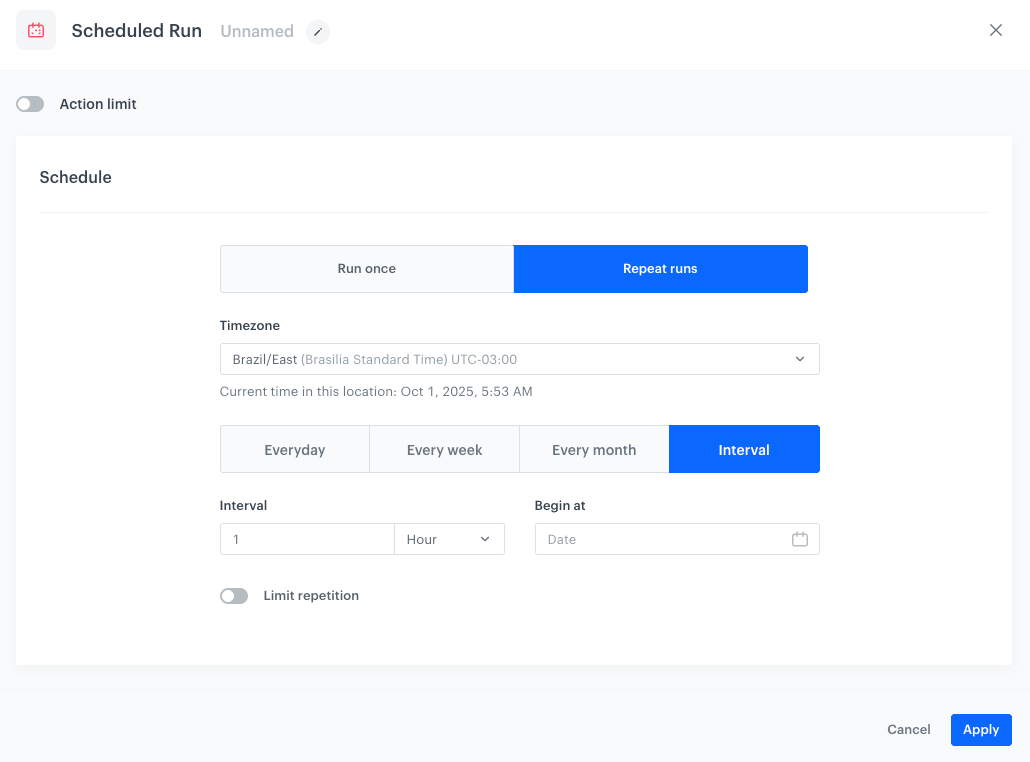
         When you select a day that does not exist in a month  (for example, February 30th or September 31st), the workflow will not trigger that month.  

         |           | 29th | 30th | 31st |
         |-----------|----|----|----|
         | February  | <img src="/api/docs/image/54176ad07f146575310749eba44b7c2f42c1b327/icons/close-s.svg" class="icon" alt= "Red checkmark">*  |  <img src="/api/docs/image/54176ad07f146575310749eba44b7c2f42c1b327/icons/close-s.svg" class="icon" alt= "Red checkmark">  |  <img src="/api/docs/image/54176ad07f146575310749eba44b7c2f42c1b327/icons/close-s.svg" class="icon" alt= "Red checkmark">  |
         | April     |  <img src="/api/docs/image/54176ad07f146575310749eba44b7c2f42c1b327/icons/check-s.svg" class="icon" alt="Green checkmark">  | <img src="/api/docs/image/54176ad07f146575310749eba44b7c2f42c1b327/icons/check-s.svg" class="icon" alt="Green checkmark">   | <img src="/api/docs/image/54176ad07f146575310749eba44b7c2f42c1b327/icons/close-s.svg" class="icon" alt= "Red checkmark">   |
         | June      | <img src="/api/docs/image/54176ad07f146575310749eba44b7c2f42c1b327/icons/check-s.svg" class="icon" alt="Green checkmark">   | <img src="/api/docs/image/54176ad07f146575310749eba44b7c2f42c1b327/icons/check-s.svg" class="icon" alt="Green checkmark">   | <img src="/api/docs/image/54176ad07f146575310749eba44b7c2f42c1b327/icons/close-s.svg" class="icon" alt= "Red checkmark">   |
         | September | <img src="/api/docs/image/54176ad07f146575310749eba44b7c2f42c1b327/icons/check-s.svg" class="icon" alt="Green checkmark">   |  <img src="/api/docs/image/54176ad07f146575310749eba44b7c2f42c1b327/icons/check-s.svg" class="icon" alt="Green checkmark">  | <img src="/api/docs/image/54176ad07f146575310749eba44b7c2f42c1b327/icons/close-s.svg" class="icon" alt= "Red checkmark">   |
         | November  |  <img src="/api/docs/image/54176ad07f146575310749eba44b7c2f42c1b327/icons/check-s.svg" class="icon" alt="Green checkmark">  | <img src="/api/docs/image/54176ad07f146575310749eba44b7c2f42c1b327/icons/check-s.svg" class="icon" alt="Green checkmark">   | <img src="/api/docs/image/54176ad07f146575310749eba44b7c2f42c1b327/icons/close-s.svg" class="icon" alt= "Red checkmark">   |

         `*`- It doesn't concern leap years

         </div></div></div>

      </div>
      </div>


## Example of use
---
In this example, you schedule the workflow launch to send alerts with metric results from Synerise to a Slack channel.

<figure>
<img src="/api/docs/image/54176ad07f146575310749eba44b7c2f42c1b327/use-cases/all-cases/_gfx/videocall-slac-alerts.png" alt="Configuration of the workflow that sends alert messages based on the metric results to the Slack channel" class="full">
<figcaption> Configuration of the workflow that sends alert messages based on the metric results to a Slack channel</figcaption>
</figure>

This workflow includes the following nodes:
1. The node that launches the workflow periodically (**Scheduled Run**), in this example it is everyday at 7.00 A.M
2. The node that sends a webhook to a Slack channel with a message that contains the metric results
3. The finishing node


   <div class="admonition admonition-note"><div class="admonition-icon"><svg xmlns="http://www.w3.org/2000/svg" fill="none" viewBox="0 0 24 24" stroke="currentColor" stroke-width="2.5"><path stroke-linecap="round" stroke-linejoin="round" d="M13 16h-1v-4h-1m1-4h.01M21 12a9 9 0 11-18 0 9 9 0 0118 0z" /></svg></div><div class="admonition-body"><div class="admonition-content">

   The full instructions on how to implement this use case are available [here](/use-cases/slack-integration).

   </div></div></div>


    