To be able to communicate with customers through an email channel, you need their consent to receive emails.
You can use Automation Hub to prepare workflows that facilitate the single and double opt-in scenarios. This article contains instructions how to do that.
The **single opt in** process saves the marketing agreement (email channel) without a user email confirmation. When a profile sends a newsletter submission form, the agreement is confirmed in their profile card without requiring an email confirmation.
The **double opt-in** process is also started when a customer submits the form, but the agreement is not saved to the profile until they click the confirmation link received by email.
The workflow described further in this article is designed to work with the implementation described in [the developer guide](/developers/web/newsletter-agreements). In this setup, you cannot use the single-opt in and double opt-in mechanisms simultaneously in different subscription forms.
## Requirements
---
- Implement a tracking code into your website (instructions: [here](/docs/settings/tool/tracking_codes) and [here](/developers/web/installation-and-configuration)).
- Configure an email account ([instructions](/docs/settings/configuration/email-account)).
- Go to [**Data Modeling Hub > Profile attributes**](https://app.synerise.com/assets/profile-attributes) and verify that a `newsletter_agreement_enabled` attribute exists. If it does not, create it. For instructions, see [this section](/docs/crm/customer-properties#adding-profile-attributes-in-the-synerise-portal).
- Prepare email confirmation/notification templates, depending on the solution you want to use:
- Notification for single opt-in (the notification is optional)
- Confirmation email for double opt-in (confirmation is required)
- Reminder for double opt-in (the reminder is optional)
If you are not familiar with Automation Hub, you can find all information about it [here](/docs/automation).
## Creating the automation trigger
1. Go to **Automation Hub > Workflows > New workflow**.
2. Enter the name of the workflow.
3. On the dashboard, click **Add trigger**.
4. Select the **Data Changed** node.
5. Open the configuration window by clicking the node.
6. From the **Choose value** dropdown list, select **Attributes > newsletter_agreement_enabled**.
7. From the **Choose operator** dropdown list, select **Equal (String)**.
8. In the text field, enter `enabled`.
9. Click **Apply**.
10. On the **Data Changed** node, click **THEN**.
11. From the list, add a **Delay** node.
12. Open the configuration window by clicking the added node.
13. Change the delay to 60 seconds and click **Apply**.
14. If you want to only include customers who have not agreed to a newsletter before, add a filter node:
1. On the **Delay** node, click **THEN**.
2. From the dropdown list, select the **Profile Filter** node.
3. Open the configuration window by clicking the added node.
4. From the **Choose filter** dropdown list, select **Clients > Attributes > newsletter_agreement** (you can use the search field).
- If you use email address as a unique profile identifier, select **Clients > Attributes > newsletter_agreement**.
- If you [configured emails as non-unique](/docs/settings/configuration/non-unique-emails), select **Clients > Attributes** and then the attribute you configured as the email agreement indicator.
5. From the **Choose operator** dropdown list, select **Equal**.
**Result**: A text field appears.
6. In the text field, enter `enabled`.
7. Confirm by clicking **Apply**.
8. On the filter node, click **MATCHED**.
9. From the dropdown list, select the **End** node.
**Result**: If a profile already has newsletter subscription enabled, the journey ends at this point.
15. Continue configuring the automation depending on the scenario you need:
- [Enable agreement immediately (single opt-in)](#single-opt-in)
- [Enable agreement after confirmation (double opt-in)](#double-opt-in)
## Single opt-in
1. On the last node you added:
- If you added the optional filter for profiles who previously agreed to newsletters, click **NOT MATCHED** on the filter node.
- If you didn't add that filter, click **THEN** on the **Delay** node.
2. Select the **Update Profile** node.
3. Open the configuration window by clicking the new node.
4. From the left dropdown list, select the attribute:
- If you use email address as a unique profile identifier, select **Attributes > newsletter_agreement**.
- If you [configured emails as non-unique](/docs/settings/configuration/non-unique-emails), select **Attributes** and then the attribute you configured as the email agreement indicator.
5. From the right dropdown list, select **Change**.
6. In the text field that appears, enter `enabled`.
7. Click **Apply**.
8. If you want to send a notification, add a notification node:
1. On the **Update Profile** node, click **THEN**.
2. From the dropdown list, select the **Send Email** node.
3. Open the configuration window by clicking the new node.
4. In the **Sender details** section:
1. In the **From email address** field, select the email address from which the email is sent.
2. In the **From name** field, enter the name of the sender that displays in the customer mailbox.
3. In the **"Reply to" email address** field, select the email customers can reply to.
4. In the **"Reply to" name** field, enter the name of the sender.
5. Select the **Send without marketing agreement** checkbox.
5. In the **Content** section:
1. In the **Subject** field, enter the subject of the email (shown in the customer's mailbox).
2. In the **Template** field, select the template of the notification email.
6. In the **UTM and URL parameters** section, click **Skip step** and **Yes**.
7. In the **Additional parameters** section, click **Skip step** and **Yes**.
8. Click **Apply**.
9. On the last added node, click **THEN**.
10. From the dropdown list, select the **End** node.
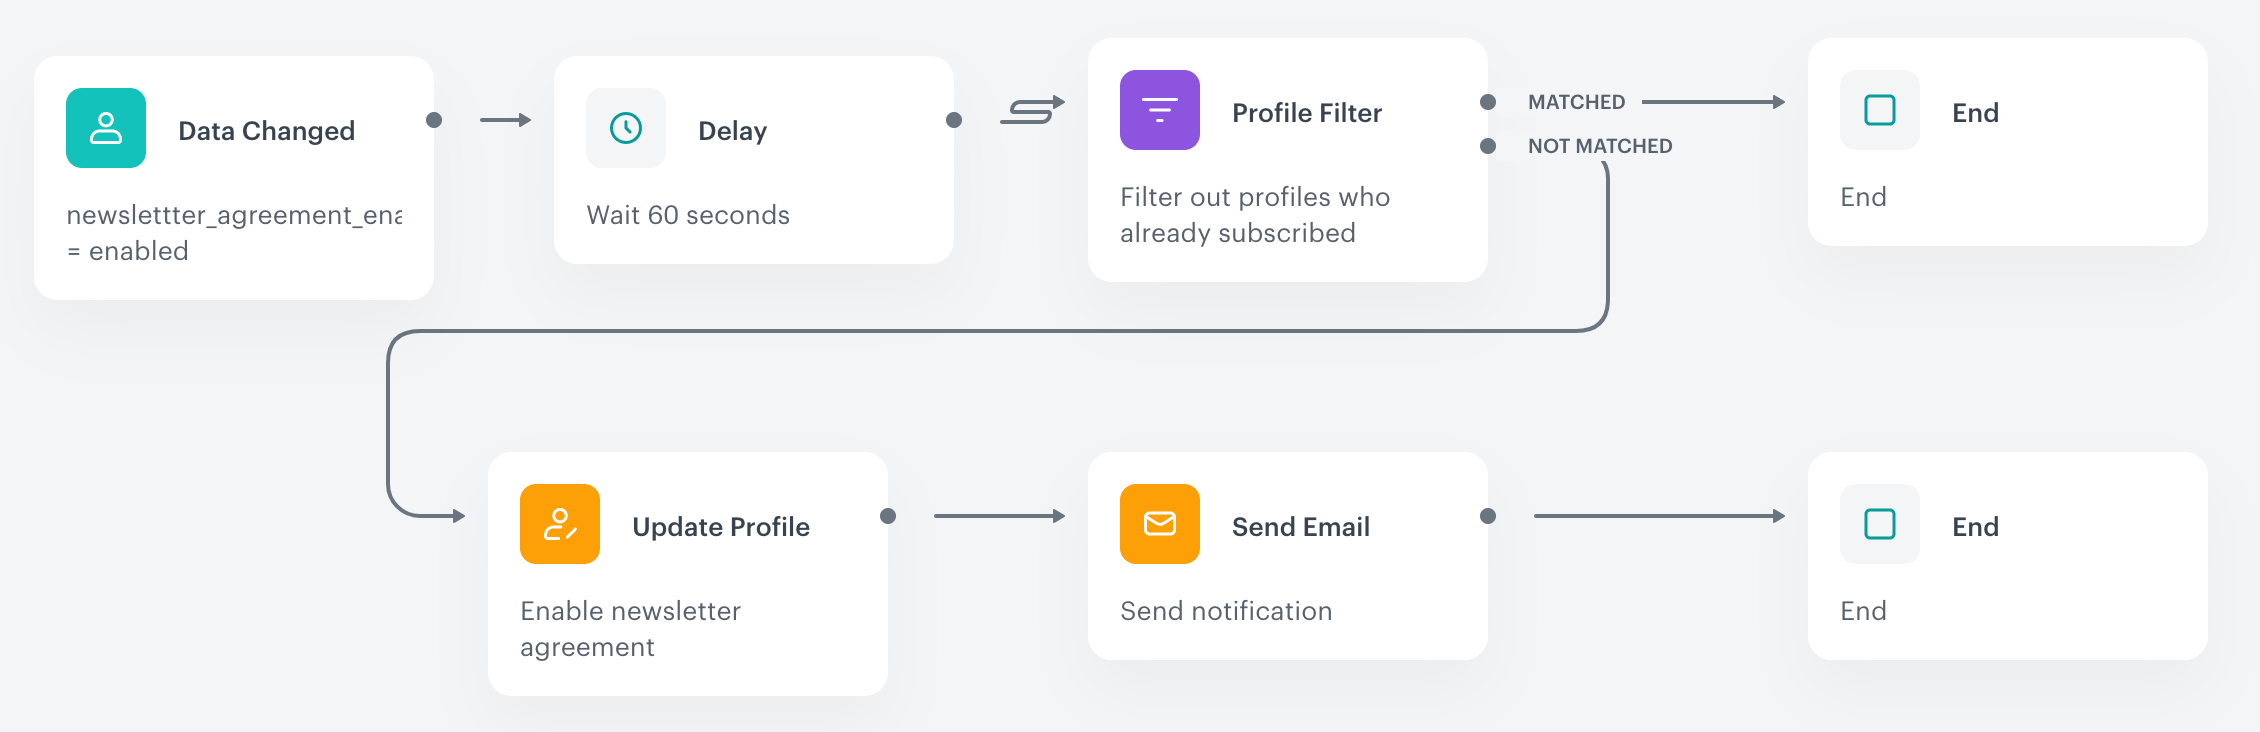
**Result**: The workflow looks similar to this:
Single-opt in workflow with filter and notification
11. To save the workflow:
- as a draft, click **Save**.
- and launch it, click **Save&Run**.
## Double opt-in
For your reading convenience, this section is divided into sub-sections for each node.
### Send a confirmation email
1. On the last node you added:
- If you added the optional filter for profiles who previously agreed to newsletters, click **NOT MATCHED** on the filter node.
- If you didn't add that filter, click **THEN** on the **Delay** node.
2. From the dropdown list, select the **Send Email** node.
3. Open the configuration window by clicking the new node.
1. In the **Sender details** section:
1. In the **From email address** field, select the email address from which the email is sent.
2. In the **From name** field, enter the name of the sender that displays in the customer mailbox.
3. In the **"Reply to" email address** field, select the email customers can reply to.
4. In the **"Reply to" name** field, enter the name of the sender.
5. Select the **Send without marketing agreement** checkbox.
2. In the **Content** section:
1. In the **Subject** field, enter the subject of the email (shown in the customer's mailbox).
2. In the **Template** field, select the template of the confirmation email.
3. In the **UTM and URL parameters**, click **Skip step** and **Yes**.
4. Click **Apply**.
### Wait for confirmation
1. On the **Send email** confirmation node, click **THEN**.
2. From the dropdown list, select **Event Filter**.
3. Open the configuration window by clicking the new node.
4. In the **Check** drop-down list, select **without limits** (default).
5. From the **Choose event** dropdown list, select `newsletter.click`.
6. Click the **+ where** button.
7. From the **Choose parameters** dropdown list, select `url`.
8. As the logical operator, select **Contain**.
**Result**: A text field appears.
1. In the text field, enter the agreement confirmation URL.
2. Confirm by clicking **Apply**.
### Update newsletter agreement
1. On the **Event Filter** node, click **THEN** or **MATCHED**.
2. From the dropdown list, select the **Update Profile** node.
3. Open the configuration window by clicking the new node.
4. From the left dropdown list, select the attribute:
- If you use email address as a unique profile identifier, select **Attributes > newsletter_agreement**.
- If you [configured emails as non-unique](/docs/settings/configuration/non-unique-emails), select **Attributes** and then the attribute you configured as the email agreement indicator.
5. From the right dropdown list, select **Change**.
6. In the text field that appears, enter `enabled`.
7. Click **Apply**.
8. On the **Update Profile** node, click **THEN**.
9. From the dropdown list, select the **End** node.
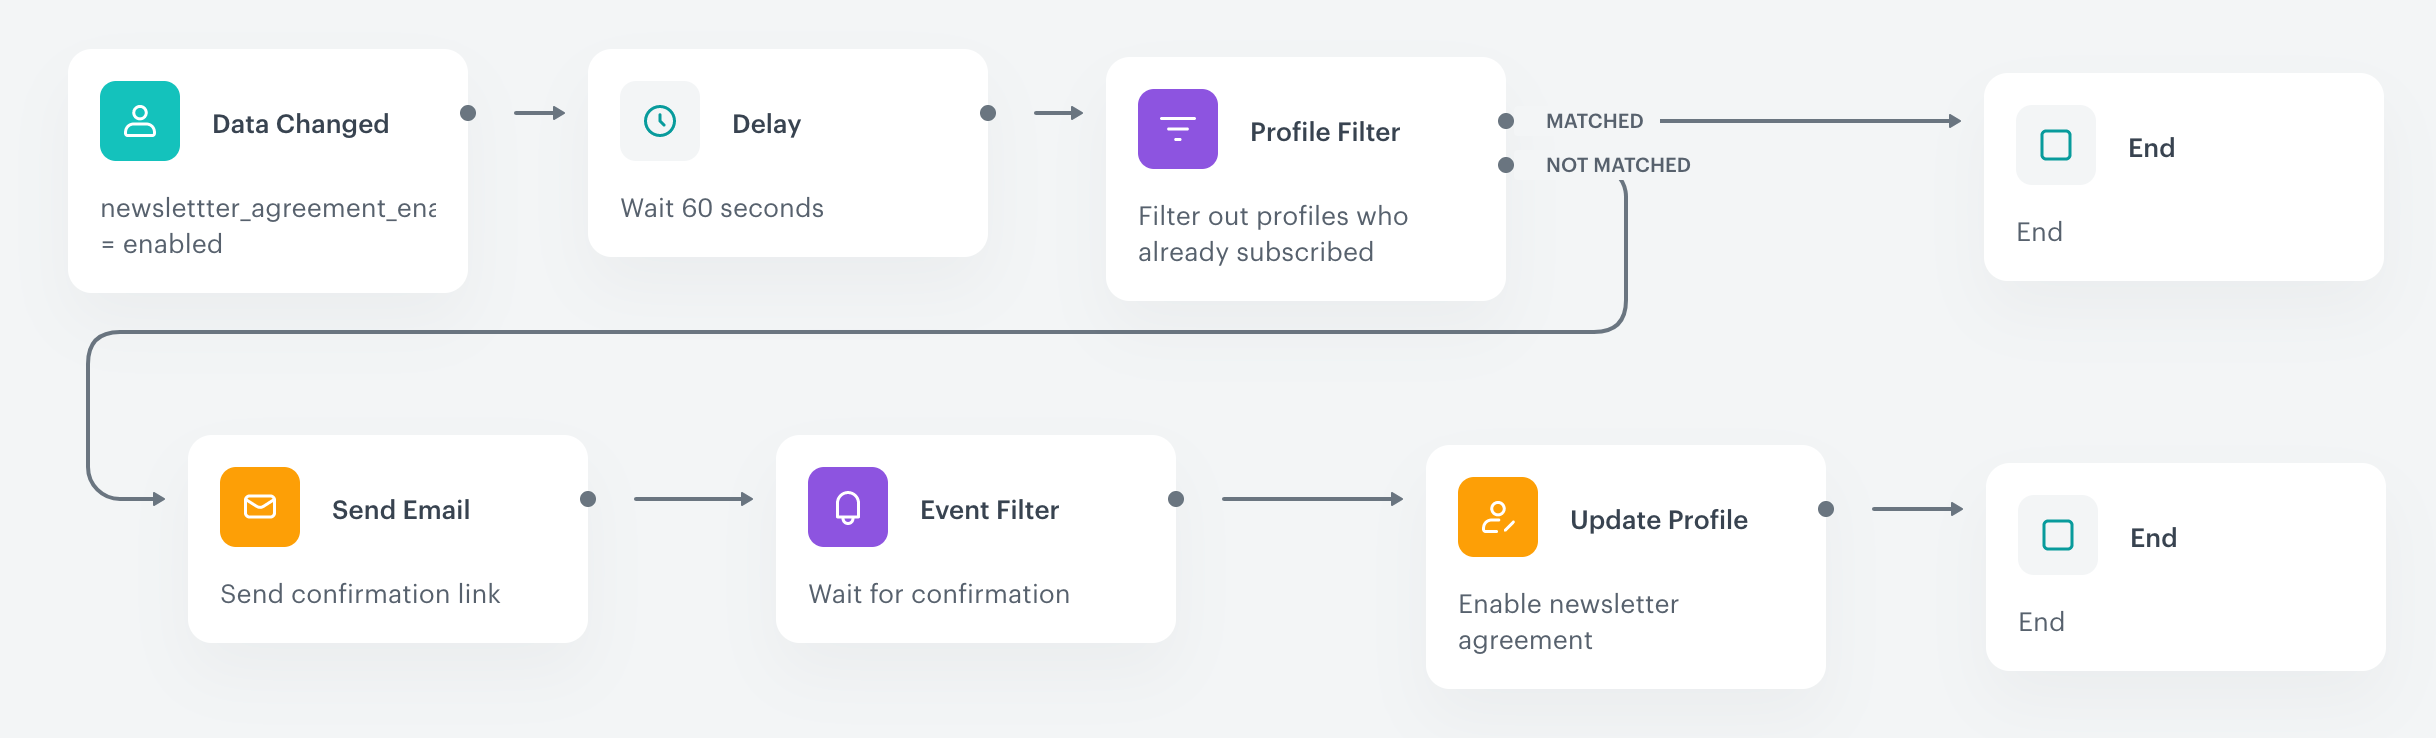
**Result**: The workflow looks similar to this:
Double opt-in configuration
1. Save the automation or add a reminder:
- If you want to add an email confirmation reminder, continue to [Adding the confirmation reminder node](#optional-add-confirmation-reminder).
- If you want to save the workflow as a draft, click **Save**.
- If you want to save and launch the workflow, click **Save&Run**.
### Optional: add confirmation reminder
In the double opt-in scenario, you can add an email reminder.
1. Click the **Event Filter** node.
2. In the **Check** drop-down list, select **for period of time**.
3. In the **Time range** section that appears, set the period after which the reminder will be sent.
4. Click **Apply**.
5. On the **Send Email** node, click the three dots icon (it appears when you hover your cursor over the node) and select **Duplicate**.
6. **Optional**: Change the email template used in the duplicate **Send Email** node.
7. From **NOT MATCHED** on the **Event Filter** node, drag a path to the duplicate **Send Email** node.
5. On the **Event Filter** node, click the three dots icon (it appears when you hover your cursor over the node) and select **Duplicate**.
9. Click the duplicate **Event Filter** node.
10. In the **Check** drop-down list, select **without limits**.
11. Click **Apply**.
12. From **THEN** on the **Send Email** node, drag a path to the duplicate **Event Filter** node.
5. On the **Update Profile** node, click the three dots icon (it appears when you hover your cursor over the node) and select **Duplicate**.
6. From **MATCHED** on the duplicate **Event Filter** node, drag a path to the duplicate **Update Profile** node.
7. On the duplicate **Update Profile** node, click **THEN**.
8. From the dropdown list, select the **End** node.
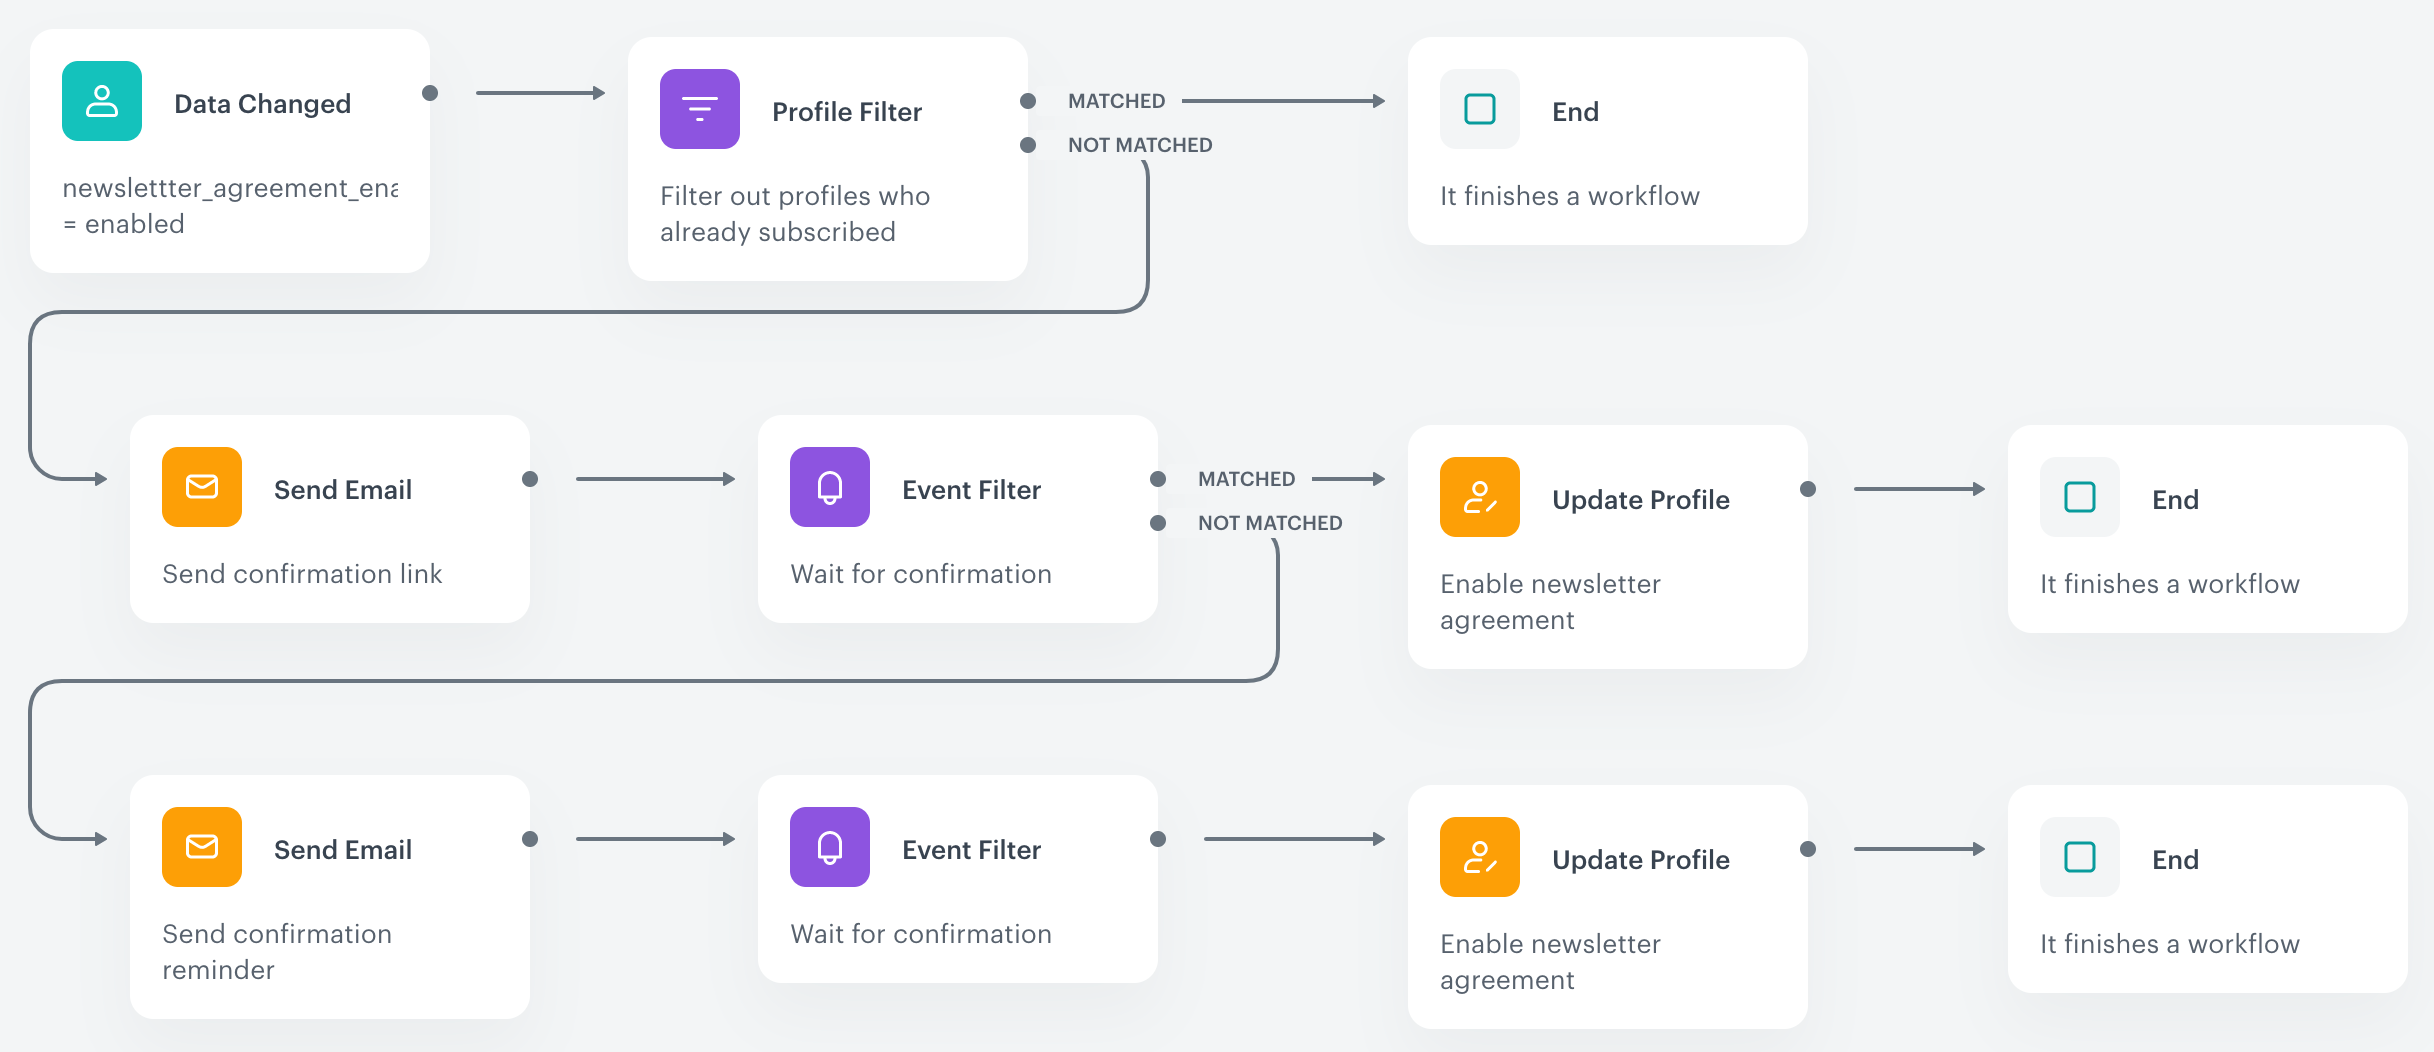
**Result**: The workflow looks similar to this:
Double opt-in configuration with reminder
1. To save the workflow:
- as a draft, click **Save**.
- and launch it, click **Save&Run**.