The Managed domains feature facilitates the process of domain verification, which is necessary to prove ownership of a given domain and user accounts that are or will be registered with that domain. After a successful domain verification, Synerise will assign that domain to your workspace, automatically link the user accounts under that domain with your workspace and, as a result of the process, enable central management of user accounts in your workspace.
You may verify more than one domain, if required.
**Example**
Let's assume you are the owner of `example.org` domain and your users have accounts such as `john.doe@example.org` and `jane.doe@example.org`. After you verify the ownership of the `example.com` domain, all users with the email addresses within the @example.org domain will be managed in your workspace and you will have full rights to manage their accounts (see [Benefits](/docs/settings/identity-access-management/access-control/managed-domains#benefits) below for details). Users from other domains can be invited to the workspace as Guests and you will be able to remove their access to the workspace, but nothing else.
However, the Guest accounts will still be forced to:
- have [two factor authentication](/docs/settings/identity-access-management/access-control/two-factor-authentication) enabled (if such configuration is enforced by the workspace)
- have their IP access added to [IP allow-listing](/docs/settings/identity-access-management/access-control/ip-allow-listing) (if configured for the workspace)
The domain verification can be done in two ways:
1. [Verifying a domain through adding a TXT entry to the DNS](/docs/settings/identity-access-management/access-control/managed-domains#verifying-domains-by-adding-a-txt-entry-to-the-dns)
2. [Verifying a domain through uploading an HTML file to your web server (HTTPS)](/docs/settings/identity-access-management/access-control/managed-domains#verifying-domains-by-uploading-an-html-file-to-your-web-server-https)
## Benefits
---
Once verified, a managed domain will let you perform the following actions on accounts from that domain:
- [reset a user's two factor authentication configuration](/docs/settings/identity-access-management/users#resetting-2fa)
- [revoke access to a workspace](/docs/settings/identity-access-management/users#revoking-access)
- [delete user's account](/docs/settings/identity-access-management/users#deleting-accounts), in addition to revoking access to your workspace
- [set up Single Sign-On through SAML based Identity Provider](/docs/settings/identity-access-management/access-control/single-sign-on)
## Prerequisites
---
- You must be granted a set of permissions that allow access to Settings and editing within this hub.
- You must have access to domain management or to the root folder in the hosting behind the domain.
### Verifying domains by adding a TXT entry to the DNS
This verification method involves copying a TXT record and adding it to your DNS. After a positive domain verification, your DNS host will be checked for the added TXT record.
If it's missing, you will be notified about the detected lack of the TXT record. As a consequence, the domain will remain unverified and wait for you to verify the ownership.
DNS entry verification
In order to verify your domain ownership through a DNS entry:
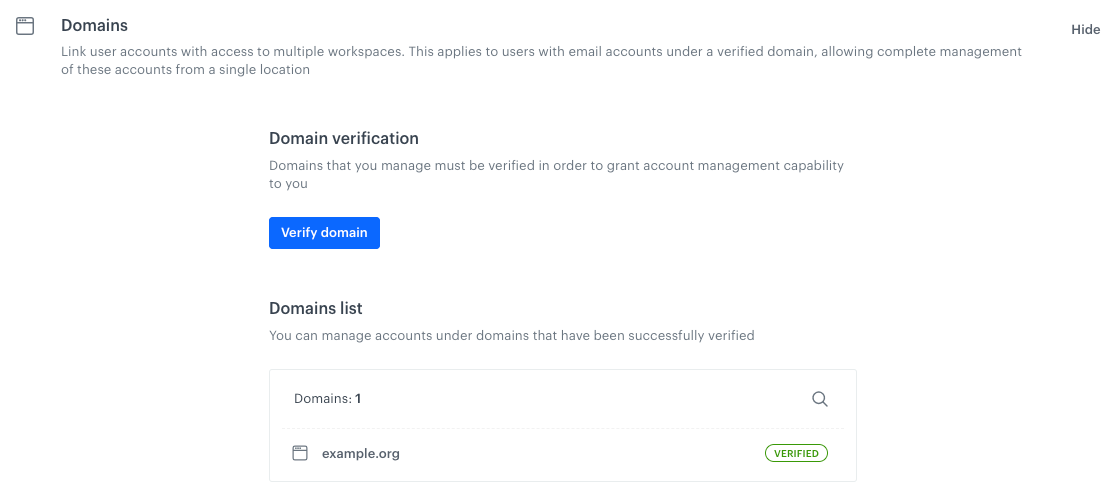
1. Go to **Settings > Access Control**.
2. In the **Manage domain** section, click **Show**.
3. Click **Verify domain**.
**Result**: A pop-up appears.
4. On the pop-up, select **DNS**.
5. Copy the verification code.
6. Go to your DNS host and add a new TXT record with the previously copied code (exemplary code: `synerise-domain-verification=d0b010a9-01de-4cba-af05-dffcf5c6beb3`):
- Record type: TXT
- Alias/Host/Name: leave it blank or enter `@` (depending on your provider)
- Time to live: leave it at default
7. In the **Domain name** field, enter the name of the domain, for example, `synerise.com`, `test.com`, and so on.
8. Confirm by clicking **Verify**.
DNS changes may take up to 24 hours to update depending on your DNS host. You may need to wait before your domains are verified.
**Result**: Your domain is verified. User accounts with the verified domain become manageable in the workspace in **Settings > Users**.
A verified domain
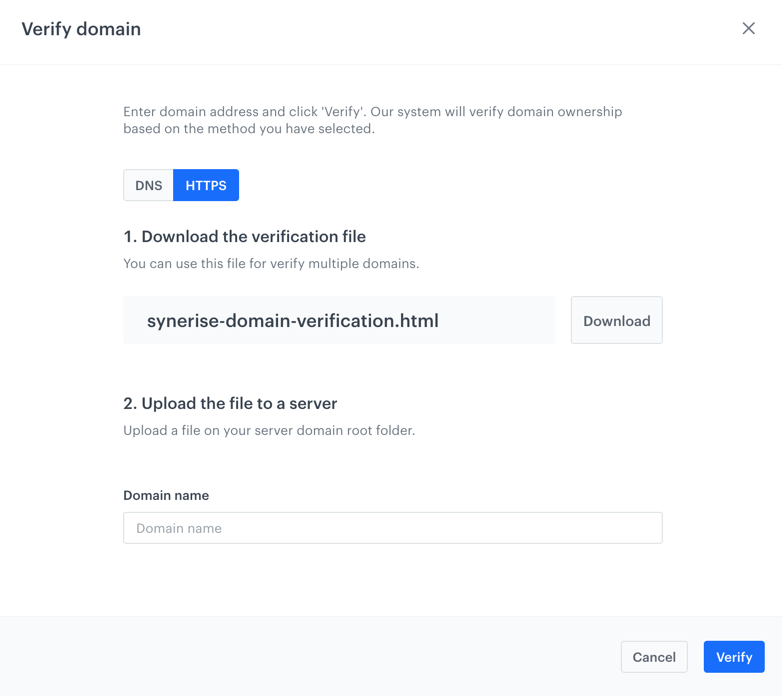
### Verifying domains by uploading an HTML file to your web server (HTTPS)
This method involves uploading an HTML file (which you can download from Synerise) to your web server. For security reasons, the system periodically checks the file. If it's not in the root folder, the domain will not maintain its verified status.
Before you use this method, make sure that:
- You use HTTPS protocol (this is mandatory).
- You have an SSL certificate, as self-signed certificates won't work.
HTTPS entry verification
In order to verify your domain ownership by using an HTML file:
1. Go to **Settings > Access Control**.
2. In the **Manage domain** section, click **Show**.
3. Click **Verify domain**.
**Result**: A pop-up appears.
4. On the pop-up, select **HTTPS**.
5. Download the verification file.
6. Upload it to the root folder of your domain's website.
7. In the **Domain name** field, enter the name of the domain, for example, `synerise.com`, `test.com`, and so on.
8. Confirm by clicking **Verify**.
**Result**: Your domain is verified. User accounts with the verified domain become manageable in the workspace in **Settings > Users**.
A verified domain
### Deleting a verified domain
To remove a verified domain, click **Remove** next to the domain and verify that you want to remove it.
When you remove a domain from your list of verified domains, the users with that domain can no longer be managed.