
This is a guide to the integration between Synerise and Microsoft Entra ID (formerly Microsoft Azure Active Directory (Azure AD)), which enables your users to authorize with their Microsoft Entra ID accounts. The integration with Microsoft Entra ID is offered through the SAML 2.0 protocol. 

## Benefits
---
- **Centralized user management** - With Microsoft Entra ID, you get to administer users from one central place in your organization.

- **Increased security** - The benefit of a single user account in many applications helps to maintain a single identity and credentials, so users don’t have to remember too many credentials. Authentication takes place only with Microsoft Entra ID, with a single set of security-related policies regardless of the application.

- **Improved user experience** - Your users only need to sign in once to use multiple applications. This approach ensures faster authentication, saves time and relieves users from remembering multiple credentials.


## Prerequisites
---

To get started, you need the following items:

- An Microsoft Entra ID subscription with permission to create applications
- At least one [verified domain](/docs/settings/identity-access-management/access-control/managed-domains)
- User permissions to access Settings and perform Identity provider configuration in Synerise


## Configuring SAML application in Microsoft Entra ID
---
The first step is to add the Synerise application to your Microsoft Entra ID account.

1. Log in to [Microsoft Azure Portal](https://portal.azure.com/).
2. Go to **Microsoft Entra ID > Manage > Enterprise Applications**.
3. Select **All applications** and then click **New application**.
4. In the **Add from the gallery** section, in the search box type `Synerise AI Growth Operating System`.
5. From the results, select **Synerise AI Growth Operating System** and add the application.  
    **Result**: Your application is added.
7. On the Synerise AI Growth Operating System application integration page, go to **Manage > Single sign-on**. 
    <figure>
    <img src="/api/docs/image/54176ad07f146575310749eba44b7c2f42c1b327/docs/settings/_gfx/azure-configuration.png" alt="SAML-based SSO" class="full" >
    <figcaption> Configuration in the Microsoft Azure portal </figcaption>
    </figure>
8. In the **Basic SAML Configuration** section, on the right side, click the **Edit** button.
9. <span id="redirect-uri"></span>Obtain the value of the **Service Provider Redirect URI** field (you can find it in Synerise, go to <img src="/api/docs/image/54176ad07f146575310749eba44b7c2f42c1b327/icons/settings-icon.svg" alt="Settings icon" class="icon"> **Settings > Access Control > Identity Providers**), and enter this value in the following fields in Azure MD: 
    - **Reply URL (Assertion Consumer Service URL)**
    - **Sign on URL**
10. <span id="download-certificate"></span>In the **SAML Signing Certificate** section, download **Certificate (Base64)**.
11. <span id="login-url"></span>From the **Set up Synerise AI Growth Cloud** section, note down the value of the **Login URL** field (it's required in the further part of the integration process). 
12. <span id="app-id"></span>From the **Set up Synerise AI Growth Cloud** section, note down the value of the **Azure AD Identifier** field (it's required in the further part of the integration process).

## Configuring user assignment to the application
---
You can assign users to the Synerise application in several ways within Microsoft Entra ID depending on your needs. The configuration settings allow you to let all your users use Synerise or only the selected user groups/individuals.

1. Log in to [Microsoft Azure Portal](https://portal.azure.com/).
2. Go to **Microsoft Entra ID > Manage > Enterprise Applications**. 
3. Select the **Synerise** application.
4. Go to the **Manage > Properties** section.
    - If you want to require assigning users to the app (unassigned users won’t be able to use the application, regardless of any further configuration), set **Assignment required?** to **Yes**.
        
      <details class="accordion"><summary>Further procedure when you select Yes</summary><div class="accordion-content"><ol> <li>Go to <strong>Users and groups</strong> and click <strong>Add user</strong>.</li> <li>Select individual users or groups who will be granted access to the Synerise application.</li> <li>Confirm the selection by clicking <strong>Assign</strong>.</li> </ol></div></details>

    - If you don’t want to assign users to the app, set the **Assignment required?** to **No**.
        
      <details class="accordion"><summary>Results when you set No</summary><div class="accordion-content"><ul> <li>All users and groups have access to the application.</li> <li>If you want to grant access to specific user groups, you can map those user groups in <a href="/docs/settings/identity-access-management/access-control/single-sign-on/#define-permissions-for-users-who-authorize-by-identity-provider">Dynamic group assignment</a> in Synerise.</li> <li>If there was no role assignment mapping, whenever a user accesses the Synerise app, this user receives information about the lack of access and a request to contact Organization admin.</li> </ul></div></details>


## Configuring application access based on Microsoft Entra ID security groups
---


<div class="admonition admonition-important"><div class="admonition-icon"><svg xmlns="http://www.w3.org/2000/svg" fill="none" viewBox="0 0 24 24" stroke="currentColor" stroke-width="2.5"><path stroke-linecap="round" stroke-linejoin="round" d="M12 8v4m0 4h.01M21 12a9 9 0 11-18 0 9 9 0 0118 0z" /></svg></div><div class="admonition-body"><div class="admonition-content">

Perform this procedure only if you set the **User assignment required** to **No** in the [Configuring user application assignment procedure](/docs/settings/identity-access-management/single-sign-on-tutorials/setup-sso-entra-id#configuring-user-assignment-to-the-application).  
Otherwise, omit it.

</div></div></div>


1. Log in to [Microsoft Azure Portal](https://portal.azure.com/).
2. Go to **Microsoft Entra ID > Manage > Groups**.
3. Select the security groups you want to enable access for.
4. Note down the **Object Ids** of the security groups for which you want to enable access to Synerise.  
   In this example, access will be granted for three security groups:
    <figure>
    <img src="/api/docs/image/54176ad07f146575310749eba44b7c2f42c1b327/docs/settings/_gfx/azure-configuration-groups.png" alt="SAML-based SSO" class="full" >
    <figcaption>Example groups</figcaption>
    </figure>
    
    - `SYN_ADMIN` with **Object Id**: `9338ee1f-f662-48df-b286-7b93c9816e38`) where we want to assign the PROFILE_ADMIN role in Synerise
    - `SYN_MANAGER` with **Object Id**: `1826c186-ec0d-4ac0-a939-53d964b0e157` where we want to assign the PROFILE_MANAGER role in Synerise
    - `SYN_USER` with **Object Id**: `731e7b07-604a-4ce5-b26e-e1a73c4e440f` where we want to assign the PROFILE_USER role in Synerise
    
   <div class="admonition admonition-warning"><div class="admonition-icon"><svg xmlns="http://www.w3.org/2000/svg" fill="none" viewBox="0 0 24 24" stroke="currentColor" stroke-width="2.5"><path stroke-linecap="round" stroke-linejoin="round" d="M12 9v2m0 4h.01m-6.938 4h13.856c1.54 0 2.502-1.667 1.732-2.5L13.732 4c-.77-.833-1.964-.833-2.732 0L4.082 16.5c-.77.833.192 2.5 1.732 2.5z" /></svg></div><div class="admonition-body"><div class="admonition-content">

   These are just example **Object Ids**. While performing the procedure, replace them with the actual IDs for your security groups.

   </div></div></div>

6. After noting down the IDs, go to Synerise (<img src="/api/docs/image/54176ad07f146575310749eba44b7c2f42c1b327/icons/settings-icon.svg" alt="Settings icon" class="icon"> **Settings > Access Control > Identity Providers** ) to the **Just-in-Time provisioning** section.
    1. Switch the **Dynamic role assignment** option on.
    2. Follow the instructions described [here](/docs/settings/identity-access-management/access-control/single-sign-on#define-permissions-for-users-who-authorize-by-identity-provider).

## Configuring application access based on Synerise SAML app assignment
---

<div class="admonition admonition-important"><div class="admonition-icon"><svg xmlns="http://www.w3.org/2000/svg" fill="none" viewBox="0 0 24 24" stroke="currentColor" stroke-width="2.5"><path stroke-linecap="round" stroke-linejoin="round" d="M12 8v4m0 4h.01M21 12a9 9 0 11-18 0 9 9 0 0118 0z" /></svg></div><div class="admonition-body"><div class="admonition-content">

Perform this procedure only if you set the **User assignment required** to **Yes** in the [Configuring user application assignment procedure](/docs/settings/identity-access-management/single-sign-on-tutorials/setup-sso-entra-id#configuring-user-assignment-to-the-application).  
Otherwise, omit it.

</div></div></div>


1. Log in to [Microsoft Azure Portal](https://portal.azure.com/). 
2. Go to **Microsoft Entra ID > Manage > Enterprise Applications**. 
3. Select the **Synerise** application (which was created in the [Configuring SAML application in Microsoft Azure](#configuring-user-assignment-to-the-application) section).
4. In the **Overview** section (which you're currently in), select **1. Assign users and groups**.
5. Select **Add user > Users and groups** and select the groups you want to assign to the Synerise application. 
6. After assigning all users or groups, to confirm selection, click the **Assign** button.
7. Continue the set up within Synerise as described in [this step](#mapping-step) in [Configuring Microsoft Entra ID as an Identity Provider in Synerise](#configuring-microsoft-entra-id-as-an-identity-provider-in-synerise).

## Configuring group claims
---
In order to pass role or group claims within Microsoft Azure, you must: 

1. Log in to [Microsoft Azure Portal](https://portal.azure.com/).
2. Go to **Microsoft Entra ID > Manage > App registrations**.
3. Select the **Synerise** application (which was created in the [Configuring SAML application in Microsoft Azure](#configuring-user-assignment-to-the-application) section).
4. Go to **Token configuration** section.
5. <span id="step5"></span>Click **Add groups claim**.
    - If you want to enable access to the application based on Active Directory security group assignment for users, click **Security groups**.
    - If you want to enable access to the application based only on groups assigned to the Synerise application, click **Groups assigned to the application**.
6. Optionally, go to the **SAML** section and select **Emit groups as role claims**.
    - If you select it, the claim will use the following attribute name: `http://schemas.xmlsoap.org/ws/2005/05/identity/claims/role`
    - If you leave this checkbox unselected, the SAML integration will use the following attribute name: `http://schemas.xmlsoap.org/ws/2005/05/identity/claims/groups` or `http://schemas.microsoft.com/ws/2008/06/identity/claims/groups`
7. Continue the configuration depending on your selection in [step 5](#step5):
   - If you selected **Security groups**, continue to [this procedure](#configuring-application-access-based-on-microsoft-entra-id-security-groups).
   - If you selected **Groups assigned to the application**, continue to [this procedure](#configuring-microsoft-entra-id-as-an-identity-provider-in-synerise).

## Configuring Microsoft Entra ID as an Identity Provider in Synerise
---

1. Log in to Synerise.
2. Select the workspace you want to configure single sign-on for.
3. Go to <img src="/api/docs/image/54176ad07f146575310749eba44b7c2f42c1b327/icons/settings-icon.svg" alt="Settings icon" class="icon"> **Settings > Access Control > Single Sign-On (SSO)**.
4. In the **General settings** section: 
    1. From the **Authentication methods** dropdown list, select the authentication method to the value of your choice. Read more information about it the [Make log-in screen modifications](/docs/settings/identity-access-management/access-control/single-sign-on#make-log-in-screen-modifications) section.
    
       <div class="admonition admonition-tip"><div class="admonition-icon"><svg xmlns="http://www.w3.org/2000/svg" fill="none" viewBox="0 0 24 24" stroke="currentColor" stroke-width="2.5"><path stroke-linecap="round" stroke-linejoin="round" d="M9.663 17h4.673M12 3v1m6.364 1.636l-.707.707M21 12h-1M4 12H3m3.343-5.657l-.707-.707m2.828 9.9a5 5 0 117.072 0l-.548.547A3.374 3.374 0 0014 18.469V19a2 2 0 11-4 0v-.531c0-.895-.356-1.754-.988-2.386l-.548-.547z" /></svg></div><div class="admonition-body"><div class="admonition-content">

       At the beginning, we suggest setting it to **Both methods** unless you have a separate account that’s in different domain than you will be setting up SSO for.

       </div></div></div>

    2. <span id="button-name"></span> In the **Sign-in button text** field, type the name that is displayed on the sign-in button, for example `Sign in with Microsoft Entra ID`.
5. In the **Authentication settings** section:
    1. From the **Managed domains**, select the domains you want to use for your SSO.
    2. Enable **Attribute containing email address**.  
        **Result**: The **URL of the email attribute** text field appears.
    3. In the **URL of the email attribute**, enter the email attribute name: `http://schemas.xmlsoap.org/ws/2005/05/identity/claims/emailaddress` (use it only for Microsoft Entra ID integration).
    <figure>
    <img src="/api/docs/image/54176ad07f146575310749eba44b7c2f42c1b327/docs/settings/_gfx/azure-integration-general.png" alt="SAML-based SSO" class="full" >
    <figcaption> The result </figcaption>
    </figure>

6. <span id="mapping-step"></span>In the **Just-in-Time provisioning** section, follow the procedure described [here](/docs/settings/identity-access-management/access-control/single-sign-on#define-permissions-for-users-who-authorize-by-identity-provider).
    - If you kept the default role assignment: 
        <figure>
        <img src="/api/docs/image/54176ad07f146575310749eba44b7c2f42c1b327/docs/settings/_gfx/azure-default-roles.png" alt="SAML-based SSO" class="full" >
        <figcaption> Filled in dynamic assignment settings </figcaption>
        </figure>
            
        **Result**: In this model, every authenticated person has a role (or roles) assigned according to the settings defined here regardless of any configuration on Identity Provider side and depending on setup in the **Update user roles while signing in** field.
    - If you selected dynamic role assignment:
        <figure>
        <img src="/api/docs/image/54176ad07f146575310749eba44b7c2f42c1b327/docs/settings/_gfx/azure-dynamic-assignment.png" alt="SAML-based SSO" class="full" >
        <figcaption> Filled in dynamic assignment settings </figcaption>
        </figure>
        
        **Result**: Every authenticated person has a role (or roles) assigned based on group/role mapping between Microsoft Entra ID and Synerise depending on setup in the **Update user roles while signing in** field.
7. In the **SAML protocol settings** section:
    1. In the **Issuer** and **SSO endpoint** fields, enter the Login URL obtained from the Microsoft Azure Portal (you copied the URL while performing [step 10](#login-url) in the [Configuring SAML application in Microsoft Azure](#configuring-saml-application-in-microsoft-entra-id) procedure).
    2. In the **Identity Provider application ID** field, paste the value you obtained from **Azure AD Identifier** from Microsoft Azure Portal (you copied the URL while performing [step 11](#app-id) in the [Configuring SAML application in Microsoft Azure procedure](#configuring-saml-application-in-microsoft-entra-id)). 
    3. The **Service Provider redirect URI** is filled in by default (you used it in [step 8](#redirect-uri) in the [Configuring SAML application in Microsoft Azure procedure](#configuring-saml-application-in-microsoft-entra-id)).
    3. In **Request binding**, select the method of communication between the requestors and responders.
    5. In **Response signature verification**, select where the SAML signature is available.
    4. In **Response validation method**, select **Static**.
    4. In **Identity Provider Signature Certificate**, upload certificate downloaded from Microsoft Azure Portal (you downloaded it in [step 9](#download-certificate) in the [Configuring SAML application in Microsoft Azure procedure](#configuring-saml-application-in-microsoft-entra-id)).
    5. Optionally, set the **Max clock skew** to 10 seconds.  
        **Result**:
            <figure>
            <img src="/api/docs/image/54176ad07f146575310749eba44b7c2f42c1b327/docs/settings/_gfx/azure-saml-configuration.png" alt="SAML-based SSO" class="full" >
            <figcaption> The result of configuring SAML settings in Synerise </figcaption>
            </figure>
8. Next to the **Single Sign-On (SSO)** headline, click **Apply**.

## Test SSO 
---

After completing the Microsoft Entra ID setup, test the integration.

1. If you are logged in to Synerise, log out. 
2. Go [the Synerise portal](https://app.synerise.com/spa/login).
3. Enter your email address.
4. Click **Continue**.
5. Click the **Sign in with Microsoft Entra ID** (the text on the button depends on the value you entered in [this step](#button-name)).  
    **Result**: You will be redirected to Microsoft where you will be authenticated immediately if there is an active session or you will be asked to authenticate and as a result you'll be redirected back to Synerise.


   <details class="accordion"><summary>In case you can't authenticate</summary><div class="accordion-content"><ul> <li><p>
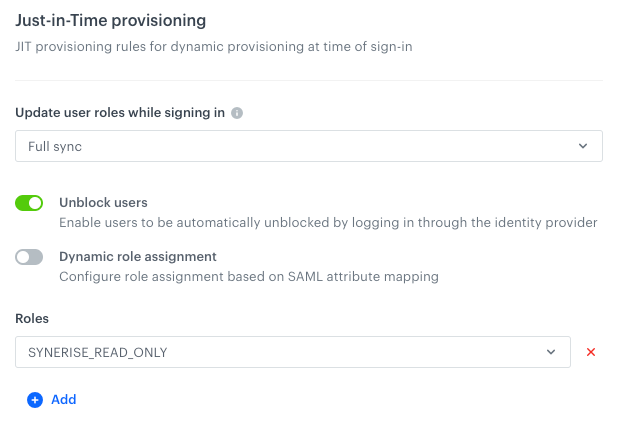
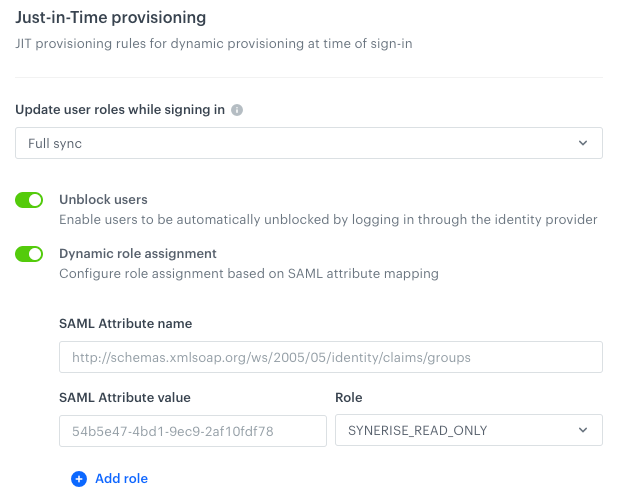
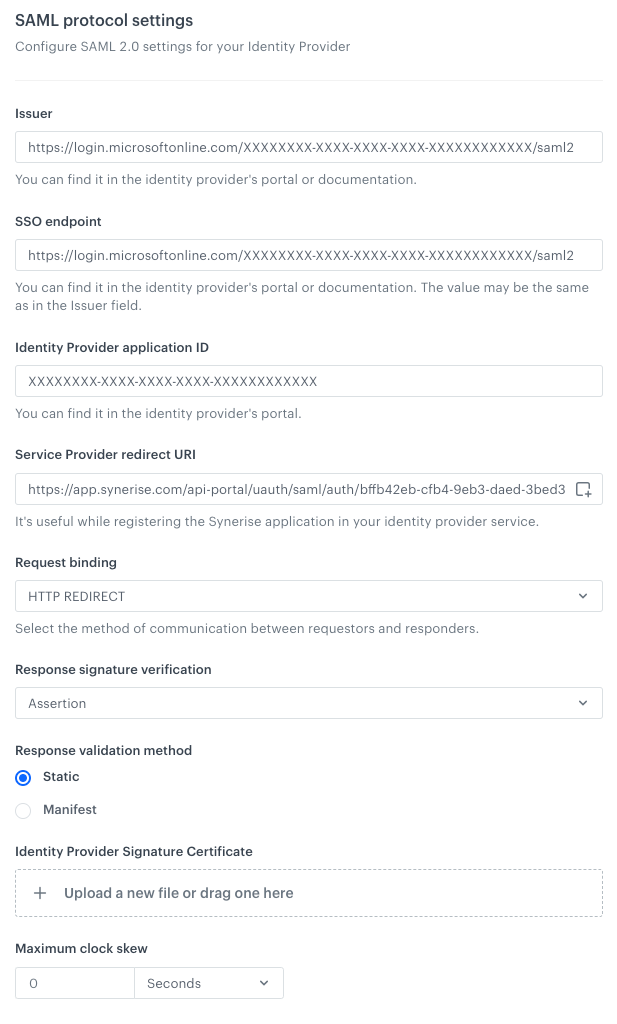
In the Synerise application, review the SAML setup for any typos or errors in the Just-In-Time provisioning configuration.</p> </li> <li><p>
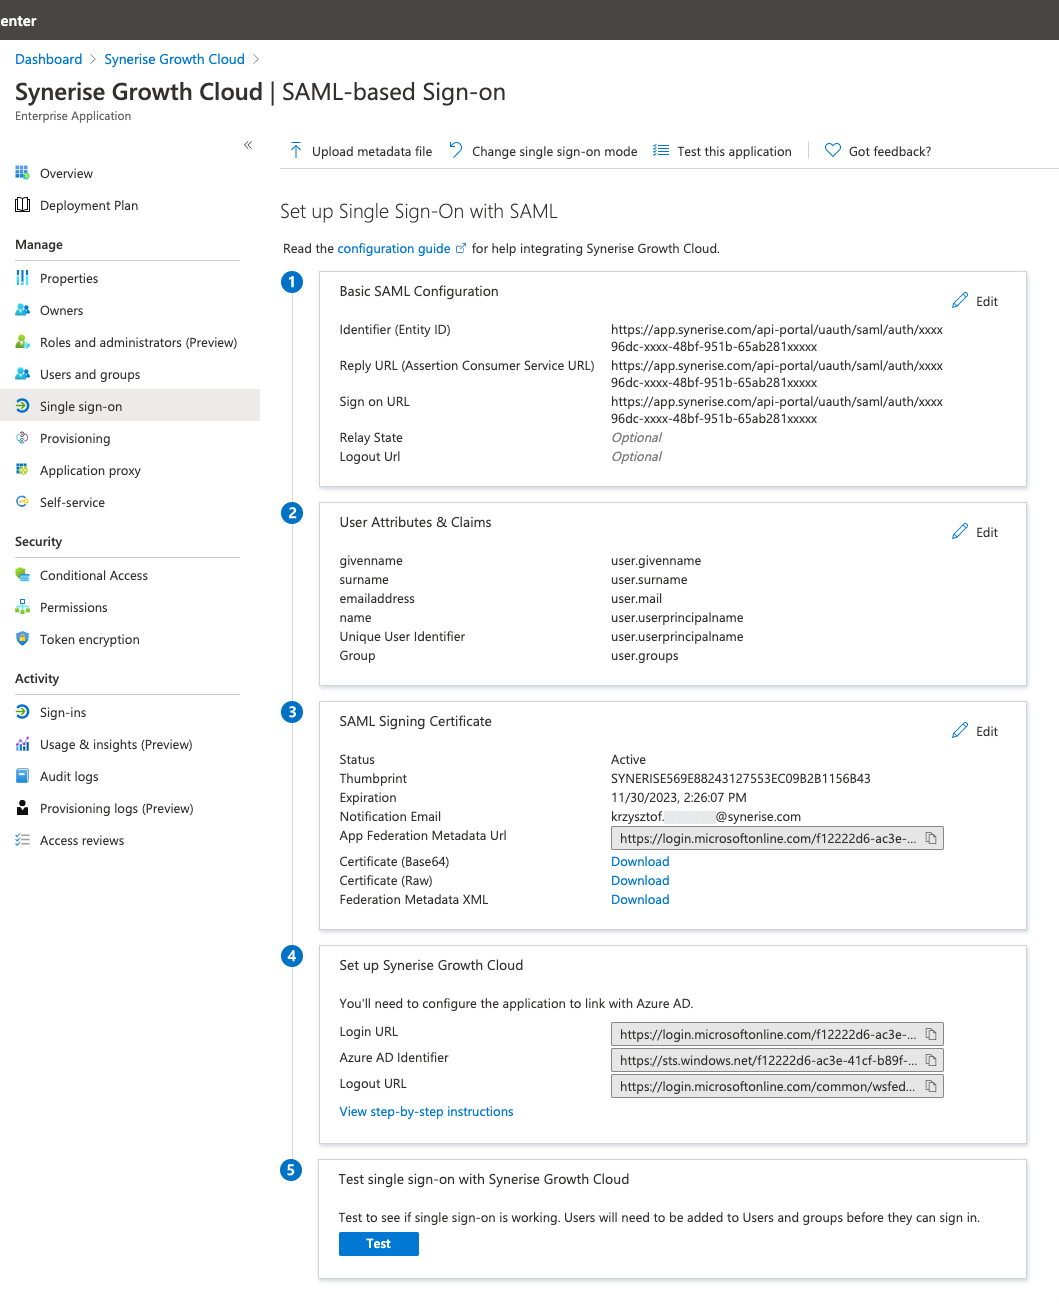
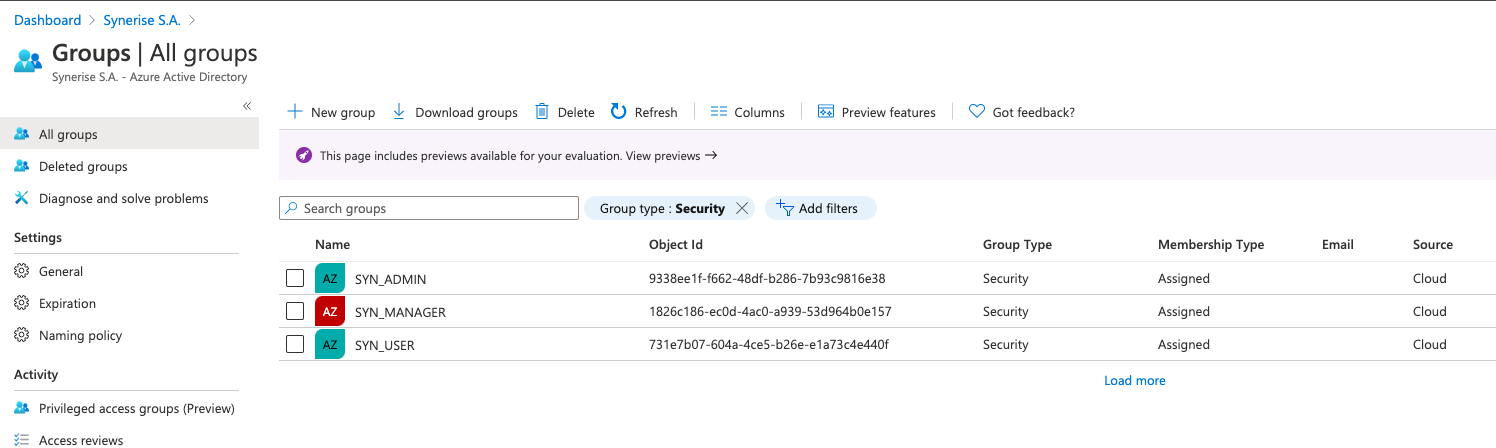
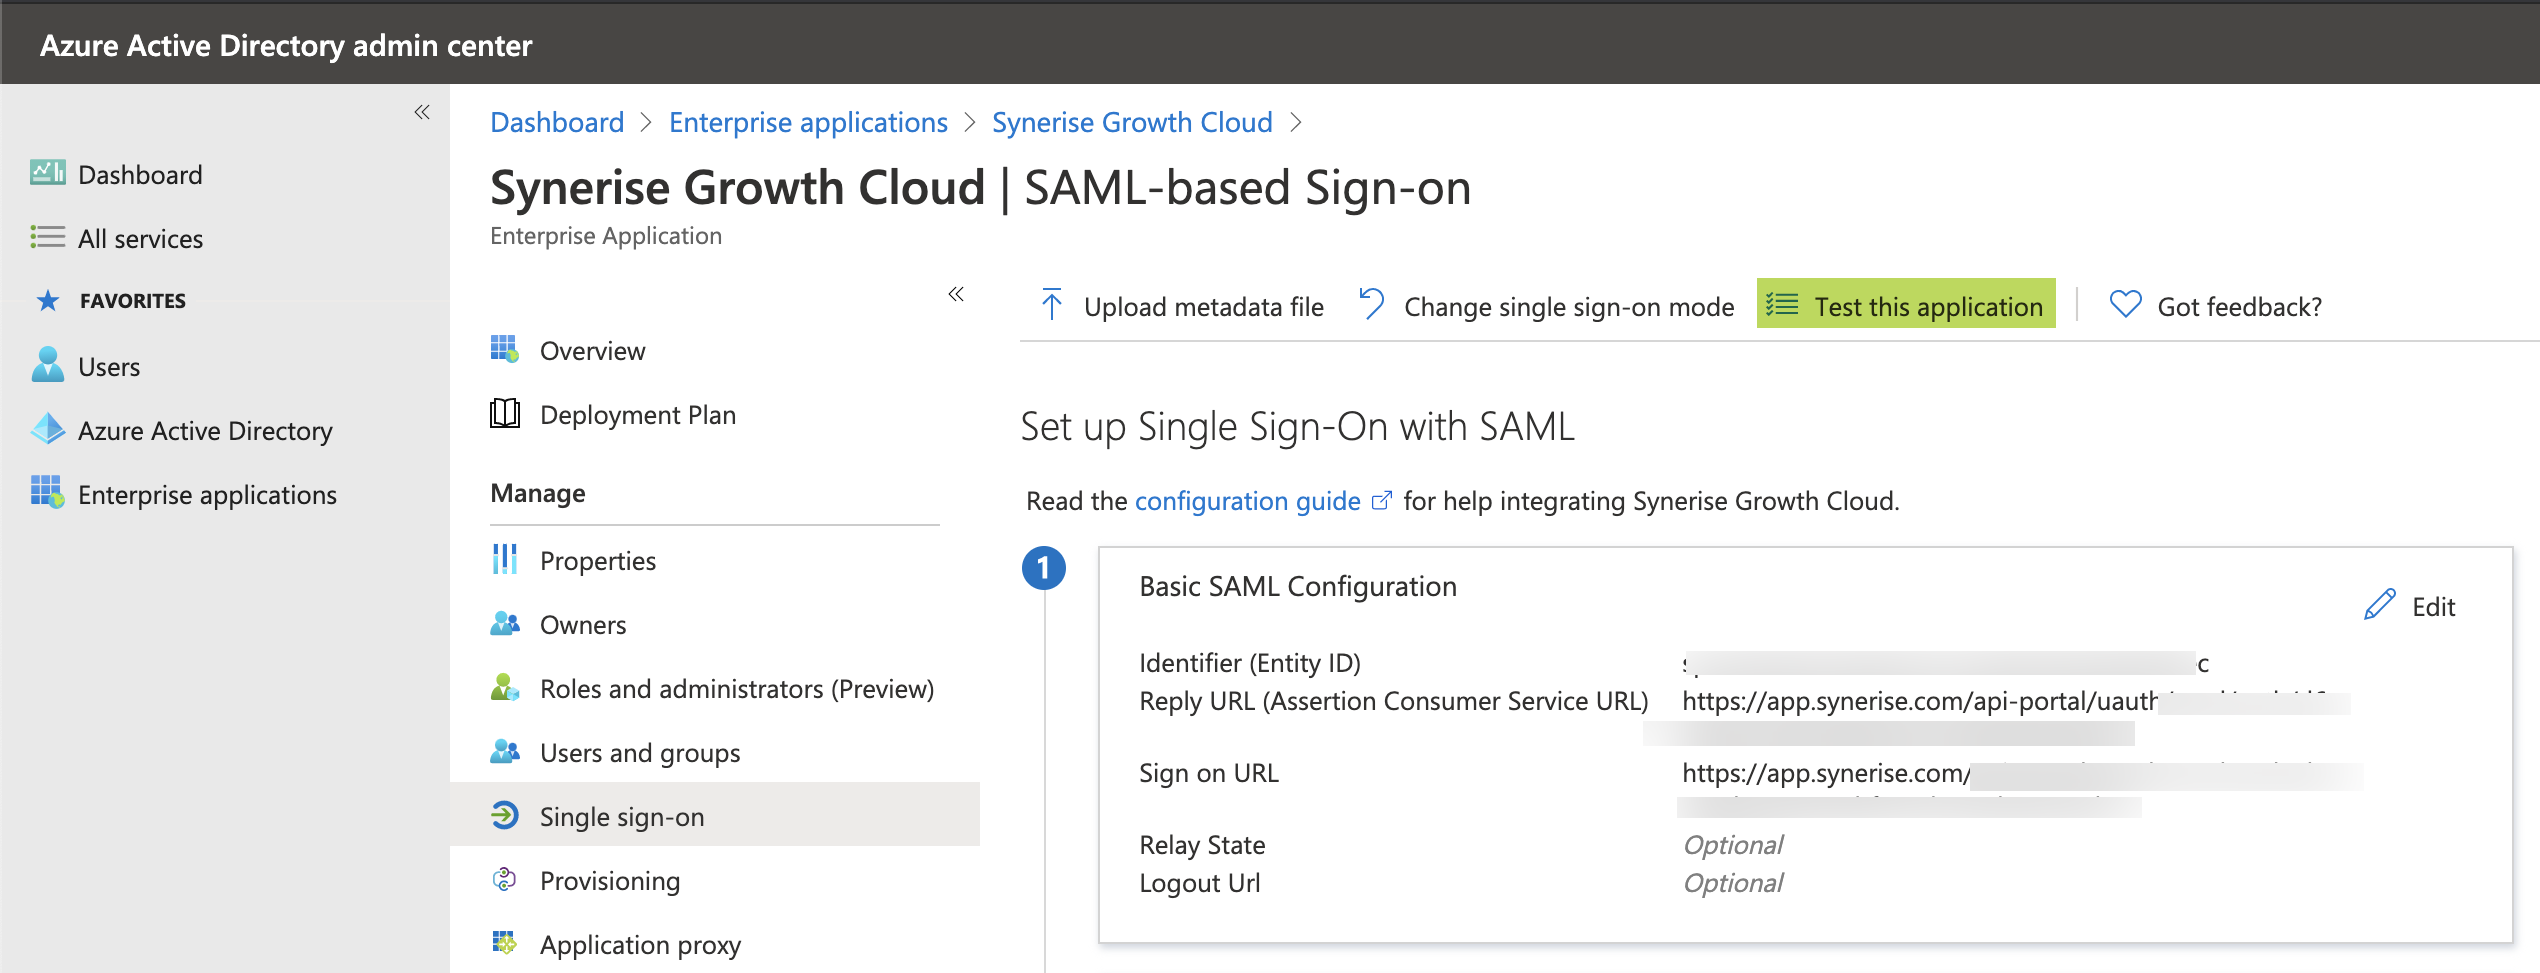
In Microsoft Entra ID portal:</p> <ol> <li>Click <strong>Test this application</strong>.<br> <strong>Result</strong>: You are automatically signed in to the Atlassian Cloud for which you can configure SSO. <figure> <img src="/api/docs/image/54176ad07f146575310749eba44b7c2f42c1b327/docs/settings/_gfx/test-this-application.png" alt="SAML-based SSO" class="full" > <figcaption> The result of configuring SAML settings in Synerise </figcaption> </figure></li> </ol> </li> <li><p>Alternatively, Synerise is available in <a href="https://myapplications.microsoft.com/">https://myapplications.microsoft.com/</a> if you didn&#39;t set the <strong>Visible to users?</strong> option to <strong>No</strong> in the <strong>Enterprise application</strong> setup.</p> </li> </ul></div></details>


Congratulation! You signed in through Microsoft Entra ID.


<div class="admonition admonition-note"><div class="admonition-icon"><svg xmlns="http://www.w3.org/2000/svg" fill="none" viewBox="0 0 24 24" stroke="currentColor" stroke-width="2.5"><path stroke-linecap="round" stroke-linejoin="round" d="M13 16h-1v-4h-1m1-4h.01M21 12a9 9 0 11-18 0 9 9 0 0118 0z" /></svg></div><div class="admonition-body"><div class="admonition-content">

When the process works as expected, you can switch the **Authentication Mode** setting, so only the SSO authentication method is allowed, excluding the option of authorizing through email and password.

</div></div></div>


