Establishing a connection is the first step of integrating Shopify with Synerise. Once the connection is in place, data can flow between the two platforms. After you complete the procedure described in this article, you can run data synchronization and define attribute and event parameter mapping, as described in [Configuring Shopify data synchronization](/docs/settings/tool/shopify/configuring-shopify-synchronization).
## Prerequisites
---
- Your Synerise user account must have the **Settings > Integration**: `create` permission.
- You must have admin access to the Shopify organization that owns your store, so you can create an app in the [Shopify Dev Dashboard](https://dev.shopify.com).
## Preparing an app in the Shopify Dev Dashboard
---
Before creating a connection in Synerise, create and configure an app in Shopify.
1. Log in to [dev.shopify.com](https://dev.shopify.com) and create an app in the organization that owns your store.
2. On the app's **Versions** tab, add the following scopes:
- `read_products`
- `read_customers`
- `read_orders`
4. Release the version.
3. On the app's **Home** tab, install the app on your store.
4. From the app's **Settings** tab, copy the **Client ID** and **Client secret**.
You will need these values to create a connection in Synerise.
## Creating a connection in Synerise
---
1. In Synerise, go to **Settings > Apps & Services**.
2. Find Shopify and click **Show**.
3. Click **New integration**.
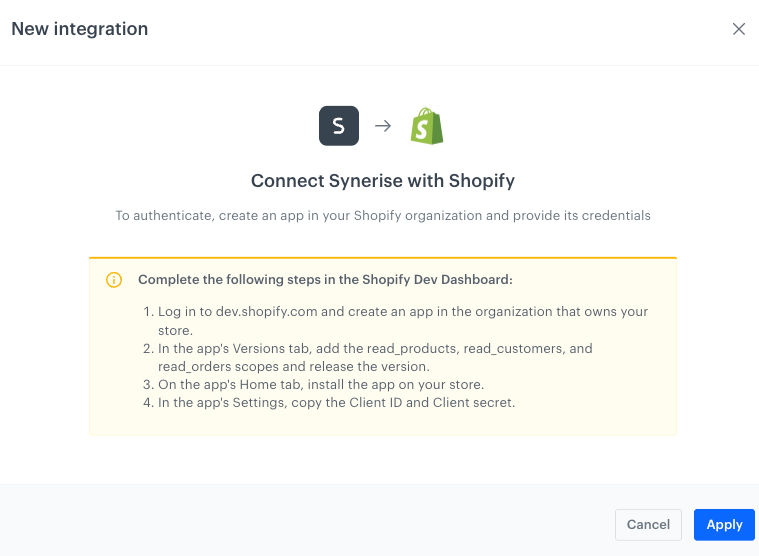
**Result**: A pop-up appears, listing the steps you completed in [Preparing an app in the Shopify Dev Dashboard](#preparing-an-app-in-the-shopify-dev-dashboard).
The New integration pop-up with instructions for the Shopify Dev Dashboard
4. Enter the **Client ID** and **Client secret** you copied while preparing the app in Shopify.
5. Click **Apply**.
**Result**: At the bottom of the **Settings** menu, **(Shopify) Data import** appears.
## Accessing Shopify configurations
---
Once a connection is created, go to **Settings > (Shopify) Data import** to manage your integration:
- On the **Configurations** tab, you can view, filter by status (**Active**, **Draft**, **Paused**), and create configurations for customers, orders, and products.
- On the **All historical data import** tab, you can view historical data imports launched from any configuration.
To learn how to create and configure a configuration, see [Configuring Shopify data synchronization](/docs/settings/tool/shopify/configuring-shopify-synchronization).
## Implementing tracking codes in your shop
---
In this part of the process, you will need to implement [Synerise tracking codes](/developers/web/installation-and-configuration) in two places:
1. [A pixel](#adding-a-pixel-with-the-tracking-code) in the Shopify admin panel
2. [The store's theme's code](#adding-the-tracking-code-to-the-store-theme-code)
### Adding a pixel with the tracking code
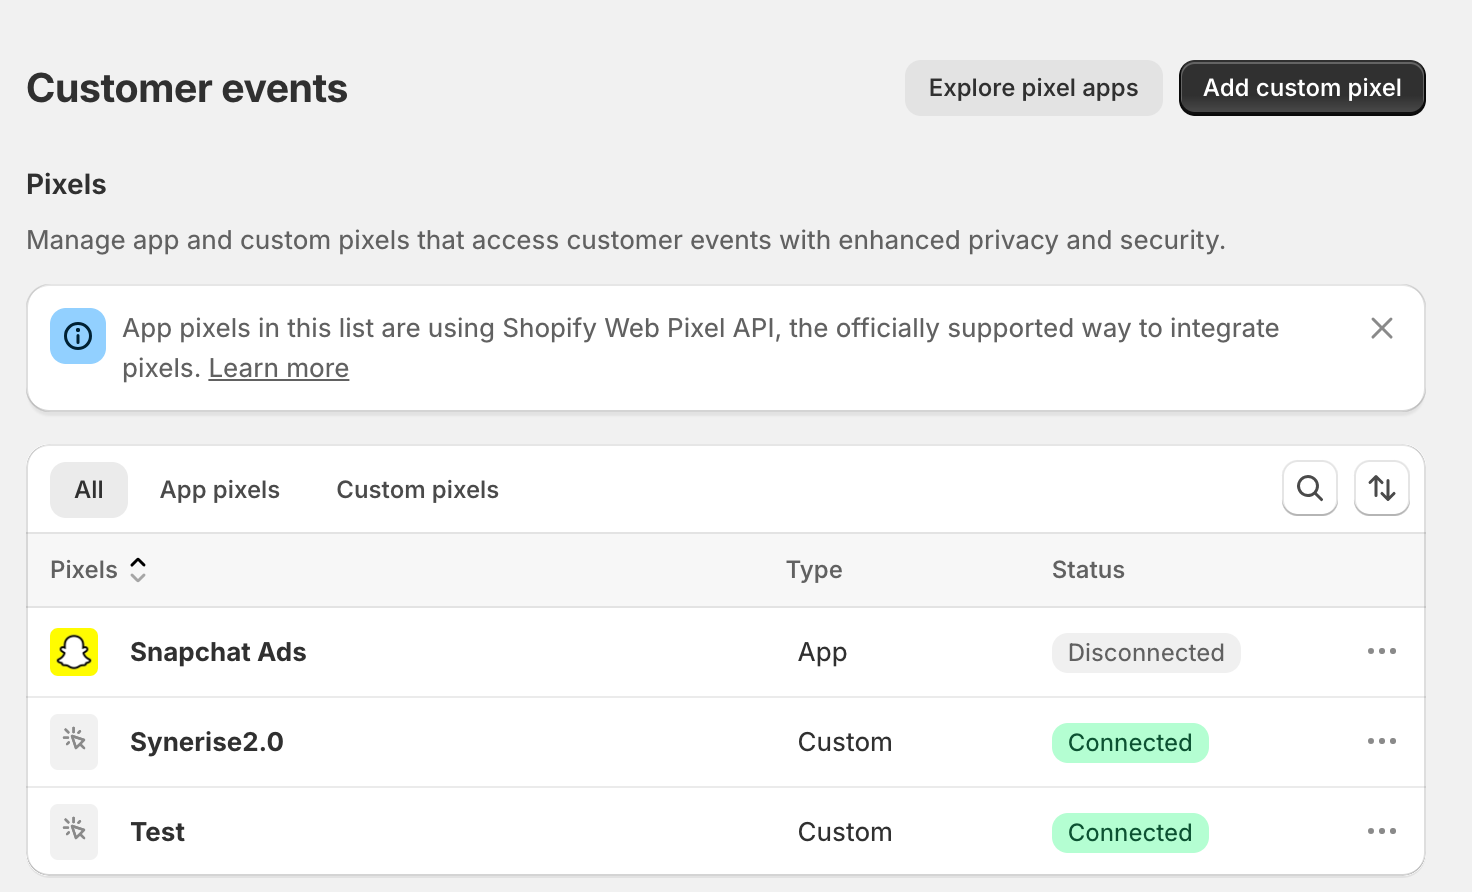
1. In Shopify, go to **Admin panel > Settings > Customer events**.
**Result**:
The customer events view
2. Click **Add custom pixel**.
**Result**: A pop-up appears.
3. In the **Pixel name** field, enter the name of the pixel.
This is only for identifying the pixel on the list of pixels.
4. Click **Add pixel**.
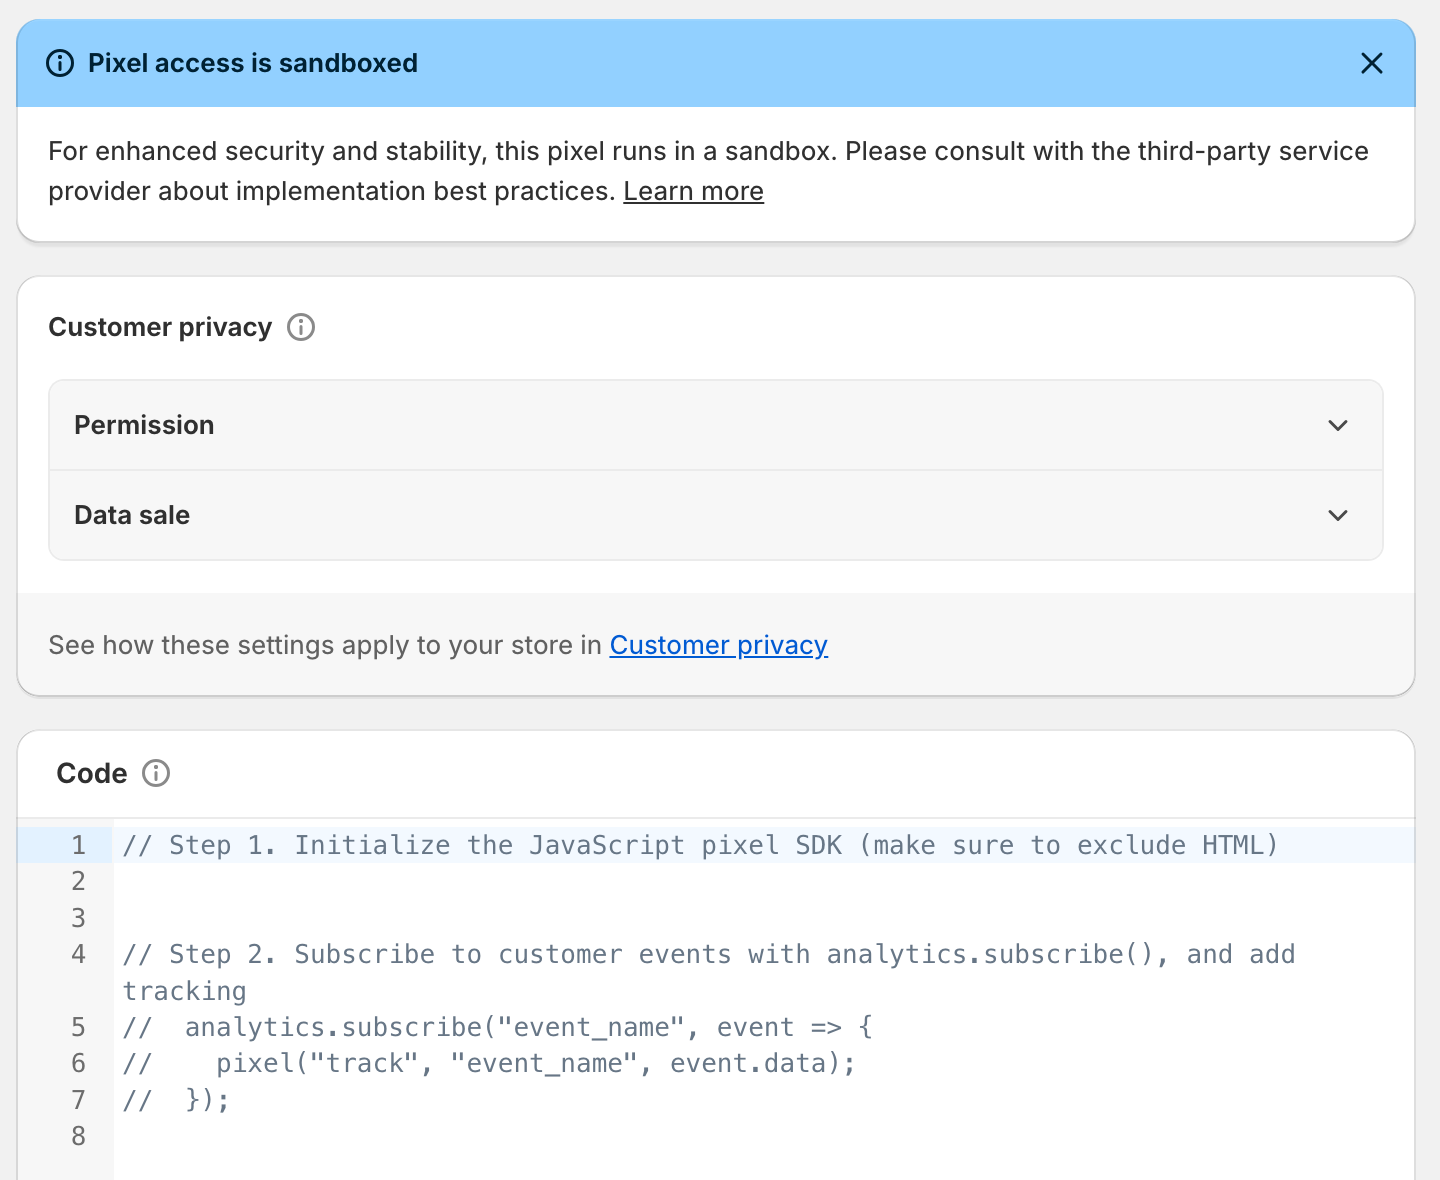
**Result**:
Configuration of a pixel
5. Leave the settings in the **Customer privacy** section at default.
6. In the **Code** section, enter your **Tracking code for Shopify pixel**.
7. In the upper right corner, click **Save**.
8. At the bottom of the **Code** section, click **Connect**.
**Result**: Tracking of the following customer activities starts:
- adding or removing an item from the cart
These two activities generate [`product.addToCart`](/docs/assets/events/event-reference/items#productaddtocart) and [`product.removeFromCart`](/docs/assets/events/event-reference/items#productremovefromcart) events in the Synerise platform on the card of a customer. These activities also generate a [`cart.status`](/docs/assets/events/event-reference/items#cartstatus) event. The parameters of all these events contain the IDs of the products.
- viewing a page
This activity generates a [`page.visit`](/docs/assets/events/event-reference/web-and-app#pagevisit) event and triggers tracking the cart status. The basket contents are saved in the browser's local storage (in a `_snrs_cart_state` parameter), so when a customer visits the website, the contents of their cart are checked as well as the list of IDs of product they visited.
- logging in and logging out
These activities generate [`client.login` event](/docs/assets/events/event-reference/web-and-app#clientlogin) and [`client.logout` event](/docs/assets/events/event-reference/web-and-app#clientlogout) events, respectively
### Adding the tracking code to the store theme code
1. In the Shopify admin panel, go to **Online Store > Themes**.
2. On the theme you currently use, click the **Customize** button.
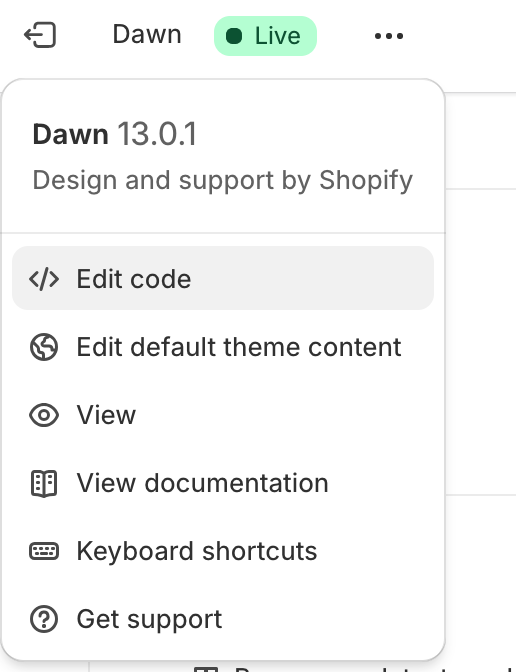
3. In the upper left corner, click the three dot icon.
**Result**:
After clicking the three dots icon, a dropdown appears
4. From the dropdown list, select **Edit code**.
5. In `theme.liquid.html`, enter your **Tracking code for store's theme code**.
6. Save the changes.
**Result**:
- When a customer visits a product page, a [`page.visit`](/docs/assets/events/event-reference/web-and-app#pagevisit) event with the item's SKU is generated.
- [dynamic content](/docs/campaign/dynamiccontent) can be used on the store website.
- events connected with:
- creating, updating and deleting customers,
- transactions
- item updates
will be sent after enabling [live and historical synchronization](/docs/settings/tool/shopify/configuring-shopify-synchronization#running-historical-and-live-synchronization), which is described in the further part of the process.
 **Settings > Apps & Services**.
2. Find Shopify and click **Show**.
3. Click **New integration**.
**Result**: A pop-up appears, listing the steps you completed in [Preparing an app in the Shopify Dev Dashboard](#preparing-an-app-in-the-shopify-dev-dashboard).
**Settings > Apps & Services**.
2. Find Shopify and click **Show**.
3. Click **New integration**.
**Result**: A pop-up appears, listing the steps you completed in [Preparing an app in the Shopify Dev Dashboard](#preparing-an-app-in-the-shopify-dev-dashboard).