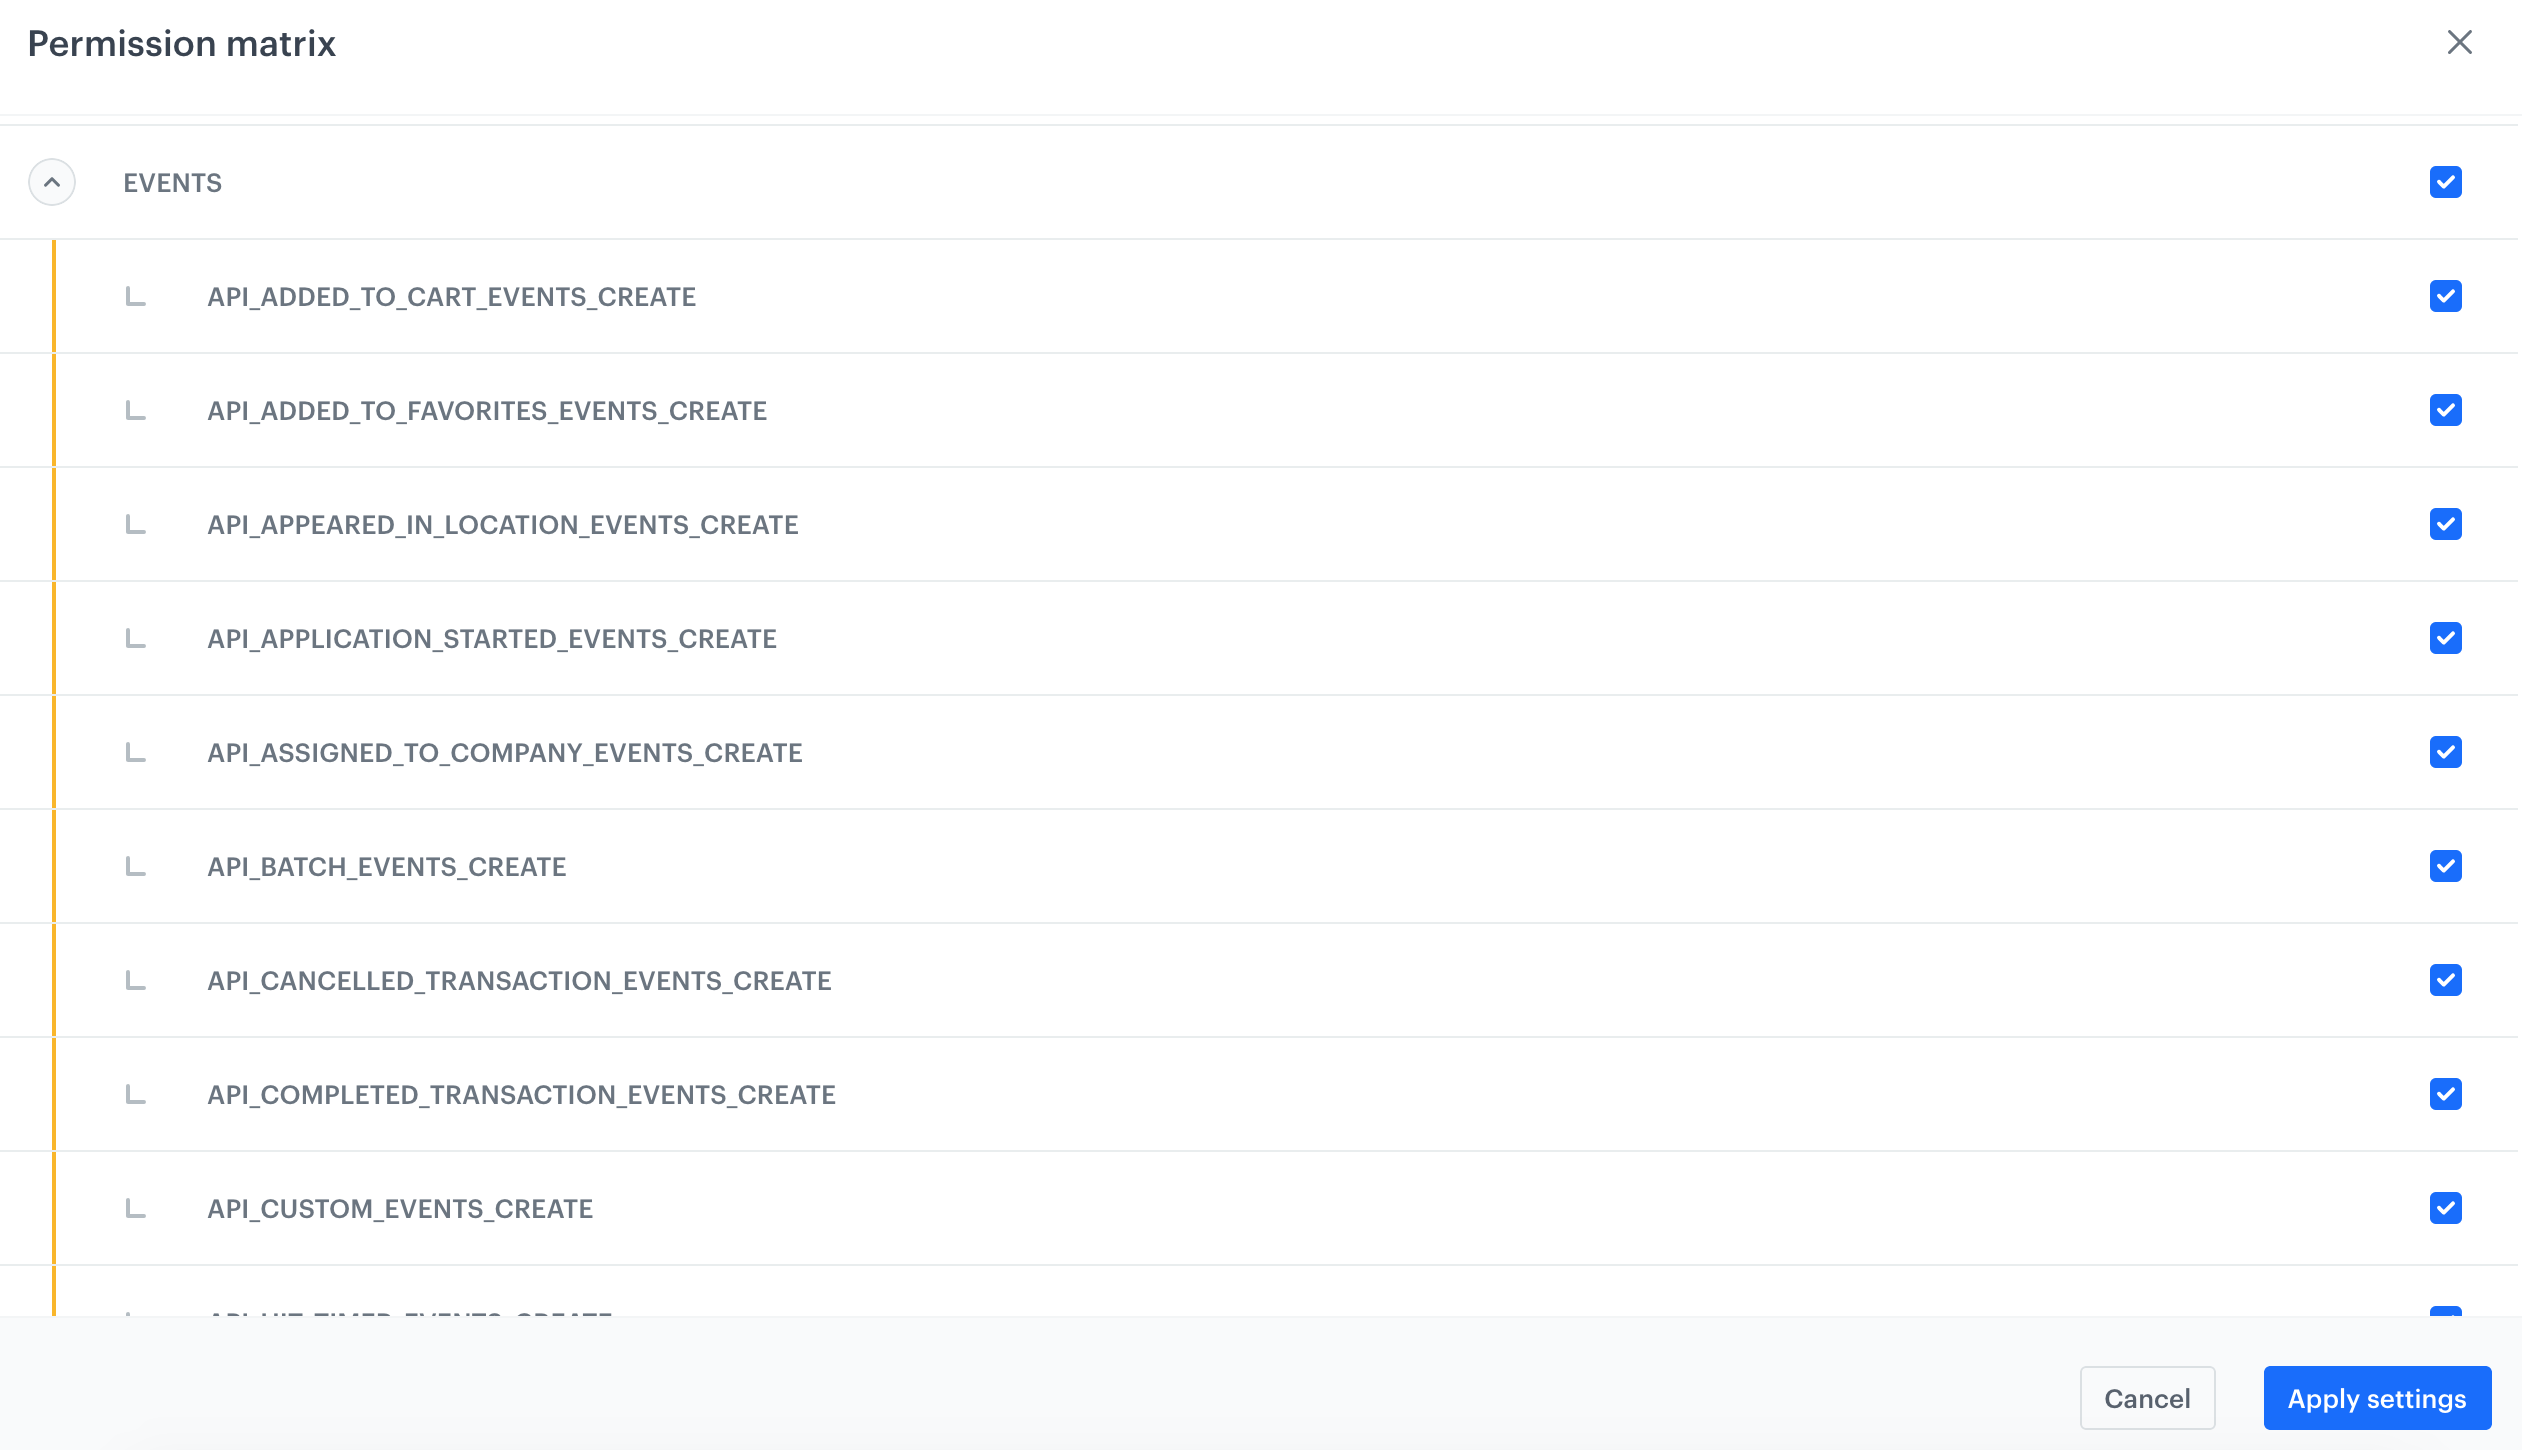
Sylius is a fast-growing open-source e-commerce platform, prized for its flexibility and booming adoption. With the official Synerise Integration plugin, you will bring Synerise AI capabilities to your commerce: predictions, recommendations, AI search and personalization. Additionally, you will gain real-time insights into customer behavior and keep data synchronized across customers, orders, and products, all within one connected ecosystem. 


<div class="youtube-embed youtube-facade not-prose" data-youtube-id="TIK1cXJd024" role="button" tabindex="0" aria-label="Play YouTube video"><img src="https://img.youtube.com/vi/TIK1cXJd024/hq720.jpg" alt="YouTube video" class="youtube-facade-thumb" loading="lazy" /><span class="youtube-facade-play" aria-hidden="true"><svg viewBox="0 0 68 48" width="68" height="48"><path d="M66.52 7.74c-.78-2.93-2.49-5.41-5.42-6.19C55.79.13 34 0 34 0S12.21.13 6.9 1.55c-2.93.78-4.64 3.26-5.42 6.19C.06 13.05 0 24 0 24s.06 10.95 1.48 16.26c.78 2.93 2.49 5.41 5.42 6.19C12.21 47.87 34 48 34 48s21.79-.13 27.1-1.55c2.93-.78 4.64-3.26 5.42-6.19C67.94 34.95 68 24 68 24s-.06-10.95-1.48-16.26z" fill="red"/><path d="M45 24 27 14v20" fill="white"/></svg></span></div>


## Plugin scope
---
- **Website activity tracking** - real-time monitoring of key user interactions such as page visits, session starts, and other on-site activities
- **Purchase path tracking** - real-time monitoring of transactions and cart events
- **Customer identification** - identifying customers on the website along with sending their attributes such as email, phone number, marketing consents, and address
- **Product catalog synchronization** - real-time synchronization of all updates in the product catalog
- **Historical data integration** - Import existing customer and transaction data into Synerise for a complete, unified view


## Requirements
---
1. You must have [user permissions to create an API key in Synerise](/docs/settings/identity-access-management/permissions/settings-permissions#manage-api-keys).  
2. You must have access to admin panel in the Sylius platform.
3. [Add the hostname to the Sylius channel](https://docs.sylius.com/the-book/configuration/channels#create-or-edit-a-channel).  
3. Symfony Messenger should be up and running on your store (optional, but highly recommended);  
    Messenger is required for historical data synchronization. It can also be used to queue up events happening live, which will improve overall performance. 


## Configuration in Synerise
---

### Add a workspace API key

1. In Synerise, go to **Settings > API Keys > Add API key**.
2. On the pop-up:
    1. Select **Workspace**.
    2. In **API key name**, enter the name of the API key (it will be visible on the list of API keys).
    3. Optionally, in **Description**, enter the description of the key (it will be visible on the list of API keys).  
    <figure>
    <img src="/api/docs/image/54176ad07f146575310749eba44b7c2f42c1b327/docs/settings/_gfx/new-api-sylius.png" alt="Adding a new API key for the Sylius integration" class="medium" >
    <figcaption> Adding a new API key for the Sylius integration </figcaption>
    </figure>
3. Confirm by clicking **Save**.
4. Find the key on the top of API key list and click it.
5. On the **Permissions** section, click **Show**.
5. On the pop-up, select the following permissions:  
    - **CATALOG**: 
        - CATALOGS_CATALOG_CREATE
        - CATALOGS_CATALOG_READ
        - CATALOGS_ITEM_BATCH_CATALOG_CREATE
    - **CLIENT**:
        - API_BATCH_CLIENT_CREATE
        - API_CLIENT_CREATE
    - **EVENTS**:
        - API_ADDED_TO_CART_EVENTS_CREATE
        - API_ADDED_TO_FAVORITES_EVENTS_CREATE
        - API_CUSTOM_EVENTS_CREATE
        - API_LOGGED_IN_EVENTS_CREATE
        - API_LOGGED_OUT_EVENTS_CREATE
        - API_REGISTERED_EVENTS_CREATE
        - API_REMOVED_FROM_CART_EVENTS_CREATE
    - **SEARCH**:  
        - ITEMS_SEARCH_CONFIG_SEARCH_CREATE,
        - ITEMS_SEARCH_CONFIG_SEARCH_UPDATE,
        - ITEMS_SEARCH_CONFIG_SEARCH_READ,
        - ITEMS_SEARCH_SEARCH_READ
    - **TRACKER**  
        - TRACKER_CREATE
    - **TRANSACTION**
        - API_BATCH_TRANSACTION_CREATE
        - API_TRANSACTION_CREATE

    <figure>
    <img src="/api/docs/image/54176ad07f146575310749eba44b7c2f42c1b327/docs/settings/_gfx/magento-api-key-permissions.png" alt="Permissions for the API key required by the Sylius integration" class="full" >
    <figcaption> A fragment of permissions for the API key required by the Sylius integration </figcaption>
    </figure>
6. Confirm by clicking **Apply settings**.
8. On the **General** section, click **Show**.
9. Copy the API key and paste it to the notepad.  
    <figure>
    <img src="/api/docs/image/54176ad07f146575310749eba44b7c2f42c1b327/docs/settings/_gfx/sylius-api-key-details.png" alt="Details of the API key" class="full" >
    <figcaption> Details of the API key </figcaption>
    </figure>

### Enable basic workspace authentication (optional)

By default, the authorization process involves obtaining a token with a limited lifespan through a request. This means that if a token is leaked, it can only be used until it expires, limiting potential misuse. We recommend using Bearer authentication, as it provides this secure, time-limited access.  

Alternatively, you can use basic workspace authentication, which requires only the workspace GUID and API key. This method can be faster since it doesn’t require additional token acquisition requests. However, if the credentials are leaked, they allow unlimited use until the keys are revoked. In both methods, you have the option to delete or revoke keys, instantly preventing further access. While basic authentication offers simplicity and easy revocation, it may carry a higher security risk compared to token-based Bearer authentication.

The full instruction is available in ["Basic workspace authentication"](/docs/settings/tool/api#basic-workspace-authentication)

## Configuration in Sylius
---
Log in to your administration panel in Sylius and perform the steps described below:

### Download and install the Synerise plugin

1. Download the plugin from the [Sylius store](https://store.sylius.com/products/synerise-integration-plugin-by-synerise).
2. Install the plugin according to the [documentation](https://github.com/Synerise/Sylius-Integration-Plugin/?tab=readme-ov-file#installation).

### Connect Synerise to Sylius  

In this part of the process, you need to connect a Synerise workspace to Sylius by using the API key of a Synerise workspace. This will allow you to exchange the data between Synerise and Sylius.  

1. On the left panel, click **Synerise > Workspace connection**.  
2. In the upper-right corner, click **Connect workspace**.  
    **Result**:  
    <figure>
    <img src="/api/docs/image/54176ad07f146575310749eba44b7c2f42c1b327/docs/settings/_gfx/sylius-connect-workspace.png" alt="A form which lets you connect Synerise and Sylius workspaces" class="full" >
    <figcaption> A form which lets you connect Synerise and Sylius workspaces </figcaption>
    </figure>  
3. In **Synerise Workspace API key** provide the API key you created in [Add a workspace API key](#add-a-workspace-api-key).
4. In **Environment**, select the API host URL. You can recognize your host by how you access the portal:
    - If your Synerise portal URL starts with `https://app.synerise.com/`, select **Microsoft Azure**.
    - If your Synerise portal URL starts with `https://app.azu.synerise.com/`, select **Microsoft Azure US**.
    - If your Synerise portal URL starts with `https://app.geb.synerise.com/`, select **Google Cloud Platform**.  
5. In **Authentication method**, select the authentication method:  
    - if you want to include an access token in the authorization header of an HTTP request, select **Bearer**;  
    - if you want to use workspace GUID and API key for authentication ([basic workspace authentication](#enable-basic-workspace-authentication-optional)), select **Basic** and provide the Synerise workspace GUID.  
     You can get the workspace GUID in the Synerise platform in **Settings > API keys**. Go to the details of the workspace API key you used in this integration and copy the GUID from the **Basic access authentication** section.  
5. In the **Advanced settings** section:  
    - If you want to keep subsequent requests and responses to be sent and received over the same connection, set **Enable keep-alive header** to **Yes**.   
    - In **Timeout of live requests**, define the time after which the real-time requests will be terminated.
    - In **Timeout of scheduled requests**, define the time after which the scheduled requests will be terminated. 
    - If you want to enable logging requests and responses, enable **Log requests and responses**.  
        Logs will be available on the server in the `ver/log` catalog.  


### Assign Synerise workspace to Sylius channels

In this part of the process, you will enable tracking customer activity in your store with a tracking code that is automatically added when you assign workspaces to the websites, as detailed in this section.

You can connect multiple Synerise workspaces to Sylius (which you have done in the Workspace Connection tab). However, in the Channel configuration section, the setup works like this: Each channel can be assigned with a single workspace, but the same workspace can be assigned to multiple channels. In other words, there is a many-to-one relationship—multiple channels can connect to one workspace, but each channel can connect to only one workspace.

1. On the left panel, click **Synerise > Channel configurations**.  
    **Result**:  
    <figure>
    <img src="/api/docs/image/54176ad07f146575310749eba44b7c2f42c1b327/docs/settings/_gfx/sylius-workspace-mapping.png" alt="Assigning Synerise workspace to the Sylius channel" class="full" >
    <figcaption> Assigning Synerise workspace to the Sylius channel </figcaption>
    </figure>  
2. From the **Channel** dropdown, select the Sylius channel configuration.
3. From the **Workspace** dropdown, select the Synerise workspace with which you want to connect the Sylius channel configuration.  
4. Click **Next**.  

#### Page tracking

In this part of the process, you will initiate page tracking to collect and send data about customers activity on your website to Synerise. The tracking code is can be automatically when you assign channel to a workspace.  

<figure>
<img src="/api/docs/image/54176ad07f146575310749eba44b7c2f42c1b327/docs/settings/_gfx/sylius-page-tracking.png" alt="A Page tracking section in the Sylius platform" class="full" >
<figcaption> A Page tracking section in the Sylius platform </figcaption>
</figure>

1. Leave the **Automatically add tracking code to monitor customer activity** option enabled.  
    The tracking code will be created in the Synerise platform and it will be automatically added to your website.
2. If you want to add OG tags to the product pages and to [`page.visit` events generated in Synerise](/docs/assets/events/event-reference/web-and-app#pagevisit), enable **Add OG tags to the product pages and page.visit events**.  
    
   <details class="accordion"><summary>Click here to expand the list of OG tags sent which will be in page.visit events</summary><div class="accordion-content"><ul> <li><code>og:type</code> - specification of the object,</li> <li><code>product:retailer_part_no</code> - the SKU of the item,</li> <li><code>og:image</code> - image URL,</li> <li><code>og:title</code> - product name,</li> <li><code>og:url</code> - product URL,</li> <li><code>product:category</code> - product category,</li> <li><code>product:price:amount</code> - the current price of the item,</li> <li><code>product:sale_price:amount</code> - the price at which the product is currently being offered for sale,</li> <li><code>product:original_price:amount</code> - the original price (before discounts, if any);</li> </ul></div></details>

3. If you want to display [dynamic content](/docs/campaign/dynamiccontent/introduction-to-dynamic-content) on your e-shop, enable **Dynamic content for PWA, SPA sites**.  
    PWA stands for Progressive Webpage Application and SPA stands for Single Page Application.  
4. If you use several subdomains, they generate cookies with their own domain. To declare a specific domain instead, enable **Override cookie domain** and enter the domain.  
    The domain must conform with channel's URL settings. Subdomains are also accepted.
5. By default, page visits are tracked automatically. If you want to implement custom tracking of page visits, enable **Custom page visit implementation** and make necessary changes in your source code.  
    Instructions for the code changes are available in ["Tracking code in Single Page Applications"](/developers/web/advanced-tracking-code#tracking-code-in-single-page-applications); this configuration will also work for progressive webpage application (PWA).
6. Click **Next**.  

#### Event tracking 

In this part of the process, select the activities which will be tracked and generated as events in the Synerise platform on the activity list of the customers who performed a given activity. Events generation within the plugin doesn't require additional actions. 


<div class="admonition admonition-important"><div class="admonition-icon"><svg xmlns="http://www.w3.org/2000/svg" fill="none" viewBox="0 0 24 24" stroke="currentColor" stroke-width="2.5"><path stroke-linecap="round" stroke-linejoin="round" d="M12 8v4m0 4h.01M21 12a9 9 0 11-18 0 9 9 0 0118 0z" /></svg></div><div class="admonition-body"><div class="admonition-content">

The list of tracked activities contains a `product.updated` event which is the only event that won't be generated in Synerise. Each product update in Sylius triggers an update of the catalog which contains a product feed in Synerise.

</div></div></div>


<details class="accordion"><summary>Click here to expand the list of events and their description</summary><div class="accordion-content"><p>The names of events are hyperlinked to the Synerise default event reference, where you can find a list of parameters which are available in an event. Event generation within the plugin doesn&#39;t require additional actions. </p> <table> <thead> <tr> <th>Event name</th> <th>Description</th> </tr> </thead> <tbody><tr> <td><a href="/docs/assets/events/event-reference/items/#productaddtocart"><code>product.addToCart</code></a></td> <td>A customer added an item to their cart.</td> </tr> <tr> <td><a href="/docs/assets/events/event-reference/items/#productremovefromcart"><code>product.removeFromCart</code></a></td> <td>A customer removed an item from their cart.</td> </tr> <tr> <td><a href="/docs/assets/events/event-reference/items/#productaddreview"><code>product.addReview</code></a></td> <td>A logged-in customer submitted a product review.</td> </tr> <tr> <td><a href="/docs/assets/events/event-reference/items/#cartstatus"><code>cart.status</code></a></td> <td>A summary of the cart’s current contents.</td> </tr> <tr> <td><a href="/docs/assets/events/event-reference/web-and-app/#clientlogin"><code>client.login</code></a></td> <td>A customer logged in to the website or mobile application.</td> </tr> <tr> <td><a href="/docs/assets/events/event-reference/web-and-app/#clientlogout"><code>client.logout</code></a></td> <td>A customer logged out from the website or mobile application.</td> </tr> <tr> <td><a href="/docs/assets/events/event-reference/profiles/#clientregister"><code>client.register</code></a></td> <td>A customer was registered successfully.</td> </tr> <tr> <td><a href="/docs/assets/events/event-reference/profiles/#profileupdated"><code>profile.updated</code></a></td> <td>A customer was updated.</td> </tr> <tr> <td><a href="/docs/assets/events/event-reference/items/#transactioncharge"><code>transaction.charge</code></a></td> <td>A transaction was completed. This event is the summary of the transaction.</td> </tr> <tr> <td><code>product.update</code></td> <td>A catalog with a product feed in Synerise is updated. This event is not generated in Synerise.</td> </tr> </tbody></table></div></details>


<figure>
<img src="/api/docs/image/54176ad07f146575310749eba44b7c2f42c1b327/docs/settings/_gfx/sylius-event-tracking.png" alt="An Event tracking section in the Sylius platform" class="full" >
<figcaption> An event tracking section in the Sylius platform </figcaption>
</figure>

1. By default, in the **Tracking events** section, all events are selected. If you want to narrow down the scope of events, de-select the events you don't need.  
    As a result, an event will be generated on the activity list of a profile that belongs to the customer who performed an action.

2. To add parameters from the [_snrs_param cookie](/developers/web/cookies#_snrs_params) to cart and transaction events, enable **Add tracking parameters to cart and transaction events**.  
3. In **Queue tracking events**, select the events which will be queued up and sent through a consumer process. Deselected events will be sent in real-time.  
4. To complete the whole configuration, click **Configure**.  
    **Result**: Live synchronization of customer activities has been enabled. This means that the events you selected in this part of the process are sent to Synerise.  
    
   <div class="admonition admonition-note"><div class="admonition-icon"><svg xmlns="http://www.w3.org/2000/svg" fill="none" viewBox="0 0 24 24" stroke="currentColor" stroke-width="2.5"><path stroke-linecap="round" stroke-linejoin="round" d="M13 16h-1v-4h-1m1-4h.01M21 12a9 9 0 11-18 0 9 9 0 0118 0z" /></svg></div><div class="admonition-body"><div class="admonition-content">

   When a customer agrees to receive marketing communication, their profile is either created if it does not yet exist or updated if it already exists.

   </div></div></div>


### Synchronization (on demand)

Up to this point, a real-time synchronization was triggered through [event tracking](#event-tracking). In this part of the process, you can initiate synchronization on demand of the following information:
- products,  
    
  <div class="admonition admonition-warning"><div class="admonition-icon"><svg xmlns="http://www.w3.org/2000/svg" fill="none" viewBox="0 0 24 24" stroke="currentColor" stroke-width="2.5"><path stroke-linecap="round" stroke-linejoin="round" d="M12 9v2m0 4h.01m-6.938 4h13.856c1.54 0 2.502-1.667 1.732-2.5L13.732 4c-.77-.833-1.964-.833-2.732 0L4.082 16.5c-.77.833.192 2.5 1.732 2.5z" /></svg></div><div class="admonition-body"><div class="admonition-content">

  Make sure you have [added the hostname to the Sylius channel](https://docs.sylius.com/the-book/configuration/channels#create-or-edit-a-channel). Otherwise the product synchronization will fail.

  </div></div></div>

- orders,
- customer data, including marketing agreements;


By doing this, you can provide Synerise with transaction data, customer information acquired to until now, and integrate your item feed into Synerise.


<div class="admonition admonition-note"><div class="admonition-icon"><svg xmlns="http://www.w3.org/2000/svg" fill="none" viewBox="0 0 24 24" stroke="currentColor" stroke-width="2.5"><path stroke-linecap="round" stroke-linejoin="round" d="M13 16h-1v-4h-1m1-4h.01M21 12a9 9 0 11-18 0 9 9 0 0118 0z" /></svg></div><div class="admonition-body"><div class="admonition-content">

When a customer agrees to receive marketing communication, their profile is either created if it does not yet exist or updated if it already exists.

</div></div></div>


To synchronize data from Sylius to Synerise on demand, you need to set up a synchronization for a specific channel. This initial step entails choosing a Sylius channel, selecting the relevant product attributes, and determining the format for sending these attributes during synchronization. Subsequently, you can proceed to execute a synchronization job by defining the data scope and specifying the time range from which information will be extracted and transmitted.  

#### Create synchronization for a channel 

1. On the left panel, click **Synerise > Synchronization**.  
2. In the upper right corner, click **Configure**.   
    **Result**:  
    <figure>
    <img src="/api/docs/image/54176ad07f146575310749eba44b7c2f42c1b327/docs/settings/_gfx/sylius-synchro-configuration.png" alt="A blank synchronization form in which you must select the Sylius website and define product settings for synchronization" class="full" >
    <figcaption> A blank synchronization form in which you must select the Sylius website and define product settings for synchronization </figcaption>
    </figure>
3. From the **Channel** dropdown list, select the channel from which the data will be used for synchronization.  
4. In **Product settings**, from the **Product attributes** list, select the item attributes which will be updated in Synerise.  
5. In **Attribute value**, select the format of item attributes:  
    - If you want to send the IDs of item attributes (for example, `1234`) and their values (for example, `blue`), select **Id & Value**, as a result, the object will look as follows:  
        
      <pre><code class="language-json">
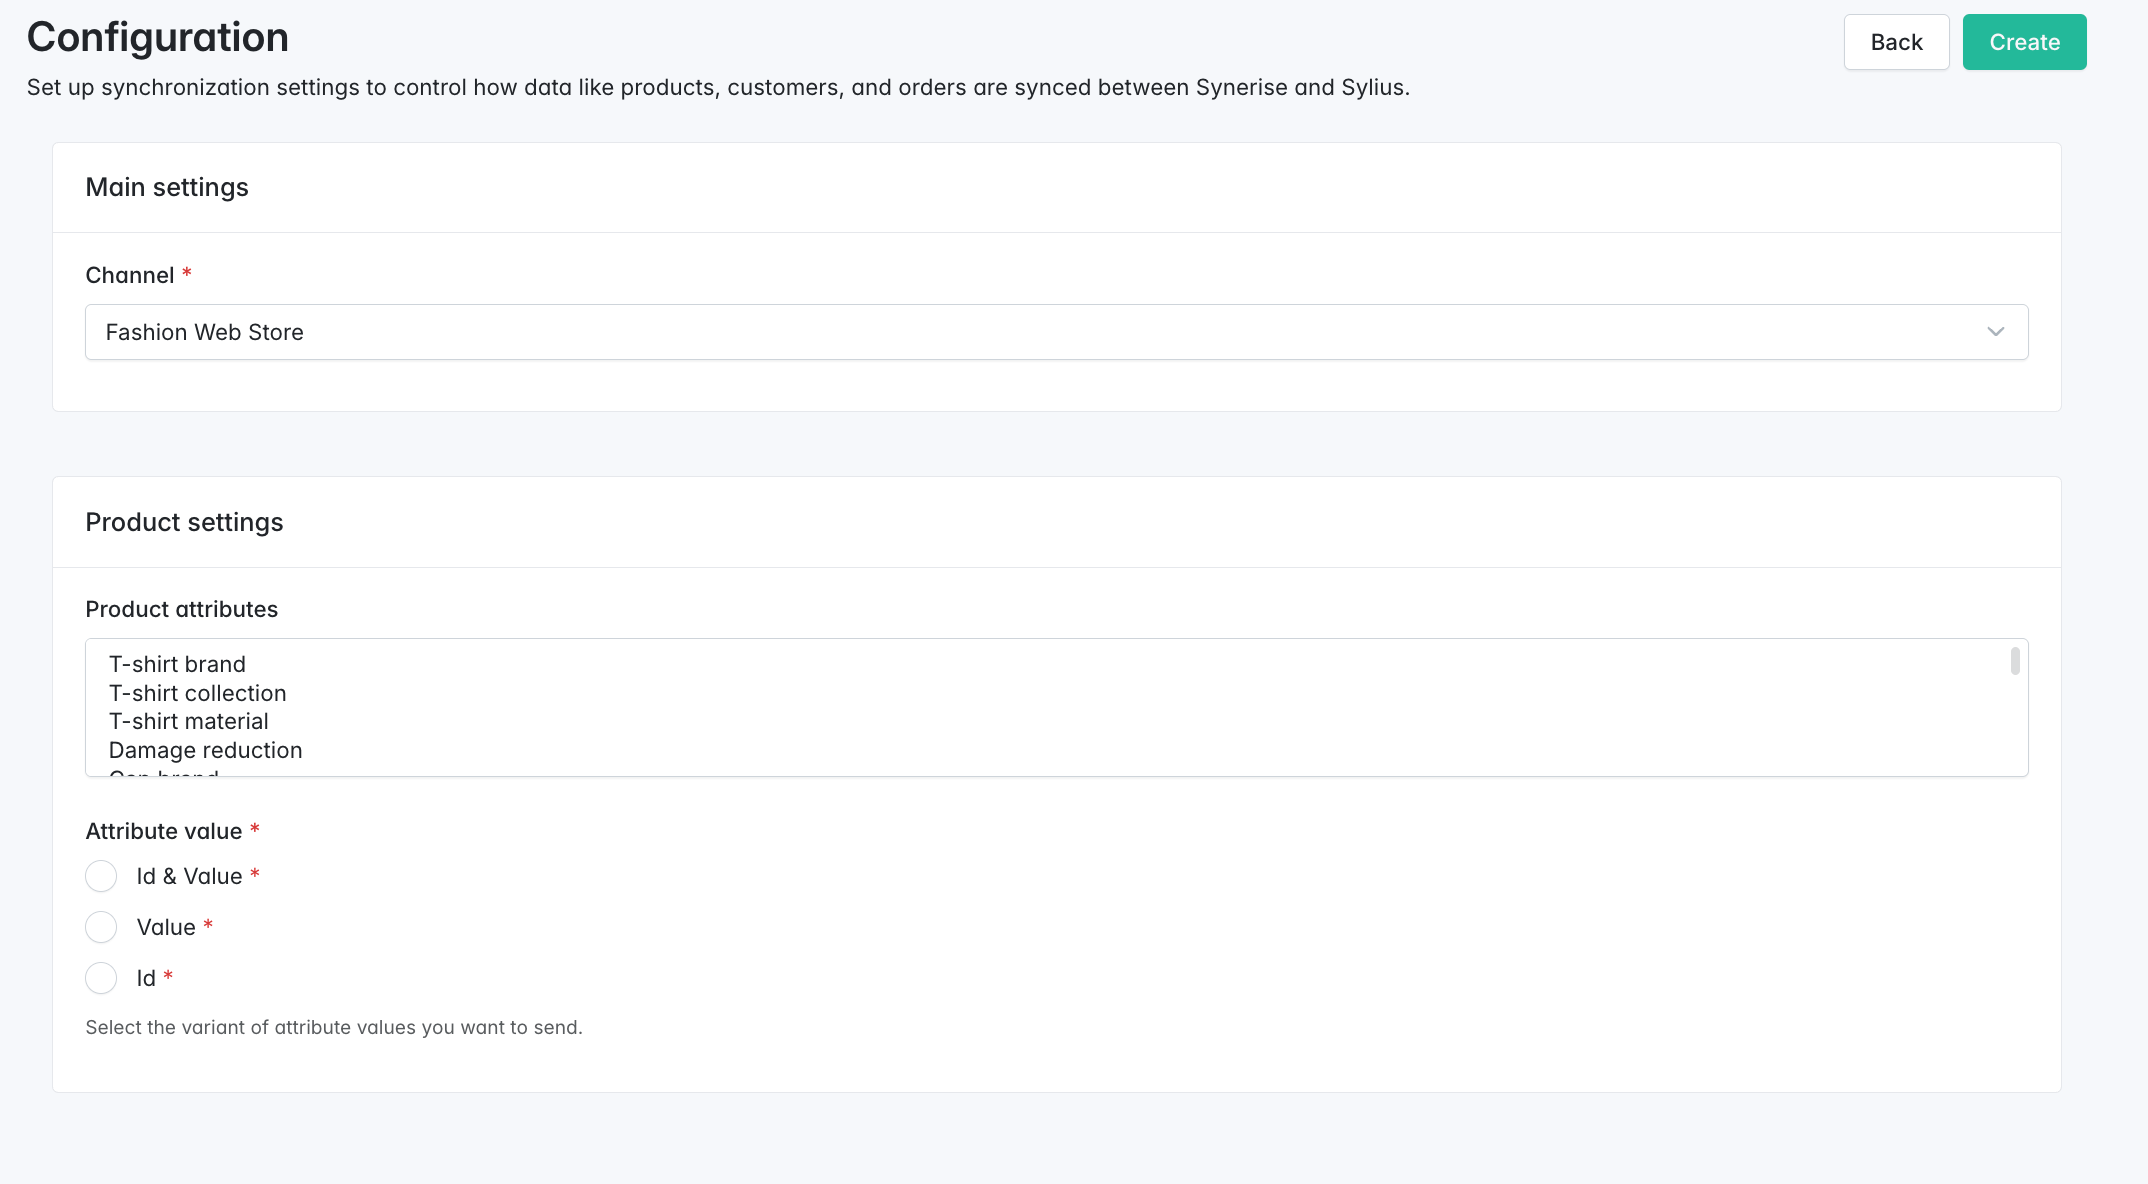
{'id':1234, 'value': 'blue'}</code></pre>

        We recommend sending both as it provides more data.  
    - If you want to send only the values of attributes (for example, `blue`), select **Value**;
    - If you want to send only the IDs (for example, `1234`), select **Id**;  
6. Confirm the configuration by clicking **Create** in the upper-right corner.  
    **Result**:  
    <figure>
    <img src="/api/docs/image/54176ad07f146575310749eba44b7c2f42c1b327/docs/settings/_gfx/created-synchronization.png" alt="A synchronization for a Sylius channel available on the list of synchronizations" class="full" >
    <figcaption> A synchronization for a Sylius channel available on the list of synchronizations </figcaption>
    </figure>


#### Start synchronization job

In this part of the process, you can launch a synchronization job, select the scope of data, and choose time from which data will be synchronized.  

1. On the left panel, click **Synerise > Synchronization**. 
2. Next to the synchronization of the Sylius channel, click the eye icon.  
3. In the upper-right corner, click **New synchronization**.  
4. In **Sync settings**, select the data scope:  
    - **Customers** - if you want to synchronize customer information.  
        As a result, `profile.updated` events will be generated on the activity list on a profile card in Synerise.
    - **Products** - if you want to synchronize product information.  
        As a result, the item feed in the Synerise catalog will be updated. The catalog containing the feed in Synerise follows this naming convention: `channel-{id}`, for example, channel-123.
    - **Orders** - if you want to synchronize transactional data.  
        As a result, `transaction.charge` events will be generated on the activity list on a profile card in Synerise.
5. In **Since** and **Until**, define the period from which the data will be synchronized. 
6. Start the synchronization by clicking **Create** in the upper-right corner.  
    The synchronization will be executed in background by the messenger consumers. Please make sure your messenger:cosnume process is being run.


