
The Synerise users can integrate their websites built on the WooCommerce platform. The scope of integration involves the transmission of the following data from WooCommerce to Synerise:
- information about the customers (their activity, identification of a customer throughout the whole journey),
- information about the transactions,
- information about the items


  <div class="admonition admonition-important"><div class="admonition-icon"><svg xmlns="http://www.w3.org/2000/svg" fill="none" viewBox="0 0 24 24" stroke="currentColor" stroke-width="2.5"><path stroke-linecap="round" stroke-linejoin="round" d="M12 8v4m0 4h.01M21 12a9 9 0 11-18 0 9 9 0 0118 0z" /></svg></div><div class="admonition-body"><div class="admonition-content">

  The Synerise for WooCommerce plug in is currently in the beta version.

  </div></div></div>


#### Multistore support
If you manage several stores within one Wordpress panel and you send the data from them to one workspace, you will need to define a common cookie domain and separate catalogs for each store. The steps do to this are included in the process described further.

## Prerequisites
---
- Add [a tracking code](/developers/web/installation-and-configuration) in Synerise.
- You must be granted user permissions to access the API key section to be able to create a key in Synerise.  
- You must have access to the admin panel in Wordpress.
- You must use 4.7 Wordpress version or higher.
- Configure the WooCommerce plugin. Use the WooCommerce plugin version that supports:  
    - 7.0 PHP version or higher
    - 4.7 Wordpress version or higher
    
   <div class="admonition admonition-note"><div class="admonition-icon"><svg xmlns="http://www.w3.org/2000/svg" fill="none" viewBox="0 0 24 24" stroke="currentColor" stroke-width="2.5"><path stroke-linecap="round" stroke-linejoin="round" d="M13 16h-1v-4h-1m1-4h.01M21 12a9 9 0 11-18 0 9 9 0 0118 0z" /></svg></div><div class="admonition-body"><div class="admonition-content">

   You can find more information in the [WooCommerce documentation](https://woocommerce.com/document/update-php-wordpress/).

   </div></div></div>


## Download the Synerise plugin 
---

1. To download the Synerise plugin for WooCommerce, click [here](https://github.com/Synerise/synerise-for-woocommerce).
2. To install the plug in, insert the plugin folder to the `/wp-content/plugin/` catalog in your directory.  
    
   <div class="admonition admonition-warning"><div class="admonition-icon"><svg xmlns="http://www.w3.org/2000/svg" fill="none" viewBox="0 0 24 24" stroke="currentColor" stroke-width="2.5"><path stroke-linecap="round" stroke-linejoin="round" d="M12 9v2m0 4h.01m-6.938 4h13.856c1.54 0 2.502-1.667 1.732-2.5L13.732 4c-.77-.833-1.964-.833-2.732 0L4.082 16.5c-.77.833.192 2.5 1.732 2.5z" /></svg></div><div class="admonition-body"><div class="admonition-content">

   Keep the original name of the plugin folder (`synerise-for-woocommerce`).

   </div></div></div>


## Configuration in Synerise
---
Log in to your workspace in Synerise and perform the steps described below:

### Create an API key
---
1. In Synerise, go to <img src="/api/docs/image/54176ad07f146575310749eba44b7c2f42c1b327/icons/settings-icon.svg" alt="Settings icon" class="icon"> **Settings > API Keys > Add API key**.
2. On the pop-up:
    1. Enter the name of the API key (it will be visible on the list of API keys).
    2. Select **Workspace**.
    3. Optionally, enter the description of the key (it will be visible on the list of API keys).  
    <figure>
    <img src="/api/docs/image/54176ad07f146575310749eba44b7c2f42c1b327/docs/settings/_gfx/new-api-woocommerce.png" alt="Adding a new API key for the WooCommerce integration" class="large" >
    <figcaption> Adding a new API key for the WooCommerce integration </figcaption>
    </figure>
3. Confirm by clicking **Save**.
4. Find the key on the top of the API key list and click **Permissions**.
5. On the pop-up, select the following permissions:  
    - **CATALOG**: 
        - CATALOGS_CATALOG_CREATE
        - CATALOGS_CATALOG_READ
        - CATALOGS_ITEM_BATCH_CATALOG_CREATE
    - **CLIENT**:
        -  API_BATCH_CLIENT_CREATE
        - API_CLIENT_CREATE
    - **EVENTS**:
        - API_ADDED_TO_CART_EVENTS_CREATE
        - API_CUSTOM_EVENTS_CREATE
        - API_LOGGED_IN_EVENTS_CREATE
        - API_LOGGED_OUT_EVENTS_CREATE
        - API_REGISTERED_EVENTS_CREATE
        - API_REMOVED_FROM_CART_EVENTS_CREATE
    - **TRACKER**  
        - TRACKER_CREATE
    - **TRANSACTION**
        - API_BATCH_TRANSACTION_CREATE
        - API_TRANSACTION_CREATE

    <figure>
    <img src="/api/docs/image/54176ad07f146575310749eba44b7c2f42c1b327/docs/settings/_gfx/magento-api-key-permissions.png" alt="Permissions for the API key required by the WooCommerce integration" class="large" >
    <figcaption> Permissions for the API key required by the WooCommerce integration </figcaption>
    </figure>

6. Confirm by clicking **Apply settings**.
7. In the **General** section, click **Show**.
8. Copy the API key and paste it to the notepad.  
    <figure>
    <img src="/api/docs/image/54176ad07f146575310749eba44b7c2f42c1b327/docs/settings/_gfx/woo-api-key-details.png" alt="Details of the API key" class="full" >
    <figcaption> Details of the API key </figcaption>
    </figure>

#### Enable basic workspace authentication (optional)
    By default, the authorization process involves obtaining a token with a limited lifespan. To acquire this token, you must send a request. Alternatively, basic workspace authentication requires only the  GUID and API key, eliminating the need for additional requests or timeouts. However, this approach may increase vulnerability.

1. If you want to authorize requests only by API key and GUID (workspace login), in the **Basic workspace authentication** section, click **Show**.  
2. Switch the **Enable workspace authentication** toggle on.  
    **Result**: A GUID field appears.
3. Copy the value of the GUID field and save it in the notepad.  
    This value serves as a workspace identifier which will be used as a login in the authorization requests. To learn more about basic authorization, read ["Basic workspace authentication"](/docs/settings/tool/api#basic-workspace-authentication).
4. Confirm by clicking **Apply**.

## Configuration in the WooCommerce panel
---
Log in to your administration panel in WooCommerce and perform the steps described below:

### Add API key
---
1. In the **API key** field, enter the key you created [in the previous part of the process](#create-an-api-key).
2. In the **Host** field, leave the value at default (`https://api.synerise.com`).
    <figure><img src="/api/docs/image/54176ad07f146575310749eba44b7c2f42c1b327/docs/settings/_gfx/woo-api.png" class="large" alt="The configuration of the API section"><figcaption>The configuration of the API section</figcaption></figure>
    
    
   <div class="admonition admonition-note"><div class="admonition-icon"><svg xmlns="http://www.w3.org/2000/svg" fill="none" viewBox="0 0 24 24" stroke="currentColor" stroke-width="2.5"><path stroke-linecap="round" stroke-linejoin="round" d="M13 16h-1v-4h-1m1-4h.01M21 12a9 9 0 11-18 0 9 9 0 0118 0z" /></svg></div><div class="admonition-body"><div class="admonition-content">

   The Request logging option is available after you configure the plugin for the first time. This option allows you to enable logging requests.

   </div></div></div>


3. If you want to enable basic authorization with Synerise API key, in the **Basic Auth** section, set the **Enabled** field to **Yes**.
4. In the **API GUID** field, enter the Synerise Workspace GUID you received in ["Enable basic authorization"](#enable-basic-workspace-authentication-optional).
3. Click **Next step**.  

### Add tracking code
---
In this part of the process, you can enable tracking the customer activity in your store by [a tracking code](/developers/web/installation-and-configuration) which is added automatically. You can also set advanced options related to page tracking in this section as well.

1. Set the **Enabled** option to **Yes**.
3. **Recommended**: Set the **Open Graph** option to **Yes**.  
    **Result**: WooCommerce sends the following OG tags to Synerise:  
        - `og:title` which is the name of the item,  
        - `og:description` which is the description of the item,  
        - `og:image` which is the file path to the item image,  
        - `og:type`which is the type of the content,  
        - `og:url` which is the link to the item,  
        - `og:site_name` which is the name of the website your item is on,    
        - `product:retailer_part_no` which is the SKU of the item,  
        - `product:price:amount` which is the current price of the item,    
        - `product:price:currency` which is the currency of the current price,  
        - `product:original_price:amount` which is the original price (before discounts, if any),    
        - `product:original_price:currency` which is the currency of the original price (before discounts, if any),  
        - `product:category` which is the category of the purchased item 
        
    
   <div class="admonition admonition-warning"><div class="admonition-icon"><svg xmlns="http://www.w3.org/2000/svg" fill="none" viewBox="0 0 24 24" stroke="currentColor" stroke-width="2.5"><path stroke-linecap="round" stroke-linejoin="round" d="M12 9v2m0 4h.01m-6.938 4h13.856c1.54 0 2.502-1.667 1.732-2.5L13.732 4c-.77-.833-1.964-.833-2.732 0L4.082 16.5c-.77.833.192 2.5 1.732 2.5z" /></svg></div><div class="admonition-body"><div class="admonition-content">

   When **Open Graph** is switched off, the `product:retailer_part_no parameter` is not added to the pages and you cannot track which product pages are visited.

   </div></div></div>


4. If multiple subdomains share a tracking code, in the **Cookie domain** field, enter the domain of the common cookies.
5. From the **Tracker host** dropdown list,  select the option according to your Synerise deployment variant. 

    <figure><img src="/api/docs/image/54176ad07f146575310749eba44b7c2f42c1b327/docs/settings/_gfx/woo-tracking.png" class="large" alt="The configuration of the Tracking section"><figcaption>The configuration of the Tracking section</figcaption></figure>
3. In case you need to customize the tracking code, in the **Custom script** subsection, set the **Enabled** option to **Yes**. In the **Script** field, paste [the tracking code](/developers/web/installation-and-configuration) (available in Synerise > Settings > Tracking code) and make changes to the code.  
    
   <div class="admonition admonition-important"><div class="admonition-icon"><svg xmlns="http://www.w3.org/2000/svg" fill="none" viewBox="0 0 24 24" stroke="currentColor" stroke-width="2.5"><path stroke-linecap="round" stroke-linejoin="round" d="M12 8v4m0 4h.01M21 12a9 9 0 11-18 0 9 9 0 0118 0z" /></svg></div><div class="admonition-body"><div class="admonition-content">

   In order to send events, either **Cookie domain** or **Custom script** are required.

   </div></div></div>

5. Click **Next step**. 

### Define event settings 
---
In this part of the process:
- [Enable tracking of the backend events related to customers and products](#enable-event-tracking). By default, all events are selected. Most of them will be available in the [customers' profiles](/docs/crm/crm-profile).  
    
  <div class="admonition admonition-important"><div class="admonition-icon"><svg xmlns="http://www.w3.org/2000/svg" fill="none" viewBox="0 0 24 24" stroke="currentColor" stroke-width="2.5"><path stroke-linecap="round" stroke-linejoin="round" d="M12 8v4m0 4h.01M21 12a9 9 0 11-18 0 9 9 0 0118 0z" /></svg></div><div class="admonition-body"><div class="admonition-content">

  We recommend selecting all the events.

  </div></div></div>
 
- You can [queue events and send them to Synerise in custom intervals](#enable-queuing-events) instead of sending them in real time.

#### Enable event tracking

1. Select the **Events** section    
3. Select the scope of tracked events.
    1. Set the **Enabled** option to **Yes**.
    2. All events are selected by default. If you don't want to track all, you can unselect some of them. You can choose from the following events:  
    | Event                              | Description                                                                                                                                          | Action name in Synerise              |
    |------------------------------------|------------------------------------------------------------------------------------------------------------------------------------------------------|-------------------------------------|
    | Customer registration              | This event is generated when a customer creates an account on your website.                                                                       | client.register                     |
    | Customer login                     | This event is generated when a customer logs in to their account on your website.                                                                 | client.login                        |
    | Customer logout                    | This event is generated when a customer logs out from their account on your website.                                                              | client.logout                       |
    | Customer data saved                | This event is generated when a customer makes changes to their account (for example, updates information about birthday, location, and so on). | client.updateData                   |
    | Customer added product to cart     | This event is generated when a customer adds an item to the cart.                                                                                 | product.addToCart                   |
    | Customer removed product from cart | This event is generated when a customer removes an item from the cart.                                                                            | product.removeFromCart              |
    | Customer placed order              | This event is generated when a customer places an order.                                                                            | transaction.charge              |
    | Product update                     | This event is generated when a product has been edited - then the product is added to queue to be synchronized.                                                                            | n/a              |
    | Product update in bulk             | This event is generated when a set of products has been edited - then the products are added to queue to be synchronized.                                                                            | n/a              |
    | Product update by quick edit       | This event is generated when a product is edited through the quick edit option. The product is added to queue to be synchronized.                                                                          | n/a              |
    | Product import                     | This event is generated when a product has been edited through the import of data.                                                                            | n/a              |
    | Product trashed/untrashed          | This event is generated when the product is removed or restored. The deleted product stays in the Synerise catalog and the `deleted=1` parameter is added. If it's restored, the `deleted` parameter value changes to `0`. These changes are applied to the Synerise catalog immediately.                                                                            | n/a              |
    | Product review                     | This event is generated when a customer adds a review to a product.                                                                            | product.addReview              |
                       
    <figure>
    <img src="/api/docs/image/54176ad07f146575310749eba44b7c2f42c1b327/docs/settings/_gfx/woocommerce-events.png" alt="The list of events" class="full" >
    <figcaption> The list of events </figcaption>
    </figure> 

#### Enable queuing events
---
1. In the **Event queue** section, set the **Enabled** field to **Yes**.
2. In the **Cron expression** field, enter a cron expression that defines the frequency of sending batches of events to Synerise.
3. In the **Page size** field, enter the size of a batch of events that will be sent in a single request.

## Select data for synchronization
---
In this part of the process, you will 
- select the product attributes for synchronization, orders, and customers. 
- enter a Synerise catalog name to which the product data will be sent.  
    If the catalog with such name does not exist, it will be automatically created in Synerise (Data Modeling Hub > Catalogs).

By default, all attributes are selected and the synchronization of customers and orders is enabled as well.

1. In the **Products** section:  
    1. Set the **Enabled** option to **Yes**.
    2. In the **Attributes** field, select or unselect the attributes which are sent to the Synerise catalog.  
    If you create custom attributes after the configuration of the Synerise for WooCommerce plugin, you can return to the settings and add the attributes to this field.  
2. In the **Customers** section, set the **Enabled** option to **Yes**.  
3. In the **Orders** section, set the **Enabled** option to **Yes**.  
4. In the **Catalog** section, in the **Catalog name**, enter the name of the catalog to which the data will be sent. If you haven't created a catalog in Synerise, enter a name of the catalog and it will be automatically created in Synerise.  
    
   <div class="admonition admonition-warning"><div class="admonition-icon"><svg xmlns="http://www.w3.org/2000/svg" fill="none" viewBox="0 0 24 24" stroke="currentColor" stroke-width="2.5"><path stroke-linecap="round" stroke-linejoin="round" d="M12 9v2m0 4h.01m-6.938 4h13.856c1.54 0 2.502-1.667 1.732-2.5L13.732 4c-.77-.833-1.964-.833-2.732 0L4.082 16.5c-.77.833.192 2.5 1.732 2.5z" /></svg></div><div class="admonition-body"><div class="admonition-content">

   If you manage multiple stores, set different catalog names while configuring the plugin settings for each store.

   </div></div></div>


    <figure><img src="/api/docs/image/54176ad07f146575310749eba44b7c2f42c1b327/docs/settings/_gfx/woo-data.png" class="large" alt="The configuration of the Data section"><figcaption>The configuration of the Data section</figcaption></figure>

5. Click **Next step**.  

## Configure data synchronization
---
By default, the Synerise plugin uses the WooCommerce-native scheduler to schedule the synchronization of data between Synerise and WooCommerce which runs in asynchronous loopback. However, this default setting may cause notable delays between a customer's activity (event) and its transfer to Synerise. 

#### Optimization


<div class="admonition admonition-note"><div class="admonition-icon"><svg xmlns="http://www.w3.org/2000/svg" fill="none" viewBox="0 0 24 24" stroke="currentColor" stroke-width="2.5"><path stroke-linecap="round" stroke-linejoin="round" d="M13 16h-1v-4h-1m1-4h.01M21 12a9 9 0 11-18 0 9 9 0 0118 0z" /></svg></div><div class="admonition-body"><div class="admonition-content">

This solution is optional, but recommended.

</div></div></div>


To achieve nearly real-time data synchronization between WooCommerce and Synerise, you can disable the scheduler, set up a cron job with the [WP CLI command](https://actionscheduler.org/wp-cli/) on your server, and set the `action-scheduler` to run separately for the Synerise task group and other processes.

1. Install `wp-cli` according to the instructions available in the [documentation](https://wp-cli.org/).
2. In the WooCommerce panel, go to **Synerise > Settings > Synchronization**.
3. In the **Action Scheduler** section, set the **Default Consumer Disabled** option to **Yes**.  
    <figure><img src="/api/docs/image/54176ad07f146575310749eba44b7c2f42c1b327/docs/settings/_gfx/disable-action-scheduler.png" class="large" alt="Disabling asynchronous loopback"><figcaption>Disabling asynchronous loopback</figcaption></figure>  

    **Result**: The schedule stops running in asynchronous loopback.
4. In your server, in the `crontab`, configure cron to start the scheduler as WP CLI command. Make sure WP CLI is available as a global `wp` alias or modify the command according to your WP CLI setup.    
    
   <pre><code class="language-plaintext">* * * * * 
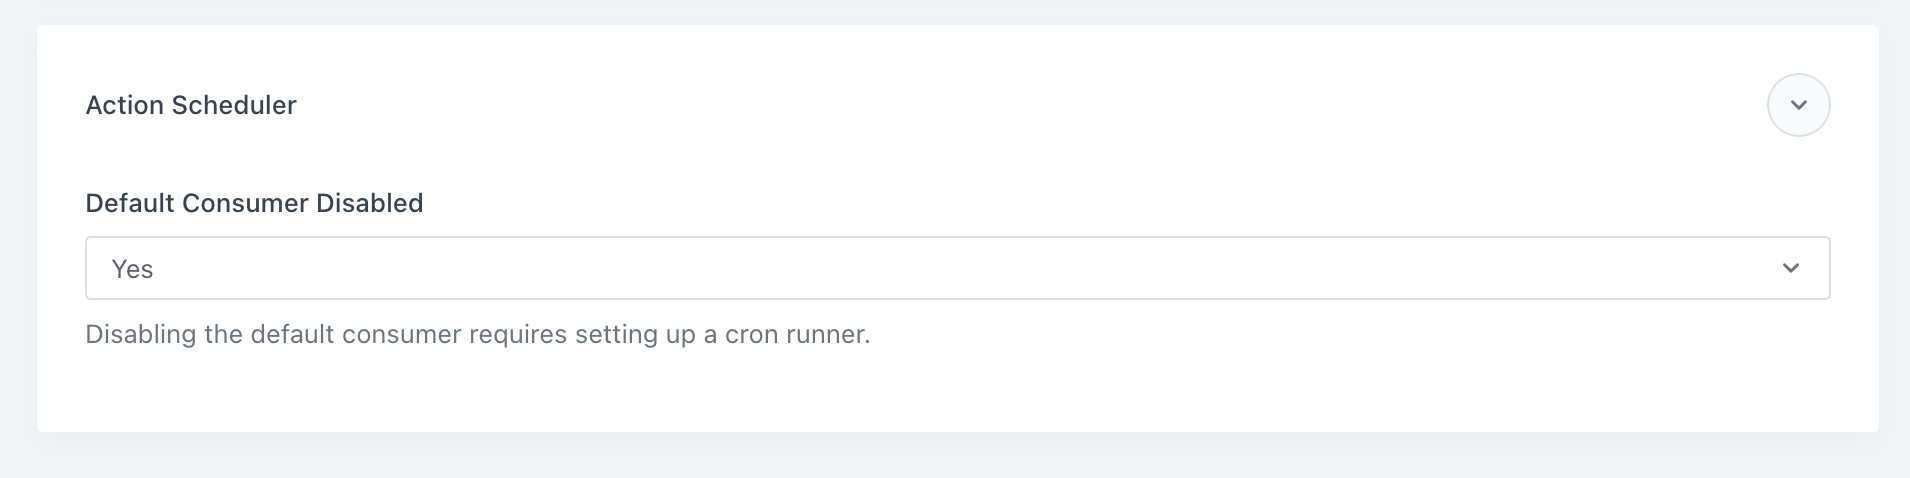
wp action-scheduler run --group=synerise_for_woocommerce
   * * * * * wp action-scheduler run --exclude-groups=synerise_for_woocommerce</code></pre>
  
    This way the Synerise actions will be processed in parallel with other scheduled actions and your servers process them faster.
5. Proceed to defining the frequency of [full data synchronization](#full-synchronization) and/or [update synchronization](#updates-synchronization). 


   <div class="admonition admonition-warning"><div class="admonition-icon"><svg xmlns="http://www.w3.org/2000/svg" fill="none" viewBox="0 0 24 24" stroke="currentColor" stroke-width="2.5"><path stroke-linecap="round" stroke-linejoin="round" d="M12 9v2m0 4h.01m-6.938 4h13.856c1.54 0 2.502-1.667 1.732-2.5L13.732 4c-.77-.833-1.964-.833-2.732 0L4.082 16.5c-.77.833.192 2.5 1.732 2.5z" /></svg></div><div class="admonition-body"><div class="admonition-content">

   Synchronization is disabled by default. Before enabling, verify the configuration of each item attribute to make sure it contains all data you want to include.

   </div></div></div>


### Full synchronization
---
In this part of the process you can synchronize the data collected before the integration.

1. In the **Full synchronization** section, set the **Enabled** option to **Yes**.  
2. In the **Cron expression** field, enter the time of the synchronization in the form of a cron expression.  
3. In the **Page size** field, enter the size of a batch of items that will be sent in a single request.  
    
   <div class="admonition admonition-important"><div class="admonition-icon"><svg xmlns="http://www.w3.org/2000/svg" fill="none" viewBox="0 0 24 24" stroke="currentColor" stroke-width="2.5"><path stroke-linecap="round" stroke-linejoin="round" d="M12 8v4m0 4h.01M21 12a9 9 0 11-18 0 9 9 0 0118 0z" /></svg></div><div class="admonition-body"><div class="admonition-content">

   Extending the default size might speed up synchronization process, but it also means heavier database usage.

   </div></div></div>


    <figure><img src="/api/docs/image/54176ad07f146575310749eba44b7c2f42c1b327/docs/settings/_gfx/woo-full.png" class="full" alt="The configuration of the Full synchronization subsection"><figcaption>The configuration of the Full synchronization subsection</figcaption></figure>

### Updates synchronization
---
This subsection allows you to synchronize ongoing item updates. It is based on the item queues, which are built by data update events. 


<div class="admonition admonition-important"><div class="admonition-icon"><svg xmlns="http://www.w3.org/2000/svg" fill="none" viewBox="0 0 24 24" stroke="currentColor" stroke-width="2.5"><path stroke-linecap="round" stroke-linejoin="round" d="M12 8v4m0 4h.01M21 12a9 9 0 11-18 0 9 9 0 0118 0z" /></svg></div><div class="admonition-body"><div class="admonition-content">

It is highly recommended keeping the update synchronization process running, while the data synchronization can be disabled when unused.

</div></div></div>


1. Set the **Enabled** option to **Yes**.  
2. In the **Cron expression** field, enter the time of the synchronization in the form of a cron expression.  
3. In the **Page size** field, enter the size of a batch of items that will be sent in a single request.  
    
   <div class="admonition admonition-important"><div class="admonition-icon"><svg xmlns="http://www.w3.org/2000/svg" fill="none" viewBox="0 0 24 24" stroke="currentColor" stroke-width="2.5"><path stroke-linecap="round" stroke-linejoin="round" d="M12 8v4m0 4h.01M21 12a9 9 0 11-18 0 9 9 0 0118 0z" /></svg></div><div class="admonition-body"><div class="admonition-content">

   Extending the default size might speed up synchronization process, but it also means heavier database usage which can slow down the work of the service.

   </div></div></div>


    <figure><img src="/api/docs/image/54176ad07f146575310749eba44b7c2f42c1b327/docs/settings/_gfx/woo-updates.png" class="full" alt="The configuration of the Update Syncrhonization subsection"><figcaption>The configuration of the Update Syncrhonization subsection</figcaption></figure>

### Enabling marketing agreements
---
In the **Marketing agreements** section, you can enable collecting marketing agreements (for email and SMS) and send them to Synerise. 

You can choose from the following options:
- **Disabled** - Choose this option if you don't want to collect the marketing agreements.
- **Map existing metadata** - Choose this option, if you already implemented solutions that collect marketing agreements on your website. This option allows you to declare the parameter names which store the marketing agreements in the database (supported values: `true/false`, `0/1`). As a result, the values of the declared parameters are sent to Synerise to update the values in `newsletter_agreement` and `receive_smses` parameters.
- **Add marketing agreements to register form** - Choose this option, if you want to add marketing agreements options to the registration form. As a result, the email and SMS agreement checkboxes are added to the form. 
- **Add marketing agreements to checkout form** - Choose this option, if you want to add marketing agreements options to the payment form. As a result, the email and SMS agreement checkboxes are added to the form.
- **Add marketing agreements to register and checkout form** - Choose this option if you want to add marketing agreement to both registration and checkout forms. 

#### Map existing metadata

<figure><img src="/api/docs/image/54176ad07f146575310749eba44b7c2f42c1b327/docs/settings/_gfx/woo-map-metadata.png" class="full" alt="Mapping existing metadata form"><figcaption>Mapping existing metadata form</figcaption></figure>

In the **Customer metadata** and **Order metadata** sections, enter the names of the parameters that contain the marketing agreements in your database.
- Data from the **Customer metadata** section will be used to update information about recognized customers.
- Data from the **Order metadata** section will be used to save information about customer who are logged out. 

#### Add marketing agreements to forms

<figure><img src="/api/docs/image/54176ad07f146575310749eba44b7c2f42c1b327/docs/settings/_gfx/woo-add-agreements-to-forms.png" class="full" alt="Add marketing agreements to forms"><figcaption>Add marketing agreements to forms form</figcaption></figure>

In the settings for the three **Add marketing agreements to** options (checkout, registration forms, or both forms), you can define the design of checkboxes on the interface. 
1. In the **Label** field, enter the description that will be displayed next to the checkbox.
2. In the **Field classes** field, you can add your own class.


4. When you're done with configuring the plugin settings, confirm by clicking **Finish**.  

You can go back to the settings of the plugin any time. 
You can check the status of synchronization on the dashboard of the Synerise plugin as well. 

