**A/B tests** in emails are used in the assessment of possible changes in the communication. The test allows you to easily and quickly evaluate which version is more targeted at the customer and has a higher impact on conversions. This allows you to easily **optimize communication with various customer segments**, especially since different groups may react in different ways to the same content.
In an A/B test you set up two or more variations of one email and send each to a specific percentage of your total recipients. Half of the test group is sent Version A, and the other half gets Version B. It doesn't have to be exactly 50-50, however. In Synerise **you can set up the customer allocation on your own**. The result, measured by opens and clicks, determines the best version.
Send test versions of the email to any number of selected users in order to evaluate the sales hypothesis. Using email A/B testing, you’ll also discover what actually works on your prospects and how to address them!
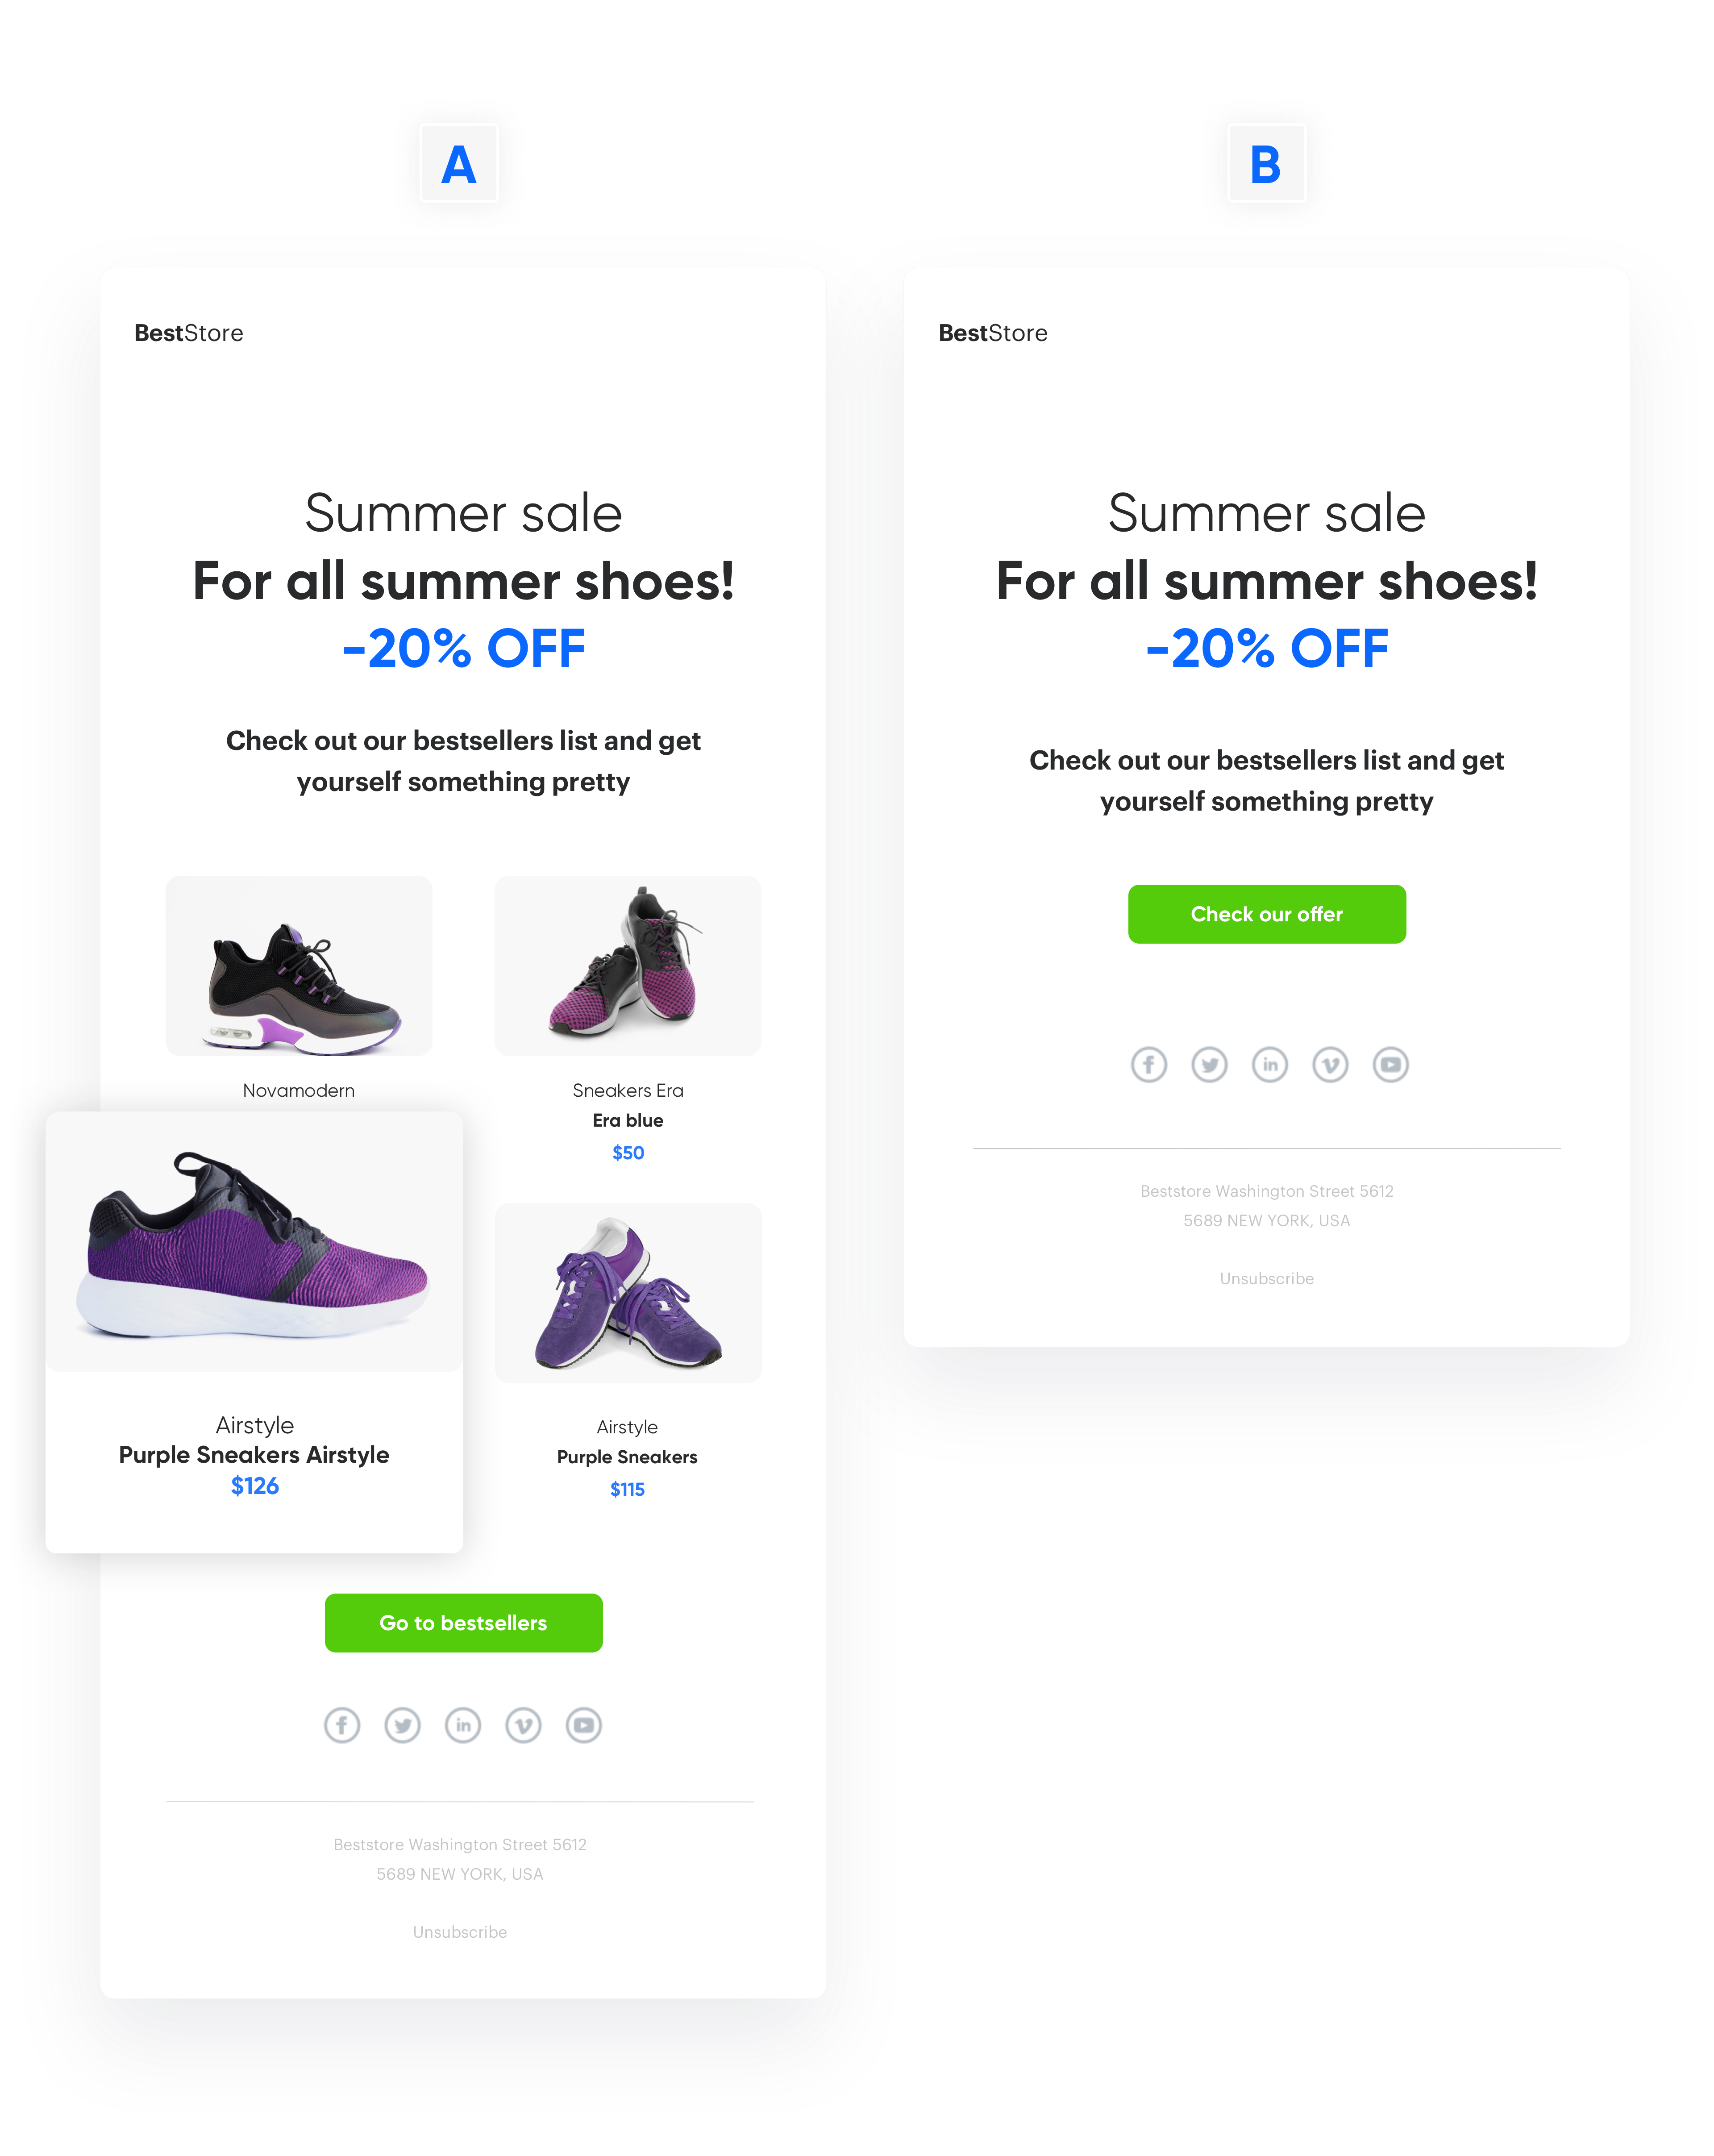
Example email A/B test
## Example of use - Retail industry
A client prepared an automation that allowed them to test the sending of 2 email templates to a part of their database. After a specified time (in this case after 24 hours), the other group not included in the test received the version with the higher CTR. The aim of the communication was to check how users reacted to the mailing, and to use this knowledge for other users not participating in the test (by sending them the template to which the test participants responded better).
## Prerequisites
---
To implement this use case, perform the following steps in the given order:
- [Create an email account](/docs/campaign/e-mail/configuring-email-account).
- [Prepare email templates](/docs/campaign/e-mail/creating-email-templates).
- [Import profile database](/docs/automation/actions/synerise-integrations/import-customers).
## Process
---
1. [Create the email templates](/use-cases/ab-test-mailing#create-the-email-templates).
2. [Prepare a metric](/use-cases/ab-test-mailing#prepare-a-metric)
3. [Create new workflow](/use-cases/ab-test-mailing#create-new-workflow).
## Create the email templates
---
Create the email templates you want to test in **Experience Hub -> Email** > , and save them using the **Save as a template** option.
## Prepare a metric
---
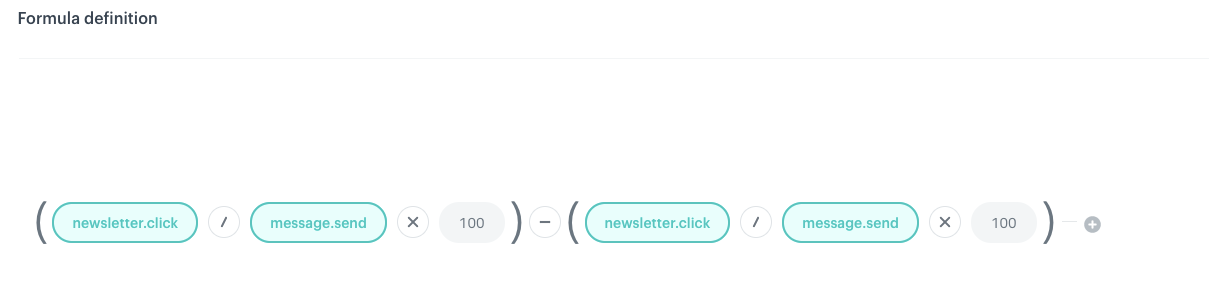
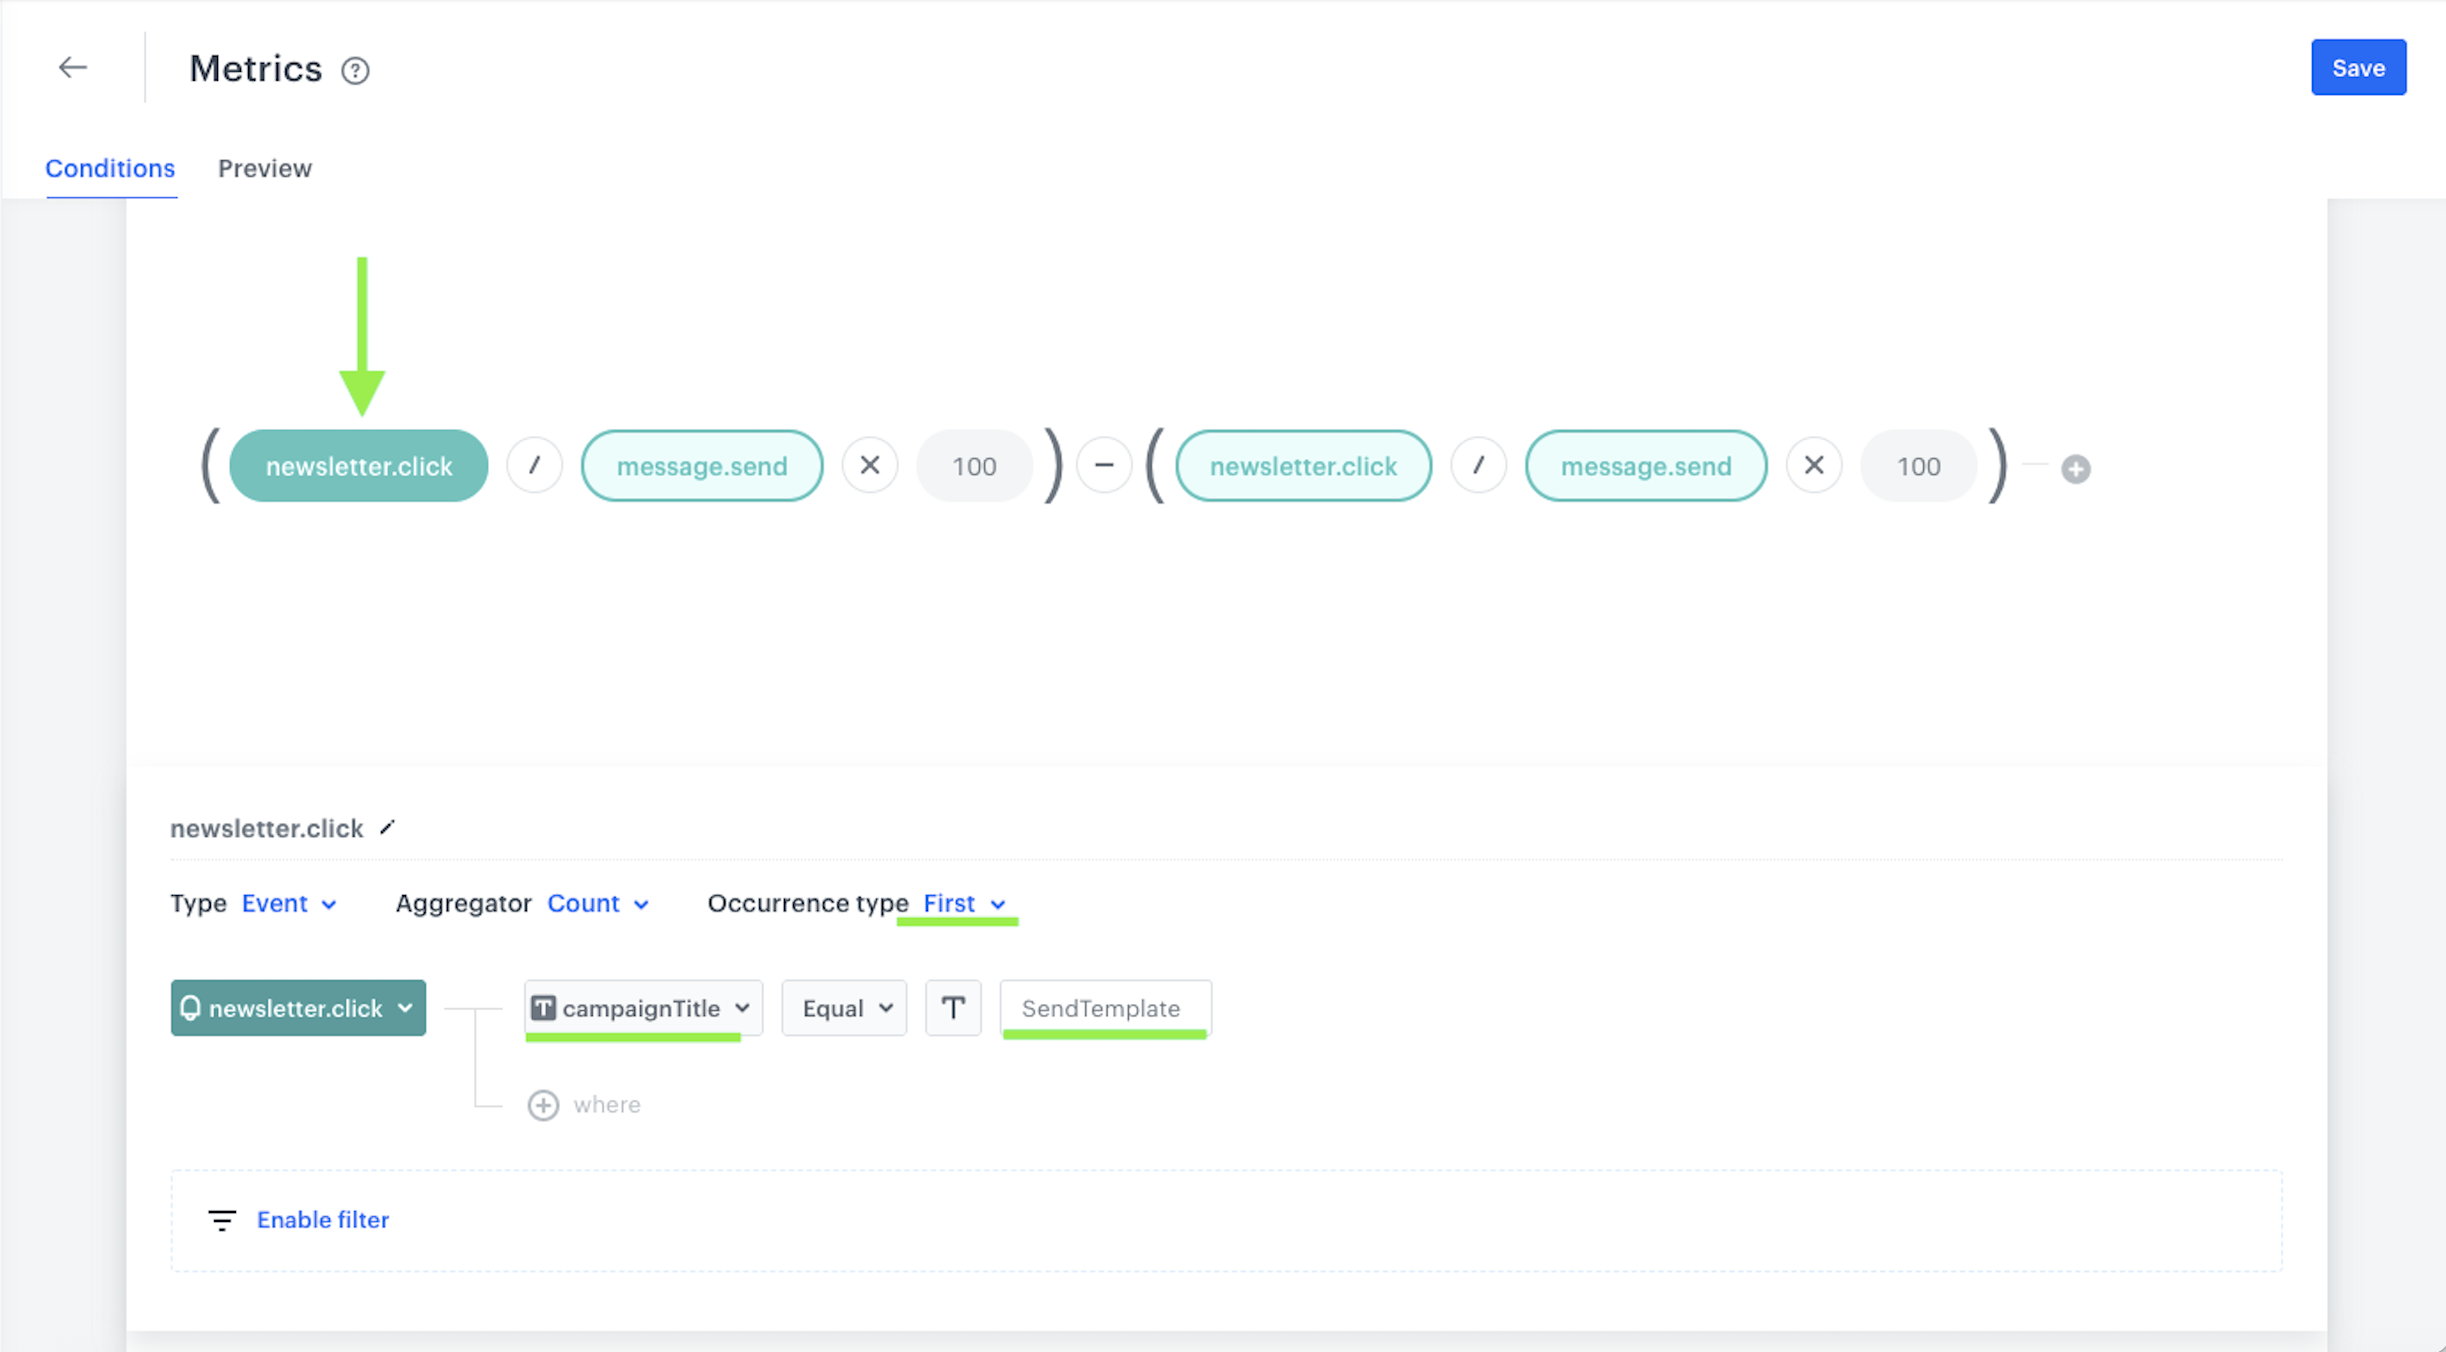
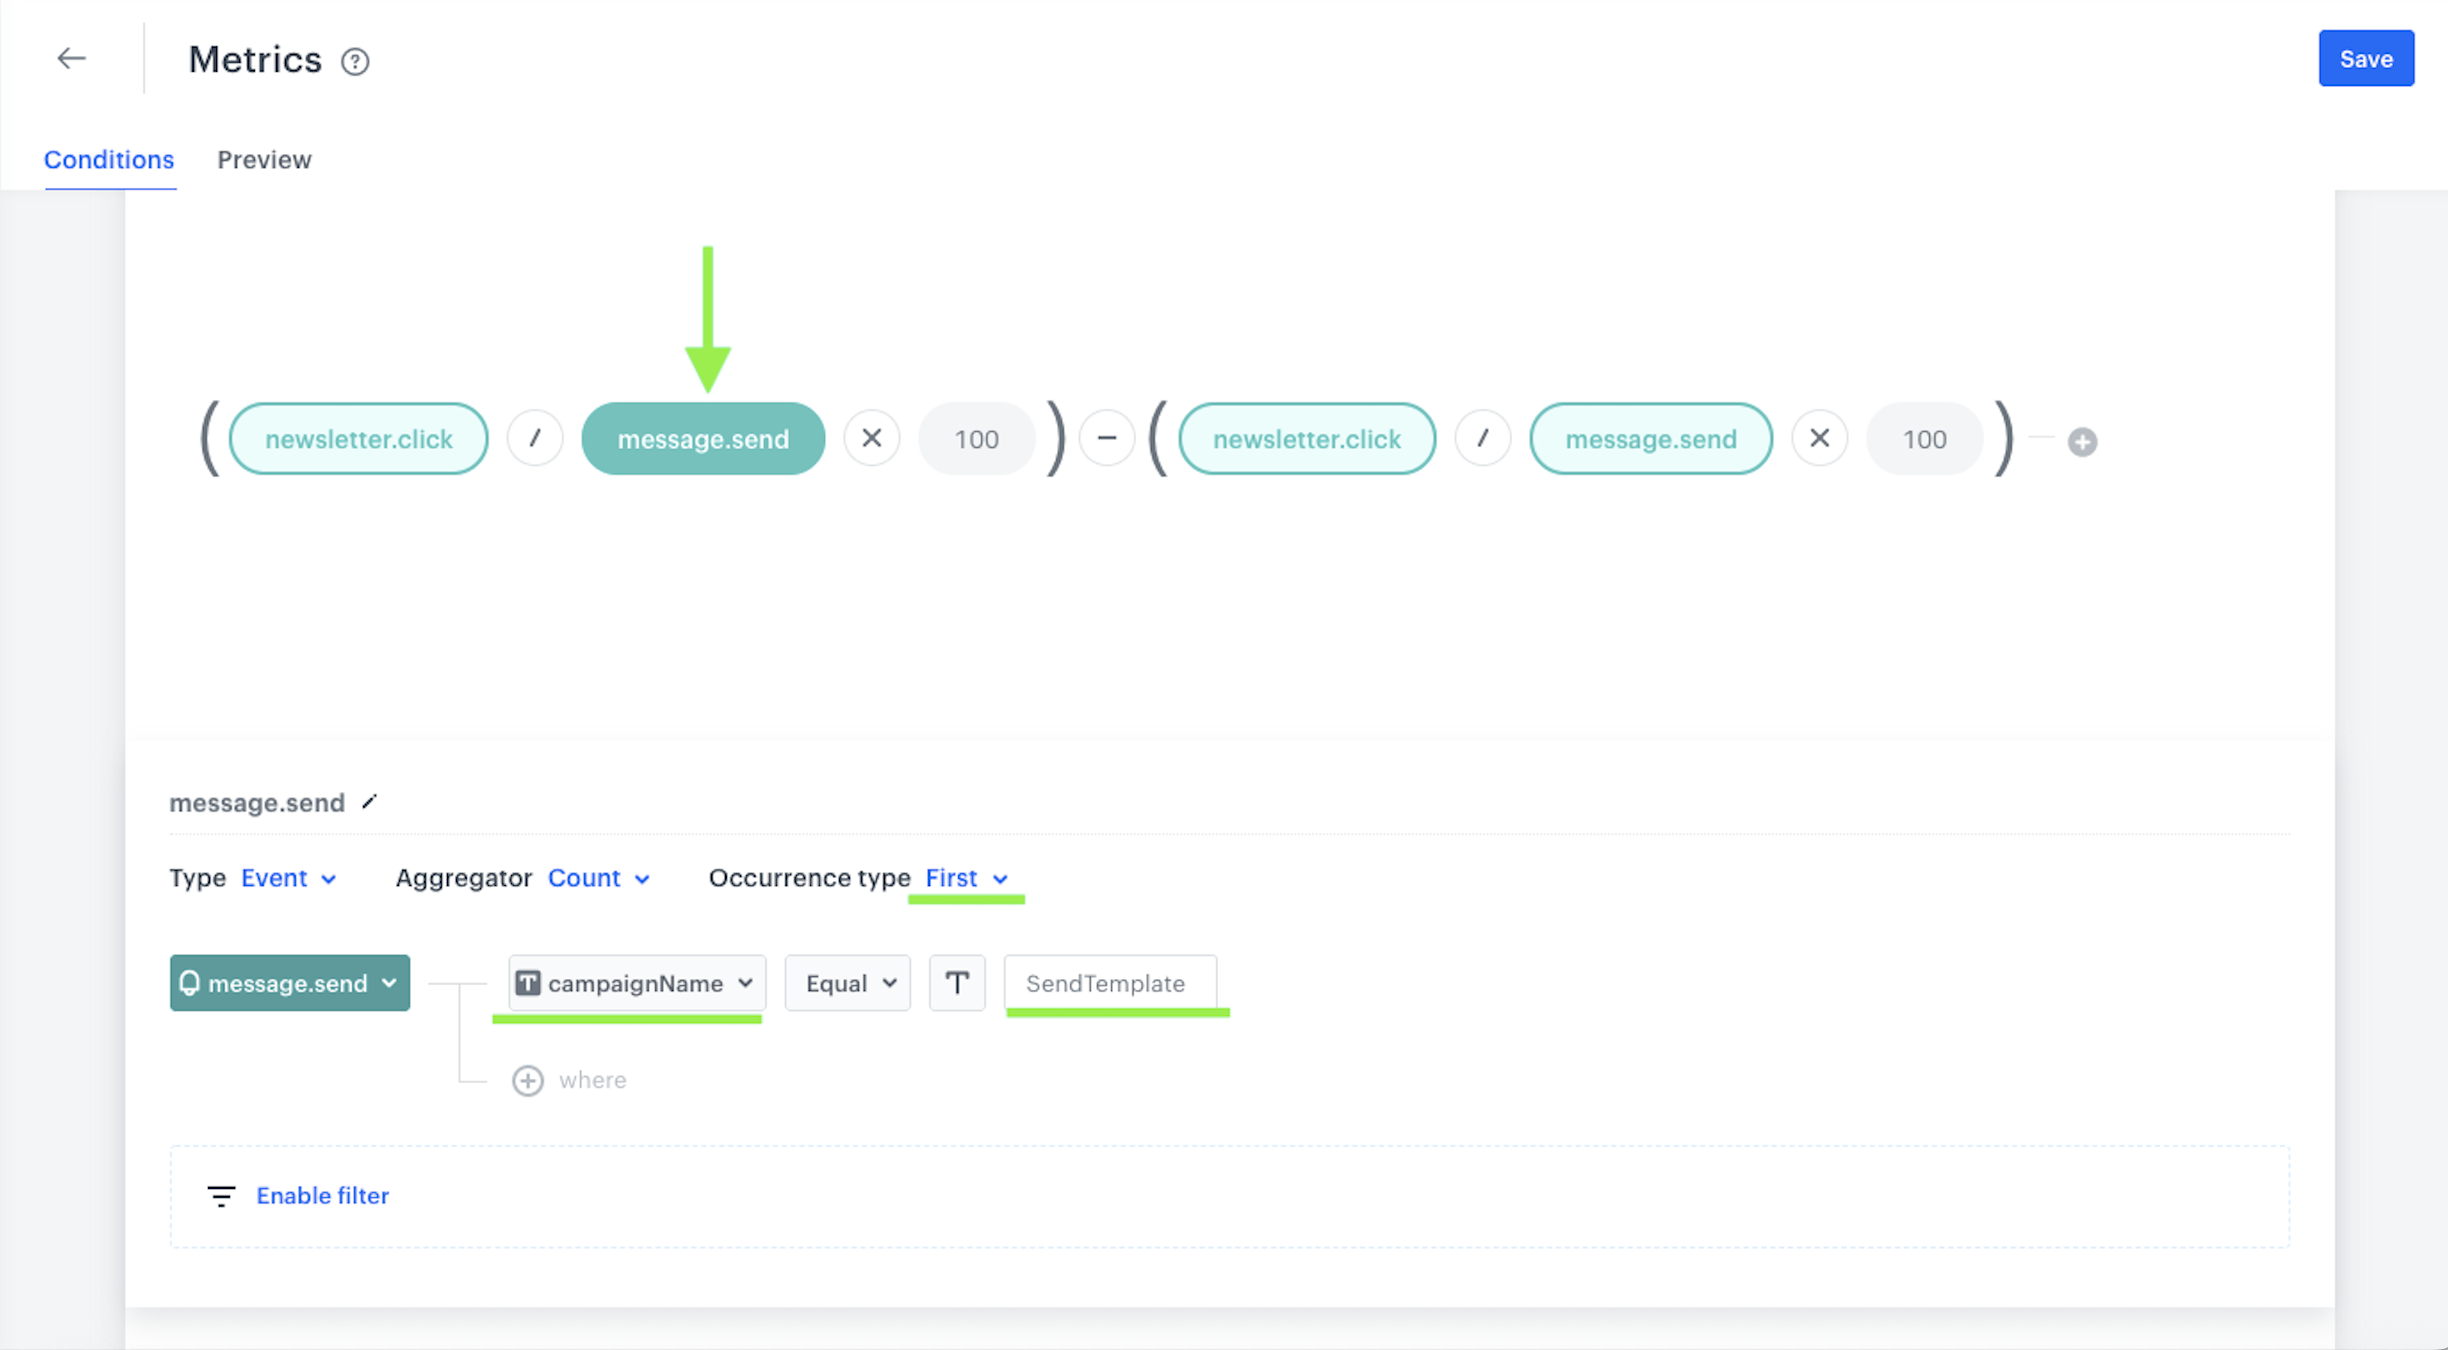
The next node we have to set up is the **Metric Filter** node. Add it to the third path for the group C. The value of the CTR indicator determines the winning version of the template. The formula of the metric must subtract the CTR of the template sent to group A from the CTR of the template sent to group B. If the result of the metric is greater than 0, it means that template A had higher CTR and wins. If the metric result is below 0, it means the CTR of the version B is higher.
1. Go to **Decision Hub > Metrics > New metric**.
2. Select the **Formula metric**.
The formula of the metric
3. Enter the unique names you will use for the **Send Email** nodes in the workflow you will create in further steps (for example SendTemplate).
4. **For the first bracket**, use the name of the node with template A, **for the second bracket** use the name of the node with template B.
- For the **newsletter.click** event, select **campaignTitle** parameter.
- For the **message.send** event, select **CampaignName** parameter.
The first bracket counting the CTR of template A The further part of the first bracket counting the CTR of template A
5. Click the second bracket, using the name of the **Send Email** node appropriate for group B and save the prepared metric and return to the automation.
## Create new workflow
---
1. Go to **Automation Hub > Workflow** and click the **New workflow** button.
2. Add your **Audience** - you can choose a segment of people with consent for email communication or you can select the **New audience** option and define your conditions for this specific automation (for example, if in addition to the fact that users have email consents enabled, they should have additional attributes/tags and so on).
3. **Add ABx Test node** to divide your audience into test groups.
By default, we have the group A and B with an equal 50/50 division - you can add another group here, and de-select the **Equal allocation** option if you want an unequal division. In our example, 3 groups are created.
- **Group A**: 20% of the database
- **Group B**: 20% of the database
- **Group C**: the remaining 60% of the database
Screenshot presenting ABx Test node
4. From the **ABx Test** node, you have to add three different paths - for group A, group B and C.
1. The first path for **group A** must be connected to the **Send Email** node.
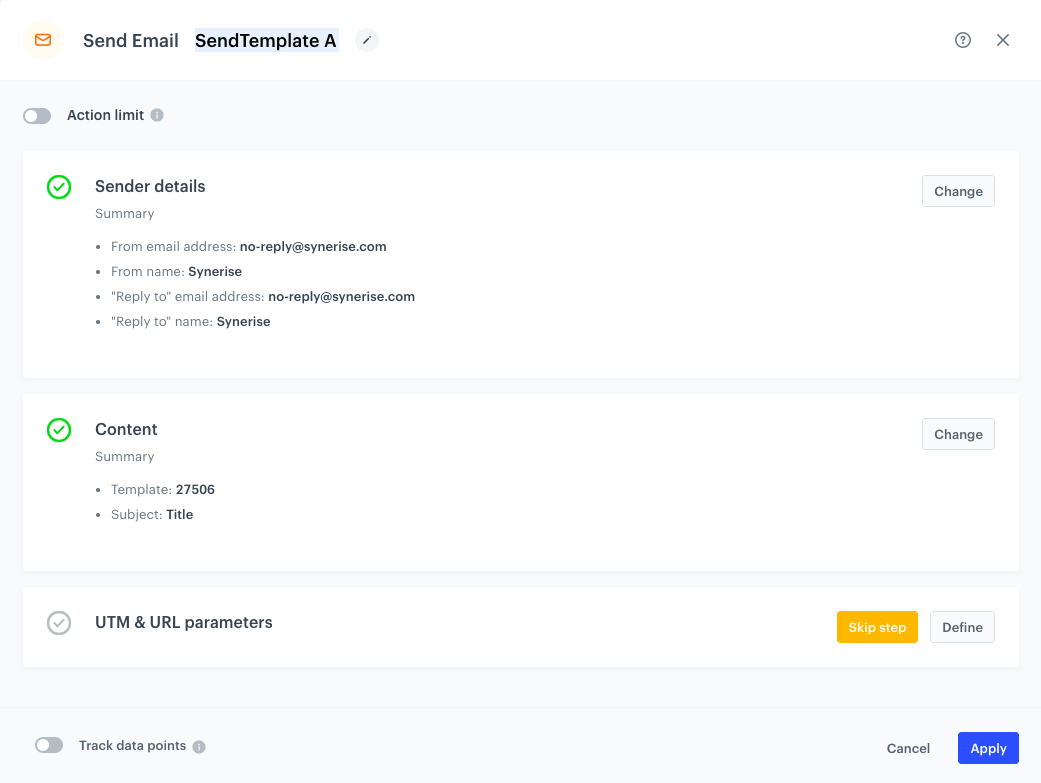
1. Double-click the **Send Email** node.
2. The **Sender details** are filled in by default, if you want to send your message from different email account, click **Change**.
3. In the **Content** section, enter the subject of the email (it will display in the inbox) and select the template.
4. Enter the name of the node (for example `SendTemplate A`).
This is required step and the name must be unique.
5. Optionally, you can fill in the UTM parameters.
6. After the **Send Email** node, add the **End** node.
Screenshot presenting Send Email node
2. In the second path for **group B**:
1. Double-click the **Send Email** node.
2. The **Sender details** are filled in by default, if you want to send your message from different email account, click **Change**.
3. In the **Content** section, enter the subject of the email (it will display in the inbox) and select the template.
4. Enter the name of the node (for example `SendTemplate B`).
This is required step and the name must be unique.
5. Optionally, you can fill in the UTM parameters.
6. After the **Send Email** node, add the **End** node.
3. In our case, **group C** is the largest group (60%) to which the winning template will be sent.
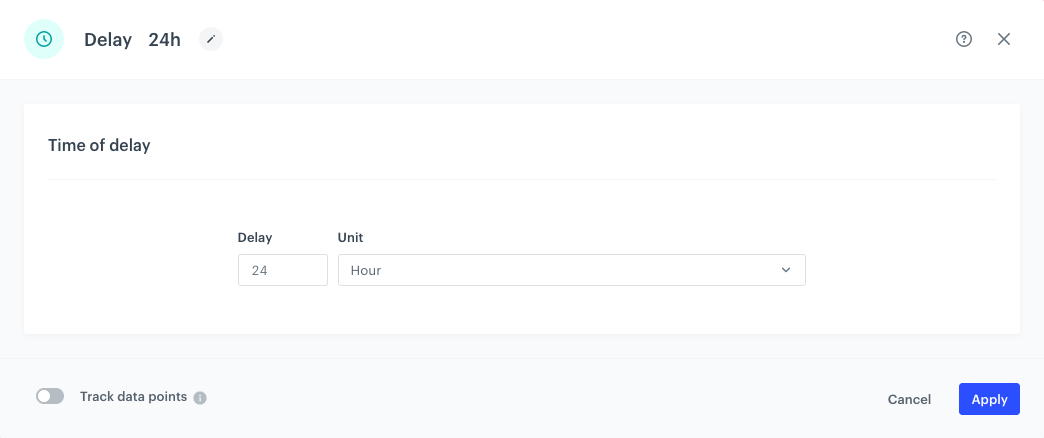
1. First, add the **Delay** node.
2. Make sure that the users have time to react to the emails sent to groups A and B in the test and that the appropriate amount of data is collected for the metric, so the winner can be determined.
3. The time unit depends on the customer, in our case it was **24 hours**.
Delay node
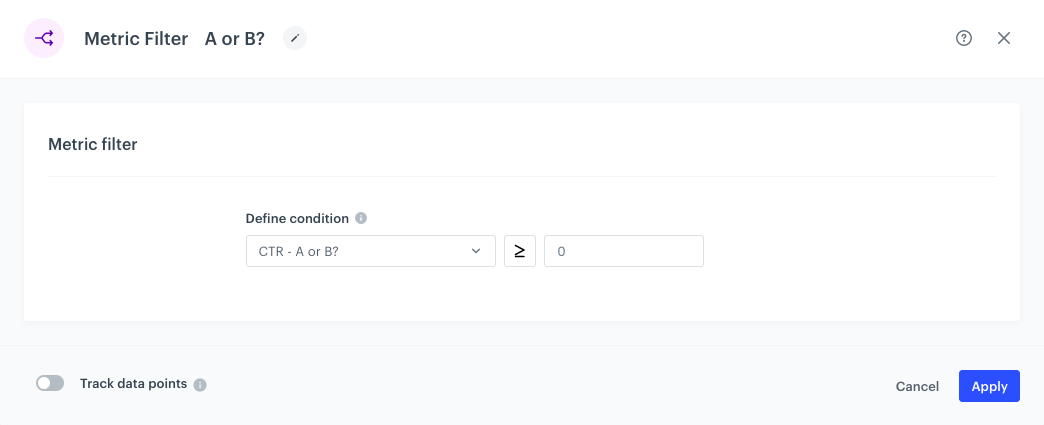
5. In the **Metric Filter** node, we can already define the metric prepared by us (we select it from the dropdown list) and it is necessary to add the condition that it should meet.We established that for the created metric, if it is greater than 0, template A won, if less than 0, then template B.
What if the CTR is equal and we get 0? To avoid surprises, we agreed with the customer that if CTRs are identical, then template A is sent. In the node, we set the metric to be equal to or greater than 0.
Metric Filter node
6. From the node prepared you can make two paths - if our metric meets the condition that we assumed or does not meet it.
1. Choosing a **matched path**, add the **Send Email** node and insert our template from **Metric Filter** node.
2. Add the **End** node.
The metric counts the difference between CTR A and CTR B, if it matches the result greater than or equal to 0, it means that our template A had a higher CTR and won.
7. Similarly, if our metric does not meet the condition assumed in the node, it means that the CTR of version B had to be greater, so we add the **Send Email** node with template B, and then add the **End** node.
8. Add **End** nodes where the workflow should finish for users.
9. Define **capping** (here 1 for 1 day).
10. Optionally, **add titles** for the rest of the nodes so the workflow will be more understandable to your colleagues.
11. **Name** the workflow.
12. To save it as a draft, click **Save it** or activate by clicking **Save & Run**.
The final automation
## Check the use case set up on the Synerise Demo workspace
---
Check the prepared [metric](https://app.synerise.com/analytics/metrics/d034567c-3616-4fb2-82b0-8fa4f89fb6d0) and [workflow](https://app.synerise.com/automations/automation-diagram/c5bb660f-5eeb-4dc4-b577-ae1a926a1d54) directly in the Synerise Demo workspace.
If you’re our partner or client, you already have automatic access to the **Synerise Demo workspace (1590)**, where you can explore all the configured elements of this use case and copy them to your workspace.
If you’re not a partner or client yet, we encourage you to fill out the contact [form](https://demo.synerise.com/request) to schedule a meeting with our representatives. They’ll be happy to show you how our demo works and discuss how you can apply this use case in your business.
## Read more
---
- [ABx Test node](/docs/automation/conditions/abx-split-node)
- [Automation Hub](/docs/automation)
- [Audience node](/docs/automation/triggers/audience-node)
- [Metrics](/docs/analytics/metrics)
- [Metric Filter node](/docs/automation/conditions/metric-filter-node)