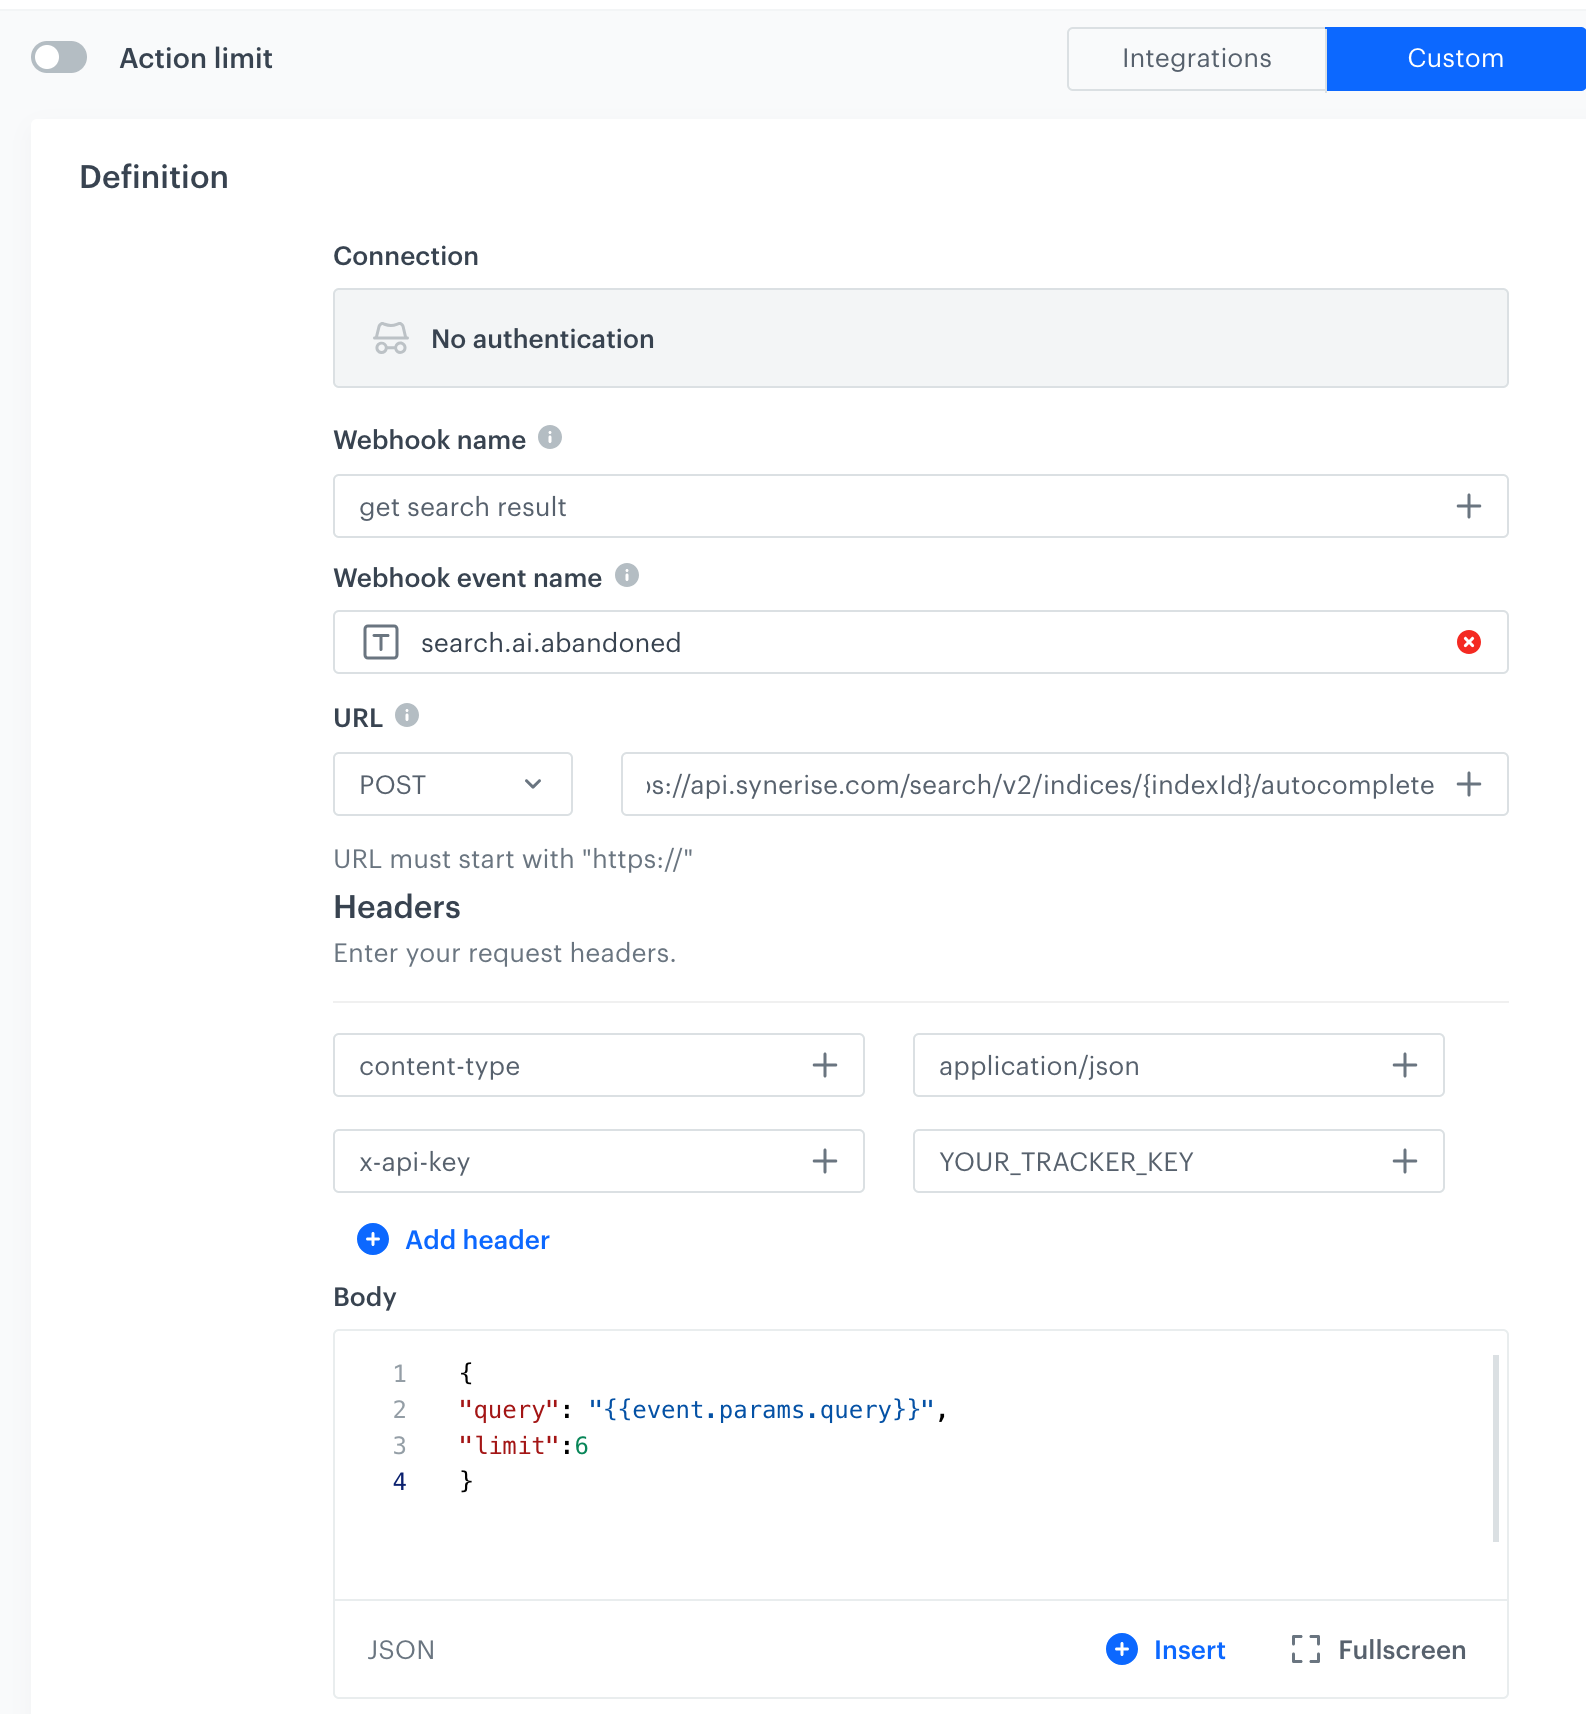
Recover customers who have abandoned their search. When customers conduct a search on your website without adding any items to their cart, this is known as search abandonment. When a customer doesn’t complete a purchase, send an email with products related to the phrase they searched.

This use case describes how to prepare an automated workflow that is triggered by customer searching a specific phrase and sends them an email with an offer based on the abandoned search after 48 hours. One of the challenges addressed in this use case is the use of outgoing integration.

## Prerequisites
---
- [Implement AI search](https://developers.synerise.com/AISearch/AISearch.html) in any of your channels (mobile app, website, and so on).
- Match customers using search in any of your channels with their emails. To do so, we suggest to implement customer identification [on the website](/developers/web/tracking-form-data) and [in your mobile app](/developers/mobile-sdk/user-identification-and-authorization).
- [Create an email account](/docs/campaign/e-mail/configuring-email-account).
- [Create an email template](/docs/campaign/e-mail/creating-email-templates).

## Prepare a workflow
---
Create a workflow which sends your customers an email offer with the products from their abandoned AI search. Optionally, you can add additional nodes, depending on your business needs.

1. Go to <img src="/api/docs/image/54176ad07f146575310749eba44b7c2f42c1b327/icons/automation-hub-icon.svg" alt="Automation Hub icon" class="icon" > **Automation Hub > Workflows > New workflow**.  
2. Enter the name of the workflow.

### Define the Profile Event trigger node
At this stage, we will configure conditions that launch the workflow. As a trigger, we will use the `item.search` event.

1. As the first node of the workflow, add **Profile Event**. In the configuration of the node: 
    1. From **Choose event** dropdown menu, choose `item.search` event.  

     
   <div class="admonition admonition-note"><div class="admonition-icon"><svg xmlns="http://www.w3.org/2000/svg" fill="none" viewBox="0 0 24 24" stroke="currentColor" stroke-width="2.5"><path stroke-linecap="round" stroke-linejoin="round" d="M13 16h-1v-4h-1m1-4h.01M21 12a9 9 0 11-18 0 9 9 0 0118 0z" /></svg></div><div class="admonition-body"><div class="admonition-content">

   `item.search` is an event that our system generates automatically, when our AI search is implemented somewhere in any of your channels, when customer searches for a phrase. It contains `query` parameter which stores the phrase entered by customer.

   </div></div></div>

2. Confirm by clicking **Apply**.

### Configure the Event Filter node
This node will set the workflow to wait for 48 hours for customer conversion (`product.buy`). If the purchase is made, then the workflow ends. If it doesn't happen, the workflow moves on because the customer meets the abandoned search scenario. This setting is just an example and can be configured according to your business needs.

1. As the next node, add **Event Filter**. In the configuration of the node: 
    1. In the **Check** field, from the dropdown menu choose **for period of time**.
    2. Set the time range. In our case, it is 48 hours.
    3. In the **Define conditions** field, from the **Choose event** dropdown menu, choose `product.buy` event.
2. Confirm by clicking **Apply**.
3. For the **Matched** path, add the **End** node .

### Configure the Outgoing Integration node
In this step, we will use the phrase that the customer has searched for (it is stored as a `query` event parameter in the trigger) to send a request to AI search for products related to this phrase. In further steps, we will use these products in the email which will be added to it through a dynamic insert. You can find the method to retrieve products related to the phrase [at this link](https://developers.synerise.com/AISearch/AISearch.html#operation/SearchAutocompletePost).  
In order to create a request, we configure a custom webhook by defining the Endpoint URL, body request, and so on. This action allows you to send requests from Synerise to external systems.


1. To the **Not matched** path, add **Outgoing Integration**. In the configuration of the node: 
    1. Choose **Custom webhook**.
    2. Name the webhook. In our case `get search result`.
    3. In **Webhook event name**, click **Create event** and create a new event:
        1. As **Name**, enter `search.ai.abandoned`
        2. As **Display name**, enter `Abandoned AI search`
    3. In the **URL** section, next to **POST**, type the endpoint of request: `https://api.synerise.com/search/v2/indices/{indexId}/autocomplete`, where `{indexId}` is the ID of your AI search index.
    4. In the **Headers** section, click **Add header**. In the first field type `x-api-key`, and in the second, enter the tracker key from your [tracking code](/developers/web/installation-and-configuration).
    5. In the **Body** section add the following JSON frame with Jinjava code:
        
        
       <pre><code class="language-jinja">{   
               "query": "{{event.params.query}}",
               "limit":6
               }</code></pre>


        **Where:**
        | Phrase      | Explanation                                                                                                                                                                                                                                                    |
        |------------ |--------------------------------------------------------------------------------------------------------------------------------------------------------------------------------------------------------------------------------------------------------------- |
        | `query`  | this is the phrase the customer used in their search, taken from the event triggering the workflow -<br> <br>`item.search`. To insert this phrase dynamically we used [an insert](/developers/inserts/automation#event-parameters).  |
        | `limit`   | this phrase limits how many products the customer will receive.                                                                                                                                                                                                |

    6. Leave **None** as the the method of authorization.
2. Confirm by clicking **Apply**.

   <figure><img src="/api/docs/image/54176ad07f146575310749eba44b7c2f42c1b327/use-cases/all-cases/_gfx/outgoing.png" class="full" alt="Outgoing Integration configuration"><figcaption>Outgoing Integration configuration</figcaption></figure>

### Configure the Event Filter node
This node will allow you to use the products returned by the AI search in the previous step, to send an email with those products. The data of the returned products will be included in the parameters of the `search.ai.abandoned` event.

1.   As the next node, add **Event Filter**. In the configuration of the node: 
        1. In the **Define conditions** field, from the **Choose event** dropdown menu, choose the `search.ai.abandoned` event.
2. Confirm by clicking **Apply**.

### Configure settings for email
1. As the next node, add **Send Email**. Configure it according to your business needs.
2. Configure the sender details section.
3. Configure the Content section.
    1. In the **Subject** field, enter your message subject.
    2. In the **Template** section, choose the template email template prepared earlier.
    3. You can define **UTM & URL parameters**.
4. Confirm by clicking **Apply**.
    

   <div class="admonition admonition-important"><div class="admonition-icon"><svg xmlns="http://www.w3.org/2000/svg" fill="none" viewBox="0 0 24 24" stroke="currentColor" stroke-width="2.5"><path stroke-linecap="round" stroke-linejoin="round" d="M12 8v4m0 4h.01M21 12a9 9 0 11-18 0 9 9 0 0118 0z" /></svg></div><div class="admonition-body"><div class="admonition-content">

   You need to enrich your email template with products related to the phrase your customer searched. To do so, use [Jinjava code](/developers/inserts/automation#event-parameters) and correlate it with parameters from the `search.ai.abandoned` event.

   </div></div></div>


### Add the finishing node
1. Add the **End** node.
2. In the upper right corner, click **Save & Run**.  
    **Result**:  
    <figure><img src="/api/docs/image/54176ad07f146575310749eba44b7c2f42c1b327/use-cases/all-cases/_gfx/workflow-ai-search.png" class="full" alt="The workflow configuration"><figcaption>The workflow configuration</figcaption></figure>

## Check the use case set up on the Synerise Demo workspace
---
You can also check the [workflow configuration](https://app.synerise.com/automations/automation-diagram/b4661379-1a4e-4b32-a8c9-fd3aede43cdc) directly in Synerise Demo workspace.

If you’re our partner or client, you already have automatic access to the **Synerise Demo workspace (1590)**, where you can explore all the configured elements of this use case and copy them to your workspace.  

If you’re not a partner or client yet, we encourage you to fill out the contact [form](https://demo.synerise.com/request) to schedule a meeting with our representatives. They’ll be happy to show you how our demo works and discuss how you can apply this use case in your business.


## Read more
---
- [Automation inserts](/developers/inserts/automation)
- [Creating workflows](/docs/automation/creating-automation)
- [Outgoing Integration](/docs/automation/actions/webhook-node)
