
The effectiveness of abandoned cart scenarios in mobile push notifications lies in their ability to significantly boost conversion rates by reminding customers about items they have shown interest in but have not yet purchased. This strategy leverages the power of timely, personalized communication to encourage users to complete their transactions, often incorporating incentives like discounts or free shipping to further entice the customer back to their cart.

In this use case, we will outline the steps to create an abandoned cart scenario specifically for mobile push notifications. The scenario begins when a customer adds items to their shopping cart but exits the app without completing the purchase. After a predetermined period of inactivity, the system triggers a push notification that is sent to the customer's mobile device.

<figure>
<img src="/api/docs/image/54176ad07f146575310749eba44b7c2f42c1b327/use-cases/all-cases/_gfx/abandoned-cart–mobile-push.png" alt="Mobile push - example" class="large no-frame">
<figcaption> Example mobile push with an abandoned cart items </figcaption>
</figure>

## Prerequisites 
---

- Add [product Feed](/developers/product-feed).
- Create [product catalog](/docs/assets/catalogs).
- Integrate Synerise [mobile SDK](/developers/mobile-sdk) in your mobile application. 
- Implement mobile pushes in your mobile application: [iOS](/developers/mobile-sdk/configuring-push-notifications/ios), [Android](/developers/mobile-sdk/configuring-push-notifications/android).
- Implement the [transaction events](/developers/web/transactions-sdk) using [SDK](/developers/web/transactions-sdk) or [API](https://developers.synerise.com/DataManagement/DataManagement.html#operation/CreateATransaction).
- [Implement the `cart.status` event](/developers/web/cart), which stores the current status of the basket in the form of an event on the customer's card. The event has to be sent to Synerise after every change in the cart status.
- Collect [product.addToCart event](/docs/assets/events).

## Process
---

In this use case, you will go through the following steps:

1. [Create an aggregate](/use-cases/abandoned-cart-mobile-push#create-an-aggregate).
2. [Create mobile push notification](/use-cases/abandoned-cart-mobile-push#create-mobile-push-template).
4. [Create a workflow](/use-cases/abandoned-cart-mobile-push#create-a-workflow).

## Create an aggregate 
---
In this step, create an aggregate that returns the list of products in a cart. The result of the aggregate will be used to display products in your mobile push notification.

1. Go to <img src="/api/docs/image/54176ad07f146575310749eba44b7c2f42c1b327/icons/behavioral-data-hub-icon.svg" alt="Behavioral Data Hub icon" class="icon"> **Behavioral Data Hub > Live Aggregates  > Create aggregate**.
2. As the aggregate type, select **Profile**.  
2. Enter the name of the aggregate.
3. Click **Analyze profiles by** and select **Last**.
5. From the **Choose event** dropdown list, select the [`cart.status`](/docs/assets/events/event-reference/items#cartstatus) event.
6. As the event parameter, select **products**.
7. Set the period from which the aggregate will analyze the results to **Lifetime**. 
12. Save the aggregate.

<figure>
<img src="/api/docs/image/54176ad07f146575310749eba44b7c2f42c1b327/use-cases/all-cases/_gfx/last-cart-status.png" class="full" alt="Configuration of the aggregate">
<figcaption>Configuration of the aggregate</figcaption>
</figure>

## Create mobile push template
---

1. Go to **Experience Hub > Mobile Push > Templates**.
2. You can use the template from the folder or create your own one using the mobile push code editor.  
To use the template, click **New Template**.
3. Choose what type of message you want to create. In our case it's **Simple Push**.
4. Choose how you want to create mobile push message. In this use case we will use **Visual Builder**. 
5. Create your mobile push message according to your business needs. 
   For more information on creating a mobile push, visit our [User Guide](/docs/campaign/Mobile/creating-mobile-push-templates).  

   Below you can find exemplary jinjava codes for the fields Message, URL and Image.  
- In the **Message section**, we add the product title
- In the **URL section** given link to the product page.
- In the **Image section** added URL to the image, which is in the catalog.

   **Message section**

   <pre><code class="language-jinja">
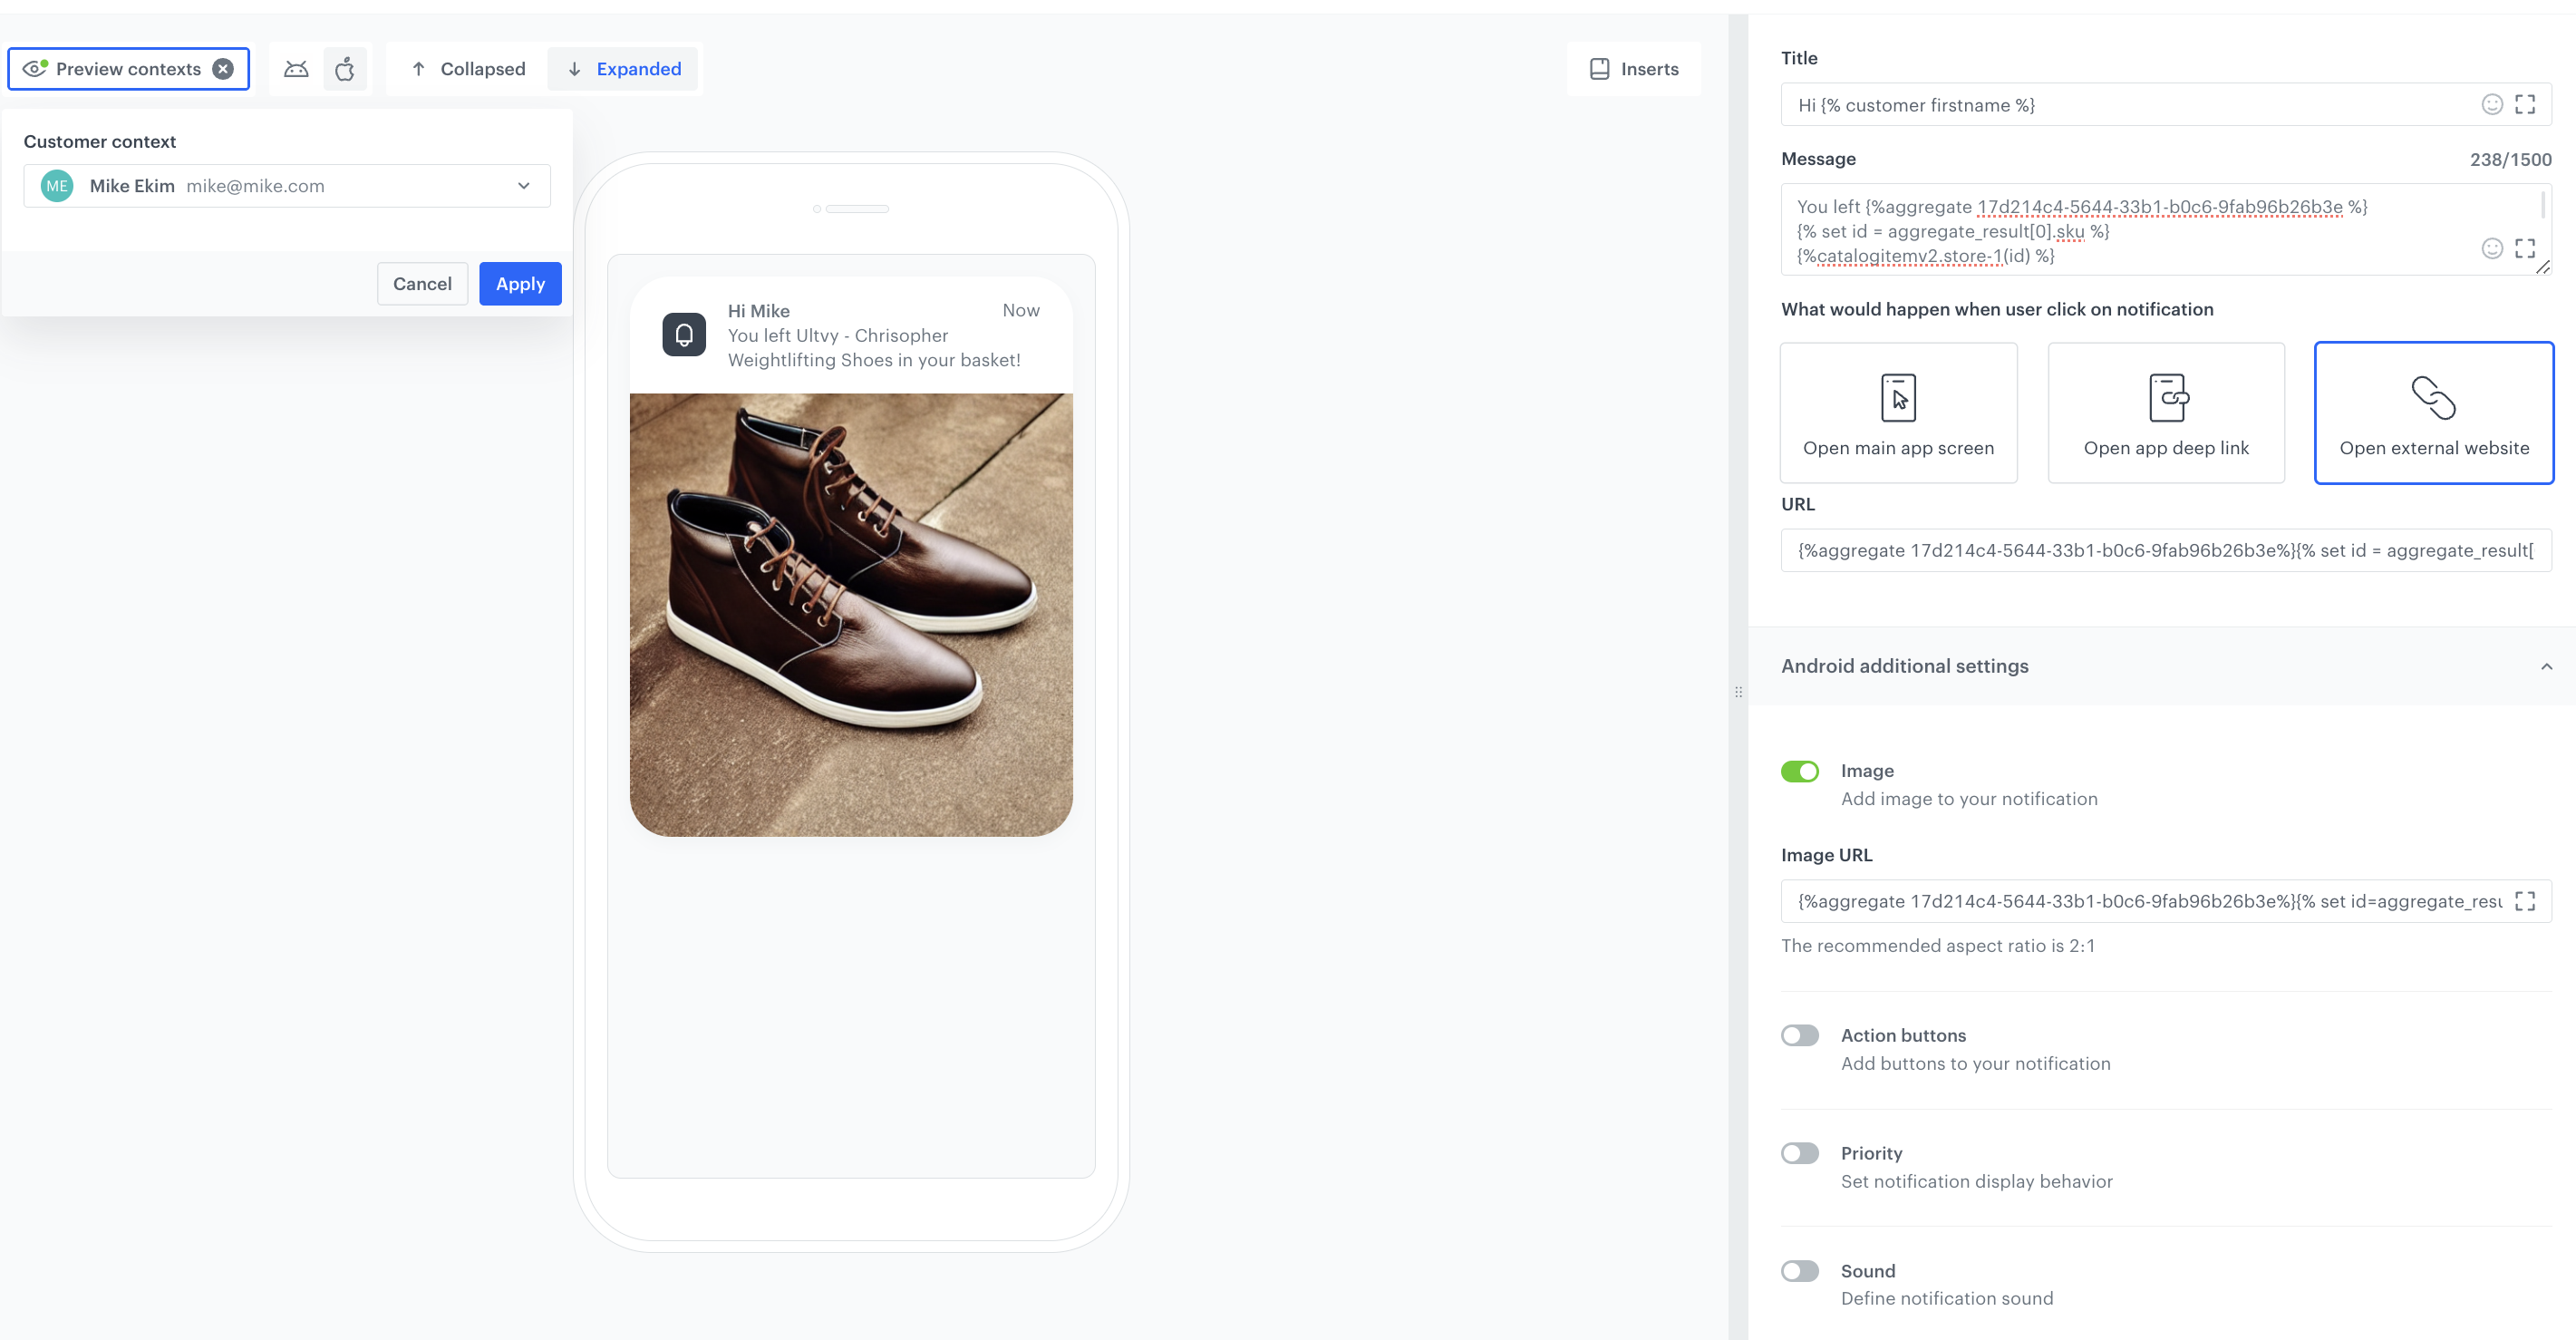
You left {%aggregate 17d214c4-5644-33b1-b0c6-9fab96b26b3e %}
   {% set id = aggregate_result[0].sku %}
   {%catalogitemv2.store-1(id) %}
   {%set itemObject=catalog_result%}
   {{itemObject.name}}
   {%endcatalogitemv2%}
   {%endaggregate%} in your basket!</code></pre>


   **URL section**

   <pre><code class="language-jinja">{%aggregate 17d214c4-5644-33b1-b0c6-9fab96b26b3e%}{% set id = aggregate_result[0].sku %}{%catalogitemv2.store-1(id) %}{%set itemObject=catalog_result%}{{itemObject.productUrl}}{%endcatalogitemv2%}{%endaggregate%}</code></pre>


   **Image section**

   <pre><code class="language-jinja">{%aggregate 17d214c4-5644-33b1-b0c6-9fab96b26b3e%}{% set id = aggregate_result[0].sku %}{%catalogitemv2.store-1(id) %}{%set itemObject=catalog_result%}{{itemObject.image}}{%endcatalogitemv2%}{%endaggregate%}</code></pre>


   **Usage:**
1. Replace aggregate ID with the ID you’d like to use.
2. In `{% set id = aggregate_result[0].sku %}` replace `sku` with the name of the catalog’s attribute that holds sku.
3. In `{%catalogitemv2.store-1(id) %}` replace `store-1` with the name of your item catalog.
4. In `{{itemObject.link}}`, `{{itemObject.name}}`, `{{itemObject.imageLink}}` make sure to put a correct name of an attribute which holds product’s **link**, **name** or **imageLink**.


   <div class="admonition admonition-important"><div class="admonition-icon"><svg xmlns="http://www.w3.org/2000/svg" fill="none" viewBox="0 0 24 24" stroke="currentColor" stroke-width="2.5"><path stroke-linecap="round" stroke-linejoin="round" d="M12 8v4m0 4h.01M21 12a9 9 0 11-18 0 9 9 0 0118 0z" /></svg></div><div class="admonition-body"><div class="admonition-content">

   To properly display icons on iOS, you need to pay attention to whether the **Mutable-Content** option is enabled.  
   Disabling this option will result in the icon not displaying on mobile push.

   </div></div></div>


<figure>
<img src="/api/docs/image/54176ad07f146575310749eba44b7c2f42c1b327/use-cases/all-cases/_gfx/mobile-push-abandoned-cart.png" class="full" alt="Mobile push template configuration">
<figcaption>Mobile push template configuration</figcaption>
</figure>


## Create a workflow
---

The workflow will be triggered by the [`product.AddToCart`](/docs/assets/events/event-reference/items#productaddtocart) event. The delay is defined up to 1 day. If a customer does not make a transaction within one day, we will send a push notification with a reminder to buy products left in the cart.

1. Go to <img src="/api/docs/image/54176ad07f146575310749eba44b7c2f42c1b327/icons/automation-hub-icon.svg" alt="Automation Hub icon" class="icon" > **Automation Hub > Workflows > New workflow**.  
2. Enter the name of the workflow.

### Define the trigger node
---
1. As the first node, add the **Profile Event**. In the settings of the node, select the **productAddToCart** event.
2. Click **Apply**.

   <figure>
   <img src="/api/docs/image/54176ad07f146575310749eba44b7c2f42c1b327/use-cases/all-cases/_gfx/mobilepush4.png" alt="Profile Event" class="large">
   <figcaption> Configuration of the Profile Event node </figcaption>
   </figure>

### Configure the Delay node
---
1. Add the **Delay** node. In the node settings:
    1. In the **Delay** field, type `1`.
    2. From the dropdown list, choose **Day**.
2. Click **Apply**.

   <figure>
   <img src="/api/docs/image/54176ad07f146575310749eba44b7c2f42c1b327/use-cases/all-cases/_gfx/mobilepush5.png" alt="Delay" class="large">
   <figcaption> Configuration of the Delay node </figcaption>
   </figure>

### Define the Profile Filter node
---
As the next node, choose **Profile Filter** to check if a customer have made a transaction in the last 24 hours.

1. Add the **Profile Filter** node. In the node settings:
    1. From the **Choose filter** dropdown, select the [`transaction.charge`](/docs/assets/events/event-reference/items#transactioncharge) event.
    2. Change **matching** to **not matching**.
    3. Set the date range to the last 1440 minutes.     
    
   <div class="admonition admonition-important"><div class="admonition-icon"><svg xmlns="http://www.w3.org/2000/svg" fill="none" viewBox="0 0 24 24" stroke="currentColor" stroke-width="2.5"><path stroke-linecap="round" stroke-linejoin="round" d="M12 8v4m0 4h.01M21 12a9 9 0 11-18 0 9 9 0 0118 0z" /></svg></div><div class="admonition-body"><div class="admonition-content">

   Use 1440 minutes instead of 1 day – use smaller granulation, as in this case 1 day would take the time from current hour till the midnight, so such an analysis would not take into consideration all customers who meet the filter conditions.

   </div></div></div>

2.  Click **Apply**.

### Define the Send Mobile Push node
---

1. Add the **Send Mobile Push** node to the **Matched** path.
2. In the settings of the node, choose the type of the mobile push and the template you have prepared [in the previous steps](/use-cases/abandoned-cart-mobile-push#create-mobile-push-template).

   <figure>
   <img src="/api/docs/image/54176ad07f146575310749eba44b7c2f42c1b327/use-cases/all-cases/_gfx/send-mobile-push-node-abandoned-cart.png" alt="Send Mobile Push node" class="large">
   <figcaption> Configuration of the Send Mobile Push node </figcaption>
   </figure> 

## Add the finishing node 
---
1. Add the **End** node to the **Send Mobile Push** node and **Not Matched** path from the **Profile Filter** node. 
2. In the upper right corner, click **Save & Run**.

<figure>
<img src="/api/docs/image/54176ad07f146575310749eba44b7c2f42c1b327/use-cases/all-cases/_gfx/workflow-abandoned-cart-mobile-push.png" alt="Final view of the workflow" class="full">
<figcaption>Final view of the workflow</figcaption>
</figure>

## Check the use case set up on the Synerise Demo workspace
---
You can check the configuration of each step from this use case in our Synerise Demo workspace:
- [Aggregate](https://app.synerise.com/analytics/aggregates/17d214c4-5644-33b1-b0c6-9fab96b26b3e)
- [Mobile push template](https://app.synerise.com/campaigns/mobile-push/content-manager/template/129344)
- [Workflow](https://app.synerise.com/automations/automation-diagram/691feacc-8158-4986-abd1-2b12aabee328)

If you’re our partner or client, you already have automatic access to the **Synerise Demo workspace (1590)**, where you can explore all the configured elements of this use case and copy them to your workspace.  

If you’re not a partner or client yet, we encourage you to fill out the contact [form](https://demo.synerise.com/request) to schedule a meeting with our representatives. They’ll be happy to show you how our demo works and discuss how you can apply this use case in your business. 

## Read more 
---
- [Automation Hub](/docs/automation) 
- [Creating aggregates](/docs/analytics/aggregates/creating-aggregates) 
- [Jinjava inserts](/developers/inserts/insert-usage) 
- [Mobile notifications](/docs/campaign/Mobile/mobile_campaign)

