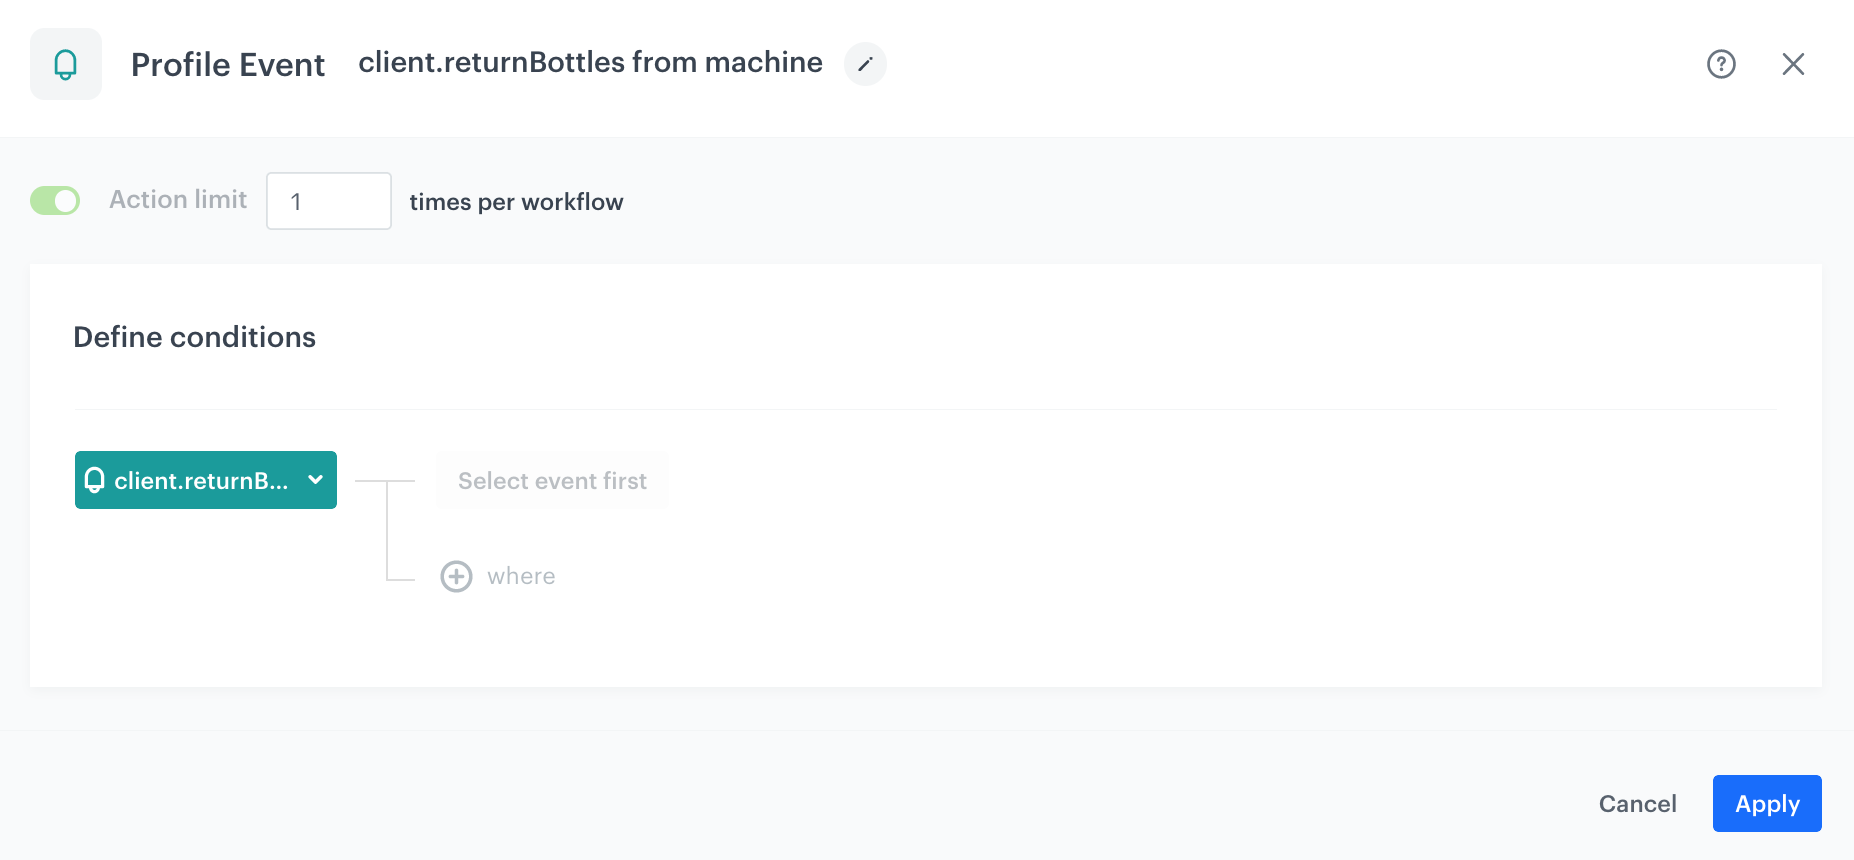
When building a loyalty program, you usually want improve customer engagement and experience, increase revenue and sales, and increase customer lifetime value. To achieve these goals, you need tools that make the whole process simple to build and attractive to the customer, so they want to feel as a part of your company. Synerise has your back. We ensure you have the best experience building loyalty scenarios, including the most flexible way to calculate and charge loyalty points.

A flexible approach to collecting loyalty points allows them to be earned through interaction in the mobile app, website, and by interaction with external tools. If any machine, tool, or device can send us a custom event, we can assign points in the loyalty program without having to create advanced integrations.
As an example, we consider the bottle machines of one of our clients. The company created this solution for customers to encourage them to use green solutions that help protect the environment.

In this use case, we describe the process of adding points in the loyalty program for returning used bottles to the bottle machine. The bottle machine sends a custom event to Synerise, informing about the bottles' return, the number of bottles, and their description. Based on this information, Synerise assigns loyalty points for the activity to customers who have previously scanned their barcode from the app. All the collected parameters are used in the push notification sent to the customer when the bottles are returned to the bottle machine.

## Prerequisites 
---
- Integrate Synerise [mobile SDK](/developers/) in your mobile application. 
- Implement mobile pushes in your mobile application: [iOS](/developers/mobile-sdk/configuring-push-notifications/ios), [Android](/developers/mobile-sdk/configuring-push-notifications/android).
- Use [custom events](https://developers.synerise.com/DataManagement/DataManagement.html#operation/CustomEvent) to save data to customers' profiles when they perform an activity.  
    In this particular use case:
    - The bottle machine reads the barcodes on the bottles.
    - A custom `client.returnBottles` event is sent from the machine to Synerise.
    - The custom event's parameters include:
       - the number of bottles (`productsCount`)
       - the customer's identifier (`custom_identify`)
    
   <div class="admonition admonition-note"><div class="admonition-icon"><svg xmlns="http://www.w3.org/2000/svg" fill="none" viewBox="0 0 24 24" stroke="currentColor" stroke-width="2.5"><path stroke-linecap="round" stroke-linejoin="round" d="M13 16h-1v-4h-1m1-4h.01M21 12a9 9 0 11-18 0 9 9 0 0118 0z" /></svg></div><div class="admonition-body"><div class="admonition-content">

   The event name and parameters are examples. You can define your own names and parameters depending on your business needs.

   </div></div></div>


- Create a mobile push template that will be used later in a [workflow](/use-cases/adding-points-for-custom-event#create-a-workflow). It should inform customers who use mobile app about points added for returned bottles. To do it, use `{{event.params.points}}` in code of your message.

## Security configuration
---
Before you start working with this hub, if you are a Synerise customer or partner, consider reading [the section about denylisting events](/docs/settings/tool/api#denylist). This natively accessible configuration will allow you to manage the restrictions in points management that may help you prevent fraud.

## Create a workflow 
---
This use case is based on a workflow triggered by the `client.returnBottles` event. The workflow generates an event with the number of points rewarded to the specific customer for this activity and sends them a push notification with this information.

1. Go to <img src="/api/docs/image/54176ad07f146575310749eba44b7c2f42c1b327/icons/automation-hub-icon.svg" alt="Automation Hub icon" class="icon" > **Automation Hub > Workflows > New workflow**.  
2. Enter the name of the workflow.

### Define the Profile Event trigger node
---
At this stage, you should configure the conditions that trigger the workflow. Use the `client.returnBottles` event as a trigger. 

1. As the first node of the workflow, add **Profile Event**. 
2. From the **Choose event** dropdown menu, choose the `client.returnBottles` event. 
2. Confirm by clicking **Apply**.

 <figure><img src="/api/docs/image/54176ad07f146575310749eba44b7c2f42c1b327/use-cases/all-cases/_gfx/custom-event1.png" class="full" alt="Configuration of the Profile Event node"><figcaption>Configuration of the Profile Event node</figcaption></figure>

### Define the Generate Event node
---

At this stage, an event with information about the number of points added for returning bottles for specific customer will be generated. 

1. As the second node of the workflow, add **Generate Event**. 
2. In the **Event name**, enter the name of the event that will be generated on the customer's profile. In this case, it is `points.upcharge`. This event cause counting the points for customers.

    
   <div class="admonition admonition-important"><div class="admonition-icon"><svg xmlns="http://www.w3.org/2000/svg" fill="none" viewBox="0 0 24 24" stroke="currentColor" stroke-width="2.5"><path stroke-linecap="round" stroke-linejoin="round" d="M12 8v4m0 4h.01M21 12a9 9 0 11-18 0 9 9 0 0118 0z" /></svg></div><div class="admonition-body"><div class="admonition-content">

   While naming your custom event, follow the `context.action` pattern used for the default events in the application, such as `page.visit`, `product.buy`, and so on.

   </div></div></div>


4. In the **Body** section, define the parameters of this event, and click **Apply**.

  **Example content of **Body** section:**

    
   <pre><code class="language-jinja">{
     "description": "Points for returning bottles",
     "displayHeader": "Eco - second life of your bottle",
     "points": "{{event.params.productsCount|multiply(10)|int}}"
   }</code></pre>

  
In the jinjava code presented above, `points` is the number of points added to the profile. This number is counted based on the `productsCount` from the `client.returnBottles` event, which stores the number of returned bottles. In our use case, the number of points is the number of bottles multiplied by 10.


<div class="admonition admonition-note"><div class="admonition-icon"><svg xmlns="http://www.w3.org/2000/svg" fill="none" viewBox="0 0 24 24" stroke="currentColor" stroke-width="2.5"><path stroke-linecap="round" stroke-linejoin="round" d="M13 16h-1v-4h-1m1-4h.01M21 12a9 9 0 11-18 0 9 9 0 0118 0z" /></svg></div><div class="admonition-body"><div class="admonition-content">

The event body is an example. You can add more parameters or change the point calculation formula according to your business needs.

</div></div></div>


### Define the Profile Filter node
---
As the next step, you should add the Profile Filter node, which checks if the customer agreed to receive notifications about the points status. 

1. Add **Profile Filter** node. 
2. In the settings of the node choose **Profiles > Attributes** and select the attribute that is assigned to customers who have agreed to receive push notifications. In our case it is `receive_push_messages`. 
3. As the **Operator**, choose **Boolean - Is true**.
4. Click **Apply**.

    <figure><img src="/api/docs/image/54176ad07f146575310749eba44b7c2f42c1b327/use-cases/all-cases/_gfx/custom-event7.png" class="full" alt="The Profile Filter node configuration"><figcaption>The Profile Filter node configuration</figcaption></figure>

### Configure the Send Mobile Push node
---

1. To the **Matched** path, add a **Send Mobile Push** node. 
2. In the settings of the node, choose the **Template type** of the mobile push and add the template you have prepared in the prerequisites.
2. Click **Apply**.

### Prepare the final settings 
---

1. To the **Not matched** path and after **Send Mobile Push**, add **End** nodes.
2. Optionally, define **capping**.
3. Optionally, add titles to each node so the workflow will be more understandable to your colleagues.
4. Activate the workflow by clicking **Save & Run**.

 <figure><img src="/api/docs/image/54176ad07f146575310749eba44b7c2f42c1b327/use-cases/all-cases/_gfx/custom-event4.png" class="full" alt="The workflow configuration"><figcaption>The workflow configuration</figcaption></figure>

## Check the use case set up on the Synerise Demo workspace
---
You can also check the [workflow configuration](https://app.synerise.com/automations/automation-diagram/2e0ad164-e7c6-41a9-8e30-ae76bd44f0eb) directly in Synerise Demo workspace. 

If you’re our partner or client, you already have automatic access to the **Synerise Demo workspace (1590)**, where you can explore all the configured elements of this use case and copy them to your workspace.  

If you’re not a partner or client yet, we encourage you to fill out the contact [form](https://demo.synerise.com/request) to schedule a meeting with our representatives. They’ll be happy to show you how our demo works and discuss how you can apply this use case in your business. 

## Read more
---

- [Automation Hub](/docs/automation)
- [API](/developers/api)
- [Integration](/docs/automation/integration)
- [Mobile campaigns](/docs/campaign/Mobile)

