
Adform integration empowers businesses to extend their reach and connect with specific segments and similar audiences, capitalizing on Adform's extensive partner network. By seamlessly sending user segments from Synerise to Adform, you can reach not only users within your predefined segments but also individuals who share striking similarities with them. This can be a valuable tool for increasing advertising effectiveness, brand awareness, driving traffic to your website and boosting sales.

In this use case, you will create dynamic content that assigns the adFormID attribute to customers and a workflow that sends segments of customers to Adform. 

## Prerequisites 
---
- Have an Adform account.
- Create API keys according to [this](/docs/settings/tool/api#adding-api-keys) instruction, and add appropriate permissions. Screenshot below shows all the required permissions:
<figure>
<img src="/api/docs/image/54176ad07f146575310749eba44b7c2f42c1b327/use-cases/all-cases/_gfx/permissions.png" alt="The selection of permissions required for this use case" class="full">
<figcaption> Permissions required for this use case </figcaption>
</figure>

## Process 
---
In this use case, you will go through the following steps:
1. [Match ID Cookie on Web](#match-id-cookie-on-web), create Dynamic Content assigning AdformID value to site customers.
2. [Match ID Cookie on Mobile](#match-id-cookie-on-mobile), send a custom event assigning AdformID value to mobile customers.
3. [Save Adform ID as an attribute](#save-adform-id-as-an-attribute).
4. [Create a workflow to sends a group of customers to Adform](#create-a-workflow-to-share-segmentation).

## Match ID Cookie on Web
---
In this part of the process, you match the Adform ID with your customer's profile in Synerise.

In the browser, Adform issues an ID in a cookie named `uid` from the `adform.co.uk` domain. This cookie is unique within your browser and resets itself in the following cases:
- Clearing cookies in the browser
- Expiration of a cookie (60 days)
- Mechanisms on the website that enforce the right of users to be forgotten (clearing cookies)


  <div class="admonition admonition-important"><div class="admonition-icon"><svg xmlns="http://www.w3.org/2000/svg" fill="none" viewBox="0 0 24 24" stroke="currentColor" stroke-width="2.5"><path stroke-linecap="round" stroke-linejoin="round" d="M12 8v4m0 4h.01M21 12a9 9 0 11-18 0 9 9 0 0118 0z" /></svg></div><div class="admonition-body"><div class="admonition-content">

  This value is not returned by calling `document.cookie`.

  </div></div></div>


Since one customer can use multiple devices, it is necessary to store multiple Adform IDs per a customer in Synerise. The Adform ID is stored in the `adFormID` attribute, which will take values separated by `|` (the unique Adform ID collected from the browser or application), for example:

`"adFormID": "2122903280729231000|2122903280729231001"`

You can prepare a dynamic content with the code that matches the Adform ID with the UUID from Synerise by adding a value to the `adFormID` attribute. It is important that the value is added, not overwritten.

1. Go to <img src="/api/docs/image/54176ad07f146575310749eba44b7c2f42c1b327/icons/experience-hub-icon.svg" alt="Image presents the Experience Hub icon" class="icon"> **Experience Hub > Dynamic content > Create new**.
2. Enter the name of the dynamic content.
3. Choose the **Insert Object** type.
4. As the **Audience**, you can leave **Everyone** or specify to whom the attribute should be assigned according to your business needs.
5. In the **Content** section, click **Define**. 
6. Leave **Simple message** as default.
7. In **CSS selector**:
    1. Select **After (in div)**
    2. In the field, enter `.snrs-modal-wrapper`
8. In the **Create your template** tab, click **Create message**.
    1. Click **+ New template** in the upper rght corner.
    2. Leave the **HTML** and **CSS** tabs blank, and in the **JavaScript** tab paste the following script:
    
       <pre><code class="language-javascript">(function () {

       function loadScript(src, callback) {

           let script = document.createElement('script');

           script.src = src;

           script.onload = function () {

               return callback(window.Adform);

           };

           document.head.append(script);

       }

       function checkAdform(instance) {

           if (!instance || !instance._uid) {

               console.log('no uid')

           } else {

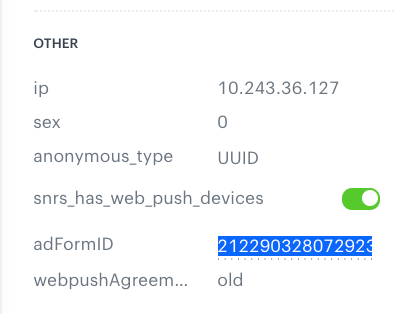
               var oldUid = "{% if 'adFormID' in customer|string %}{{ customer['adFormID'] }}{% else %}brak{% endif %}";

               if (oldUid === 'brak' || oldUid.indexOf(instance._uid) === -1) {

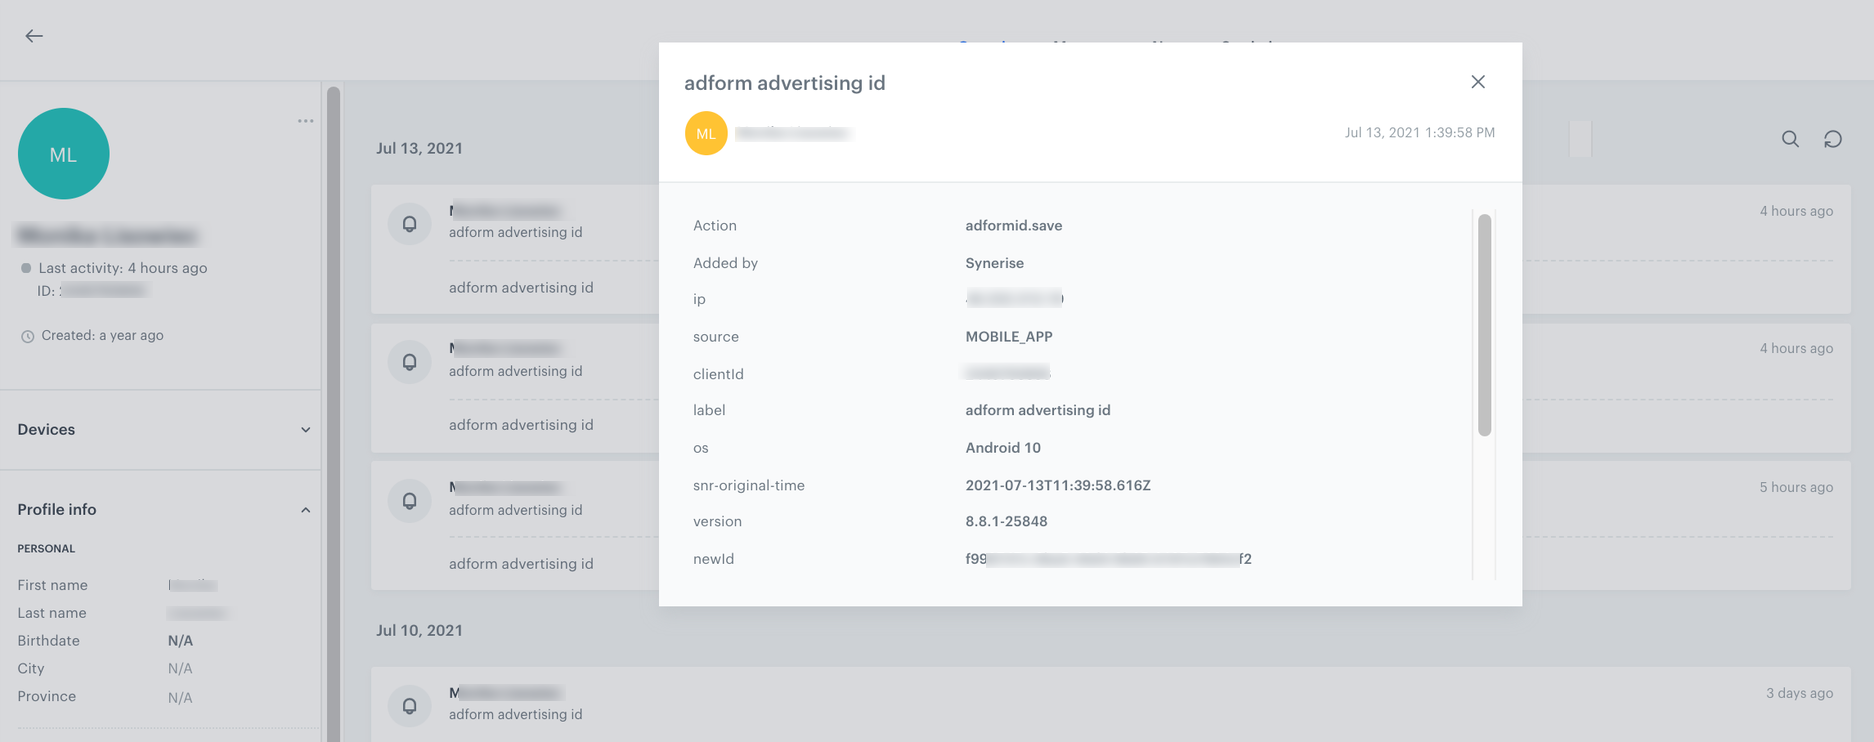
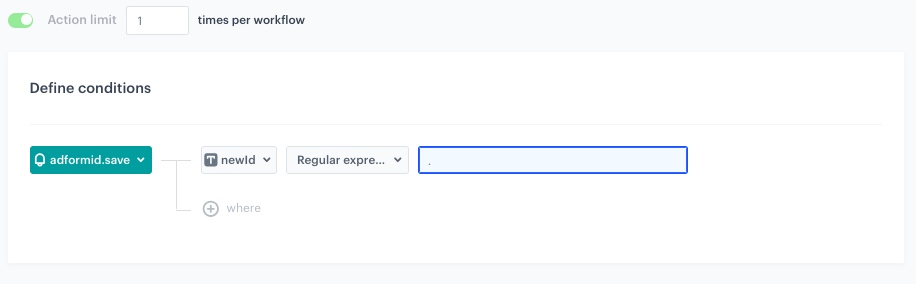
                   SR.event.trackCustomEvent('adformid.save', {

                       newId: instance._uid.toString(),

                   });

                   console.log('adform uid sent -&gt; ' + instance._uid);

               }

           }

       }

       loadScript('https://track.adform.net/serving/cookie/?adfaction=getjs;adfcookname=uid', checkAdform)

       })();</code></pre>

    3. To continue the process of configuring the dynamic content campaign, click **Next**.
9. Click **Apply**.
10. In the **Schedule** section, click **Define**.
    1. As the **Display time** choose **Display immediately**.
    2. Click **Apply**.
2. In the **Display Settings** section, click **Define**.
    1. Specify circumstances for dynamic content to be displayed and Advanced options, according to your business needs.
    2. Click **Apply**.
3. Optionally, you can define the UTM parameters and additional parameters for your dynamic content campaign.
4. Click **Activate**.

**Result:** `adformid.save` event is generated, it will contain the `adFormID` parameter with the ID value.

## Match ID Cookie on Mobile
---
The cookie matching is based on the Adveritising ID, which is a fixed ID for a given device issued by Google.

Currently, Advertising ID is not collected through our SDK. You must implement such tracking in the application. You can do this by sending a custom event.


<pre><code class="language-json">{
  "label": "custom.event",
  "action": "adformid.save,
  "client": {
  "uuid": "xxx", // uuid from mobile app
  },
  "params": {
    "newId": "ADVERTISEMENT_ID"
    "source": "MOBILE_APP"                                   
    }
}</code></pre>

    
<div class="admonition admonition-important"><div class="admonition-icon"><svg xmlns="http://www.w3.org/2000/svg" fill="none" viewBox="0 0 24 24" stroke="currentColor" stroke-width="2.5"><path stroke-linecap="round" stroke-linejoin="round" d="M12 8v4m0 4h.01M21 12a9 9 0 11-18 0 9 9 0 0118 0z" /></svg></div><div class="admonition-body"><div class="admonition-content">

The event is recommended to be sent once per customer.

</div></div></div>


The custom event available on the activity list on the customer’s profile:

<figure><img src="/api/docs/image/54176ad07f146575310749eba44b7c2f42c1b327/use-cases/all-cases/_gfx/adform-mobile-event.png" class="full" alt="The output of custom event sent from mobile"><figcaption>The output of custom event sent from mobile</figcaption></figure>

## Save Adform ID as an attribute
---
In this part of the process you will create a workflow that is triggered by the `adformid.save` event and adds the ID it contains to the current value of the client attribute.

1. Go to <img src="/api/docs/image/54176ad07f146575310749eba44b7c2f42c1b327/icons/automation-hub-icon.svg" alt="Automation Hub icon" class="icon" > **Automation Hub > Workflows > New workflow**.  
2. Enter the name of the workflow.

### Define the Profile Event trigger node
---
1. As the first node of the workflow, add **Profile Event**. In the configuration of the node: 
    1. From the **Choose event** dropdown menu, choose the **adformid.save** event.
    2. Click the **+ where** button, from the **Choose parameter** dropdown menu, choose **newId**.
    3. From the **Choose operator** dropdown, choose **Regular expression**.
    4. In the next field, type the `.`, which means that all values are considered (except for `null`).
2. Click **Apply**.

<figure>
<img src="/api/docs/image/54176ad07f146575310749eba44b7c2f42c1b327/use-cases/all-cases/_gfx/profilee_adform.png" alt="The configuration of the Profile Event node" class="full">
<figcaption> The configuration of the Profile Event node </figcaption>
</figure>

### Define the Update Profile node
---
1. Add the **Update Profile** node. In the configuration of the node:
    1. From the first dropdown list, select **adFormID**.
    2. From the next dropdown list, select **Change**.
    3. In the field enter the following formula:
    
       <pre><code class="language-javascript">{% set currentValue = customer['adFormID'] %}{% set newVal = event.params.newId|string %}{% set currentValues = currentValue|split('|') %}{% do currentValues.append(newVal) %}{% set finalValues = [] %}{% if currentValue|length &gt; 255 %}{% for x in currentValues %}{% if loop.index0 &gt; 0 %}{% do finalValues.append(x) %}{% endif %}{% endfor %}{% else %}{% if newVal in currentValue %}{% catalog.kill(it) %}{% else %}{% set finalValues = currentValues %}{% endif %}{% endif %}{{ finalValues|join('|') }}</code></pre>


   <div class="admonition admonition-note"><div class="admonition-icon"><svg xmlns="http://www.w3.org/2000/svg" fill="none" viewBox="0 0 24 24" stroke="currentColor" stroke-width="2.5"><path stroke-linecap="round" stroke-linejoin="round" d="M13 16h-1v-4h-1m1-4h.01M21 12a9 9 0 11-18 0 9 9 0 0118 0z" /></svg></div><div class="admonition-body"><div class="admonition-content">

   The insert above checks:
   - If the customer doesn't have the `adformID` assigned, the attribute is assigned to them.
   - If the customer has the `adformID` assigned, the length of the ID is checked. If it exceeds 255 characters, old ID is deleted and new is added. If it doesn't, new ID is added.

   </div></div></div>
   
2. Click **Apply**.

<figure>
<img src="/api/docs/image/54176ad07f146575310749eba44b7c2f42c1b327/use-cases/all-cases/_gfx/adform_updatep.png" alt="The configuration of the Update Profile node" class="full">
<figcaption> The configuration of the Update Profile node </figcaption>
</figure>

### Add the finishing node
---
1. Add the **End** node.
2. In the upper right corner, click **Save & Run**.  
    **Results**: 

    <figure><img src="/api/docs/image/54176ad07f146575310749eba44b7c2f42c1b327/use-cases/all-cases/_gfx/adform_saveid_wrkflw.png" class="full" alt="The workflow configuration"><figcaption>The workflow configuration</figcaption></figure>

    <figure><img src="/api/docs/image/54176ad07f146575310749eba44b7c2f42c1b327/use-cases/all-cases/_gfx/adform-updated-attribute.png" class="full" alt="The view of the updated attribute in the customer's profile"><figcaption>Updated attribute in the customer's profile</figcaption></figure>

## Create a workflow to share segmentation
---
In this part of the process, you will prepare a workflow which sends a group of customers based on the adFormId to Adform. You will define the filters in the Audience node to include customers with assigned adFormId according to your business needs.

1. Go to <img src="/api/docs/image/54176ad07f146575310749eba44b7c2f42c1b327/icons/automation-hub-icon.svg" alt="Automation Hub icon" class="icon" > **Automation Hub > Workflows > New workflow**.  
2. Enter the name of the workflow.

### Define the Audience trigger node
---
1. Start the workflow with the **Audience** node.
2. Click the node to configure it.
3. In the **Run trigger** section, specify whether you want the workflow to run cyclically or on a one-time basis.
4. In the **Define audience** section, choose **New audience**.
    1. Click **Define conditions**.
    2. From the **Choose filter** dropdown list, select the **adFormId** attribute.
    5. From the **Choose operator** dropdown, choose **Is true**.
    6. Optionally, you can add other filters to define the audience according to your business needs.
6. Click **Apply**


   <div class="admonition admonition-tip"><div class="admonition-icon"><svg xmlns="http://www.w3.org/2000/svg" fill="none" viewBox="0 0 24 24" stroke="currentColor" stroke-width="2.5"><path stroke-linecap="round" stroke-linejoin="round" d="M9.663 17h4.673M12 3v1m6.364 1.636l-.707.707M21 12h-1M4 12H3m3.343-5.657l-.707-.707m2.828 9.9a5 5 0 117.072 0l-.548.547A3.374 3.374 0 0014 18.469V19a2 2 0 11-4 0v-.531c0-.895-.356-1.754-.988-2.386l-.548-.547z" /></svg></div><div class="admonition-body"><div class="admonition-content">

   You can optionally add the Profile Filter node as the next step in your workflow. This node allows you to divide your segment into subgroups.

   <figure><img src="/api/docs/image/54176ad07f146575310749eba44b7c2f42c1b327/use-cases/all-cases/_gfx/adform_tip.png" class="full" alt="The view of the workflow with optional Profile Filter node"><figcaption>The workflow with optional Profile Filter node</figcaption></figure>

   </div></div></div>


### Configure the Outgoing Integration node
---
You will use the Outgoing Integration node to upload segments from Synerise to Adform.

1. Add **Outgoing Integration**. In the configuration of the node: 
    1. In the upper right corner, choose **Custom**.
    3. As the Webhook connection type, choose **API key**.
    4. Click **Select connection**, select the API key you created as a part of [prerequisites](#prerequisites). 
    5. If the connection you want to use is in the list, select it and proceed. If the connection list is empty or you don’t see a connection, follow [this](/docs/automation/integration/outgoing-webhook#define-the-connection) instruction. 
2. Name the webhook.
2. Select the **POST method**.
3. In the **Endpoint** field, enter the endpoint to which you will send the segment.
    
   <div class="admonition admonition-important"><div class="admonition-icon"><svg xmlns="http://www.w3.org/2000/svg" fill="none" viewBox="0 0 24 24" stroke="currentColor" stroke-width="2.5"><path stroke-linecap="round" stroke-linejoin="round" d="M12 8v4m0 4h.01M21 12a9 9 0 11-18 0 9 9 0 0118 0z" /></svg></div><div class="admonition-body"><div class="admonition-content">

   To obtain the endpoint, contact us at `synerise.com/support`. When contacting, provide: the link to the automation responsible for submitting the segment and the DMP ID, which you can find in your Adform panel.

   </div></div></div>

4. Leave the **content-type** at the default value: `application / json`. 
5. In the body of the request, paste the code below. The OwnerID value must be a combination of your workspace name and the name of the segmentation that it will be exported with to Adform, for example, SyneriseDemo_female where SyneriseDemo is the name of the workspace and female is the name of the segmentation

   <pre><code class="language-json">
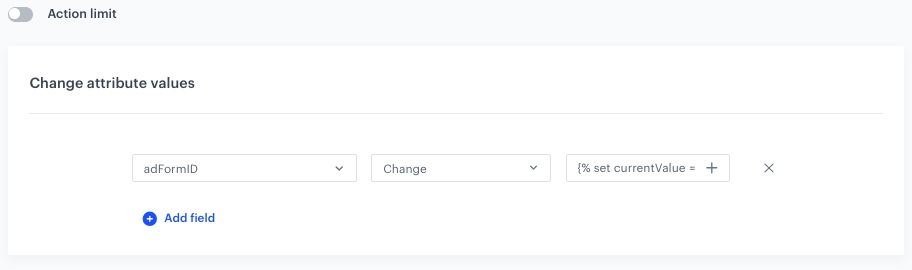
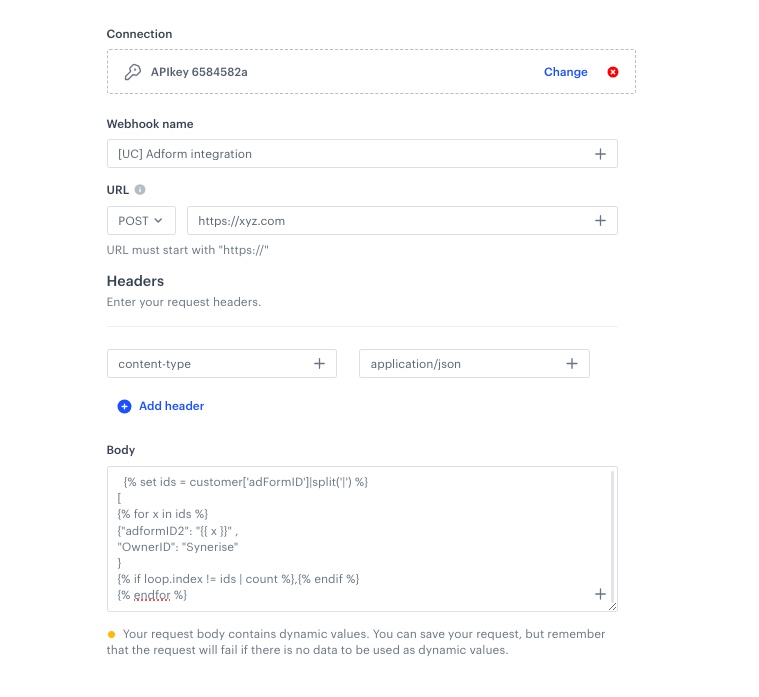
{% set ids = customer['adFormID']|split('|') %}
   [
   {% for x in ids %}
   {"adformID2": "{{ x }}" ,
   "OwnerID": "SyneriseDemo_female"
   }
   {% if loop.index != ids | count %},{% endif %}
   {% endfor %}</code></pre>


    <figure>
    <img src="/api/docs/image/54176ad07f146575310749eba44b7c2f42c1b327/use-cases/all-cases/_gfx/adform_integration.png" alt="The configuration of the Outgoing Integration node" class="full">
    <figcaption> The configuration of the Outgoing Integration node </figcaption>
    </figure>

7. Click **Apply**.

### Add the finishing node
---
1. Add the **End** node.
2. In the upper right corner, click **Save & Run**.  
    **Result**: 

    <figure><img src="/api/docs/image/54176ad07f146575310749eba44b7c2f42c1b327/use-cases/all-cases/_gfx/adform_wrkflw.png" class="full" alt="The workflow configuration"><figcaption>The workflow configuration</figcaption></figure>

## Check the use case set up on the Synerise Demo workspace
---
You can check the configuration of each step from this use case in our Synerise Demo workspace: 
- [Dynamic Content](https://app.synerise.com/campaigns/create/d7413af5-3e74-414d-8ff1-13d1b6bb5cb2)
- [Workflow to save Adform ID as an attribute](https://app.synerise.com/automations/automation-diagram/ad437660-a793-44f2-bc58-90c5cebe633e)
- [Workflow to share segmentation](https://app.synerise.com/automations/automation-diagram/5982f11b-00b8-49ac-8cbd-d9df8d8e72b1)

If you’re our partner or client, you already have automatic access to the **Synerise Demo workspace (1590)**, where you can explore all the configured elements of this use case and copy them to your workspace.  

If you’re not a partner or client yet, we encourage you to fill out the contact [form](https://demo.synerise.com/request) to schedule a meeting with our representatives. They’ll be happy to show you how our demo works and discuss how you can apply this use case in your business. 

## Read more
---
- [Automation Hub](/docs/automation)
- [Dynamic content](/docs/campaign/dynamiccontent)
- [Integration](/docs/automation/integration)
- [Segmentation](/docs/analytics/segmentations)