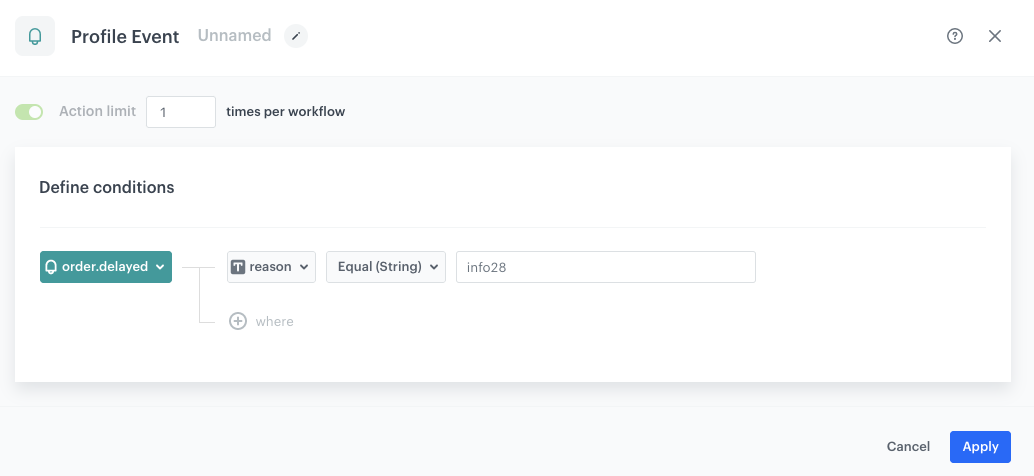
You can use Synerise to inform customers that their order will be delayed, instead of calling them or waiting until they call and ask about the products they orderd.

This use case provides the instructions on the basic implementation of this use case, that is sending an email with information about the delay in delivery of the order.

## Prerequisites 
---
- Integrate with Synerise JS SDK.
- Configure [a sender account](/docs/campaign/e-mail/configuring-email-account).

## Process 
---

In this use case, you will go through the following steps:
1. [Implement a custom event](/use-cases/automatic-notification-about-delay#implement-a-custom-event).
2. [Prepare an email template](/use-cases/automatic-notification-about-delay#prepare-an-email-template).
3. [Create a workflow](/use-cases/automatic-notification-about-delay#create-a-workflow).

## Implement a custom event
---
As the first part of the process, send through API a custom event (for a test user with a test order ID) to Synerise, that signifies the delay of the order delivery. Use [this method](https://developers.synerise.com/DataManagement/DataManagement.html#operation/CustomEvent).  
You will need this event in the [further part of the process](/use-cases/automatic-notification-about-delay#create-a-workflow) to select it as a trigger of the workflow.

- If you have more than one reason for the order delay, insert them in the parameter. This way, you can prepare an email template for every reason and prepare a workflow that is reason-dependant. 
- In the event information, add the ID of the order. This way, you can later use it as an [insert](/developers/inserts) in the email template.

Example of an event:


<pre><code class="language-json">{   
"label": "Delay notification",
"action": "order.delayed",
"client": {
        "email": "john.doe@example.com"
    },
    "params": {
        "reason": "info28",
        "orderId": "1988100"
    }
}</code></pre>


## Prepare an email template
---
In this part of the process, prepare an email template that includes the information about the order ID.

If you have more than one reason for the order delay, prepare template for each reason of delay. Later on, you can prepare workflow for every reason.

1. Go to <img src="/api/docs/image/54176ad07f146575310749eba44b7c2f42c1b327/icons/experience-hub-icon.svg" alt="Image presents the Experience Hub icon" class="icon"> **Experience Hub > Email**.  
2. On the left side of the screen, click **Templates**.  
3. Select the wizard.
4. In the content of the message add this insert:  
    
   <pre><code class="language-jinjava">{{ event.params.orderId }}</code></pre>
  
    It will be replaced with the actual ID of the order.  
    
   <div class="admonition admonition-important"><div class="admonition-icon"><svg xmlns="http://www.w3.org/2000/svg" fill="none" viewBox="0 0 24 24" stroke="currentColor" stroke-width="2.5"><path stroke-linecap="round" stroke-linejoin="round" d="M12 8v4m0 4h.01M21 12a9 9 0 11-18 0 9 9 0 0118 0z" /></svg></div><div class="admonition-body"><div class="admonition-content">

   When you use the syntax above, the parameters are retrieved from the event that is in the current context. The context is the most recent Trigger or Event Filter node in the workflow. Learn more about [reusing event context from preceding nodes](/developers/inserts/automation#event-parameters)

   </div></div></div>

5. Adjust the design of the template according to your needs.
6. Save the template.

## Create a workflow
---
In this part of the process, prepare a workflow that is triggered by the event that signifies the delay of the delivery. As a result, an email is sent to the customer whose order will be delayed.  

If you have more than one reason for the order delay, insert them in the parameter. This way, you can prepare workflows for each reason of the delay.

1. Go to **Automation Hub > Workflows > New workflow**.
2. Enter the name of the workflow.
3. As the first node of the workflow, add **Profile Event**. In the node settings:  
    1. Select the event you implemented in the first part of the process.
    2. As the parameter, select the parameter that signifies the reason of the delay.  
    3. As the logical operator, select **Equal**.  
    4. In the text field that appeared, enter the reason of the delay.  
        <figure>
        <img src="/api/docs/image/54176ad07f146575310749eba44b7c2f42c1b327/use-cases/all-cases/_gfx/delay-notification-client-event.png" alt="Settings of the Profile Event trigger" class="full">
        <figcaption> Settings of the Profile Event trigger </figcaption>
        </figure>
    5. Confirm by clicking **Apply**. 
4. As the next node, add **Send Email**. In the node settings:  
    1. In the **Sender details** section, select the sender account from which the email will be sent. Confirm the changes by clicking **Apply**.
    2. In the **Content** section, enter the subject of the email (it will display in the recipient's inbox).  
        
       <div class="admonition admonition-tip"><div class="admonition-icon"><svg xmlns="http://www.w3.org/2000/svg" fill="none" viewBox="0 0 24 24" stroke="currentColor" stroke-width="2.5"><path stroke-linecap="round" stroke-linejoin="round" d="M9.663 17h4.673M12 3v1m6.364 1.636l-.707.707M21 12h-1M4 12H3m3.343-5.657l-.707-.707m2.828 9.9a5 5 0 117.072 0l-.548.547A3.374 3.374 0 0014 18.469V19a2 2 0 11-4 0v-.531c0-.895-.356-1.754-.988-2.386l-.548-.547z" /></svg></div><div class="admonition-body"><div class="admonition-content">

       In the email subject, you can also put the order number by using an insert, for example `Order information no {{event.params.orderId}}`.

       </div></div></div>

    3. Select the template you created in [Prepare an email template](/use-cases/automatic-notification-about-delay#prepare-an-email-template) step.
    4. Confirm the settings of the **Content** section by clicking **Apply**.
    5. In the **UTM & URL parameters** section, click **Change**. 
    6. Enter the parameters.
    7. Confirm the settings in the **UTM & URL parameters** section by clicking **Apply**. 
    6. Confirm the settings of the **Send Email** node by clicking **Apply** on the bottom of the pop-up.  
5. As the last node, add **End**.  
6. Click **Save & Run**.

<figure>
 <img src="/api/docs/image/54176ad07f146575310749eba44b7c2f42c1b327/use-cases/all-cases/_gfx/delay-notification-workflow.png" alt="Final configuration of the workflow" class="full">
 <figcaption> Final configuration of the workflow </figcaption>
 </figure>

## Check the use case set up on the Synerise Demo workspace
---
You can check the [workflow](https://app.synerise.com/automations/automation-diagram/8faf5493-7126-4763-b2c8-1b0ac644941d) created in this use case.

If you’re our partner or client, you already have automatic access to the **Synerise Demo workspace (1590)**, where you can explore all the configured elements of this use case and copy them to your workspace.  

If you’re not a partner or client yet, we encourage you to fill out the contact [form](https://demo.synerise.com/request) to schedule a meeting with our representatives. They’ll be happy to show you how our demo works and discuss how you can apply this use case in your business. 

## What's next
---
As an extra step, you can send a discount coupon after a delayed shipment. If the ordered goods cannot be delivered on time for logistical reasons, you can inform customers ahead of time and offer a discount coupon to be applied in future purchases, boosting the loyalty of your customers.

## Read more
---
- [Automation Hub](/docs/automation)
- [Automation Jinjava inserts](/developers/inserts/automation)
- [Creating custom events](https://developers.synerise.com/DataManagement/DataManagement.html#operation/CustomEvent)
- [Email templates](/docs/campaign/e-mail/creating-email-templates)