With Synerise you can identify customers with a high propensity to buy and create personalized messages tailored to their preferences and behavior, leveraging the power of customer data to increase engagement, build brand loyalty, and ultimately boost sales revenue. Deliver personalized content through email, SMS, and web push channels, ensuring customers receive messages in their preferred communication channel. Use the power of automation to execute a variety of business scenarios, including reminders for abandoned shopping carts or searches, delivery of promotions, and much more.
In this use case, you will create a workflow sending personalized web push, email or sms message to customers with high propensity to buy, depending on their communication consents.
## Prerequisites
---
- [Implement a tracking code](/docs/settings/tool/tracking_codes)
- [Enable the Propensity prediction type](/docs/ai-hub/predictions/enabling-predictions#enabling-propensity-and-best-fit-predictions).
- [Configure an email account](/docs/campaign/e-mail/configuring-email-account).
- [Integrate SMS gateway with Synerise](/docs/campaign/SMS/configuring-sms-gateway).
- [Configure web push notifications](/docs/campaign/Webpush/configuring-web-push).
- [Enable Time Optimizer](/docs/settings/configuration/time-optimizer#enabling-time-optimizer) in Synerise settings.
- [Create Web and Email modes](/docs/settings/configuration/time-optimizer#creating-modes) in Time Optimizer.
- Create templates for [email](/docs/campaign/e-mail/creating-email-templates), [SMS](/docs/campaign/SMS/creating-SMS-template) and [web push](/docs/campaign/Webpush/creating-webpush-templates) communication according to your business needs.
## Process
---
In this use case, you will go through the following steps:
1. [Create a segmentation](#create-a-segmentation) of customers with email/sms/web push agreement.
2. [Create a prediction](#create-a-prediction) to calculate propensity to buy for customers with email/sms/web push agreement.
3. [Create a workflow](#create-a-workflow) to send a web push, email or text message to customers with high propensity to buy, depending on their communication consents.
## Create a segmentation
---
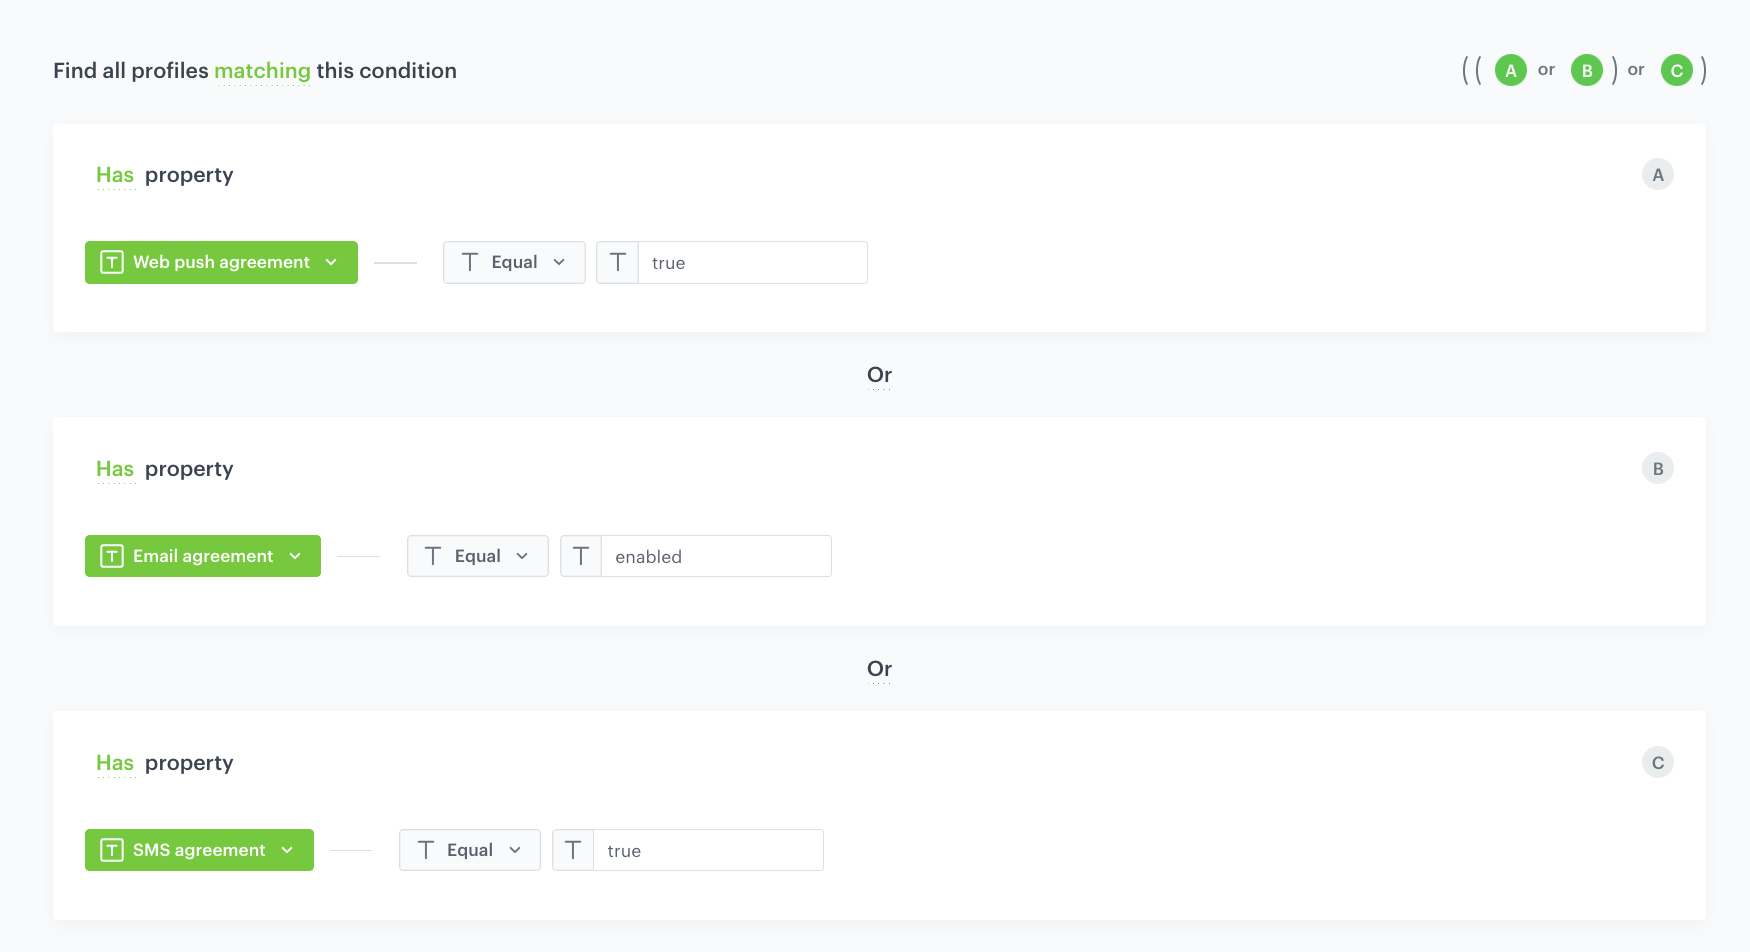
In this part of the process, create a segmentation of customers with enabled marketing agreements in one of the following channels: email, web push and SMS.
1. Go to **Decision Hub > Segmentations > New segmentation**.
2. Enter the name of the segmentation.
3. From the From the **Add condition** dropdown list, select the `Web push agreement` attribute.
4. Click the **Choose** button, and from the list of operators, choose **Equal**, and then select **true**.
5. From the From the **Add condition** dropdown list, select the `Email agreement` attribute.
6. Click the **Choose** button, and from the list of operators, choose **Equal**, and then select **enabled**.
7. From the From the **Add condition** dropdown list, select the `SMS agreement` attribute.
8. Click the **Choose** button, and from the list of operators, choose **Equal**, and then select **true**.
9. Change **And** to **Or** between all conditions.
10. Save the segmentation.
Segmentation configuration
## Create a prediction
---
In this part of the process you will create a prediction to find customers who have communication consents with the highest propensity to buy items in stock.
1. Go to **(AI Predictions) Models > New prediction** and select **Propensity** as the prediction type.
2. Define the prediction name.
3. As an audience for the prediction, select [the segmentation created in the previous step](#create-a-segmentation).
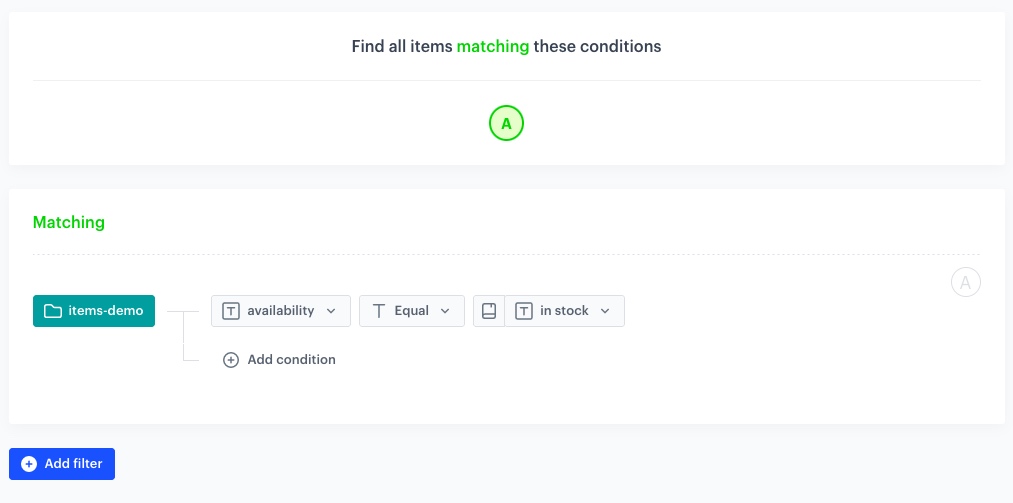
### Define the item
---
1. In the **Item selection** section, click **Define**.
2. Click **Choose item feed**.
3. Select the catalog that contains the items you want to make the prediction for.
**Result**: The **Item filter** section appears.
4. Click **Define item filter**.
1. From the **Select attribute** dropdown list, select the `availability` attribute.
You can use the search field.
2. From the dropdown list that appears, select the **Equal** operator.
3. Click the **Parameter** button field that appeared and from the dropdown list, select parameter indicating the availability of a product, in our case it is **In stock**.
4. Click **Save**.
Item filter configuration
5. Click **Apply**.
### Additional settings and saving
---
1. In the **Settings** section, click **Define**.
2. Change the **Calculation frequency** to **Recurring calculation**.
3. Set the frequency of model recalculation to 30 days.
4. In the **How would you like to display results?** section, select **2-point scale** for analysis.
5. Click **Apply**.
6. Click **Save & Calculate**.
After the calculation, a `snr.propensity.score` event is saved in the profiles of each customer in the audience. The event data includes detailed results of the prediction.
## Create a workflow
---
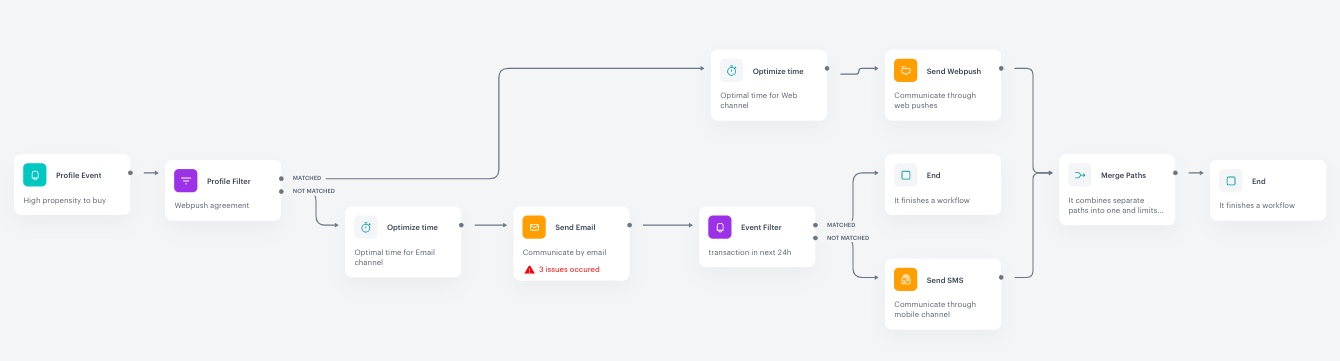
In this workflow, we will send personalized communication to customers with a high propensity to purchase, reaching them through one of their preferred communication channels. In one workflow, we will reach all those customers at the best time, regardless of their preferred type of communication.
The workflow will be triggered by the high score of the `snr.propensity.score` event. In this scenario, we will use the **Profile Filter** node to filter customers by their preferred communication channel: web push or email. If a customer has consented to web push communication and has email communication disabled, with **matched path**, we will reach them via web push. Through **not matched path**, we will reach customers with email communication enabled, and with **Event Filter**, we will check if the customer made a purchase after receiving an email. If not, we will send them a text message.
1. Go to **Automation Hub > Workflows > New workflow**.
2. Enter the name of the workflow.
### Define the trigger node
---
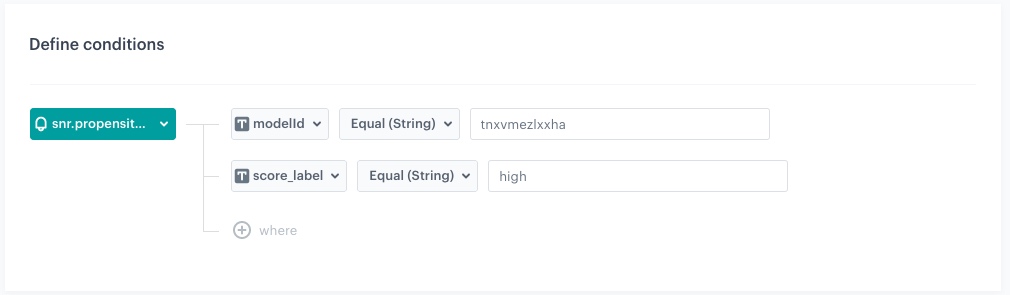
1. As the first node, add the **Profile Event**. In the settings of the node, select the `snr.propensity.score` event.
2. Click **+where**.
3. Click **Apply**.
4. From the **Choose parameter** dropdown list, select **modelId**.
**modelId** parameter equals the ID of the prediction you want to use. The model ID can be copied from the menu in the Prediction list.
5. From the **Choose operator** dropdown list, select **Equal (String)** and enter the ID of the [prediction created in the previous step](#create-a-prediction) in the text field.
6. Click **+where**.
7. From the **Choose parameter** dropdown list, select **score_label**.
8. From the **Choose operator** dropdown list, select **Equal (String)** and enter `high` in the text field.
9. Click **Apply**.
Profile Event node configuration
### Define the Profile Filter node
---
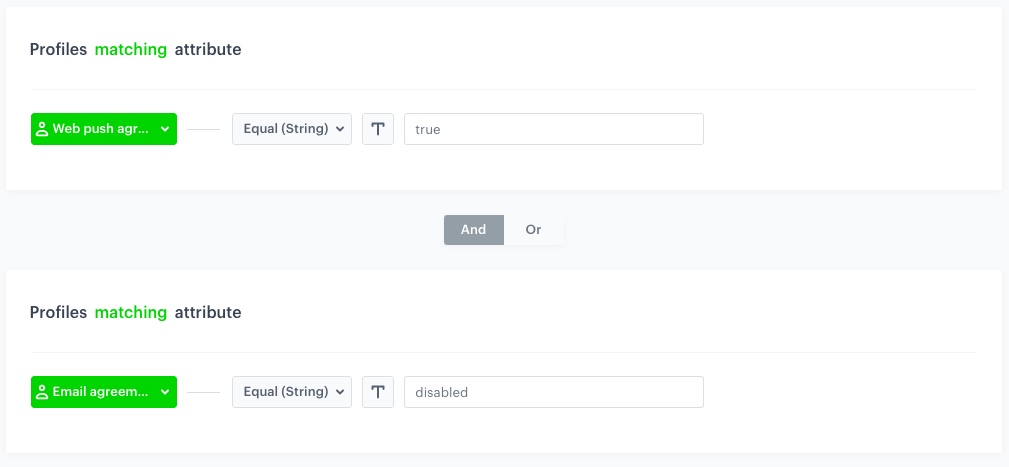
1. Add the **Profile Filter** node. In the node settings:
1. Click **Choose filter** and select **Web push agreement** attribute form the dropdown list.
2. From the **Choose operator** drop-down, choose **Equal(String)**.
3. In the text field type `true`.
4. Click **Choose filter** and select **Email agreement** attribute form the dropdown list.
5. In the text field type `disabled`.
2. Click **Apply**.
Profile Filter node configuration
### Define the Optimize Time node to the Matched path
---
1. To the **Matched** path, add the **Optimize Time** node. In the node settings:
1. From the **AI optimization mode** dropdown list, choose **Web**.
2. In **Time period to analyze**, choose the best moment to activate the node that follows the Optimize Time node. In our case it will be **Custom time period**.
3. In the **Time period** field, enter `10`
2. Click **Apply**.
### Define the Send Web Push node
---
1. To the **Optimize Time** node, add the **Send Web Push** node. In the node settings:
1. In the **Content** section, from the **Webpush template** dropdown, select [the template you created as part of the prerequsites](#prerequisites).
2. In the **Schedule** section, set the **Webpush lifespan (TTL)** according to your business needs.
3. You can describe campaigns with [additional parameters](/docs/campaign/Webpush/creating-webpush-campaigns#adding-custom-parameters).
2. Click **Apply**.
### Define the Optimize Time node to the Not matched path
---
1. To the **Not matched** path, add the **Optimize Time** node. In the node settings:
1. From the **AI optimization mode** dropdown list, choose **Mail**.
2. In **Time period to analyze**, choose the best moment to activate the node that follows the Optimize Time node. In our case it will be **Custom time period**.
3. In the **Time period** field, enter `10`
2. Click **Apply**.
### Define the Send Email node
---
1. Add the **Send Email** node. In the node settings:
1. In the **Sender details** section, choose the email account from which the email will be sent.
2. In the **Content** section, type the **Subject** and from the **Template** dropdown, select [the template you created as part of the prerequsites](#prerequisites).
3. In the **UTM & URL parameters** section, you can define the UTM parameters added to the links included in the email.
4. In the **Additional parameters** section, you can optionally describe campaigns with [additional parameters](/docs/campaign/e-mail/creating-email-campaigns#adding-custom-parameters).
2. Click **Apply**.
### Define Event Filter node
---
1. Add the **Event Filter** node. In the node settings:
1. Check event **for period of time**.
2. Define the time range to **1 Day**.
3. In the **Define conditions**, from the **Choose event** dropdown list, select `transaction.charge` event.
2. Click **Apply**.
3. For the matched path, select the **End** node.
### Define the Send SMS node
---
1. To the **Not matched** path, add the **Send SMS** node. In the node settings:
1. In the **Content** section, choose the phone number from which the message will be sent.
2. From the **SMS template** dropdown, select [the template you created as part of the prerequsites](#prerequisites).
2. Click **Apply**.
3. Add the **Merge Paths** node, joining the **Send SMS** and **Send Web Push** nodes.
### Add the finishing node and set capping
---
1. Add the **End** node.
2. In the upper right corner, click **Set Capping** and define the limit of workflows a profile can start:
1. Set **Limit** to 1.
2. Set **Time** to 3 months.
2. In the upper right corner, click **Save & Run**.
Workflow configuration
## Check the use case set up on the Synerise Demo workspace
---
In the Synerise Demo workspace, you can check:
- [Segmentation](https://app.synerise.com/analytics-v2/segmentations/14b2c630-85f5-4c75-b53b-2c0264abb2d5)
- [Prediction](https://app.synerise.com/ai-v2/predictions/propensity/uxjakavwbbgt)
- [Workflow](https://app.synerise.com/automations/automation-diagram/48972f25-04ff-43c3-a06f-1e34c7089e06)
If you’re our partner or client, you already have automatic access to the **Synerise Demo workspace (1590)**, where you can explore all the configured elements of this use case and copy them to your workspace.
If you’re not a partner or client yet, we encourage you to fill out the contact [form](https://demo.synerise.com/request) to schedule a meeting with our representatives. They’ll be happy to show you how our demo works and discuss how you can apply this use case in your business.
## Read more
---
- [Automation Hub](/docs/automation)
- [Email campaigns](/docs/campaign/e-mail)
- [Predictions](/docs/ai-hub/predictions)
- [Product feed](/developers/product-feed)
- [Segmentation](/docs/analytics/segmentations)
- [Time optimizer](/docs/settings/configuration/time-optimizer)
- [SMS campaigns](/docs/campaign/SMS)
- [Web push](/docs/campaign/Webpush)