
The targeting of advertisements or messages can be based on external data, such as weather information. This type of communication with recipients is especially relevant to companies from the medical, fashion, beverage, or agricultural industries. By collecting data on cloud cover, air temperature, and pressure, we are able to better advertise products, arouse customer interest, and even strengthen the positive perception of a brand. 

This use case describes how to retrieve data from the WeatherAPI portal and save it in the Synerise catalog. As the next steps (not covered as part of this use case), you may send marketing communication to the customers encouraging them to buy sunglasses for the upcoming sunny days.

## Prerequisites 
---

- [Assign the following permission](/docs/settings/tool/api) to your workspace API key allowing you to authorize requests and update contents in the catalog: `CATALOGS_ITEM_BATCH_CATALOG_CREATE`
- Create an account at the [WeatherAPI](https://www.weatherapi.com/) portal that provides weather information.
- Prepare a `CSV` file with the list of your points of sales (POS). The file must include the columns with the following names:
  - `attributes.store_name`- The name of the store
  - `attributes.storeId` - The ID of the store
  - `email` - Email address of the POS.
  
    <div class="admonition admonition-important"><div class="admonition-icon"><svg xmlns="http://www.w3.org/2000/svg" fill="none" viewBox="0 0 24 24" stroke="currentColor" stroke-width="2.5"><path stroke-linecap="round" stroke-linejoin="round" d="M12 8v4m0 4h.01M21 12a9 9 0 11-18 0 9 9 0 0118 0z" /></svg></div><div class="admonition-body"><div class="admonition-content">

   - If your points of sales don't have email addresses, instead of the `email` column, add `customId` column and assign to it the same value as to `attributes.storeId`. 
   - If you implemented [non-unique email](/docs/settings/configuration/non-unique-emails) setting, use `customId` instead of `email`.

    </div></div></div>

  - `attributes.store_city` - City where the POS is located
  - `attributes.latitude` - Latitude of the POS
  - `attributes.longitude` - Longitude of the POS


   <div class="admonition admonition-note"><div class="admonition-icon"><svg xmlns="http://www.w3.org/2000/svg" fill="none" viewBox="0 0 24 24" stroke="currentColor" stroke-width="2.5"><path stroke-linecap="round" stroke-linejoin="round" d="M13 16h-1v-4h-1m1-4h.01M21 12a9 9 0 11-18 0 9 9 0 0118 0z" /></svg></div><div class="admonition-body"><div class="admonition-content">

   If you want to update the weather information for the city of residence for your customers and you already have their location data (longitude and latitude) saved as attributes on the profile cards in **Behavioral Data Hub > Profiles**, you can skip this part of the process.

   </div></div></div>


## Process
---

In this use case, you will go through the following steps:

1. [Import a list of offline stores](/use-cases/data_with_current_weather_information#import-a-list-of-offline-stores).
2. [Create a segmentation](/use-cases/data_with_current_weather_information#create-a-segmentation) that gathers the points of sales you imported.
3. [Create a catalog](/use-cases/data_with_current_weather_information#create-a-catalog) which will contain regularly updated weather information.
4. [Create a workflow](/use-cases/data_with_current_weather_information#create-a-workflow) which retrieves weather information from the WeatherAPI portal and saves it in the catalog.


## Import a list of offline stores 
---
To collect weather information for each store, first you must import them with their location into Synerise. In this part of the process, you will import the list of POSes to Synerise as profiles (each POS will have a profile in **Behavioral Data Hub > Profiles**). This way, in the further part of the process, you will be able to create a segmentation of POSes and use it in a [workflow](/docs/glossary#workflow) that updates weather information for each POS.

For this purpose, you will create a workflow that will import the list of POSes to Synerise. 

1. Go to <img src="/api/docs/image/54176ad07f146575310749eba44b7c2f42c1b327/icons/automation-hub-icon.svg" alt="Automation Hub icon" class="icon" > **Automation Hub > Workflows > New workflow**.  
2. Enter the name of the workflow.
3. Click **Add trigger**.  
4. From the dropdown list, select **Scheduled Run**.  
5. Click the node.  
6. Set the **Run trigger** option to **one time**. 
7. Select the **Immediately** tab. 
8. Confirm by clicking **Apply**.
9. Click **THEN**.
11. From the dropdown list, select **Local File**.
10. Click the node.
11. Click **Upload a new file or drag one here**.  
12. Select the file you created as a part of [prerequisites](/use-cases/data_with_current_weather_information#prerequisites).
13. If needed, modify **Delimiter**, **Quotation mark**, and **Escape character**. 
14. Confirm by clicking **Apply**.  
10. Click **THEN**.
15. From the dropdown list, select **Import Profiles**. This node doesn't require any configuration. 
16. Click **THEN**.  
17. From the dropdown list, select **End**.  
    <figure>
    <img src="/api/docs/image/54176ad07f146575310749eba44b7c2f42c1b327/use-cases/all-cases/_gfx/import-list-pos.png" alt="Configuration of the workflow" class="full">
    <figcaption> Configuration of the workflow </figcaption>
    </figure>  

17. Click **Save & Run**.  
  **Result**: Each POS have a profile.

## Create a segmentation
---
In this part of the process, create a segmentation that gathers all points of sales you imported to Synerise. 

1. Go to <img src="/api/docs/image/54176ad07f146575310749eba44b7c2f42c1b327/icons/decision-hub-icon.svg" alt="Decision Hub icon" class="icon" > **Decision Hub > Segmentation > New segmentation**.
2. Enter a name for the segmentation.
2. Choose the `storeId` attribute.
3. As an operator, choose **Is true**.  
    <figure>
    <img src="/api/docs/image/54176ad07f146575310749eba44b7c2f42c1b327/use-cases/all-cases/_gfx/storeId-segmentation.png" alt="Configuration of the segmentation" class="full">
    <figcaption> Configuration of the segmentation </figcaption>
    </figure>  

5. Save your segmentation.


   <div class="admonition admonition-tip"><div class="admonition-icon"><svg xmlns="http://www.w3.org/2000/svg" fill="none" viewBox="0 0 24 24" stroke="currentColor" stroke-width="2.5"><path stroke-linecap="round" stroke-linejoin="round" d="M9.663 17h4.673M12 3v1m6.364 1.636l-.707.707M21 12h-1M4 12H3m3.343-5.657l-.707-.707m2.828 9.9a5 5 0 117.072 0l-.548.547A3.374 3.374 0 0014 18.469V19a2 2 0 11-4 0v-.531c0-.895-.356-1.754-.988-2.386l-.548-.547z" /></svg></div><div class="admonition-body"><div class="admonition-content">

   If this segmentation is to include customers, not points of sales (POS), you can, for example, use the attribute responsible for longitude and latitude with the value **"is true"** - then all customers who have this value defined on their card in Profiles will be included.

   </div></div></div>


## Create a catalog 
---
In this part of the process, create a catalog that will store the current weather information for each point of sales. This catalog will be later updated by [the workflow](/use-cases/data_with_current_weather_information#create-a-workflow) that requests the weather information.

1. Go to **Data Modeling Hub > Catalogs > New Catalog**. 
2. Enter the name of the catalog.
3. Confirm by clicking **Apply**.
3. Find the catalog on the list and click it.
   **Result**: Its URL looks as follows: `https://app.synerise.com/spa/modules/catalogs/catalogs/1234`. The number at the end is the catalog ID, save it in a notepad as you will need it later.


   <div class="admonition admonition-tip"><div class="admonition-icon"><svg xmlns="http://www.w3.org/2000/svg" fill="none" viewBox="0 0 24 24" stroke="currentColor" stroke-width="2.5"><path stroke-linecap="round" stroke-linejoin="round" d="M9.663 17h4.673M12 3v1m6.364 1.636l-.707.707M21 12h-1M4 12H3m3.343-5.657l-.707-.707m2.828 9.9a5 5 0 117.072 0l-.548.547A3.374 3.374 0 0014 18.469V19a2 2 0 11-4 0v-.531c0-.895-.356-1.754-.988-2.386l-.548-.547z" /></svg></div><div class="admonition-body"><div class="admonition-content">

   Instruction on creating catalogs is available [here](/docs/assets/catalogs/creating-catalogs).

   </div></div></div>


## Create a workflow 
---
In this part of the process, you will create a workflow for all points of sales you created (for this purpose, you will use [the segmentation you created earlier](/use-cases/data_with_current_weather_information#create-a-segmentation)). This workflow will be launched repetitively (at a frequency required by your business) to retrieve data from the [Weather API](https://www.weatherapi.com/) portal and save it in [the catalog you created eariler](/use-cases/data_with_current_weather_information#create-a-catalog).


### Add the Audience node 
Start with the **Audience** node. In its configuration, you will use [the segmentation you created in previous steps](/use-cases/data_with_current_weather_information#create-a-segmentation) and define the frequency of launching the workflow.

1. Click **Add trigger**.
2. From the dropdown list, select the **Audience** node. 
3. Leave the **Run trigger** option at default (**repeatable**).
4. Define the values for the **Interval** (frequency), **Begin at**, and **Timezone** fields according to your business requirements.
4. In the **Define audience** section, click **Select segment**.
5. Select [the segmentation you created in previous steps](/use-cases/data_with_current_weather_information#create-a-segmentation).
6. Confirm by clicking **Apply**.  
    <figure>
    <img src="/api/docs/image/54176ad07f146575310749eba44b7c2f42c1b327/use-cases/all-cases/_gfx/weather-audience.png" alt="Configuration of the Audience node" class="medium">
    <figcaption> Configuration of the Audience node </figcaption>
    </figure>

7. Confirm the settings in the node by clicking **Apply**.


### Add the Get Weather Information node

Add the **Get Weather Information** node which retrieves weather information.

1. Click **THEN**.  
2. From the dropdown list, select **Get Weather Information**.  
3. Click the node.
2. Click **Select connection**.  
3. From the dropdown list, select the connection.  
   If you haven't established a connection yet, see [Create a connection](/docs/automation/integration/weatherapi/get-weather-information#create-a-connection).
4. Leave the selection in the **Weather data period** field at default (**current weather**).  
5. In the **Location** field, enter `{{ customer.latitude }},{{ customer.longitude }}`
6. Fill the rest of the configuration form according to instructions [here](/docs/automation/integration/weatherapi/get-weather-information#define-the-integration-settings).
7. Confirm the settings by clicking **Apply**. 


### Add the Event Filter node

By adding the **Event Filter** node, the workflow waits until the `weatherapi.getWeatherInfo` event is generated on the profile card of the points of sales. This way, you can be sure that there is weather information. The event contains parameters with weather information configured in the previous node for each POS.

1. Click **THEN**.  
2. From the dropdown list, select **Event Filter**.
1. Leave the **Check** option at default.  
    
   <div class="admonition admonition-tip"><div class="admonition-icon"><svg xmlns="http://www.w3.org/2000/svg" fill="none" viewBox="0 0 24 24" stroke="currentColor" stroke-width="2.5"><path stroke-linecap="round" stroke-linejoin="round" d="M9.663 17h4.673M12 3v1m6.364 1.636l-.707.707M21 12h-1M4 12H3m3.343-5.657l-.707-.707m2.828 9.9a5 5 0 117.072 0l-.548.547A3.374 3.374 0 0014 18.469V19a2 2 0 11-4 0v-.531c0-.895-.356-1.754-.988-2.386l-.548-.547z" /></svg></div><div class="admonition-body"><div class="admonition-content">

   If there are other workflows which depend on the occurrence of this event, adjust the time of checking according to your business needs.

   </div></div></div>

2. Select the **weatherapi.getWeatherInfo** event. 
4. Confirm by clicking **Apply**. 

<figure>
<img src="/api/docs/image/54176ad07f146575310749eba44b7c2f42c1b327/use-cases/all-cases/_gfx/weather-event-filter.png" alt="The configuration of the Event Filter node" class="large">
<figcaption> The configuration of the Event Filter node </figcaption>
</figure>


### Add the Outgoing Integration node

This webhook will be used to save the retrieved information to the catalog you created in [previous part of the process](/use-cases/data_with_current_weather_information#create-a-catalog). 

1. Click **THEN**.  
2. From the dropdown list, select **Outgoing Integration**.
1. Select the **Custom webhook** tab. 
2. In the **Action name** field, enter `save.weather` (you can use different name, it's just an example). 
3. Select **POST method**.
4. In the **Endpoint** field, enter `https://developers.synerise.com/AssetManagement/AssetManagement.html#operation/addItemsBatch`  
4. Leave **content-type** at default: `application / json`. 
5. In the body of the request, paste the request body with the weather parameters returned by WeatherAPI you would like to save in the catalog. Below you can find example code:

    
   <details class="accordion"><summary>Check the example code</summary><div class="accordion-content"><pre><code class="language-jinja">
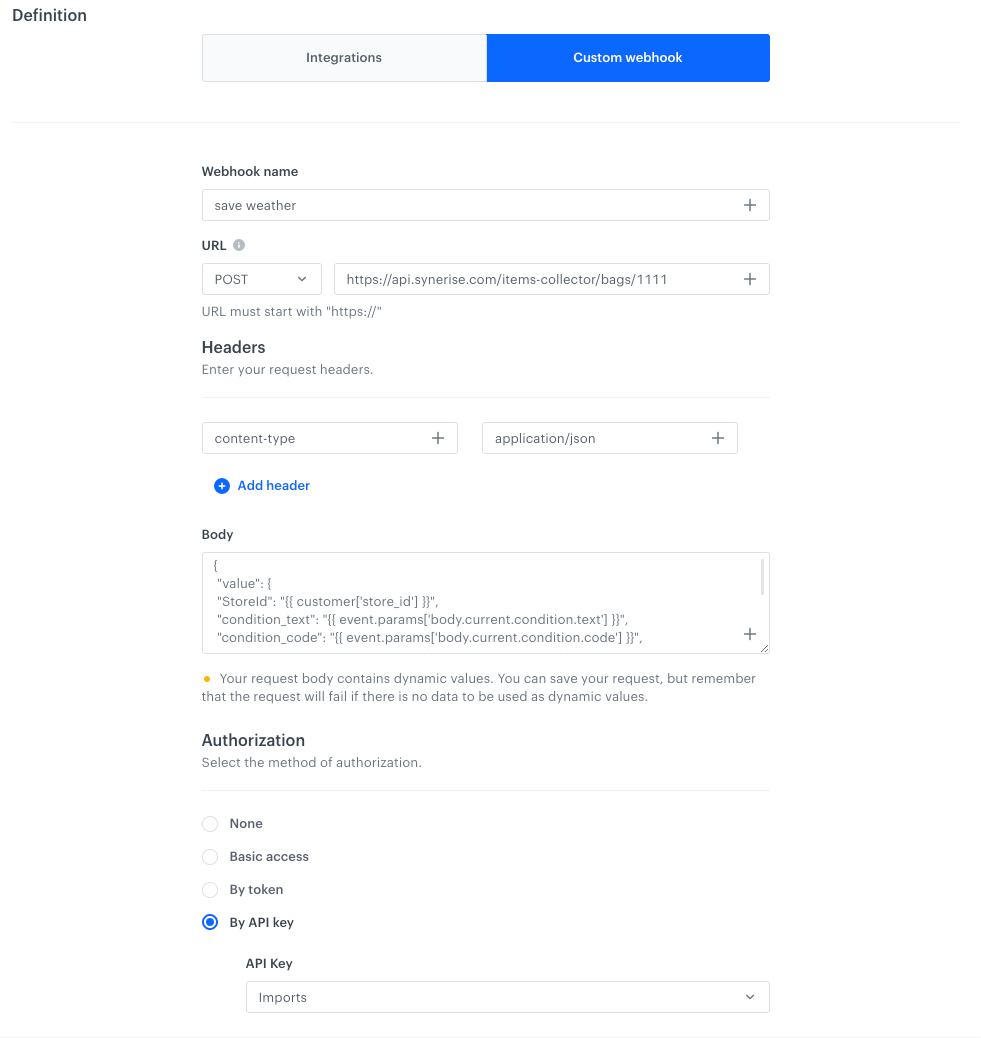
{ "value": { "StoreId": "{{ customer['storeId'] }}", "condition_text": "{{ event.params['body.current.condition.text'] }}", "condition_code": "{{ event.params['body.current.condition.code'] }}", "location_name": "{{ event.params['body.location.name'] }}", "last_updated": "{{ event.params['body.current.last_updated'] }}", "temp_c": "{{ event.params['body.current.temp_c'] }}" }, "itemKey": "{{ customer['storeId'] }}" }</code></pre></div></details>
 

    This example uses inserts with [event context](/developers/inserts/automation#event-parameters) to access WeatherAPI response data from the **Event Filter** node. The parameters from the response are injected into a request to the catalogs API and saved in a catalog.


    | Column name in the catalog            | Information saved in the column                                |
    |---------------------------------------|----------------------------------------------------------------|
    | `StoreId`                             | The ID of the point of sales                                   |
    | `condition_text`                      | Weather condition (as a string, for example `Mist`) |
    | `condition_code`                      | Weather condition (as [WeatherAPI code](https://www.weatherapi.com/docs/#weather-icons)       )                     |
    | `location_name`                       | City name                                                      |
    | `last_updated`                        | Local time when the real time data was updated.                |
    | `temp_c`                              | Temperature given in degrees Celsius                           |
    | `itemKey`                             | Unique identifier in the catalog (in this case, same as POS ID), necessary to save the weather data to the corresponding POS entry.        |


    <figure>
    <img src="/api/docs/image/54176ad07f146575310749eba44b7c2f42c1b327/use-cases/all-cases/_gfx/outgoing-integration-save-weather.png" alt="The configuration of the Outgoing Integration node" class="medium">
    <figcaption> The configuration of the Outgoing Integration node </figcaption>
    </figure>

9. In the **Authorization** section, select **By API key**.  
10. From the dropdown list, select the API key who has enabled the `CATALOGS_ITEM_BATCH_CATALOG_CREATE` permission.  
11. Confirm the settings by clicking **Apply**.


### Set up final settings of the workflow

1. After the **Outgoing Integration** node, add the **End** node.
3. Optionally, add titles to each node so the workflow will be more understandable to your colleagues.
4. Enter the name of the workflow.  
    <figure><img src="/api/docs/image/54176ad07f146575310749eba44b7c2f42c1b327/use-cases/all-cases/_gfx/weather-complete-workflow.png" class="full" alt="The complete configuration of the workflow"><figcaption>The complete configuration of the workflow</figcaption></figure>  

5. Finish your work:
    - To save the workflow as a draft, click **Save**.
    - To activate the workflow, click **Save & Run**.


As a result, you will receive a catalog with regularly updated weather data for each point of sales included in the **Audience** node.

<!---
Zmienić obrazek nizej! To dopiero po tym jak wejdzie na stage ten node.
--->

<figure>
<img src="/api/docs/image/54176ad07f146575310749eba44b7c2f42c1b327/use-cases/all-cases/_gfx/data_with_current_weather_information_1.8.png" alt="Screenshot presenting catalog" class="large">
<figcaption> Update weather data in catalog </figcaption>
</figure>

## What's next
---
The outcome of this use case is a regularly updated catalog with weather data for the region of your points of sales. You can use this information in your communication with customers by [adding references to this catalog](/developers/inserts/insert-usage#extracting-values-from-catalogs) in the templates. This way, based on the weather conditions, you can prepare a message for your customers.

### Adding new POS
To add new points of sales, you can import them as shown in [this part of the process](#import-a-list-of-offline-stores) or you can add them manually in **Behavioral Data Hub > Profiles**

### Updating existing POS
To update existing POS, you can do it on their profiles in **Behavioral Data Hub > Profiles** or you can import a file with points of sales with their updated data. 

### Removing POS
To remove a point of sales, go to **Behavioral Data Hub > Profiles**, find the POS you want to remove and use the context menu on the right hand side to remove it.

## Check the use case set up on the Synerise Demo workspace
---
You can check the configuration of use case in Synerise Demo workspace:
- [List import](https://app.synerise.com/automations/workflows/automation-diagram/e9d59ed5-88e9-4cc1-b15e-8e8ab8cfd583)
- [Catalog](https://app.synerise.com/assets/catalogs/15969)
- [Segmentation](https://app.synerise.com/analytics/segmentations/cced0b32-546e-4440-9e69-4b07a7543871)
- [Workflow configuration](https://app.synerise.com/automations/automation-diagram/b563bcc3-0c40-47a1-b75e-11ee64eac64a)

If you’re our partner or client, you already have automatic access to the **Synerise Demo workspace (1590)**, where you can explore all the configured elements of this use case and copy them to your workspace.  

If you’re not a partner or client yet, we encourage you to fill out the contact [form](https://demo.synerise.com/request) to schedule a meeting with our representatives. They’ll be happy to show you how our demo works and discuss how you can apply this use case in your business. 

## Read more
---
- [Automation Hub](/docs/automation)
- [Catalogs](/docs/assets/catalogs)
- [Get Weather Information node](/docs/automation/integration/get-weather-information)
- [Jinjava inserts](/developers/inserts/insert-usage) 
- [Outgoing Integration](/docs/automation/integration/outgoing-webhook)