Interactive dynamic content formats can increase engagement and make promotional communication less intrusive. A scratch card mechanic adds a simple game-like interaction — users reveal an offer themselves, which often increases attention and memorability compared to static banners.
In this use case, you’ll create a predefined dynamic content scratch card template displayed to users who visit a specific product category (for example, the Women category). After scratching the card, users reveal a promotion code that gives them 25% off products from that collection.
The scratch card can be revealed with a finger or cursor, making the experience more interactive while still serving a clear promotional purpose.
The template is predefined, so no coding is required — configuration happens through the template form and campaign settings.

Prerequisites
- Create item feed
Create a specific category filter in the product catalog to be reused while preparing the promotion.
Click here to see how to build the filter
Go to Data Modeling Hub > Catalogs.
- On the list, find the catalog in which you want to create the filter.
- On the right side of the screen, click

- Click Define.
- On the pop-up, define the conditions by clicking Choose filter. The list contains all parameters from the product feed. In our case category should contain WOMEN.
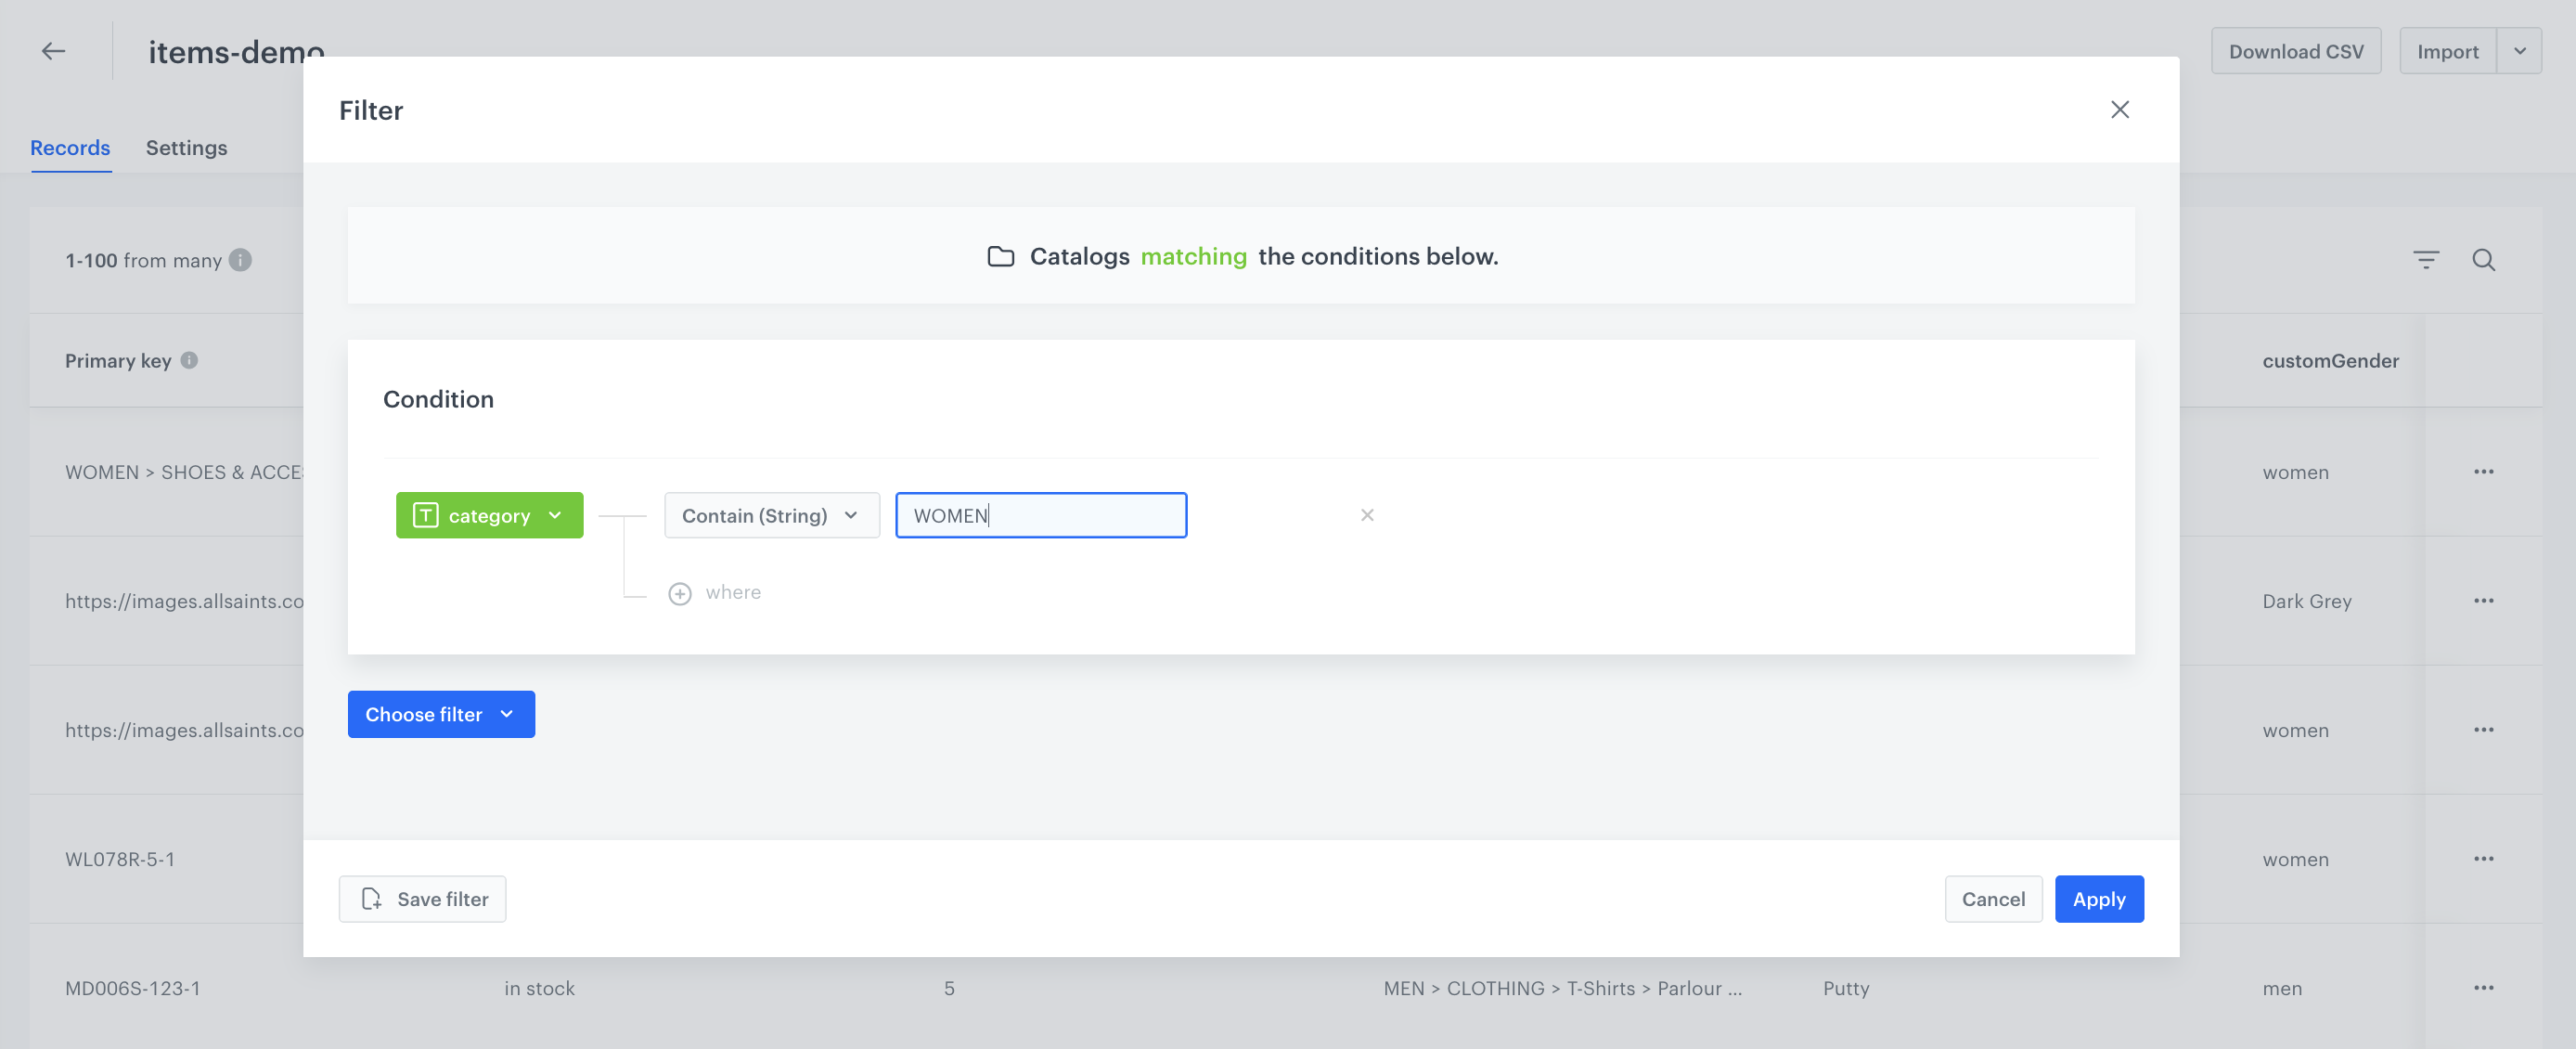
Filter configuration for category - Name and save the filter by clicking Save filter.
Process
In this use case, you will go through the following steps:
- Create a promotion with discount for specific category.
- Create a dynamic content campaign with a scratch card.
Create a promotion
Create a promotion for a specific product category with a discount rate (for example, 25%).
- Go to
 AI Hub > Regular promotions > Add promotion.
 - Enter a name for the promotion.
- Select the For selected items type of promotion.
- In the Audience section, choose Everyone.
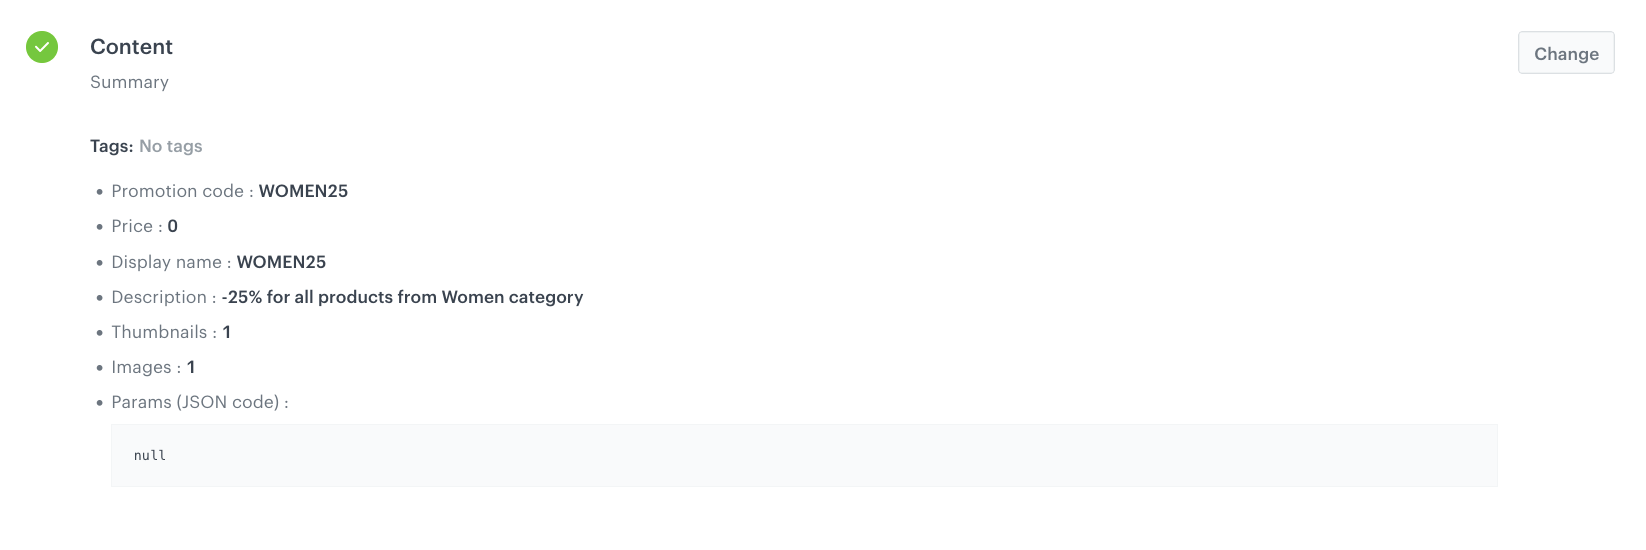
In the Content section:
- Define the name, descriptions, thumbnail, and image of the promotion.
- Optionally, you can add tags to the promotion and JSON code with additional promotion parameters.
- Confirm the settings by clicking Apply.
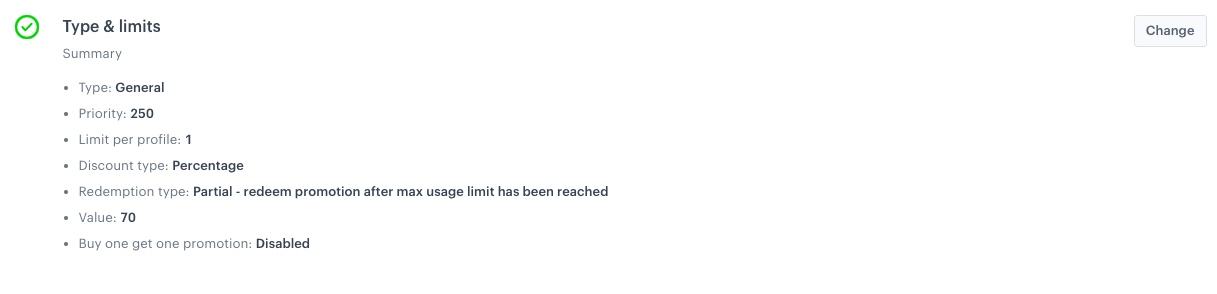
Content configuration In the Type and limits section:
Leave General in the Type section.
- In the Type section field, select General (default option).
- In the Priority, enter a number that defines the priority of the promotion.
Priority defines the order of display in the customer’s view. 1 is the highest priority. If two or more promotions applicable to a customer have the same priority, the order of display is determined by the date of creation. The one that was created earlier takes the priority over the other promotion.
- Select the Single tab (default choice).
- In the Limit per profile field, type
1. - From the Discount type dropdown list, select Percentage.
- In Discount mode, leave the default option (Static).
- In the Value field, type
25. - Confirm the settings by clicking Apply.
Type and limits configuration
In the Schedule section:
- In the Display time section, choose Scheduled.
- Pick the dates in the Start and End fields.
- In the Activity time section, deselect Same as display time.
- Set a date range when the promotion can be activated. Pick the dates in the Start and End fields.
- In the Lasting field, you can enter the time (in seconds) that a promotion remains redeemable after it is activated.
0is interpreted as infinity. - Confirm the settings by clicking Apply.
In the Items section:
- From the Source catalog dropdown list, select a catalog of items.
- In the Include items section, choose Filtered items.
- From the Select filter dropdown list, select the filter created as a part of the prerequisites. In our case, women category.
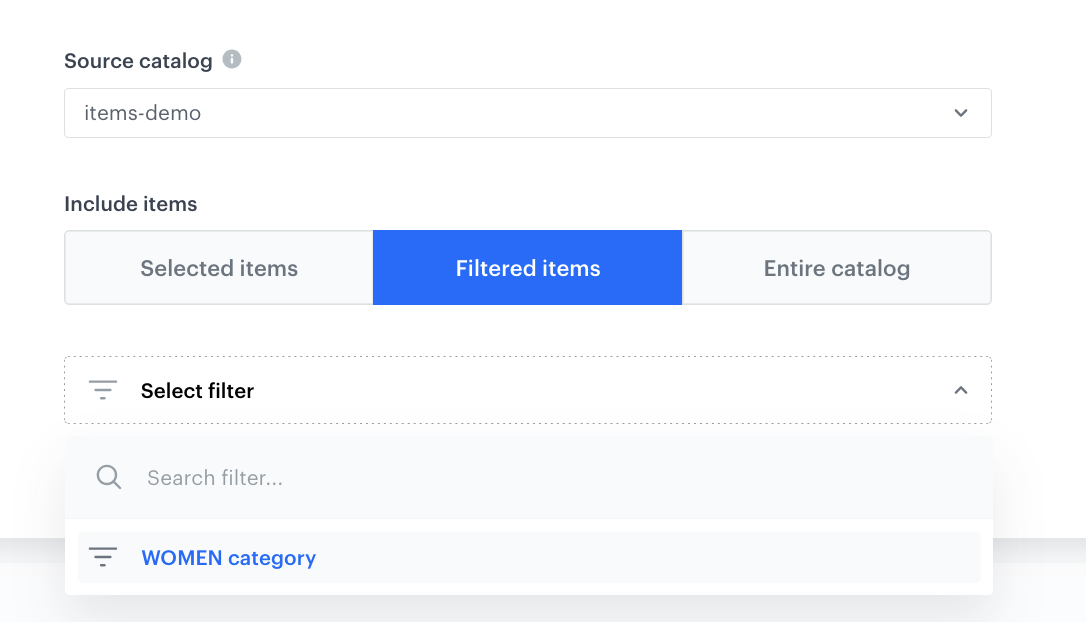
Type and limits configuration - To apply configuration and run the promotion, click Publish.
Create a dynamic content campaign
In this part of the process, you will create a dynamic content campaign with a scratch card, presented after the user visits the category Women.
- Go to
 Experience Hub > Dynamic Content > Create new
 - Enter a meaningful name for the campaign.
- Choose the web layer type of campaign.
Define the audience
- In the Audience section, click Define.
- Select the Everyone tab.
- Click Apply.
Define content
- In the Content section, click Define.
- Click Create message and from the list of template folders, select Predefined templates.
- Select Scratch card.
Result: You are redirected to the code editor.
You can edit the template in two ways, by editing the code of the template (add inserts, add variables) and/or by filling out the form in the Config tab. In this use case, we will use the capabilities of the predefined Config tab.
Edit form in the Config tab
The Config tab already has default values filled in. You can change them to fit your business needs.
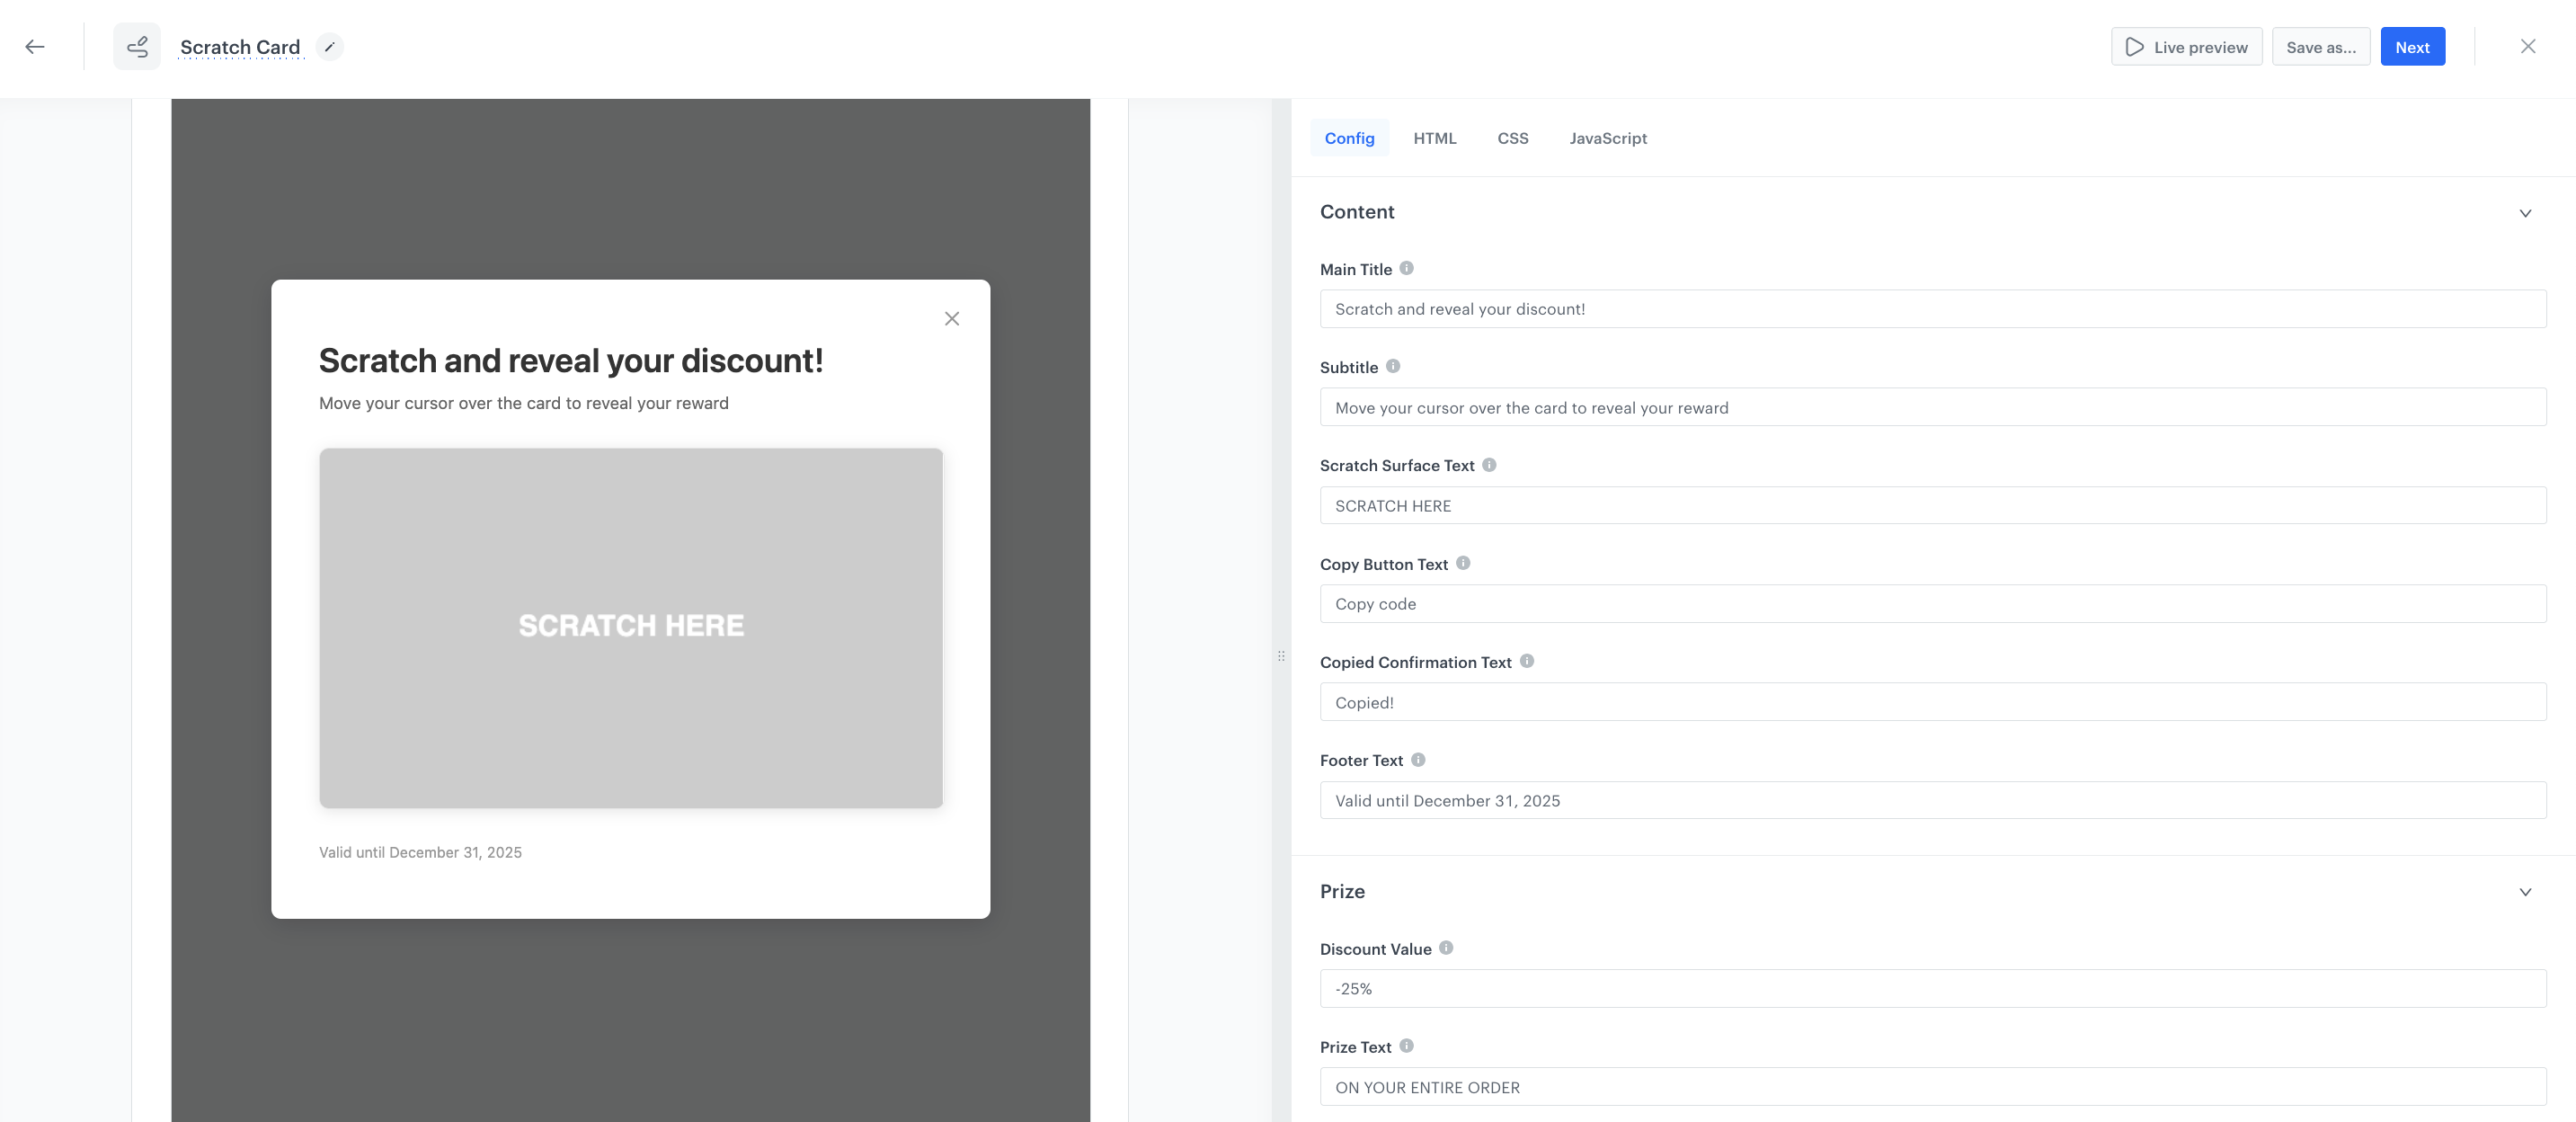
In the Content section:
- Fill out Main Title, Subtitle, Scratch Surface Text, and Button Text with specific description displayed on the scratch card.
- Add also your personalized copy for Copied Confirmation Text and Footer Text where you can add info for example about the validation date.
In the Prize section:
- In the Discount Value field, enter the value of the prize.
- In Prize Text, add the copy which will be displayed as the description for the prize amount.
- In Promo Code, enter the discount code displayed, created in the "Create a promotion" part of the process.
In the Settings section:
- Set up the Scratch Threshold (in percentage) - what percentage of the card's surface does the customer need to scratch off to see its value.
- Set up the Brush Size - in pixels.
- In the Colors section, define your color scheme.
- If the template is ready, in the upper right corner, click Save this template > Save as.
On the pop-up:
- In the Template name field, enter the name of the template.
- From the Template folder dropdown list, select the folder where the template will be saved.
- Confirm by clicking Apply.
- Click Next to continue the process of configuring the in-app campaign.
- Click Apply to save your content changes.
Schedule the message and configure display settings
As the final part of the process, you need to set the schedule.
- In the Schedule section, click Define and set the time when the campaign will be active.
- Click Apply.
- In the Display Settings section, click Define. If you want the countdown bar to be displayed to all users continuously across the website upon landing, keep the default settings.
- Click Apply.
Set up the display settings
- In the Display settings section, define the circumstances the dynamic content will be shown:
- Always on landing.
- On a specific URL which indicates a product page (for example, if a URL contains product).
- Optionally, you can define the UTM parameters and additional parameters for your dynamic content campaign.
- Click Activate.
Check the use case set up on the Synerise Demo workspace
You can check the configuration of the campaign components directly in Synerise Demo workspace:
If you’re our partner or client, you already have automatic access to the Synerise Demo workspace (1590), where you can explore all the configured elements of this use case and copy them to your workspace.
If you’re not a partner or client yet, we encourage you to fill out the contact form to schedule a meeting with our representatives. They’ll be happy to show you how our demo works and discuss how you can apply this use case in your business.