
If customers were on your site and visited specific product pages, then they probably did not land on it by accident. They wanted to go beyond the main page and learn more about you and your offer. So even if they did not complete a transaction you can reach them with an attractive offer by, for example, sending them a discount in the email. 

It can encourage them to make a transaction and come back to your site and **use discount to buy products** they previously viewed. 

## Example of use - Retail industry

A customer from the fashion industry has prepared a different promotion for every day of Black Week. They informed users about it on their site through additional banners. However, they decided to use email as a communication channel with customers who were on the site, visited a product, but did not make a purchase. After leaving the site, these customers received information about the **discount code in an email**. It was made to encourage them to come back and finish their purchase process. 

  <figure>
    <img src="/api/docs/image/54176ad07f146575310749eba44b7c2f42c1b327/use-cases/all-cases/_gfx/discount_left_the_site.png" alt="Screenshot presenting ab tests" class="full">
    <figcaption> A/B Test </figcaption>
    </figure>


**Results**

- OR **10,31%**
- CTOR **31,05%** 
- Conversion **2,6%**

## Prerequisites 
---

To implement this use case, check those articles:
- [Tracking code](/docs/settings/tool/tracking_codes)
- [OG tags implemented](/developers/web/og-tags)
- [Transaction events tracking](/developers/web/transactions-sdk)
- [Email account configuration](/docs/settings/configuration/email-account)


## Process
---
To create an email with discount for those who left the site, perform the following steps:
1. [Prepare coupons](/use-cases/discount_for_those_who_left_the_site#prepare-coupons)
2. [Prepare an email template](/use-cases/discount_for_those_who_left_the_site#prepare-an-email-template)
3. [Create a workflow](/use-cases/discount_for_those_who_left_the_site#create-a-workflow)

## Prepare coupons
---


<div class="admonition admonition-note"><div class="admonition-icon"><svg xmlns="http://www.w3.org/2000/svg" fill="none" viewBox="0 0 24 24" stroke="currentColor" stroke-width="2.5"><path stroke-linecap="round" stroke-linejoin="round" d="M13 16h-1v-4h-1m1-4h.01M21 12a9 9 0 11-18 0 9 9 0 0118 0z" /></svg></div><div class="admonition-body"><div class="admonition-content">

In [this](/docs/assets/code-pools) article, you will find the rules and procedures needed to create and use voucher pool in Synerise.

</div></div></div>
 

Depending on your needs, you can send to user general code with promotion, eg. SHOPPING20%, or coupon code individually for each user. If you decide on this second option you will have to import to Synerise coupons previously prepared in your ecommerce platform which will apply the appropriate discount in the shopping cart. 

1. Go to [Vouchers](https://app.synerise.com/spa/modules/vouchers/pools/) and prepare a Voucher pool, to which you will add coupons. 
2. Add an obligatory **Pool name**, and set the **Emission** start and **end dates**. 
3. When the pool is created, click Import and choose CSV with vouchers. 

<figure>
 <img src="/api/docs/image/54176ad07f146575310749eba44b7c2f42c1b327/use-cases/all-cases/_gfx/discountforthose.png" alt="`Screenshot presenting new coupons pool``" class="large">
 <figcaption> New coupons pool </figcaption>
 </figure>


<div class="admonition admonition-tip"><div class="admonition-icon"><svg xmlns="http://www.w3.org/2000/svg" fill="none" viewBox="0 0 24 24" stroke="currentColor" stroke-width="2.5"><path stroke-linecap="round" stroke-linejoin="round" d="M9.663 17h4.673M12 3v1m6.364 1.636l-.707.707M21 12h-1M4 12H3m3.343-5.657l-.707-.707m2.828 9.9a5 5 0 117.072 0l-.548.547A3.374 3.374 0 0014 18.469V19a2 2 0 11-4 0v-.531c0-.895-.356-1.754-.988-2.386l-.548-.547z" /></svg></div><div class="admonition-body"><div class="admonition-content">

Remember, that your csv should have only 1 column, without a name.

</div></div></div>
 

## Prepare an email template 
---

1. Go to **Campaign > Email**.
2. To distribute coupon codes, prepare an email template - design banners, copy and add the ID of the coupon pool.
3. Click **Inserts** in the upper right corner, find **Pools** on the list of inserts.
4. Choose previously a prepared Coupon pool and copy and paste it in the place where the coupon code should be shown to the user. Instead of `{% voucher %} voucher-hash {% endvoucher %}`, user will see his individual coupon code.

<figure>
   <img src="/api/docs/image/54176ad07f146575310749eba44b7c2f42c1b327/use-cases/all-cases/_gfx/discountforthose2.png" alt="`Screenshot presenting email template`" class="large">
   <figcaption> Preparing email template </figcaption>
   </figure>
  

<div class="admonition admonition-tip"><div class="admonition-icon"><svg xmlns="http://www.w3.org/2000/svg" fill="none" viewBox="0 0 24 24" stroke="currentColor" stroke-width="2.5"><path stroke-linecap="round" stroke-linejoin="round" d="M9.663 17h4.673M12 3v1m6.364 1.636l-.707.707M21 12h-1M4 12H3m3.343-5.657l-.707-.707m2.828 9.9a5 5 0 117.072 0l-.548.547A3.374 3.374 0 0014 18.469V19a2 2 0 11-4 0v-.531c0-.895-.356-1.754-.988-2.386l-.548-.547z" /></svg></div><div class="admonition-body"><div class="admonition-content">

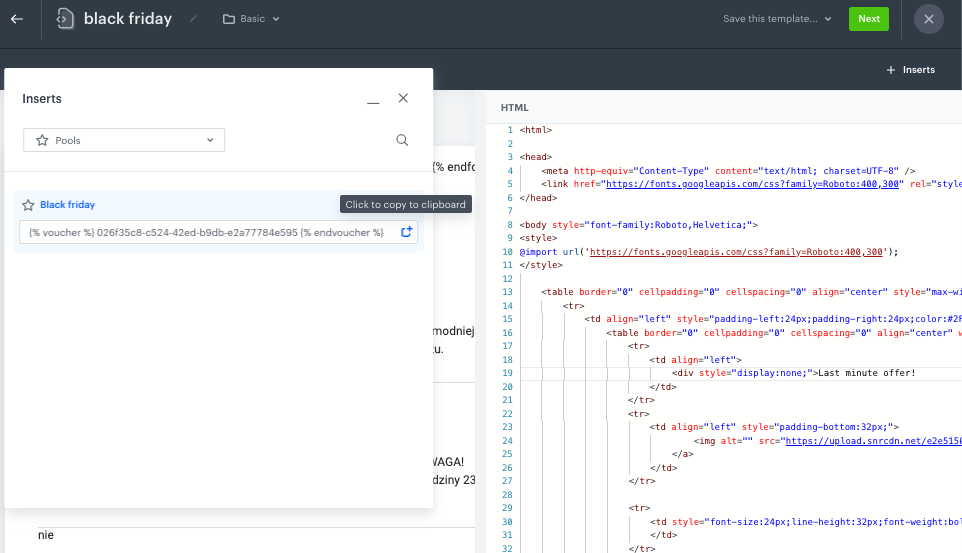
If you would like to send the same coupon code to the user twice, eg. after 1 day if user still doesn’t make a purchase, use the same voucher hash, but add flag assign=false, like in this example: **{% voucher assign=false %} voucher-hash {% endvoucher %}**

</div></div></div>


## Create a workflow 
---

To send emails to customers you will have to prepare a workflow.

1. Go to **Automation Hub > Workflow.**
2. Start with the **Profile Event** trigger and in the settings of the node, select the **page.visit** event. 
2. As the event parameter, select **retailer_part_no** - this way, the workflow starts only when a customer visits a product page. This way the workflow will be started only by a product page visit.

  
   <div class="admonition admonition-tip"><div class="admonition-icon"><svg xmlns="http://www.w3.org/2000/svg" fill="none" viewBox="0 0 24 24" stroke="currentColor" stroke-width="2.5"><path stroke-linecap="round" stroke-linejoin="round" d="M9.663 17h4.673M12 3v1m6.364 1.636l-.707.707M21 12h-1M4 12H3m3.343-5.657l-.707-.707m2.828 9.9a5 5 0 117.072 0l-.548.547A3.374 3.374 0 0014 18.469V19a2 2 0 11-4 0v-.531c0-.895-.356-1.754-.988-2.386l-.548-.547z" /></svg></div><div class="admonition-body"><div class="admonition-content">

   Use "." in a regular expression to accept a valid value of this parameter (except for null). This way, you know that this event has the **retailer_part_no** parameter.

   </div></div></div>


   <figure>
    <img src="/api/docs/image/54176ad07f146575310749eba44b7c2f42c1b327/use-cases/all-cases/_gfx/discountforthose4.png" alt="`Screenshot presenting Profile Event`" class="large">
    <figcaption> Configuration of the Profile Event node </figcaption>
    </figure>

2. Add **Delay** and define the lag between the page visit and sending the message, in our example it is 2 hours.

   <figure>
    <img src="/api/docs/image/54176ad07f146575310749eba44b7c2f42c1b327/use-cases/all-cases/_gfx/discountforthose5.png" alt="`Screenshot presenting delay``" class="large">
    <figcaption> Configuration of the Delay node </figcaption>
    </figure>

3. Using the **Profile Filter** node, exclude users who have made a transaction in the last 2 hours – it's important to use minutes instead of hours.

   <figure>
    <img src="/api/docs/image/54176ad07f146575310749eba44b7c2f42c1b327/use-cases/all-cases/_gfx/discountforthose6.png" alt="`Screenshot presenting profile filter`" class="large">
    <figcaption> Configuration of the Profile Filter node </figcaption>
    </figure>

4. Configure the **Send Email** node by selecting the appropriate email account, choosing the template that you prepared in the previous step. 

   <figure>
    <img src="/api/docs/image/54176ad07f146575310749eba44b7c2f42c1b327/use-cases/all-cases/_gfx/discountforthose7.png" alt="`Screenshot presenting content`" class="large">
    <figcaption> Configuration of the Send Email node </figcaption>
    </figure>

5. Specify capping to limit the number of coupons user will get (here it’s 1 for each 30 days).
6. Add End nodes where the workflow should finish for users. 
7. Optionally, add titles to each node so the workflow will be more understandable for your colleagues. 
8. Name the workflow and Save it or **Save & Run**. 

<figure>
   <img src="/api/docs/image/54176ad07f146575310749eba44b7c2f42c1b327/use-cases/all-cases/_gfx/discountforthose3.png" alt="`Screenshot presenting automation``" class="large">
   <figcaption> Workflow </figcaption>
   </figure>


## Check the use case set up on the Synerise Demo workspace
---

Check the [workflow](https://app.synerise.com/automations/automation-diagram/e79a8874-7a68-474d-aa69-77d6fac6789f) in our Synerise Demo workspace. 

If you’re our partner or client, you already have automatic access to the **Synerise Demo workspace (1590)**, where you can explore all the configured elements of this use case and copy them to your workspace.  

If you’re not a partner or client yet, we encourage you to fill out the contact [form](https://demo.synerise.com/request) to schedule a meeting with our representatives. They’ll be happy to show you how our demo works and discuss how you can apply this use case in your business.


## Read more
---
- [Automation Hub](/docs/automation)
- [Email templates](/docs/campaign/e-mail)

