
This use case presents a solution to prevent sending the same message to the profiles who have the same phone number. Sharing the same phone number by profiles may happen for example, when a person leaves the company and a new employee takes over a work phone with the phone number of the previous employee; or when a person creates two accounts with different personal data but the same phone number.

The core idea of this use case is to check the database for the same phone number and ensure that only one message is sent out when multiple profiles have the same number. This solution is designed to save costs and ensure that profiles do not receive unnecessary messages.

The assumption of this use case is importing all customers with unique phone numbers and enabled marketing agreement in the SMS channel to a catalog. All these customers will have a `phone_unique` tag assigned to them. Then, every time a customer enables SMS marketing agreement a workflow will verify whether the phone number for this customer is unique. If so, it will be tagged with `phon_unique`.


<div class="admonition admonition-note"><div class="admonition-icon"><svg xmlns="http://www.w3.org/2000/svg" fill="none" viewBox="0 0 24 24" stroke="currentColor" stroke-width="2.5"><path stroke-linecap="round" stroke-linejoin="round" d="M13 16h-1v-4h-1m1-4h.01M21 12a9 9 0 11-18 0 9 9 0 0118 0z" /></svg></div><div class="admonition-body"><div class="admonition-content">

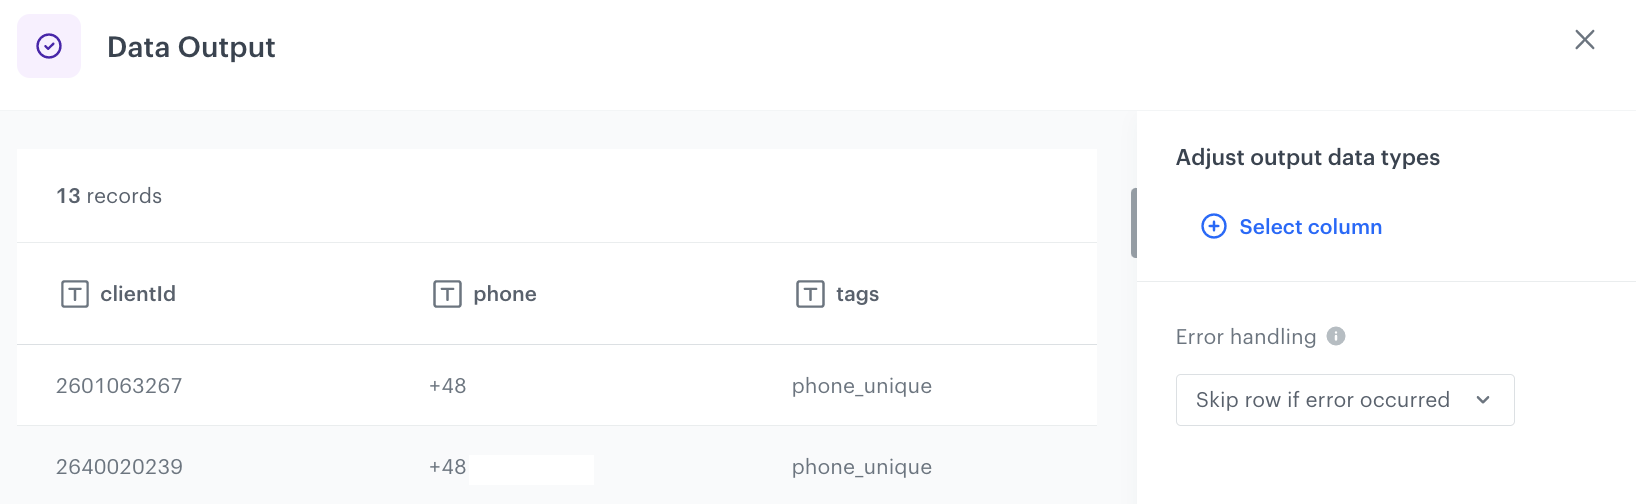
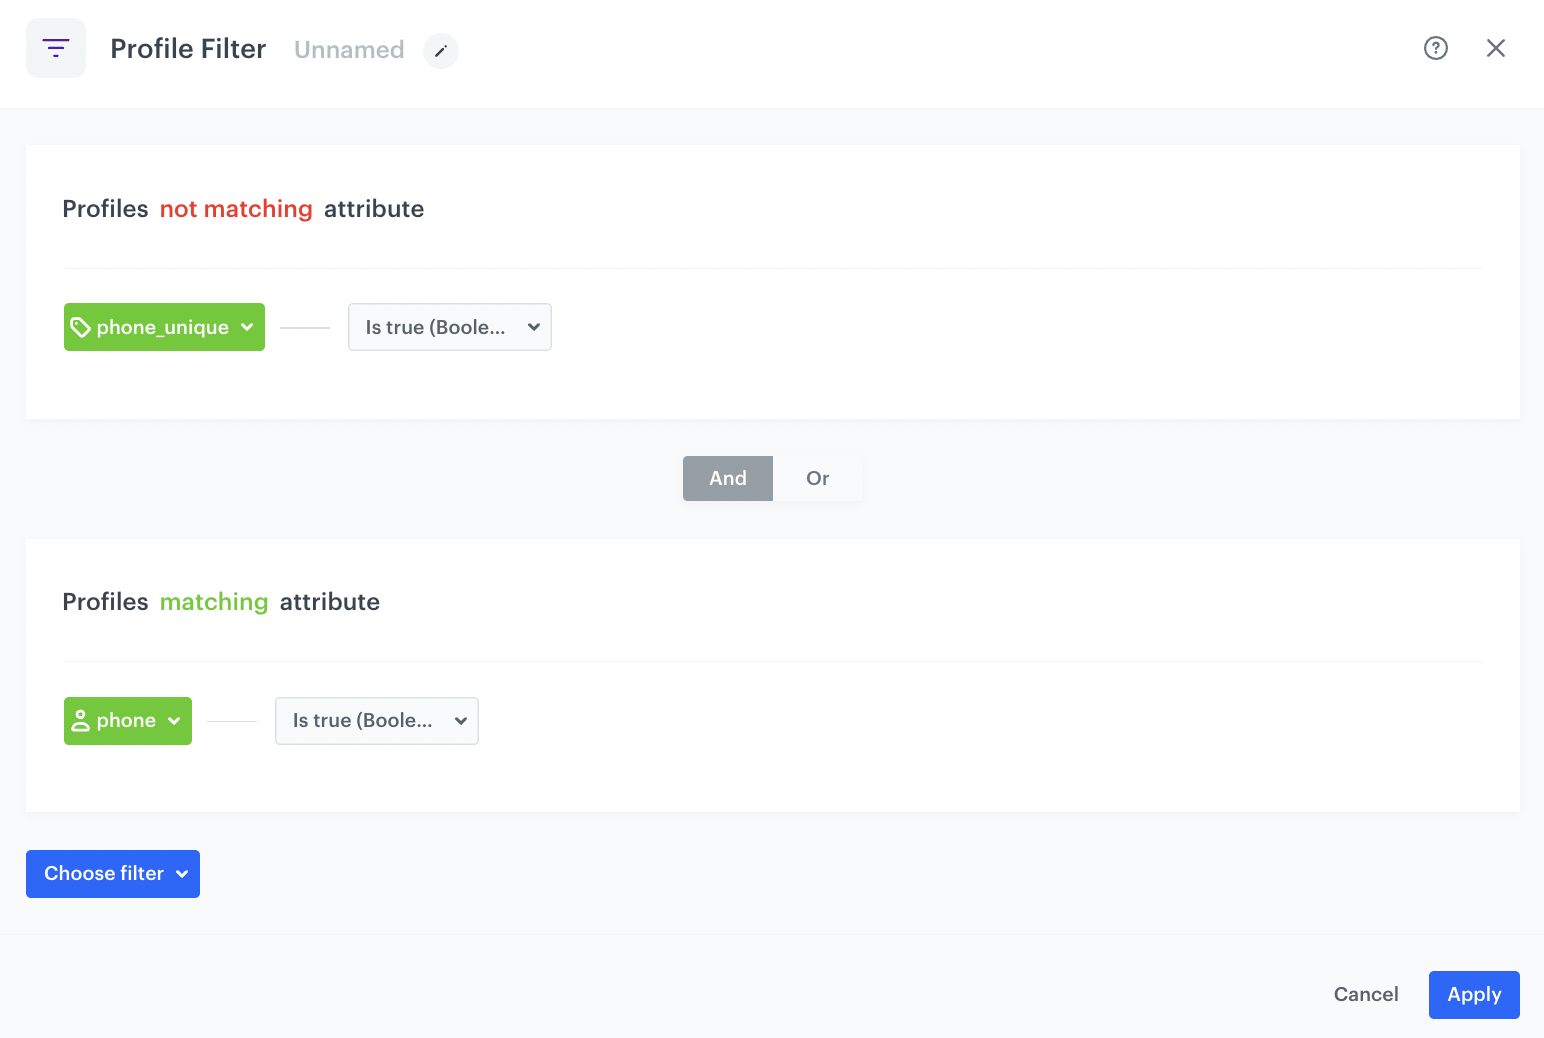
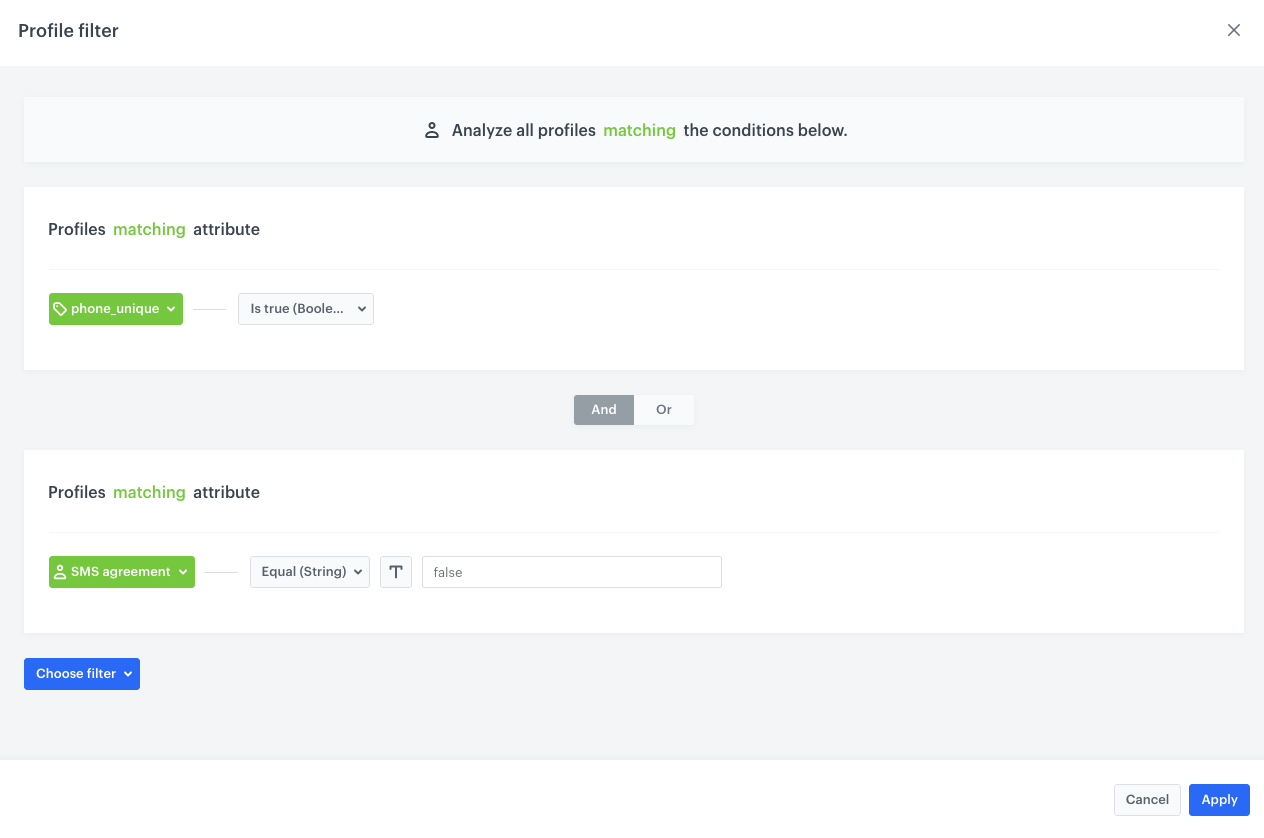
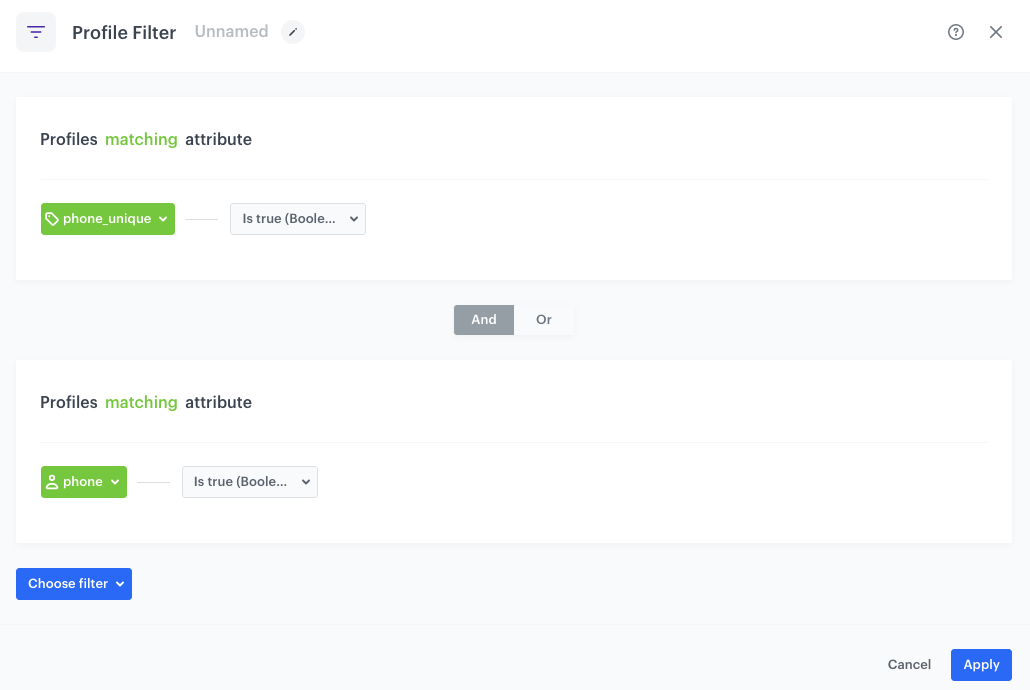
We recommend using the `phone_unique` tag for addressing recipients in mass campaigns to all customers (for example, general information about important changes that do not contain personalization). It is not necessary for real-time campaigns, especially those triggered by specific user behaviors and activities such as entering a page, purchasing, and so on, because there is a small probability of sending the same message several times to one number. However, this risk is high with large and mass shipments.
It is important to be careful with the personalization of such messages, especially without additional verification of ness of the phone number.

</div></div></div>


## Prerequisites 
---
- Create a catalog in Synerise in which you will store customers with unique phone numbers

This will allow you to select customers with a `phone_unique` tag as the recipients of your future SMS campaigns - this way you will make sure each customer won't receive the same message several times.

- In **Data Modeling Hub > Profile Tags**, [add the following tag](/docs/assets/tags): `phone_unique` 
    It will be used later in the process.

- Create a workspace [API Key](/docs/settings/tool/api) which you will use in the process.

## Process 
---

In this use case, you will go through the following steps:
1. [Create a segmentation](/use-cases/double-phone-number#create-a-segmentation) to group customers who have a phone number assigned and enabled marketing agreement in the SMS channel.
2. [Create a workflow which sends the customers from the segmentation to the catalog](/use-cases/double-phone-number#create-a-workflow-which-sends-the-customers-from-the-segmentation-to-the-catalog).
3. [Download the file with customers from the catalog](/use-cases/double-phone-number#export-the-file-from-the-catalog).
4. [Transform data](/use-cases/double-phone-number#transform-data) in the file: add a column with a `phone_unique` tag, remove `item_key` column, and rename the `id` column.
5. [Create a workflow which imports the modified file with customers to Synerise](/use-cases/double-phone-number#create-a-workflow-which-imports-the-modified-file-with-customers-to-synerise).
6. [Create a workflow that verifies uniqueness of the phone number and assigns a tag to a customer](/use-cases/double-phone-number#create-a-workflow-that-verifies-uniqueness-of-the-phone-number-and-assigns-a-tag-to-a-customer).
7. [Create a workflow that deletes a tag when a customer withdraws consent for receiving SMS](/use-cases/double-phone-number#create-a-workflow-that-deletes-a-tag-when-a-customer-withdraws-consent-for-receiving-sms).

## Create a segmentation 
---
In this part of the process, you will create a segmentation of customers who have a phone number and enabled a marketing agreement in the SMS channel.

1. Go to <img src="/api/docs/image/54176ad07f146575310749eba44b7c2f42c1b327/icons/decision-hub-icon.svg" alt="Decision Hub icon" class="icon">**Decision Hub > Segmentations > New segmentation**.
3. Enter the name of the segmentation.
4. From the **Add condition** dropdown list, select the `phone` attribute.
5. Click the **Choose** button, and from the list of operators, choose **Boolean**, and then select **Is true**.
4. From the **Add condition** dropdown list, select the `SMS agreement` attribute.
5. Click the **Choose** button, and from the list of operators, choose **Boolean**, and then select **Is true**.
6. Save the segmentation.

 <figure><img src="/api/docs/image/54176ad07f146575310749eba44b7c2f42c1b327/use-cases/all-cases/_gfx/doublephone1.png" class="full" alt="The view of the segmentation configuration"><figcaption>Segmentation configuration</figcaption></figure>  

## Create a workflow which sends the customers from the segmentation to the catalog
---
In this part of the process, you will create a workflow that imports customer data (phone number) to a file and sends it to the catalog you created as a part of prerequisites. The data will be deduplicated, which means the catalog will contain only unique phone numbers.

1. Go to <img src="/api/docs/image/54176ad07f146575310749eba44b7c2f42c1b327/icons/automation-hub-icon.svg" alt="Automation Hub icon" class="icon" > **Automation Hub > Workflows > New workflow**.  
2. Enter the name of the workflow.

### Define the Scheduled Run trigger node
---

At this stage, configure the conditions that trigger the workflow.

1. As the trigger node, select **Scheduled Run**.  
2. In the configuration of the node:  
    1. Change the **Run trigger** option to **one time**.  
    2. Choose the **Immediately** option.
    3. Confirm by clicking **Apply**.

<figure><img src="/api/docs/image/54176ad07f146575310749eba44b7c2f42c1b327/use-cases/all-cases/_gfx/doublephone2.png" class="full" alt="The configuration of the Scheduled Run node"><figcaption>The configuration of the Scheduled Run node</figcaption></figure>

### Select customers to export
---
In this part of the process, select a [segmentation of customers you created in the previous part of the process](#create-a-segmentation). Then, you will select the attribute (`phone`) whose value will be exported to a catalog in further steps.

1. Add the **Get Profiles** node.  
2. In the configuration of the node:  
    1. Select the segmentation you [created in the previous step](#create-a-segmentation) to extract customers’ data.  
    2. In the **Attributes** section, select **phone**. 
    3. Confirm by clicking **Apply**.  

   <figure><img src="/api/docs/image/54176ad07f146575310749eba44b7c2f42c1b327/use-cases/all-cases/_gfx/doublephone3.png" class="full" alt="The configuration of the Get Profiles node"><figcaption>The configuration of the Get Profiles node</figcaption></figure>

### Add the Import to Catalog node
---
In this part of the process, select a catalog to which the customer data will be imported.

1. Add the **Import to Catalog** node.
2. In the configuration of the node:  
    1. Select the catalog created as a part of the prerequisites to which the data will be imported.
    2. In the **Primary key** field, enter the `phone` attribute.
    3. Confirm by clicking **Apply**.

<figure><img src="/api/docs/image/54176ad07f146575310749eba44b7c2f42c1b327/use-cases/all-cases/_gfx/doublephone4.png" class="large" alt="The configuration of the Import to Catalog node"><figcaption>The configuration of the Import to Catalog node</figcaption></figure>

### Prepare the final settings 
---
   1. Add the **End** node and connect it to the **Import to Catalog** node.
   3. Optionally, add titles to each node so the workflow will be more understandable to your colleagues.
     <figure>
     <img src="/api/docs/image/54176ad07f146575310749eba44b7c2f42c1b327/use-cases/all-cases/_gfx/doublephone5.png" alt="Screenshot presenting workflow" class="full">
     <figcaption> Prepare workflow </figcaption>
     </figure>
   5. Activate the workflow by clicking **Save & Run**.  
    **Result**: The data will be sent to a catalog and de-duplicated during import.

## Export the file from the catalog
---
In this part of the process, you will download the file you imported to the catalog.

1. Go to **Data Modeling Hub > Catalogs**.
2. Choose the catalog from the list.
3. To download the file with your data, click **Download CSV** .

In the next step, you will use the exported file to create a data transformation rule which you will use further in the process in the Data Transformation node.

## Transform data
---
In this part of the process, you will perform the following modifications to the file:
- remove the `item_key` column
- rename the `id` column to `clientId` 
- add the `tags` column with the `phone_unique` value

1. Go to <img src="/api/docs/image/54176ad07f146575310749eba44b7c2f42c1b327/icons/automation-hub-icon.svg" alt="Automation Hub icon" class="icon" > **Automation > Data Transformation > Create transformation**.  
2. Enter the name of the transformation.  
3. Click **Add input**.  

### Add file with sample data
---
The **Data input** node allows you to add a file to be modified. In further steps, you define how the data in the file will be modified (transformation rules). Later, when this transformation is used in the workflow in the [Data Transformation node](/docs/automation/operation/data-transformation-node), the system uses the rules to transform a file selected in the workflow.

1. On the pop-up, click **Add example**.  
2. Upload the file exported in [the previous step](/use-cases/double-phone-number#export-the-file-from-the-catalog).  
3. Click **Apply**.  

### Remove column
---
Use the **Remove columns** node, which allows you to remove the `item_key` column.

1. On the **Data Input** node, click the grey dot.
2. From the dropdown list, select **Remove columns**.
4. In the configuration of the node:  
    1. Leave the **Remove Columns** option selected in the dropdown menu.
    2. Leave the default value in the dropdown (**Equal**).
    3. In the text field, enter `item_key`.
        <figure><img src="/api/docs/image/54176ad07f146575310749eba44b7c2f42c1b327/use-cases/all-cases/_gfx/doublephone6.png" class="full" alt="The configuration of the Remove columns node"><figcaption>The configuration of the Remove columns node</figcaption></figure>  
    6. Confirm by clicking **Apply**. 

### Rename column
---
In this part of the process, change the name of the `id` column to `clientId`.

1. On the **Filter column** node, click the grey dot. 
8. From the dropdown list, select **Rename column**.
9. Click the **Rename column** node.  
10. In the configuration of the node:  
    1. Click **Add rule**.  
    2. Click **Add column**.  
    3. Select the **id** column.  
    4. Under **Edit values by**, from the dropdown list, select **Replacing**.  
    6. In the text field, enter `clientId`.
        <figure><img src="/api/docs/image/54176ad07f146575310749eba44b7c2f42c1b327/use-cases/all-cases/_gfx/doublephone7.png" class="full" alt="The configuration of the Rename column node"><figcaption>The configuration of the Rename column node</figcaption></figure>  
    7. Confirm by clicking **Apply**.

### Add the new column
---
In this part of the process, you will add the new `tags` column with the `phone_unique` value.

1. On the **Rename Column** node, click the grey dot.
2. From the dropdown list, select **Add column**.
9. Click the **Add column** node.  
10. In the configuration of the node:  
    1. In the **Add column** field, enter the name of the column. In this use case, it's `tags`.  
    3. From the dropdown list, select **Static value**. 
    4. In the value box, enter `phone_unique`.
    5. Leave **Handle incomplete data** at default (**Skip row if error occurred**) to skip missing or invalid data which may occur during transformation.
    7. Confirm by clicking **Apply**.

 <figure><img src="/api/docs/image/54176ad07f146575310749eba44b7c2f42c1b327/use-cases/all-cases/_gfx/doublephone8.png" class="full" alt="The configuration of the Add new column node"><figcaption>The configuration of the Add new column node</figcaption></figure>  

### Add the finishing node
---
This node lets you preview the output of the transformation rules applied to the file. 

1. On the **Add column** node, click the grey dot.
2. From the dropdown list, select **Data Output**.  
3. To preview the results, click the **Data Output** node. 
    <figure><img src="/api/docs/image/54176ad07f146575310749eba44b7c2f42c1b327/use-cases/all-cases/_gfx/doublephone10.png" class="full" alt="The preview of modifications to the file"><figcaption>The preview of modifications to the file</figcaption></figure>
4. Close the preview
3. In the upper right corner, click **Save and publish**.  

    <figure><img src="/api/docs/image/54176ad07f146575310749eba44b7c2f42c1b327/use-cases/all-cases/_gfx/doublephone9.png" class="full" alt="The diagram of data transformation"><figcaption>The diagram of data transformation</figcaption></figure>

## Create a workflow which imports the modified file with customers to Synerise
---
In this part of the process, you will create a workflow that applies transformation rules you created in the [previous part of the process](#transform-data) to the file with customers data and import the modified file to Synerise. As a result, the profiles will be updated.

1. Go to <img src="/api/docs/image/54176ad07f146575310749eba44b7c2f42c1b327/icons/automation-hub-icon.svg" alt="Automation Hub icon" class="icon" > **Automation Hub > Workflows > New workflow**.  
2. Enter the name of the workflow.

### Define the Scheduled Run trigger node 
---
At this stage, you will define the conditions that launch the workflow.

1. As the trigger node, add **Scheduled Run**.  
2. In the configuration of the node:  
    1. Change the **Run trigger** option to **one time**.
    2. Choose the **Immediately** option.
    4. Confirm by clicking **Apply**.

<figure><img src="/api/docs/image/54176ad07f146575310749eba44b7c2f42c1b327/use-cases/all-cases/_gfx/doublephone11.png" class="full" alt="The configuration of the Scheduled Run node"><figcaption>The configuration of the Scheduled Run node</figcaption></figure>

### Select file to import
---
Select the file you exported in [part of the process](#export-the-file-from-the-catalog).
1. Add the **Local File** node.  
2. In the configuration of the node:  
    1. Upload the file. 
    2. Confirm by clicking **Apply**.  

 <figure><img src="/api/docs/image/54176ad07f146575310749eba44b7c2f42c1b327/use-cases/all-cases/_gfx/doublephone12.png" class="full" alt="Local File transfer"><figcaption>Local File transfer</figcaption></figure>  

### Add Data Transformation node
---
Select a data transformation rule you created [in this part of the process](#transform-data).

1. Add the **Data Transformation** node.  
2. In the configuration of the node, select the [data transformation you have created before](#transform-data).  
    <figure><img src="/api/docs/image/54176ad07f146575310749eba44b7c2f42c1b327/use-cases/all-cases/_gfx/doublephone13.png" class="full" alt="The configuration of the Data Transformation node"><figcaption>The configuration of the Data Transformation node</figcaption></figure>

3. Confirm by clicking **Apply**.  

### Add import profiles and finishing node
---
In this part of the process, you will import the transformed file with customers to Synerise.  

1. Add the **Import Profiles** node.
2. Add the **End** node.
3. In the upper right corner, click **Save & Run**.
<figure><img src="/api/docs/image/54176ad07f146575310749eba44b7c2f42c1b327/use-cases/all-cases/_gfx/doublephone14.png" class="full" alt="The view of the workflow configuration"><figcaption>The workflow configuration</figcaption></figure>

## Create a workflow that verifies uniqueness of the phone number and assigns a tag to a customer
---
In this part of the process, you will create a workflow that is launched when a customer enables marketing agreement in the SMS channel. The workflow checks whether the phone number is unique, if so the customer is assigned with a `phone_unique` tag and the catalog which stores unique phone numbers is updated.

1. Go to <img src="/api/docs/image/54176ad07f146575310749eba44b7c2f42c1b327/icons/automation-hub-icon.svg" alt="Automation Hub icon" class="icon" > **Automation Hub > Workflows > New workflow**.  
2. Enter the name of the workflow.

### Define the trigger node
---
The workflow is triggered by **Profile Event** where the triggering event is `profile.updated` with the `profile.receivesmses` parameter which is set to true.

1. Add the first node - **Profile Event**. In the node configuration:  
    1. From the **Choose event** dropdown list, choose the **profile.updated** event.
    2. Click <img src="/api/docs/image/54176ad07f146575310749eba44b7c2f42c1b327/docs/analytics/_gfx/where-icon.png" alt="where icon" class="icon"> button.  
    3. From the **Choose parameter** dropdown list, select **profile.receivesmses**.
    5. From the **Choose operator** dropdown list, select **Is true(Boolean)**.
2. Click **Apply**.

<figure>
<img src="/api/docs/image/54176ad07f146575310749eba44b7c2f42c1b327/use-cases/all-cases/_gfx/doublephone15.png" alt="The view of the Profile Event node configuration"  class="large">
<figcaption>Configuration of the Profile Event node</figcaption>
</figure>

### Add the Profile Filter node
---
In the next stage, using the Profile Filter node, you check if the customer already has the `phone_unique` tag and phone number. You take into account customers who have phone but do not have the `phone_unique` tag.

1. Add the **Profile Filter** node. 
2. In the settings of the node, choose **Profiles > Attributes** and select the `phone_unique` tag. 
3. As **Operator**, choose **Boolean - Is true** and nd modify the "Profile `matching` attribute" to "`not matching` attribute."
5. Click **Choose filter** and select the attribute `phone`. 
3. As the **Operator**, choose **Boolean - Is true**.
4. Click **Apply**.
3. For the **Not Matched** path, add the **End** node .
4. Click **Apply**.

    <figure><img src="/api/docs/image/54176ad07f146575310749eba44b7c2f42c1b327/use-cases/all-cases/_gfx/doublephone-profile-filter.png" class="full" alt="The Profile Filter node configuration"><figcaption>The Profile Filter node configuration</figcaption></figure>

### Configure the Outgoing Integration node
---
In this part of the process, you will send a request to [retrieve all items from the catalog](https://developers.synerise.com/DataManagement/DataManagement.html#operation/getItemsByBag) to check if the phone number exists in the catalog.

1. To the **Matched** path, add the **Outgoing Integration** node. In the configuration of the node: 
    1. Choose **Custom webhook**.
    2. In the **Webhook name** field, enter `getPhoneFromCatalog`.
    3. In the **URL** section:
        1. Choose the **GET** method.
        2. Enter the following endpoint: `https://api.synerise.com/catalogs/bags/XXXX/items?itemKey={{client.phone}}`, replace `XXXX` with the ID of your catalog.
    7. As the method of authorization, select **by API key**.
    8. From the dropdown list, select the API key you created as a [part of prerequisites](#prerequisites).
7. Click **Apply**.

<figure>
<img src="/api/docs/image/54176ad07f146575310749eba44b7c2f42c1b327/use-cases/all-cases/_gfx/doublephone17.png" alt="Webhook settings"  class="WYBIERZ ROZMIAR:full">
<figcaption>Webhook settings</figcaption>
</figure> 

### Configure the Event Filter node
The workflow will wait for the webhook to return the value of the body.metaData.totalCount parameter. If it's other than 0, the workflow will end. If it is 0, the profile will be updated with the `phone_unique` tag.

1. As the next node, add **Event Filter**. In the configuration of the node: 
    1. In the **Check** field, from the dropdown menu choose **for period of time**.
    2. Set the time range. In our case, it is 5 minutes.
    3. In the **Define conditions** field, from the **Choose event** dropdown menu, choose `webhook.response` event.
    3. Click the **+ where** button and select `name`.
    4. As the logical operator, select **Equal (String)**.
    5. As the value, add the name of the event used in the previous node: `getPhoneFromCatalog`.
    3. Click the **+ where** button and select `body.metaData.totalCount`.
    4. As the logical operator, select **Equal (Number)**.
    5. As the value, add `0`.
5. Click **Apply**.
3. For the **Not matched** path, add the **End** node .

<figure>
<img src="/api/docs/image/54176ad07f146575310749eba44b7c2f42c1b327/use-cases/all-cases/_gfx/doublephone18.png" alt="Event Filter node settings"  class="full">
<figcaption>Event Filter node settings</figcaption>
</figure> 

### Add the Update Profile node
---
1. For the **Matched** path, add the **Update Profile** node.
2. From the dropdown list, select **phone_unique** tag.
3. Leave the right dropdown list at default (**Add**). 
3. To save the changes, click **Apply**. 
 <figure>
   <img src="/api/docs/image/54176ad07f146575310749eba44b7c2f42c1b327/use-cases/all-cases/_gfx/doublephone19.png" alt="Screenshot presenting update profile node" class="large">
   <figcaption> The configuration of the Update Profile node </figcaption>
   </figure>

### Configure the Outgoing Integration node
---
In this step, [your catalog with unique phone numbers will be updated](https://developers.synerise.com/DataManagement/DataManagement.html#operation/addItems).

1. Add **Outgoing Integration** node. In the configuration of the node: 
    1. Choose **Custom webhook**.
    2. In the **Webhook name**, enter `addPhoneToCatalog`.
    3. In the **URL** section:
        1. Choose the **POST** method.
        2. Enter the following URL: `https://api.synerise.com/catalogs/bags/XXXX/items?itemKey={{client.phone}}`, where `XXXX` is the ID of your catalog.
    4. In the **Body** section, enter:
    
       <pre><code class="language-json">{
           "itemKey": "{{client.phone}}",
           "value": {
           "id": "{{client.id }}",
           "phone": "{{client.phone}}"
           }
           }</code></pre>

7. As the authorization method, select **by API key**.


<figure>
<img src="/api/docs/image/54176ad07f146575310749eba44b7c2f42c1b327/use-cases/all-cases/_gfx/doublephone20.png" alt="Webhook settings"  class="full">
<figcaption>Webhook settings</figcaption>
</figure> 

### Add the finishing node
---
1. Add the **End** node.
2. In the upper right corner, click **Save & Run**.  
    **Result**:  
    <figure><img src="/api/docs/image/54176ad07f146575310749eba44b7c2f42c1b327/use-cases/all-cases/_gfx/doublephone22.png" class="full" alt="The workflow configuration"><figcaption>The workflow configuration</figcaption></figure>

## Create a workflow that deletes a tag when a customer withdraws consent for receiving SMS
---
The next step is to create a workflow that will be triggered when a customer withdraws their consent. The workflow has similar structure to the previous one. What changes here is the trigger, instead of Profile Event, you will use the Audience node that is repeatedly triggered, for example everyday, at a certain time. 

1. Go to <img src="/api/docs/image/54176ad07f146575310749eba44b7c2f42c1b327/icons/automation-hub-icon.svg" alt="Automation Hub icon" class="icon" > **Automation Hub > Workflows > New workflow**.  
2. Enter the name of the workflow.

### Define the trigger node
---
The workflow is triggered for specific group of customers every date at a define time.

1. Start the workflow with the **Audience** node.
2. In the configuration of the node, set the **Run trigger** option to **repeatable**.
3. Set the interval to 1 per day.
4. Choose the day and time when the process starts.
5. Select the time zone.
6. In **Define audience**, choose **New Audience** and click **Define conditions**. Our audience will be a group of users who has `phone_unique` tag and change their sms agreement. 
    1. As the first condition, from the **Choose filter** dropdown menu, choose `phone_unique` attribute.  
    2. Choose operator as **Is true (Boolean)**.
    4. As the second condition, from the **Choose filter** dropdown menu, choose the `SMS agreement` attribute.
    5. Choose operator as **Equal (String)** and add the value. In our case it will be `false`. 
    
    <figure>
    <img src="/api/docs/image/54176ad07f146575310749eba44b7c2f42c1b327/use-cases/all-cases/_gfx/doublephone23.png" alt="Configuration of the Segment in the Audience node" class="full" >
    <figcaption> Configuration of the segmentation in the Audience node </figcaption>
    </figure>
8. Click **Apply**.

<figure>
    <img src="/api/docs/image/54176ad07f146575310749eba44b7c2f42c1b327/use-cases/all-cases/_gfx/doublephone24.png" alt="Configuration of the Audience node" class="full" >
    <figcaption> Configuration of the Audience node </figcaption>
    </figure>

### Add the Profile Filter node
---
In the next stage, using the Profile Filter node, you check if the customer has the `phone_unique` tag and phone number.

1. Add **Profile Filter** node. 
2. In the settings of the node choose **Profiles > Attributes** and select the tag `phone_unique`. 
3. As the **Operator**, choose **Boolean - Is true**.
5. Click **Choose filter** and select the attribute `phone`. 
3. As the **Operator**, choose **Boolean - Is true**.
4. Click **Apply**.
3. For the **Not Matched** path, add the **End** node .


    <figure><img src="/api/docs/image/54176ad07f146575310749eba44b7c2f42c1b327/use-cases/all-cases/_gfx/doublephone16.png" class="full" alt="The Profile Filter node configuration"><figcaption>The Profile Filter node configuration</figcaption></figure>

### Configure the Outgoing Integration node
---
In this part of the process, you will send a request to [retrieve all items from the catalog](https://developers.synerise.com/DataManagement/DataManagement.html#operation/getItemsByBag) to check if the phone number exists in the catalog.

1. To the **Matched** path, add the **Outgoing Integration** node. In the configuration of the node: 
    1. Choose **Custom webhook**.
    2. In the **Webhook name** field, enter `getPhoneFromCatalog`.
    3. In the **URL** section:
        1. Choose the **GET** method.
        2. Enter the following endpoint: `https://api.synerise.com/catalogs/bags/XXXX/items?itemKey={{client.phone}}`, replace `XXXX` with the ID of your catalog.
    7. As the method of authorization, select **by API key**.
    8. From the dropdown list, select the API key you created as a [part of prerequisites](#prerequisites).
7. Click **Apply**.

<figure>
<img src="/api/docs/image/54176ad07f146575310749eba44b7c2f42c1b327/use-cases/all-cases/_gfx/doublephone17.png" alt="Webhook settings"  class="full"><figcaption>Webhook settings</figcaption>
</figure> 

### Configure the Event Filter node
---
The workflow will wait for the webhook to return the value of the body.metaData.totalCount parameter. If it's equal 0, the workflow will end, because it means that the number is not in the catalog and no need to remove the tag since the number was not unique and the workflow ends. If it's 1, it means the number exists in the catalog because it was unique and the workflow must go on.

1. As the next node, add **Event Filter**. In the configuration of the node: 
    1. In the **Check** field, from the dropdown menu choose **for period of time**.
    2. Set the time range. In our case, it is 5 minutes.
    3. In the **Define conditions** field, from the **Choose event** dropdown menu, choose `webhook.response` event.
    3. Click the **+ where** button and select `name`.
    4. As the logical operator, select **Equal (String)**.
    5. As the value, add the name of the event used in the previous node: `getPhoneFromCatalog`.
    3. Click the **+ where** button and select `body.metaData.totalCount`.
    4. As the logical operator, select **Equal (Number)**.
    5. As the value, add `1`.
5. Click **Apply**.
3. For the **Not matched** path, add the **End** node .

<figure>
<img src="/api/docs/image/54176ad07f146575310749eba44b7c2f42c1b327/use-cases/all-cases/_gfx/doublephone18.png" alt="Event Filter node settings"  class="full">
<figcaption>Event Filter node settings</figcaption>
</figure> 

### Add the Update Profile node
---
1. For the **Matched** path, add the **Update Profile** node.
2. From the dropdown list, select **phone_unique** tag.
3. Click the right dropdown list and select **Remove**. 
3. To save the changes, click **Apply**. 
 <figure>
   <img src="/api/docs/image/54176ad07f146575310749eba44b7c2f42c1b327/use-cases/all-cases/_gfx/doublephone25.png" alt="Screenshot presenting update profile node" class="large">
   <figcaption> The configuration of the Update Profile node </figcaption>
   </figure>

### Configure the Outgoing Integration node
---
In this step, [you will remove a customer with their phone number from the catalog](https://developers.synerise.com/DataManagement/DataManagement.html#operation/deleteItem).


1. Add the **Outgoing Integration** node. In the configuration of the node: 
    1. Choose **Custom webhook**.
    2. In the **Webhook name** field, enter `removePhoneFromCatalog`
    3. In the **URL** section:
        1. Choose the **DELETE** method.
        2. Enter the following URL:`https://api.synerise.com/catalogs/bags/XXXX/items/{{event.params['body.data[0].id']}}`, where `XXXX` is the ID of your catalog.
    7. As the authorization method, select **by API key**.
    8. From the dropdown list, select the API key you created as a [part of prerequisites](#prerequisites).
7. Click **Apply**.

<figure>
<img src="/api/docs/image/54176ad07f146575310749eba44b7c2f42c1b327/use-cases/all-cases/_gfx/doublephone26.png" alt="Webhook settings"  class="full">
<figcaption>Webhook settings</figcaption>
</figure> 

### Add the finishing node
---
1. Add the **End** node.
2. In the upper right corner, click **Save & Run**.  
    **Result**:  
    <figure><img src="/api/docs/image/54176ad07f146575310749eba44b7c2f42c1b327/use-cases/all-cases/_gfx/doublephone22.png" class="full" alt="The workflow configuration"><figcaption>The workflow configuration</figcaption></figure>

## Check the use case set up on the Synerise Demo workspace
---
In the Synerise Demo workspace, you can check:
- [segmentation configuration](https://app.synerise.com/analytics-v2/segmentations/8e08c002-e0bf-4e66-bb28-7bf276918ee0) 
- [workflow configuration](https://app.synerise.com/automations/automation-diagram/cd94653c-b2a6-43c2-afa8-7090dee0d81e)
- [data transformation](https://app.synerise.com/automations/data-transformation/8888bd88-53a8-4f3a-89c6-93fddf4e6392)
- [workflow which imports modified file with customers back to Synerise](https://app.synerise.com/automations/automation-diagram/3f15df7f-10fb-428c-aa52-047d56dfe7d9)
- [workflow which updates the customer's profile](https://app.synerise.com/automations/automation-diagram/9bf58473-d660-4f4b-a7be-61b4605b0673)
- [workflow that deletes a tag when a customer withdraws consent for receiving SMS](https://app.synerise.com/automations/automation-diagram/afbc1610-892e-43cb-ac8c-e6e49eea56f3)


If you’re our partner or client, you already have automatic access to the **Synerise Demo workspace (1590)**, where you can explore all the configured elements of this use case and copy them to your workspace.  

If you’re not a partner or client yet, we encourage you to fill out the contact [form](https://demo.synerise.com/request) to schedule a meeting with our representatives. They’ll be happy to show you how our demo works and discuss how you can apply this use case in your business. 

## Read more
---

- [Automation Hub](/docs/automation)
- [Catalogs](/docs/assets/catalogs/introduction-to-catalogs)
- [Data Transformation](/docs/automation/data-transformation-and-imports)
- [Import](/docs/assets/imports/introduction-to-imports)
- [Segmentation](/docs/analytics/segmentations)
- [SMS campaigns](/docs/campaign/SMS)


