
Synerise workflows allow you to create customized mechanisms, thanks to which you can monitor any campaign you create and see if it is properly displayed, what results it generates, whether it is clickable, etc. One of such types of campaigns are recommendation campaigns displayed on the website or in the application, which let you prepare fully personalized content for your audience. The key element during creating recommendation campaigns is controlling if they are displayed correctly for your customers. 

Problems with campaign display might occur in case of:
- changes on the website (for example in HTML structure or CSS selectors),
- problems in settings of campaign filters (too narrow),
- errors in product feed. 

Alerts are very efficient in cases that require immediate actions. When an incident occurs, you can use a workflow which generates an alert message and sends it to your Slack channel with information that your campaign does not work. In this situation, you can react immediately and check the campaign settings. 

In our use case, we will create a workflow that starts hourly and checks if the recommendation campaign on the website was generated any and displayed during the last 60 minutes. If not, the workflow sends an alert message to the Slack channel. When counting how many times the recommendation was displayed, we will use events generated in the customer's profile every time it happens.

## Prerequisites 
---
- Implement a [recommendation campaign](/docs/ai-hub/recommendations-v2/creating-recommendation-campaign) on your website that you want to monitor. Check our [use cases](/use-cases/?ordering=DESC&sortBy=publishDate&filters=tags%3D%3D%22ai+recommendations%22ANDchannel%3D%3D%22website%22) to learn more how to do it step by step.
- Create [an incoming webhook in Slack](https://api.slack.com/messaging/webhooks).

## Process
---

In this use case, you will go through the following steps:
1. [Create a metric](/use-cases/dynamic-campaign-alert#create-a-metric) which counts how many times a campaign was displayed during the last 60 minutes.
2. [Create a workflow](/use-cases/dynamic-campaign-alert#create-a-workflow) that sends an alert message.

## Create a metric
---
In this part of the process, you create a metric which counts how many times a recommendation was displayed during the last 60 minutes.

1.  Go to <img src="/api/docs/image/54176ad07f146575310749eba44b7c2f42c1b327/icons/decision-hub-icon.svg" alt="Decision Hub icon" class="icon"> **Decision Hub > Metrics > New metric**.
2. Enter the name of the metric.
3. As the metric type, select **Simple metric**.
3. As the aggregator, set **Count**.
4. As the occurrence type, set **All**. 
5. From the **Choose event** dropdown list, select **dynamicContent.show**.
6. Click <img src="/api/docs/image/54176ad07f146575310749eba44b7c2f42c1b327/docs/analytics/_gfx/where-icon.png" alt="where icon" class="icon"> button.  
7. Click the **Choose parameter** button.  
8. From the dropdown list, select **id**.
9. Click the **Choose operator** button.
10. From the dropdown list, select **Equal**.
11. As the value of the operator add the ID of your dynamic content campaign. To find it, go to **Experience Hub > Dynamic content**, find your campaign on the list and click the three-dot button. Hover over the ID of the campaign and click **Copy ID**. 
12. Set the date range for **Last 60 minutes**.
12. Click **Save**.

<figure>
<img src="/api/docs/image/54176ad07f146575310749eba44b7c2f42c1b327/use-cases/all-cases/_gfx/dc-alert1.png" alt="Metric configuration"  class="WYBIERZ ROZMIAR:full">
<figcaption>Metric configuration</figcaption>
</figure> 


<div class="admonition admonition-note"><div class="admonition-icon"><svg xmlns="http://www.w3.org/2000/svg" fill="none" viewBox="0 0 24 24" stroke="currentColor" stroke-width="2.5"><path stroke-linecap="round" stroke-linejoin="round" d="M13 16h-1v-4h-1m1-4h.01M21 12a9 9 0 11-18 0 9 9 0 0118 0z" /></svg></div><div class="admonition-body"><div class="admonition-content">

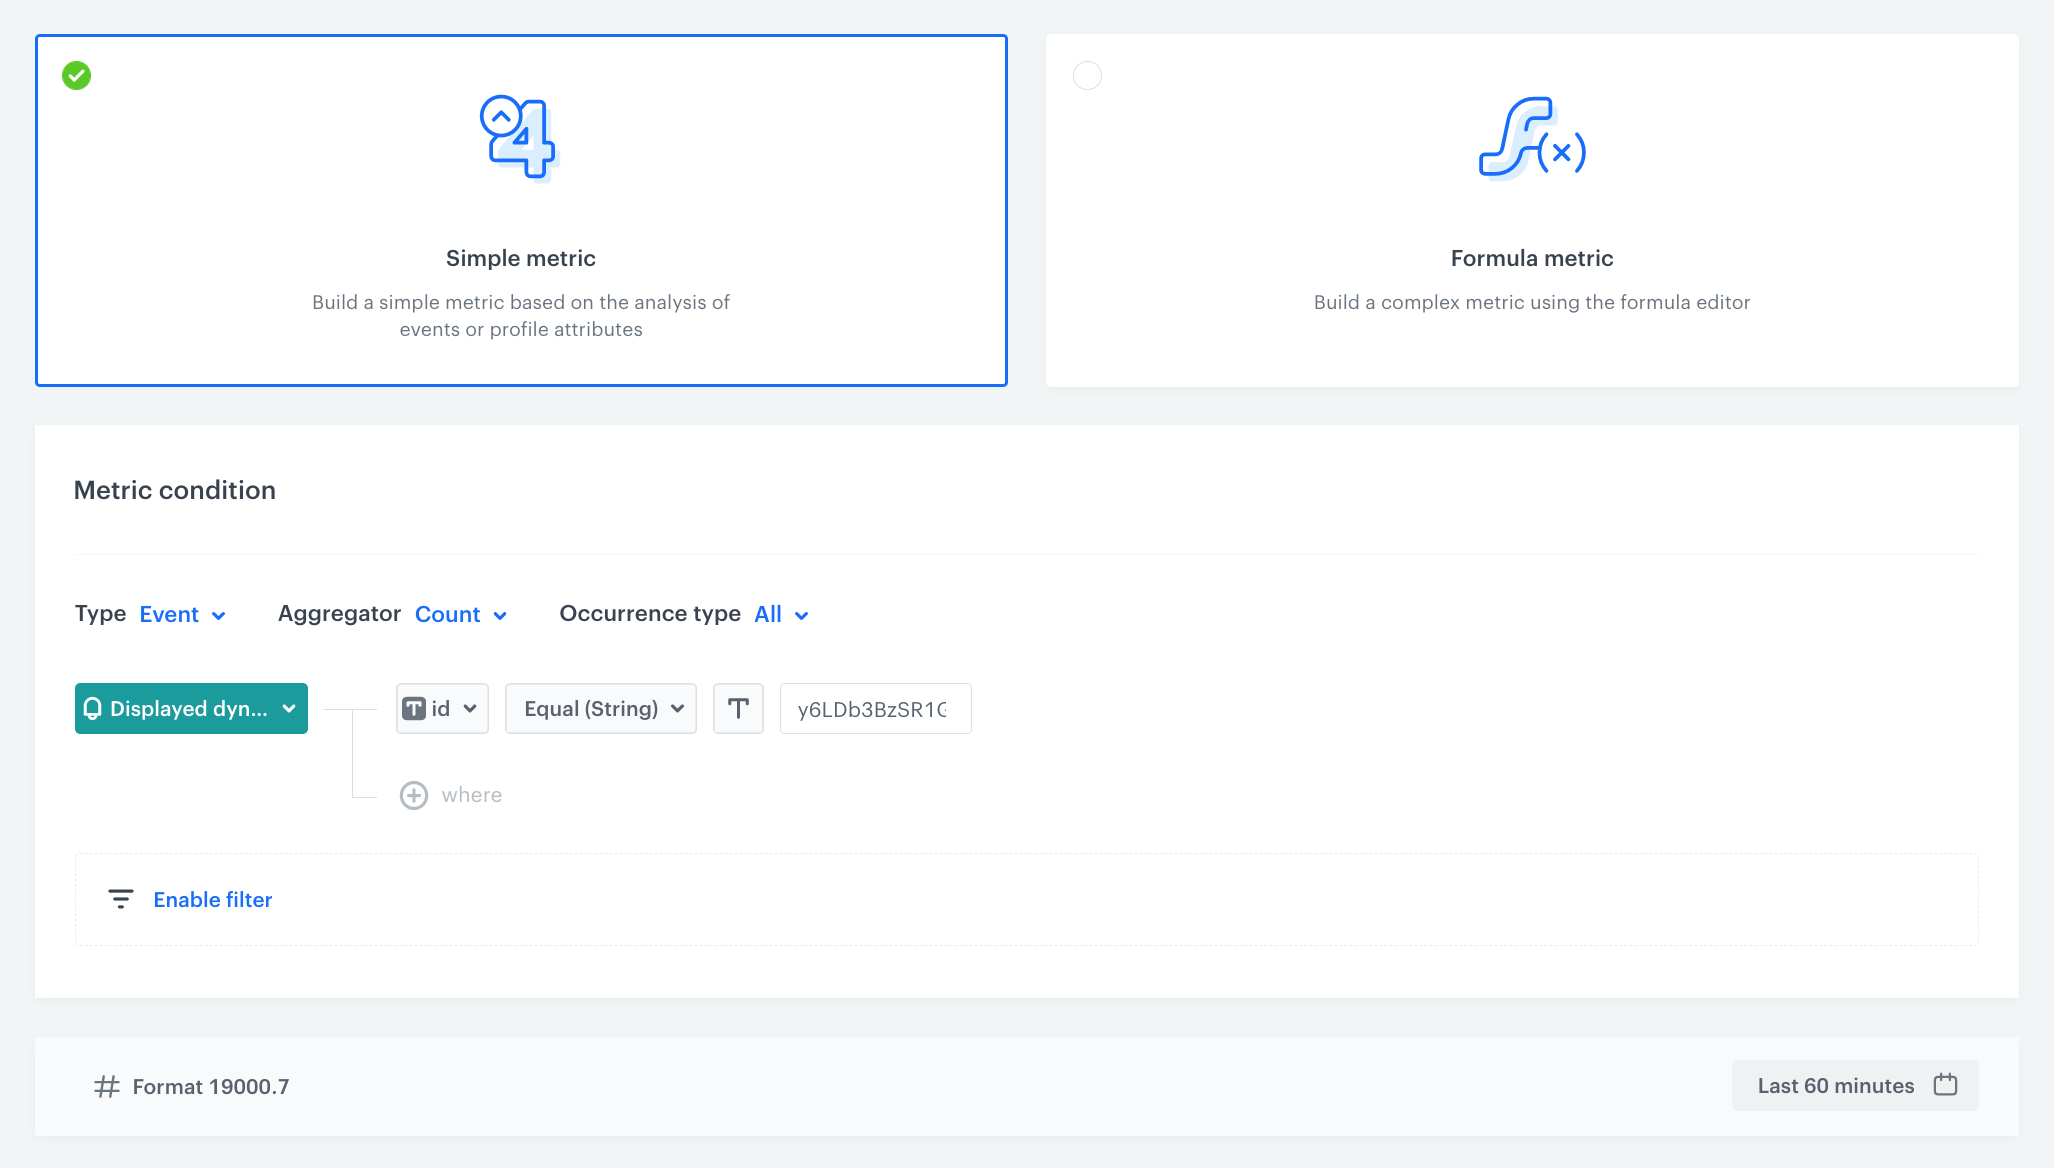
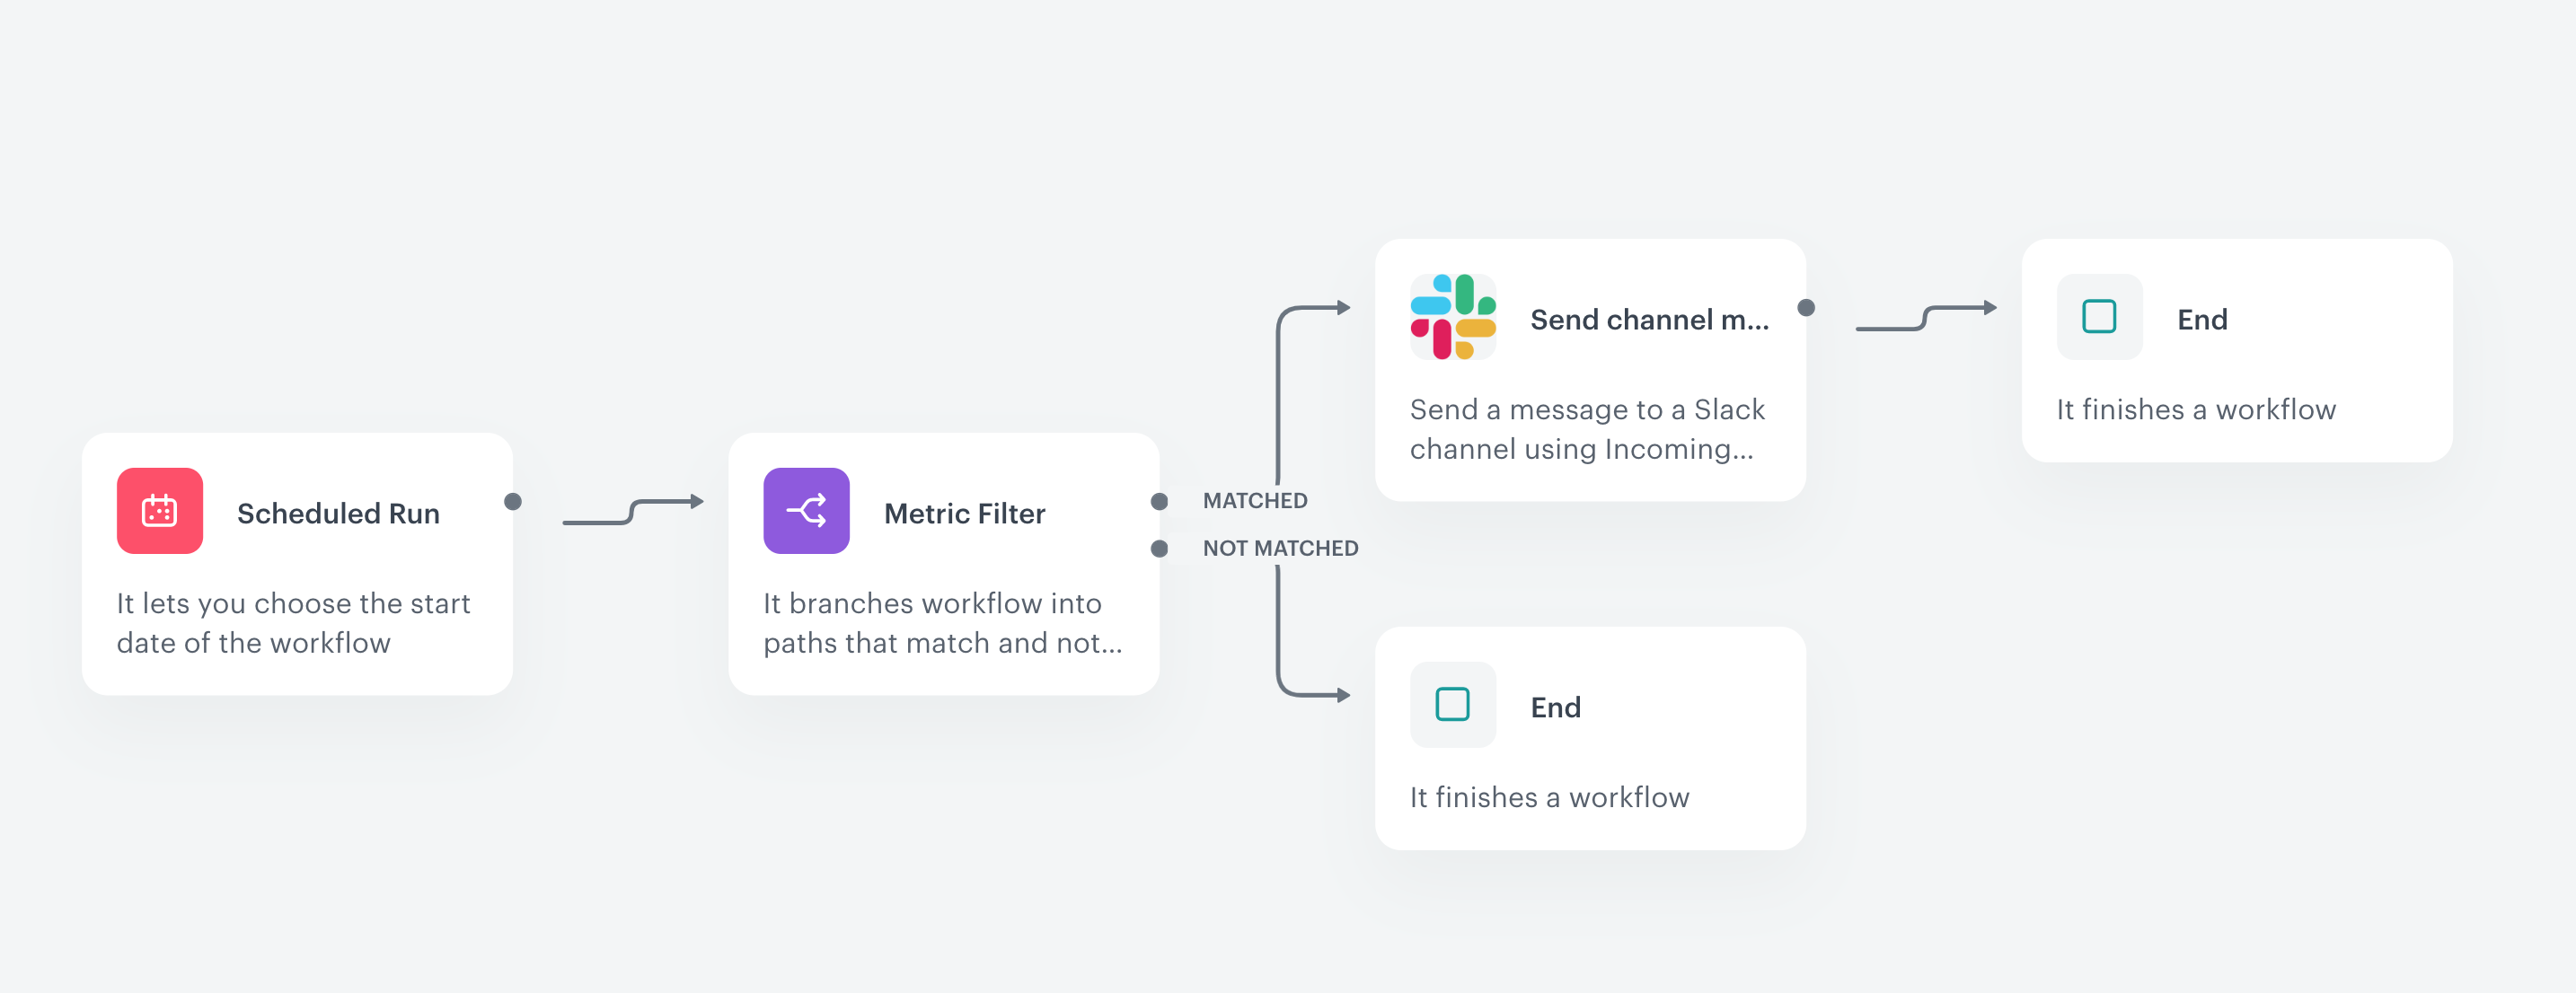
In our case, we use a dynamic content campaign with product recommendations, which automatically generates the `dynamicContent.show` event when the campaign is displayed on the website. This event has an `id` parameter which specifies the ID of the dynamic content campaign. However, this metric can be based on any other event, depending on how the campaign is implemented.

</div></div></div>


## Create a workflow
---
In this step, you will create a workflow which triggers every hour and checks if the campaign was displayed in the last 60 minutes. If not - it sends an automatic alert to your Slack channel.

1. Go to <img src="/api/docs/image/54176ad07f146575310749eba44b7c2f42c1b327/icons/automation-hub-icon.svg" alt="Automation Hub icon" class="icon" > **Automation Hub > Workflows > New workflow**.  
2. Enter the name of the workflow.

### Define the Scheduled Run trigger node
---
At this stage, you configure the conditions that trigger the workflow.

1. As the trigger node, add **Scheduled Run**.  
2. In the configuration of the node:  
    1. Leave the **Run trigger** option at default (**all time**).  
    2. From the **Timezone** dropdown list, select the time zone consistent with the timezone selected for your workspace.  
    3. Define the frequency of the workflow. In this use case, it's every day, every hour from 8:00 to 22:00. 
    4. Confirm by clicking **Apply**.

<figure><img src="/api/docs/image/54176ad07f146575310749eba44b7c2f42c1b327/use-cases/all-cases/_gfx/dc-alert-workflow1.png" class="full" alt="The configuration of the Scheduled Run node"><figcaption>The configuration of the Scheduled Run node</figcaption></figure>

### Define the Metric Filter node
---
In the **Metric Filter** node, you will select [the metric prepared in the previous part of the process](/use-cases/dynamic-campaign-alert#create-a-metric). The continuation of the workflow will depend on the result of the metric. If the metric result is equal to or less than 0, an alert will be sent to a Slack channel. 

1. After the trigger node, add **Metric Filter**.
2. In **Define condition**, choose the [metric created in the previous step](/use-cases/teams-integration#create-a-metric-which-counts-the-change-in-transactions).
3. As the condition, by using the mathematical operators, set the metric result as equal to `0`. 
4. Click **Apply**.

<figure><img src="/api/docs/image/54176ad07f146575310749eba44b7c2f42c1b327/use-cases/all-cases/_gfx/dc-alert-workflow2.png" class="full" alt="The configuration of the Metric Filter node"><figcaption>The configuration of the Metric Filter node</figcaption></figure>

### Define the Send Channel Message node
---
In this step, you will configure the settings of the outgoing integration that sends the alert message to a Slack channel. 

#### Create a connection

1. As the **matched** path after the Metric Filter node, add the **Slack > Send Channel Message** node.  
3. In the configuration of the node:  
    - If you already have created a connection, select the connection from the list.  
    - If you haven't created any connection yet:  
      1. At the bottom of the dropdown list, click **Add connection**.
      2. In the **Incoming Webhook URL** field, enter the incoming webhook URL you created as a part of [prerequisites](/use-cases/dynamic-campaign-alert#prerequisites).
      3. Click **Next**.  
      4. In the **Connection name** field, enter the name for the connection you created. 
      5. Click **Apply**.  
            **Result**: A connection is created and selected. 

#### Define the integration parameters

1. In the **Type of message** field, choose **Simple text message**.
2. Below, in **Add text message**, add the content of the message which should be sent to the Slack channel.
3. Confirm by clicking **Apply**.

<figure><img src="/api/docs/image/54176ad07f146575310749eba44b7c2f42c1b327/use-cases/all-cases/_gfx/dc-alert-workflow3.png" class="full" alt="Configuration of the workflow that sends alert messages based on the metric results to the Slack channel"><figcaption>Configuration of the workflow that sends alert messages based on the metric results to the Slack channel</figcaption></figure>

### Prepare the final settings 
---
1. **Add End nodes** where the workflow should finish for users.
2. Optionally, define **capping**.
3. Optionally, **add titles** to each node so the workflow will be more understandable to your colleagues.
4. Name the **workflow**.
5. To save it as a draft, click Save, or activate the workflow by clicking **Save & Run**. 

<figure>
<img src="/api/docs/image/54176ad07f146575310749eba44b7c2f42c1b327/use-cases/all-cases/_gfx/dc-alert2.png" alt="Workflow configuration"  class="WYBIERZ ROZMIAR:full">
<figcaption>Workflow configuration</figcaption>
</figure> 

## Check the use case set up on the Synerise Demo workspace
---
You can check the [metric](https://app.synerise.com/analytics/metrics/cd9779ca-86a0-4a62-a0db-4dbb1ca1a92b) and [workflow](https://app.synerise.com/automations/automation-diagram/4cf2fe1c-87fb-4b80-8151-7aa1920098c1) configuration directly in Synerise Demo workspace. 

If you’re our partner or client, you already have automatic access to the **Synerise Demo workspace (1590)**, where you can explore all the configured elements of this use case and copy them to your workspace.  

If you’re not a partner or client yet, we encourage you to fill out the contact [form](https://demo.synerise.com/request) to schedule a meeting with our representatives. They’ll be happy to show you how our demo works and discuss how you can apply this use case in your business. 

## Read more
---
- [Automation Hub](/docs/automation)
- [Custom events](https://developers.synerise.com/DataManagement/DataManagement.html#operation/CustomEvent)
- [Dynamic content](/docs/campaign/dynamiccontent)
- [Metrics](/docs/analytics/metrics)
- [Recommendations](/docs/ai-hub/recommendations-v2)
- [Slack integration](/docs/automation/integration/slack/send-message-to-slack-channel)

