
Net Promoter or **Net Promoter Score (NPS)** is a management tool that can be used to measure the loyalty of a brand's customer relationships. It serves as an alternative to traditional customer satisfaction research and is correlated with revenue growth. If you send your NPS surveys right after the purchase, you increase the chances of getting an immediate reply with relevant feedback.

In this use case, we describe the process of sending a short NPS survey right after the customer makes a purchase in a mobile application. The survey consists of two fields: an NPS rating on a scale from 1 to 10 and a comment field. The customer can provide such a rating only within 48 hours after a purchase. 

The campaign layout is different based on the conditions meet by the customer:

- If the customer has already filled out the survey within 48 hours after the purchase and clicks the link again, they will see a message which informs that they have already filled out this survey. 

<figure>
<img src="/api/docs/image/54176ad07f146575310749eba44b7c2f42c1b327/use-cases/all-cases/_gfx/nps1.png" alt="NPS survey - survey filled out" class="small no-frame">
</figure> 

- If the customer has not filled out the survey within 48 hours after the purchase and clicks the link after more than 48 hours, they will see a message which informs that this survey has expired. 

<figure>
<img src="/api/docs/image/54176ad07f146575310749eba44b7c2f42c1b327/use-cases/all-cases/_gfx/nps2.png" alt="NPS survey - survey expired"  class="small no-frame">
</figure> 

- If the customer has not filled out the survey within 48 hours after the purchase and clicks the link in less than 48 hours, a NPS survey is displayed.

<figure>
<img src="/api/docs/image/54176ad07f146575310749eba44b7c2f42c1b327/use-cases/all-cases/_gfx/nps3.png" alt="NPS survey"  class="small no-frame">
</figure> 

In the further part of the process, we will also present you how to create basic analyses based on customers' answers and results from the survey. 
Based on these analyses, we will create a Net Promoter Score, which is simply the percentage of customers who are promoters (those who scored 9 or 10) minus the percentage of customers who are critics (those who scored 1 to 6).

## Prerequisites 
---
- Implement [tracking code](/docs/settings/tool/tracking_codes) into your website.
- Integrate Synerise [mobile SDK](/developers/mobile-sdk) in your mobile application. 
- Implement mobile pushes in your mobile application: [iOS](/developers/mobile-sdk/configuring-push-notifications/ios) and/or [Android](/developers/mobile-sdk/configuring-push-notifications/android).
- Implement all additional information about the transactions based on the documentation for our [transactional API](https://developers.synerise.com/DataManagement/DataManagement.html#operation/CreateATransaction). Check the documentation to see how you can set up the `transaction.charge` event to track the mobile transactions directly via **source** parameter. 
- In this use case, we use the `form.submit` event, which is sent after filling out the NPS survey. You can send this event using the [API](https://developers.synerise.com/DataManagement/DataManagement.html#operation/CustomEvent) or [JS SDK](/developers/web/tracking-form-data/tracking-form-data-sdk#calling-the-sdk-directly).

## Process
---

In this use case, you will go through the following steps:
1. [Create a landing page](/use-cases/dynamic-nps#create-a-landing-page) with 3 different layouts.
2. [Create an aggregate which returns the date of completing the survey](/use-cases/dynamic-nps#create-an-aggregate-which-returns-the-date-of-completing-the-survey) - if it exists, it means that the user has completed the survey, if there is no date, it means that they have not completed it.
3. [Create an aggregate which returns the sending time of last mobile push](/use-cases/dynamic-nps#create-an-aggregate-which-returns-the-sending-time-of-last-mobile-push) with a survey which was sent to a user.
4. [Create an expression](/use-cases/dynamic-nps#create-an-expression) which checks if 48 hours have passed since the push message with the NPS survey was sent (expiration condition).
5. [Create a dynamic content campaign](/use-cases/dynamic-nps#create-a-dynamic-content-campaign) with the Jinjava code that checks the conditions which a user must meet to see one of the three landing page version. 
6. [Create a mobile push](/use-cases/dynamic-nps#create-a-mobile-push-template) with the link to the landing page.
7. [Create a workflow](/use-cases/dynamic-nps#create-a-workflow) which sends a push notification with the NPS survey to a user after making the transaction.
8. [Create a basic segmentation with NPS score](/use-cases/dynamic-nps#create-a-basic-segmentation-with-nps-score).
9. [Create a Net Promoter Score](/use-cases/dynamic-nps#create-a-net-promoter-score) based on a metric.

## Create a landing page
---

Prepare a landing page within the website of your mobile store, which will contain three different layouts (as it was present in the introduction):
- a message which informs that the survey has been already filled out (in this case marked as #COMPLETED),
- a message which informs that this survey has expired (in this case marked as #EXPIRED),
- a NPS survey in which the customer can rate the purchase or the whole shopping experience (in this case marked as #NPS).


  <div class="admonition admonition-important"><div class="admonition-icon"><svg xmlns="http://www.w3.org/2000/svg" fill="none" viewBox="0 0 24 24" stroke="currentColor" stroke-width="2.5"><path stroke-linecap="round" stroke-linejoin="round" d="M12 8v4m0 4h.01M21 12a9 9 0 11-18 0 9 9 0 0118 0z" /></svg></div><div class="admonition-body"><div class="admonition-content">

  In order for a landing page to correctly collect data, it is necessary to embed the Synerise SDK into the [landing code](/docs/campaign/landing-page). To do this, generate and copy the Synerise [tracking code](/developers/web/installation-and-configuration) and paste it in the landing page's edit panel in **JavaScript insert before end body**, in the Customize section. Below you can find an example how it can look like.

  </div></div></div>


  <details class="accordion"><summary>Check the HTML code</summary><div class="accordion-content"><pre><code class="language-HTML">function onSyneriseLoad() { SR.init({ "trackerKey":"XXXXX-XXXXX-XXXXX-XXXXX-XXXXX", }); } (function(s,y,n,e,r,i,se){s["SyneriseObjectNamespace"]=r;s[r]=s[r]||[], s[r]._t=1*new Date(),s[r]._i=0,s[r]._l=i;var z=y.createElement(n), se=y.getElementsByTagName(n)[0];z.async=1;z.src=e;se.parentNode.insertBefore(z,se); z.onload=z.onreadystatechange=function(){var rdy=z.readyState; if(!rdy||/complete|loaded/.test(z.readyState)){s[i]();z.onload = null; z.onreadystatechange=null;}};})(window,document,"script", "//web.snrbox.com/synerise-javascript-sdk.min.js","SR", "onSyneriseLoad");</code></pre></div></details>
 

- Replace the value of `trackerKey` with your own, generated [tracking code](/developers/web/installation-and-configuration).


  <div class="admonition admonition-important"><div class="admonition-icon"><svg xmlns="http://www.w3.org/2000/svg" fill="none" viewBox="0 0 24 24" stroke="currentColor" stroke-width="2.5"><path stroke-linecap="round" stroke-linejoin="round" d="M12 8v4m0 4h.01M21 12a9 9 0 11-18 0 9 9 0 0118 0z" /></svg></div><div class="admonition-body"><div class="admonition-content">

  In the code, add the information about the events which will be sent after filling the NPS form. In this case, it is `nps.send` with the `score` parameter that contains the number of points chosen for a particular customer. It should be a number. It will be important in the further analysis of the campaign results.

  </div></div></div>


<div class="admonition admonition-note"><div class="admonition-icon"><svg xmlns="http://www.w3.org/2000/svg" fill="none" viewBox="0 0 24 24" stroke="currentColor" stroke-width="2.5"><path stroke-linecap="round" stroke-linejoin="round" d="M13 16h-1v-4h-1m1-4h.01M21 12a9 9 0 11-18 0 9 9 0 0118 0z" /></svg></div><div class="admonition-body"><div class="admonition-content">

All the conditions that determine the display of a specific message will be created as a dynamic content campaign displayed on this landing page in the further steps.

</div></div></div>


## Create an aggregate which returns the date of completing the survey
---
In this step, you will create an aggregate which returns the date of completing the NPS survey - if it exists, it means that the user has completed the survey, if there is no date, it means that the survey has not been completed.

1. Go to <img src="/api/docs/image/54176ad07f146575310749eba44b7c2f42c1b327/icons/behavioral-data-hub-icon.svg" alt="Behavioral Data Hub icon" class="icon"> **Behavioral Data Hub > Live Aggregates > Create aggregate**.
2. As the aggregate type, select **Profile**.  
2. Enter the name of the aggregate.  
3. Click **Analyze profiles by** and select **Last**.
4. Select the `form.submit` event.  
5. As the parameter, choose **TIMESTAMP**
6. Click the **+ where** button and from the **Choose parameter** list, select **title** to indicate the specific form.
7. Choose the **Equal** operator and add the specific name of the form submitted as the value.
8. Set the period from which the aggregate will analyze the results to the last **48 hours**. 
12. Save the aggregate.

<figure>
<img src="/api/docs/image/54176ad07f146575310749eba44b7c2f42c1b327/use-cases/all-cases/_gfx/npsaggregate.png" alt="NPS aggregate"  class="full">
<figcaption>Configuration of the aggregate that returns the date of completing the survey</figcaption>
</figure> 

## Create an aggregate which returns the sending time of last mobile push
---
In this step, you will create an aggregate which returns the sending time of last mobile push with a survey which was sent to a user.

1. Go to <img src="/api/docs/image/54176ad07f146575310749eba44b7c2f42c1b327/icons/behavioral-data-hub-icon.svg" alt="Behavioral Data Hub icon" class="icon"> **Behavioral Data Hub > Live Aggregates > Create aggregate**.
2. As the aggregate type, select **Profile**.  
2. Enter the name of the aggregate.  
3. Click **Analyze profiles by** and select **Last**.
4. Select the `push.send` event.  
5. As the parameter, choose **TIMESTAMP**
6. Click the **+ where** button and from the **Choose parameter** dropdown list, select **title** to indicate the specific form.
7. Choose the **Equal** operator and enter the name of the latest push message campaign.
8. Set the period from which the aggregate will analyze the results to the last **48 hours**. 
12. Save the aggregate.

<figure>
<img src="/api/docs/image/54176ad07f146575310749eba44b7c2f42c1b327/use-cases/all-cases/_gfx/npsaggregate2.png" alt="NPS aggregate"  class="full">
<figcaption>Configuration of the aggregat that returns the sending time of last mobile push</figcaption>
</figure> 

## Create an expression
---
In this step, you will create an expression which checks if the customer has filled out the form in the last 48 hours.

1. Go to <img src="/api/docs/image/54176ad07f146575310749eba44b7c2f42c1b327/icons/behavioral-data-hub-icon.svg" alt="Behavioral Data Hub icon" class="icon"> **Behavioral Data Hub > Expressions > New expression**. 
2. Enter the name of the expression. 
3. Leave the **Expression** option at default (**Attribute**).
4. Build the following formula of the expression:  
    <figure>
    <img src="/api/docs/image/54176ad07f146575310749eba44b7c2f42c1b327/use-cases/all-cases/_gfx/npsexpression.png" alt="NPS expression"  class="full">
    <figcaption>Configuration of the expression which checks if the customer has filled out the form in the last 48 hours</figcaption>
    </figure>  
        
   <details class="accordion"><summary>Explanation of the expression logic</summary><div class="accordion-content"><p>
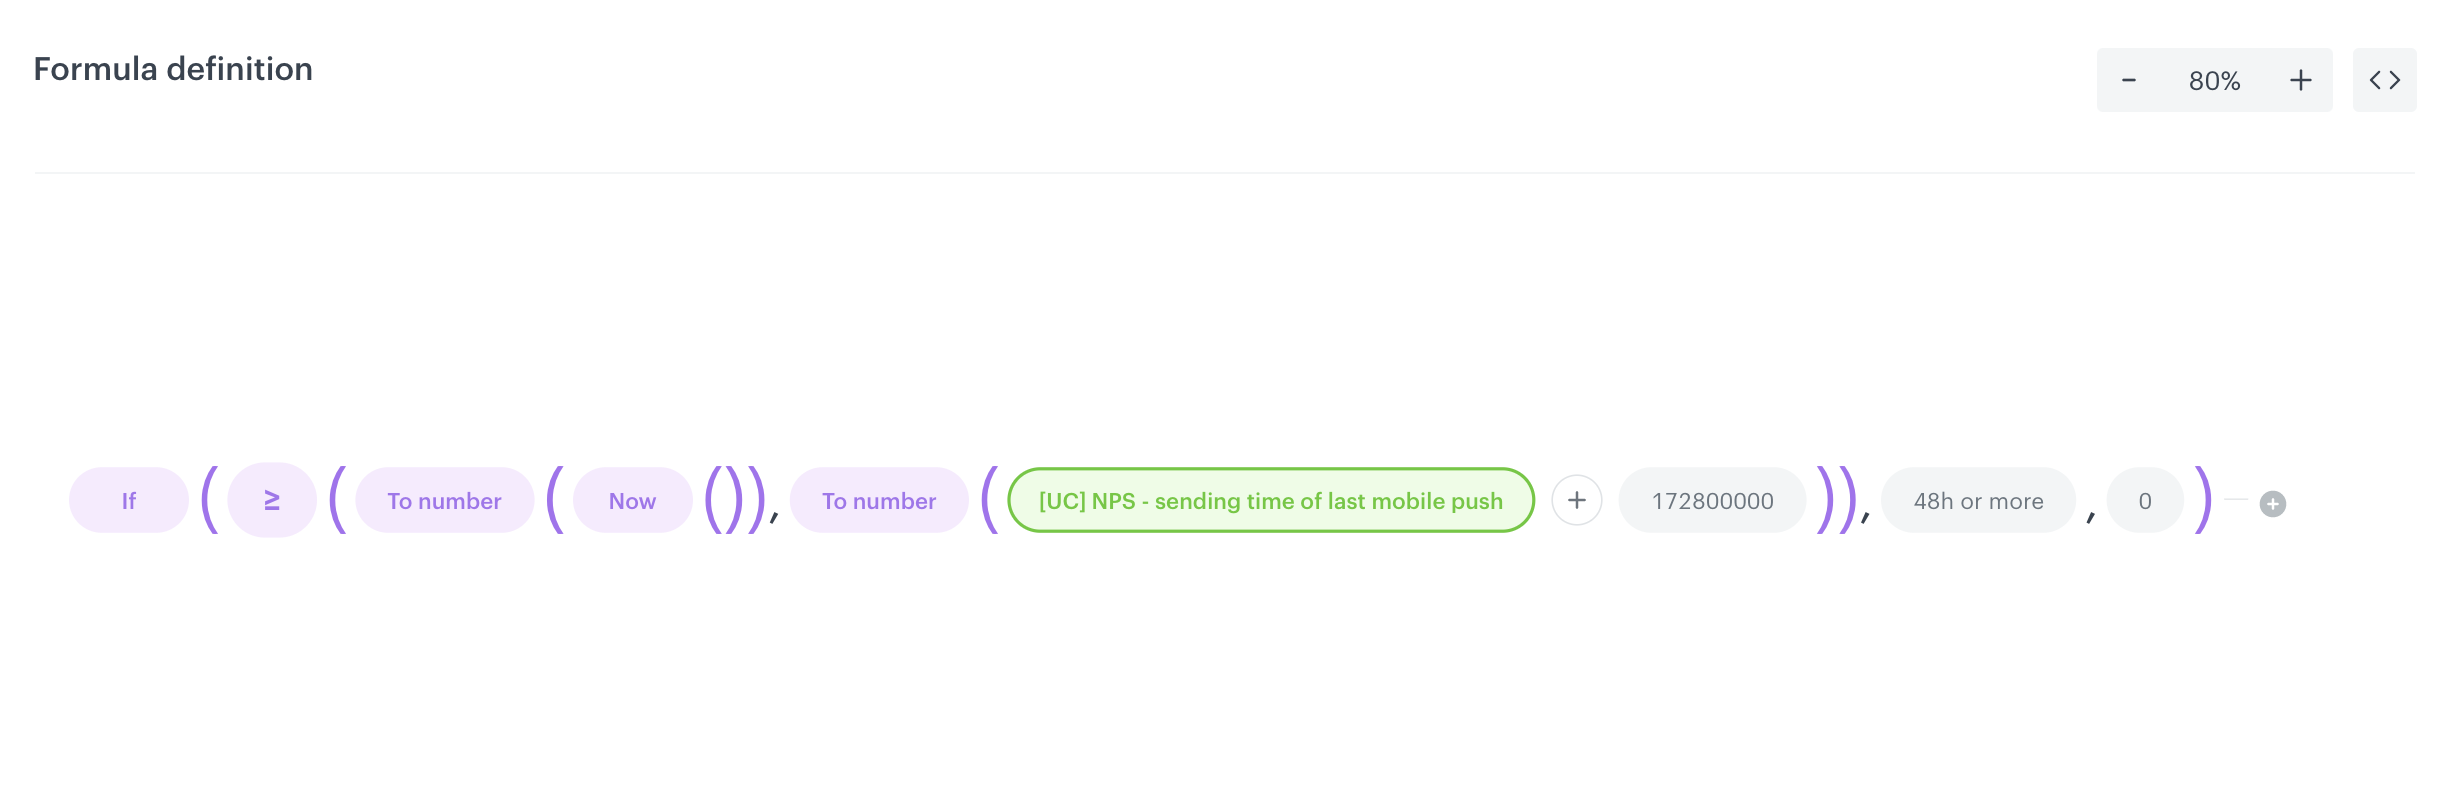
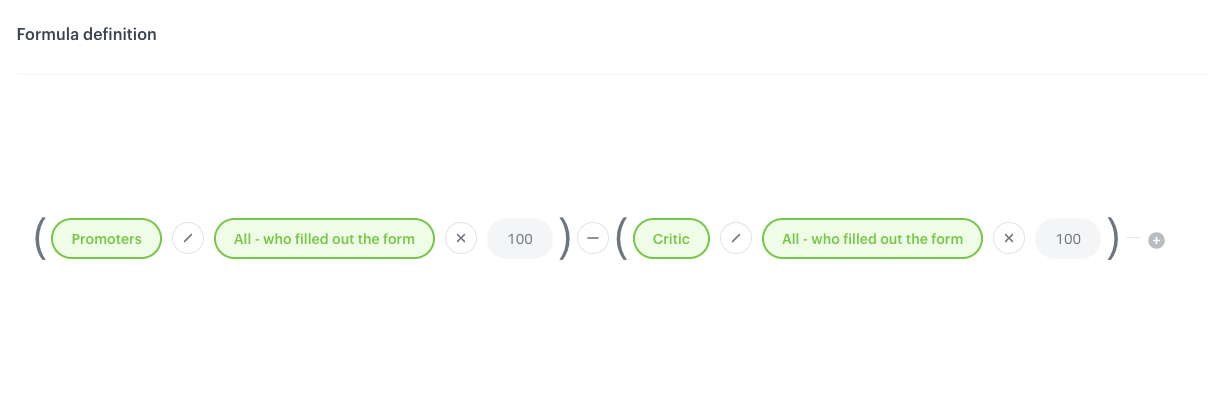
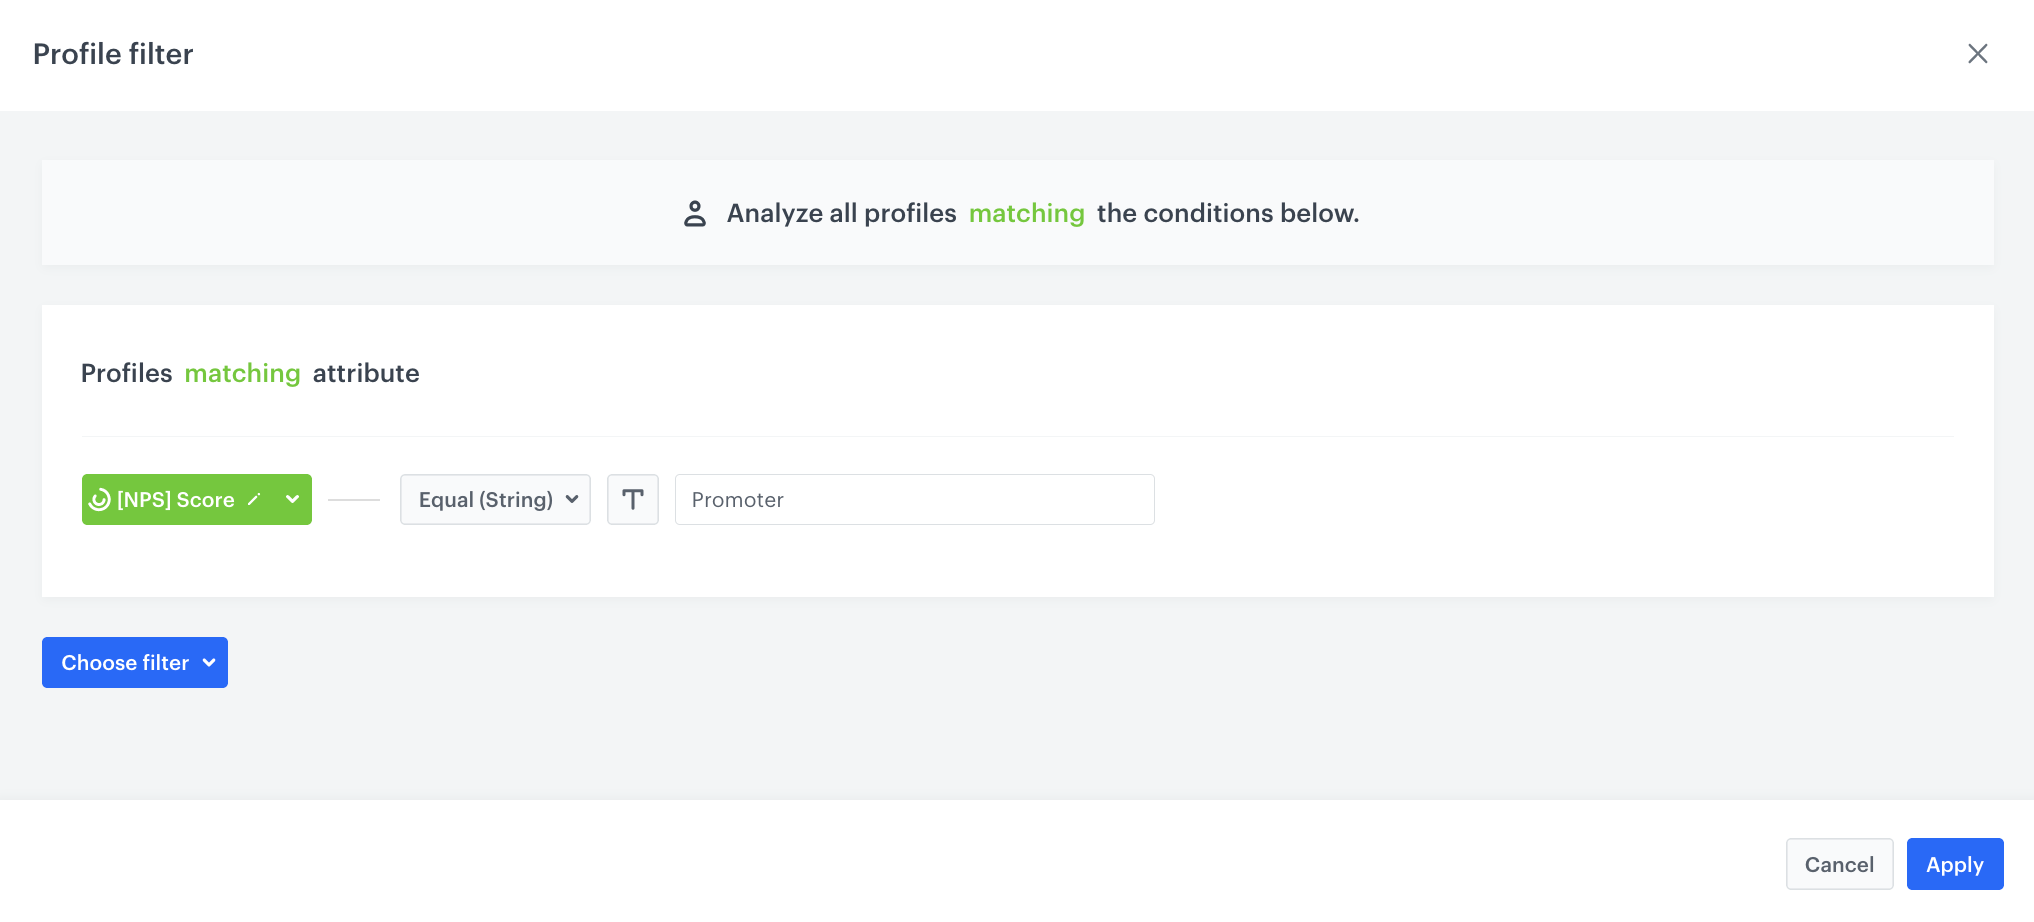
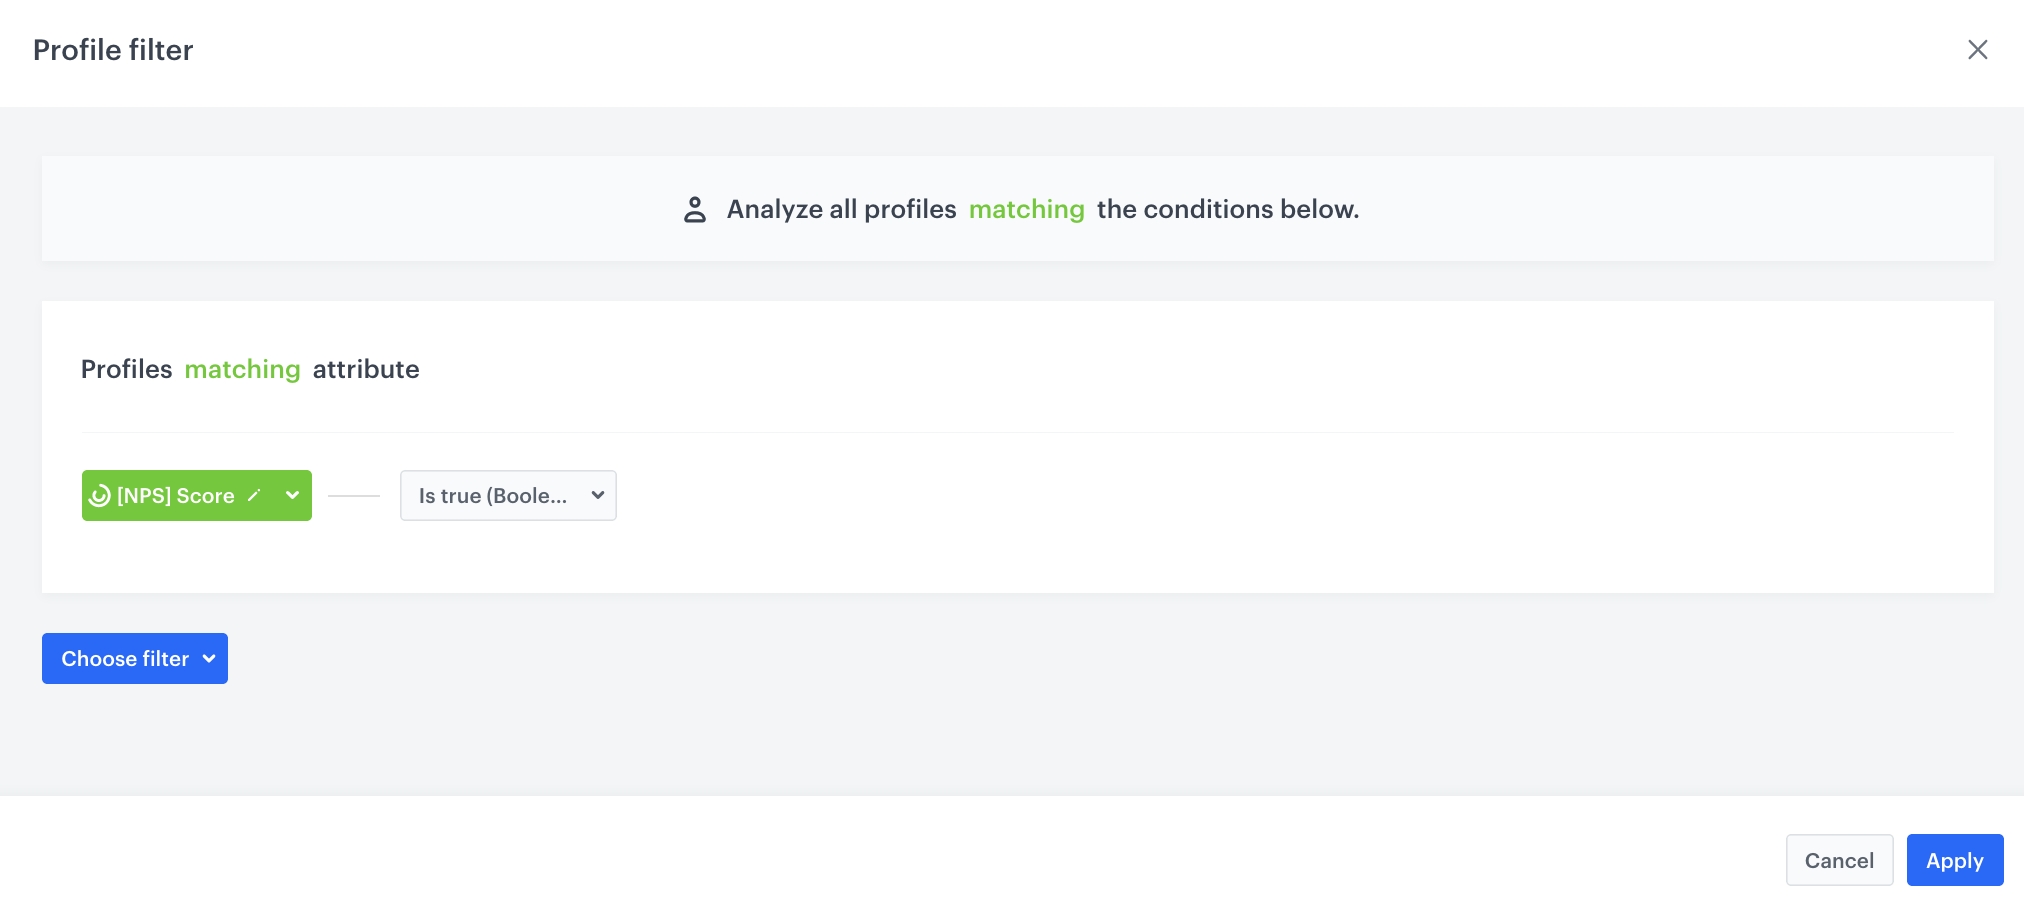
The expression formula contains the following logic:</p> <ul> <li>The expression checks if the current date is &quot;higher&quot; than the date of submitting the form (48 hours is added to the date of submission).</li> <li>If more than 48 hours have passed, returns <code>48h or more</code>.</li> <li>If less, returns <code>0</code>.</li> </ul></div></details>

5. Save the expression.

## Create a dynamic content campaign
---
In this part of the process, you will create the dynamic content campaign which will display the layout of campaign in accordance with the conditions met by the customer.

### Create a dynamic content message
---
1. Go to <img src="/api/docs/image/54176ad07f146575310749eba44b7c2f42c1b327/icons/experience-hub-icon.svg" alt="Image presents the Experience Hub icon" class="icon"> **Experience Hub > Dynamic Content > Create new**.
2. Enter the name of the campaign.
3. Choose the **Insert Object** type.
4. In the **Audience** section, select the **Everyone** tab.
4. In the **Content** section, select **Simple message**, and in the CSS selector field, enter where you want to insert the content - in this case, select **After (in div)**, and enter `.main`.
5. Click **Create message** and choose **Code editor**.
6. In the JS section add the following code, which will display the campaign layout based on conditions met by the customer.

    
   <pre><code class="language-jinja">{% expressionvar 90703adb-b985-4a67-abdf-337bd858c4f1 %}
       {% set showAfterDays = expression_result %}
       {% aggregate 492ba339-09b6-37bd-b368-7120275e54dc %} 
       {% if aggregate_result[0] is truthy %}
           {% set isReviewCompleted = true %}
       {% else %}
           {% set isReviewCompleted = false %}
           {% if isReviewCompleted != false %}
           {showImage('#COMPLETED')}
           {% else if showAfterDays == '48h or more'%}
           {showImage('#EXPIRED')}
           {% else %}
           {showImage('#NPS')}
           {% endif %}
       {% endif %}
       {% endaggregate %}
       {% endexpressionvar %}</code></pre>


<div class="admonition admonition-note"><div class="admonition-icon"><svg xmlns="http://www.w3.org/2000/svg" fill="none" viewBox="0 0 24 24" stroke="currentColor" stroke-width="2.5"><path stroke-linecap="round" stroke-linejoin="round" d="M13 16h-1v-4h-1m1-4h.01M21 12a9 9 0 11-18 0 9 9 0 0118 0z" /></svg></div><div class="admonition-body"><div class="admonition-content">

"{showImage('#COMPLETED')}" is just an example of how a reference to a specific view on your landing page may look like, it can be coded in a different way, it is important to remember, that in this place must contain the reference to a specific view from landing page.
<br>
What is more, remember to change the ID of the aggregate and expression in the code to IDs of your own analyses built in your workspace.

</div></div></div>


### Set up the schedule and display settings 
---
6. In the **Schedule** section, set the display time to **Display immediately** and save your changes.
7. In the **Display settings** section, choose **On landing**. 
8. Click **Advanced settings**.
9. In the **Page targeting** section, choose **Others**, and in the **Display on pages** section, click **Add rule**.
10. Select **Page URL containing** and enter the name of your landing page created in the [previous step](/use-cases/dynamic-nps#create-a-landing-page).
8. In the **UTM & URL parameters** section, click **Skip step**.
9. Click **Activate** and start your dynamic content campaign.

## Create a mobile push template
---
In this part of the process, you will create a mobile push template with the link to the landing page with the NPS survey.

1. Go to **Experience Hub > Mobile > Templates**.
2. Create your mobile push in the code editor. In the content of the push notification:  
   - Add a message
   - Add the link to landing page where you have display NPS survey

For more information on creating a simple mobile push, visit our [User Guide](/docs/campaign/Mobile/simple_push).

## Create a workflow
---
In this part of the process, prepare a workflow that sends the push message with the link to the survey to customers who made a transaction in the mobile application. The workflow excludes customers who have already received the link to this survey during last 30 days.

1. Go to <img src="/api/docs/image/54176ad07f146575310749eba44b7c2f42c1b327/icons/automation-hub-icon.svg" alt="Automation Hub icon" class="icon" > **Automation Hub > Workflows > New workflow**.  
2. Enter the name of the workflow.

### Define the Profile Event trigger node
---
At this stage, we will configure conditions that launch the workflow. As a trigger, we will use the `transaction.charge` event in the mobile application.

1. As the first node of the workflow, add **Profile Event**. In the configuration of the node: 
    1. From the **Choose event** dropdown menu, choose the `transaction.charge` event.
    2. Click the **+ where** button, from the **Choose parameter** dropdown menu, choose **source**.
    3. From the **Choose operator** dropdown, choose **String**, and then select **Contain (String)**.
    4. In the next field, type the `mobile` to analyze only transaction made in the mobile application.
2. Confirm by clicking **Apply**.

<figure>
<img src="/api/docs/image/54176ad07f146575310749eba44b7c2f42c1b327/use-cases/all-cases/_gfx/npsautomation.png" alt="NPS automation"  class="WYBIERZ ROZMIAR:full">
<figcaption>Profile Event node configuration</figcaption>
</figure> 

### Define the Profile Filter node
---
As the next step, add a Profile Filter node that checks whether the customer has previously received the NPS survey. In this case, we verify it by using the `push.send` event with a link to the NPS survey. This way, the customer who has already received a survey in the last 30 days will not receive another one.

1. Add the **Profile Filter** node. 
2. To configure the node settings, click the node.
3. Click the **Choose filter** button and choose the `push.send` event. 
4. Click the **+ where** button and from the **Choose parameter** drop-down menu, choose **campaignName**.
5. From the **Choose operator** drop-down, choose **Equal(String)**.
6. Enter the name of the mobile push campaign created in the [previous step](/use-cases/dynamic-nps#create-a-mobile-push-template).
8. Set the time range to **Last 30 days**.
13. Change the **Profiles matching funnel** option to **Profiles not matching funnel** by clicking the **matching** word.
12. Confirm by clicking **Apply**.
13. For the **Not matched** path, add the **End** node.

<figure>
<img src="/api/docs/image/54176ad07f146575310749eba44b7c2f42c1b327/use-cases/all-cases/_gfx/npsautomation2.png" alt="NPS automation"  class="full">
<figcaption>Profile Filter node configuration</figcaption>
</figure> 

### Configure the Send Mobile Push node
---

1. To the **Matched** path, add a **Send Mobile Push** node. 
2. In the settings of the node, from the **Template type** dropdown list, select the template you have prepared in the [previous step](/use-cases/dynamic-nps#create-a-mobile-push-template).
2. Click **Apply**.

### Prepare the final settings 
---

1. To the **Not matched** path and after **Send Mobile Push**, add **End** nodes.
3. Optionally, add titles to each node so the workflow will be more understandable to your colleagues.
4. Activate the workflow by clicking **Save & Run**.

<figure><img src="/api/docs/image/54176ad07f146575310749eba44b7c2f42c1b327/use-cases/all-cases/_gfx/npsautomation3.png" class="full" alt="The workflow configuration"><figcaption>The workflow configuration</figcaption></figure>

## Create a basic segmentation with NPS score
---
In this step, create a basic segmentation which divides your customers into 3 groups based on results from your NPS survey and the event `nps.send` and its parameter `score`. In this case, we have three exemplary groups:
- Promoters: 9-10 points
- Indifferent: 7-8 points
- Critics: 1-6 points

Create a segmentation that includes all three groups.

### Create the Promoters segment
---
Create a segment that includes only customers who assessed the purchase/shopping experience at 9 or 10 points.

1. Go to <img src="/api/docs/image/54176ad07f146575310749eba44b7c2f42c1b327/icons/decision-hub-icon.svg" alt="Decision Hub icon" class="icon" > **Decision Hub > Segmentations > New segmentation**.  
2. Enter the name of the segmentation.
3. Optionally, switch the **Show in profile card** toggle on.
3. Enter the name of the segment. 
3. From the **Add condition** dropdown list, select the `nps.send` event.
4. Click **+ where** button and select the **score** parameter.
4. As the logical operator, select **Less or equal**.  
5. Next to the logical operator, in the text field, enter `10`. 
4. Click the **and where** button and select the **score** parameter.
4. As the logical operator, select **More or equal**.  
5. Next to the logical operator, in the text field, enter `9`. 
    <figure>
    <img src="/api/docs/image/54176ad07f146575310749eba44b7c2f42c1b327/use-cases/all-cases/_gfx/npssegmentation-subsegment1.png" alt="Configuration of the segment" class="full">
    <figcaption> Configuration of the Promoters segment </figcaption>
    </figure>


### Create the Indifferent segment
---
Create a segment that includes only customers who assessed the purchase/shopping experience between 7 and 8 points.

3. Click **Add segment**.
3. Enter the name of the segment. 
3. From the **Add condition** dropdown list, select the `nps.send` event.
4. Click **+ where** button and select the **score** parameter.
4. As the logical operator, select **Less or equal**.  
5. Next to the logical operator, in the text field, enter `8`. 
4. Click the **and where** button and select the **score** parameter.
4. As the logical operator, select **More or equal**.  
5. 5. Next to the logical operator, in the text field, enter `7`. 
    <figure>
    <img src="/api/docs/image/54176ad07f146575310749eba44b7c2f42c1b327/use-cases/all-cases/_gfx/npssegmentation-subsegment2.png" alt="Configuration of the segment" class="full">
    <figcaption> Configuration of the Indifferent segment </figcaption>
    </figure>


### Create the Critics segment
---
Create a segment that includes only customers who assessed the purchase/shopping experience between 1 and 6 points.

3. Click **Add segment**
3. Enter the name of the subsegmentation. 
3. From the **Add condition** dropdown list, select the `nps.send` event.
4. Click **+ where** button and select the **score** parameter.
4. As the logical operator, select **Less or equal**.  
5. Next to the logical operator, in the text field enter `6`.  
    <figure>
    <img src="/api/docs/image/54176ad07f146575310749eba44b7c2f42c1b327/use-cases/all-cases/_gfx/npssegmentation-subsegment3.png" alt="Configuration of the segment" class="full">
    <figcaption> Configuration of the Critics segment </figcaption>
    </figure>

11. Choose a time range as **lifetime**.
12. Save the segmentation. 

**Result:** Now you can compare how many customers were in the specific segment. 

## Create a Net Promoter Score
---
In this step, create a metric which counts the example Net Promotor Score which is simply the percentage of customers who are promoters (those who scored 9 or 10) minus the percentage of customers who are critics (those who scored 1 to 6).

1.  Go to <img src="/api/docs/image/54176ad07f146575310749eba44b7c2f42c1b327/icons/decision-hub-icon.svg" alt="Decision Hub icon" class="icon"> **Decision Hub > Metrics > New metric**.
2. Enter the name of the metric.
3. As a metric kind, select **Formula metric**.
4. Build the formula of the metric as presented on the screen:
<figure>
<img src="/api/docs/image/54176ad07f146575310749eba44b7c2f42c1b327/use-cases/all-cases/_gfx/nps-metric.png" alt="The final form of a metric" class="full">
<figcaption>The final form of a metric </figcaption>
</figure>

In this metric:
- **Promoters** are based on **Profile Filter**. 
1. Click **Choose filter** and select the segment created in the [previous step](/use-cases/dynamic-nps#create-a-basic-segmentation-with-nps-score).
2. Choose operator **Equal**.
3. As the value choose the name of the first subsegment, in our case Promoter.
4. Click **Apply**.

    <figure>
    <img src="/api/docs/image/54176ad07f146575310749eba44b7c2f42c1b327/use-cases/all-cases/_gfx/nps-metric1.png" alt="The final form of a metric" class="full">
    <figcaption>Metric settings </figcaption>
    </figure>

- **All - who filled out the form** are based on **Profile Filter**. 
1. Click **Choose filter**, and select the segment created in the [previous step](/use-cases/dynamic-nps#create-a-basic-segmentation-with-nps-score).
2. Choose operator **is true**. In this way you will analyze the whole group of users from every subsegment.
4. Click **Apply**.

   <figure>
    <img src="/api/docs/image/54176ad07f146575310749eba44b7c2f42c1b327/use-cases/all-cases/_gfx/nps-metric2.png" alt="The final form of a metric" class="full">
    <figcaption>Metric settings </figcaption>
    </figure> 

- **Critics** are based on **Profile Filter**. 
7. Click **Choose filter**, and select the segment created in the [previous step](/use-cases/dynamic-nps#create-a-basic-segmentation-with-nps-score).
8. Choose operator **Equal**.
9. As the value choose the name of the last subsegment, in our case Critic.
10. Click **Apply**.

    <figure>
    <img src="/api/docs/image/54176ad07f146575310749eba44b7c2f42c1b327/use-cases/all-cases/_gfx/nps-metric3.png" alt="The final form of a metric" class="full">
    <figcaption>Metric settings </figcaption>
    </figure>


   <div class="admonition admonition-note"><div class="admonition-icon"><svg xmlns="http://www.w3.org/2000/svg" fill="none" viewBox="0 0 24 24" stroke="currentColor" stroke-width="2.5"><path stroke-linecap="round" stroke-linejoin="round" d="M13 16h-1v-4h-1m1-4h.01M21 12a9 9 0 11-18 0 9 9 0 0118 0z" /></svg></div><div class="admonition-body"><div class="admonition-content">

   You can also enrich your analysis measuring: 
   - the average result from the NPS,
   - the number of submitted forms with NPS,
   - report with most often chosen notes in order,
   <br>
   and more analyses, which you can show on the dedicated dashboard.

   </div></div></div>


## What's next
---
In case you need, you can prepare an export of your NPS results to external systems, for example [to Google Sheets](/use-cases/google-spreadsheet-integration).

## Check the use case set up on the Synerise Demo workspace
---
You can check the configuration of every element of this process directly in Synerise Demo workspace:
- [Configurartion of the aggregate](https://app.synerise.com/analytics/aggregates/492ba339-09b6-37bd-b368-7120275e54dc), which measure the date of filling out the survey
- [Configurartion of the aggregate](https://app.synerise.com/analytics/aggregates/fe2acb42-1a38-3fc2-9c00-5ab363dce20c), which checks sending time of last mobile push
- [Configurartion of the expression](https://app.synerise.com/analytics/expressions/90703adb-b985-4a67-abdf-337bd858c4f1)
- [Dynamic content campaign](https://app.synerise.com/campaigns/create/20b6430d-0b2b-4de7-96bd-5fc55dfcc0b3)
- [Automation configuration](https://app.synerise.com/automations/automation-diagram/4cbb9e50-65b0-4a96-8c88-d0ecf3d7c577)
- [Segmentation](https://app.synerise.com/analytics-v2/segmentations/64546b35-40b1-4afa-b406-43102c2c57e7)
- [Metric with NPS score](https://app.synerise.com/analytics/metrics/c38e6fd4-fda8-43c3-9f29-865893533d47)

If you’re our partner or client, you already have automatic access to the **Synerise Demo workspace (1590)**, where you can explore all the configured elements of this use case and copy them to your workspace.  

If you’re not a partner or client yet, we encourage you to fill out the contact [form](https://demo.synerise.com/request) to schedule a meeting with our representatives. They’ll be happy to show you how our demo works and discuss how you can apply this use case in your business. 

## Read more
---
- [Aggregates](/docs/analytics/aggregates)
- [Automation Hub](/docs/automation)
- [Dynamic content](/docs/campaign/dynamiccontent)
- [Expressions](/docs/analytics/expressions)
- [Landing page](/docs/campaign/landing-page)
- [Mobile campaigns](/docs/campaign/Mobile)

