
You can use SMS channel to effectively inform your customers about upcoming or ongoing promotions both in online or brick-and-mortar stores. The key to the success of these campaigns is personalization.

Imagine you have a large customer base and you want to notify them about an exciting promotion in specific stores. Instead of creating multiple campaigns for each store, you can achieve this with just one campaign using Synerise. With Jinjava, you can effortlessly customize your message content. You can dynamically change store names, locations, and other crucial details with a simple Jinjava code. This means less work for you and more personalized experience for your customers.

<figure>
<img src="/api/docs/image/54176ad07f146575310749eba44b7c2f42c1b327/use-cases/all-cases/_gfx/dynamic-sms-campaign.png" alt="Dynamic SMS campaign"  class="full no-frame">
</figure>

This use case describes a scenario that begins by explaining how to assign IDS of customers' top-choice stores as attributes to their profiles. The further part of the process outlines how to create a dynamic SMS campaign targeting customers from the selected stores.

Additional assumptions used in this use case:
- The promotion is created on the client side,
- The created catalog contains only those stores where the promotion is implemented,
- Information about the current promotion is sent to users who have assigned a store ID to their profile.

## Prerequisites 
---
- Permissions that allow access to Catalogs section and adding new catalogs.
- Prepare a CSV file with the stores where the promotion you are creating a campaign for will be available.
  The file used in this use case contains the following columns: `StoreId`, `StoreName`, `Street`, `City`.

  <details class="accordion"><summary>Example file</summary><div class="accordion-content"><figure> <img src="/api/docs/image/54176ad07f146575310749eba44b7c2f42c1b327/use-cases/all-cases/_gfx/shop-info.png" class="medium" alt="Sample file"> <figcaption>Sample file</figcaption> </figure></div></details>


- Implement the [transaction events](/developers/web/transactions-sdk) using [SDK](/developers/web/transactions-sdk) or [API](https://developers.synerise.com/DataManagement/DataManagement.html#operation/CreateATransaction). Implement a custom parameter to the event that refers to the store where the transaction occurred. In this case, we will use the `StoreId` parameter.
- Meet all requirements listed in the [introduction to SMS](/docs/campaign/SMS/introduction-to-sms#requirements).
- Promotion must be implemented on the client side. 

## Process
---
1. [Create an aggregate](/use-cases/dynamic-sms-campaign#create-an-aggregate) that identifies the top store for customers based on their transactions.
2. [Create a workflow](/use-cases/dynamic-sms-campaign#create-a-workflow-that-assigns-a-store-id-to-customer-profile) that assigns a store ID to customer profile.
3. [Create a catalog](/use-cases/dynamic-sms-campaign#create-a-catalog) with the store details.
4. [Prepare an SMS message template](/use-cases/dynamic-sms-campaign#prepare-an-sms-message-template). 
5. [Create a workflow for the SMS campaign](/use-cases/dynamic-sms-campaign#create-a-workflow-for-the-sms-campaign). 

## Create an aggregate
---
Create an aggregate to find the top store for customer based on transaction history. 

1. Go to <img src="/api/docs/image/54176ad07f146575310749eba44b7c2f42c1b327/icons/behavioral-data-hub-icon.svg" alt="Behavioral Data Hub icon" class="icon"> **Behavioral Data Hub > Live Aggregates > Create aggregate**.
2. As the aggregate type, select **Profile**.  
2. Enter the name of the aggregate.
3. Click **Analyze profiles by** and select **Top**.
4. From the **Choose event** dropdown list, select the **transaction.charge** event.
5. As the event parameter, select **StoreId**.
6. Using the date picker in the lower-right corner, set the time range to **Lifetime**. Confirm your choice with the **Apply** button.
7. Click **Save**. 
<figure>
    <img src="/api/docs/image/54176ad07f146575310749eba44b7c2f42c1b327/use-cases/all-cases/_gfx/top-store-aggregate.png" alt="Final configuration of the aggregate" class="full">
    <figcaption> Final configuration of the aggregate </figcaption>
</figure>

## Create a workflow that assigns a store ID to customer profile
---
Create a workflow that assigns a **StoreId** attribute to customers who do not have this attribute yet and update it for the customers who have switched to another store over time. 

1. Go to <img src="/api/docs/image/54176ad07f146575310749eba44b7c2f42c1b327/icons/automation-hub-icon.svg" alt="Automation Hub icon" class="icon" > **Automation Hub > Workflows > New workflow**.  
2. Enter the name of the workflow.

### Define the trigger node
---
1. Add the **Profile Event** node. 
2. From the **Choose event** dropdown list, select the **transaction.charge** event.
3. Click **Apply**.

### Define the Update Profile node
---
In this part of the process, you will add an attribute **StoreId** to the customers who do not have this attribute yet and update it for the customers who have switched to another store over time. 

1. Add the **Update Profile** node.
2. From the left dropdown list, select **Attributes > StoreId**.
3. From the right dropdown list, select **Change**.
4. In the text field, add a Jinjava with the ID of the aggregate [created earlier](/use-cases/dynamic-sms-campaign#create-an-aggregate). This Jinjava will return the top StoreId for the individual customer.  
   Jinjava used in the use case:

   <pre><code class="language-jinja">{% aggregate 6b686d01-758f-328a-859b-91e3542c5bbe %} {{ aggregate_result[0] }} {% endaggregate %}</code></pre>


   <div class="admonition admonition-note"><div class="admonition-icon"><svg xmlns="http://www.w3.org/2000/svg" fill="none" viewBox="0 0 24 24" stroke="currentColor" stroke-width="2.5"><path stroke-linecap="round" stroke-linejoin="round" d="M13 16h-1v-4h-1m1-4h.01M21 12a9 9 0 11-18 0 9 9 0 0118 0z" /></svg></div><div class="admonition-body"><div class="admonition-content">

   The above Jinjava contains the ID of the aggregate created in this use case. Make sure to replace this ID with the ID of your aggregate.

   </div></div></div>

5. Click **Apply**.

### Add the final node
---
1. Add the **End** node. 
3. Save and activate the automation by clicking **Save&Run**.

<figure>
    <img src="/api/docs/image/54176ad07f146575310749eba44b7c2f42c1b327/use-cases/all-cases/_gfx/StoreId-attribute-update-new.png" alt="Final configuration of the workflow" class="full">
    <figcaption> Final configuration of the workflow </figcaption>
</figure>

## Create a catalog
---
In this part of the process, create a catalog and import there your CSV file you prepared as a part of prerequisites.

1. Go to **Data Modeling Hub > Catalogs > New Catalog**.
2. Enter the name of the catalog and confirm it by clicking **Apply**. 
    
   <div class="admonition admonition-important"><div class="admonition-icon"><svg xmlns="http://www.w3.org/2000/svg" fill="none" viewBox="0 0 24 24" stroke="currentColor" stroke-width="2.5"><path stroke-linecap="round" stroke-linejoin="round" d="M12 8v4m0 4h.01M21 12a9 9 0 11-18 0 9 9 0 0118 0z" /></svg></div><div class="admonition-body"><div class="admonition-content">

   Don't use diacritical letters and spaces.

   </div></div></div>

3. Click the catalog on the list and click **Import Local File**.
    
If you prepared a CSV file in Excel, open it in a text editor to check whether commas are used as separators. If not, replace them with commas.
    
4. Click the **Upload a new file** button and select the file to be uploaded, then click the **Next** button.
5. You will see the information that your file has been successfully uploaded. To continue the import process, click the **Next** button.
6. In the **Primary key** field, type the name of the column whose values are treated as the key. In this case, it will be `StoreId`. To continue the process, click the **Next** button .
    <figure>
    <img src="/api/docs/image/54176ad07f146575310749eba44b7c2f42c1b327/use-cases/all-cases/_gfx/catalog-Primary-key-StoreId.png" class="large" alt="Catalog primary key configuration">
    <figcaption>Catalog primary key configuration</figcaption>
    </figure>
7. In the next screen you will find the summary of your import. If no changes are needed, click **Run import** button. 
    <figure>
    <img src="/api/docs/image/54176ad07f146575310749eba44b7c2f42c1b327/use-cases/all-cases/_gfx/import-success-store-info.png" class="large" alt="Import success">
    <figcaption>Import success</figcaption>
    </figure>

## Prepare an SMS message template
---
Create a dynamic SMS template using Jinjava that customizes the store details for each customer.

1. Go to **Experience Hub > SMS**.
2. In the menu on the left, click **Templates**.
3. Click **Create new**.
4. Click **Text editor**.
    The text editor and SMS preview open.
5. In the text box on the right, enter the contents of your message.  
    This use case uses the following content:
    
   <pre><code class="language-jinja">
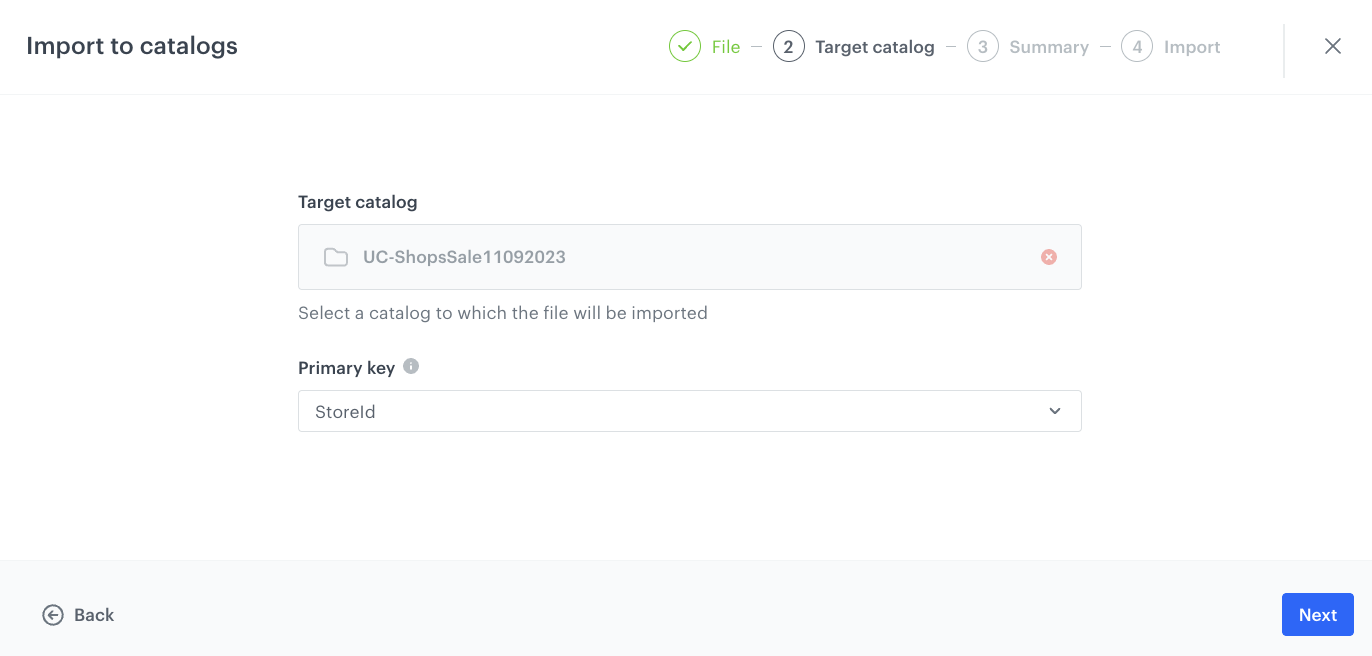
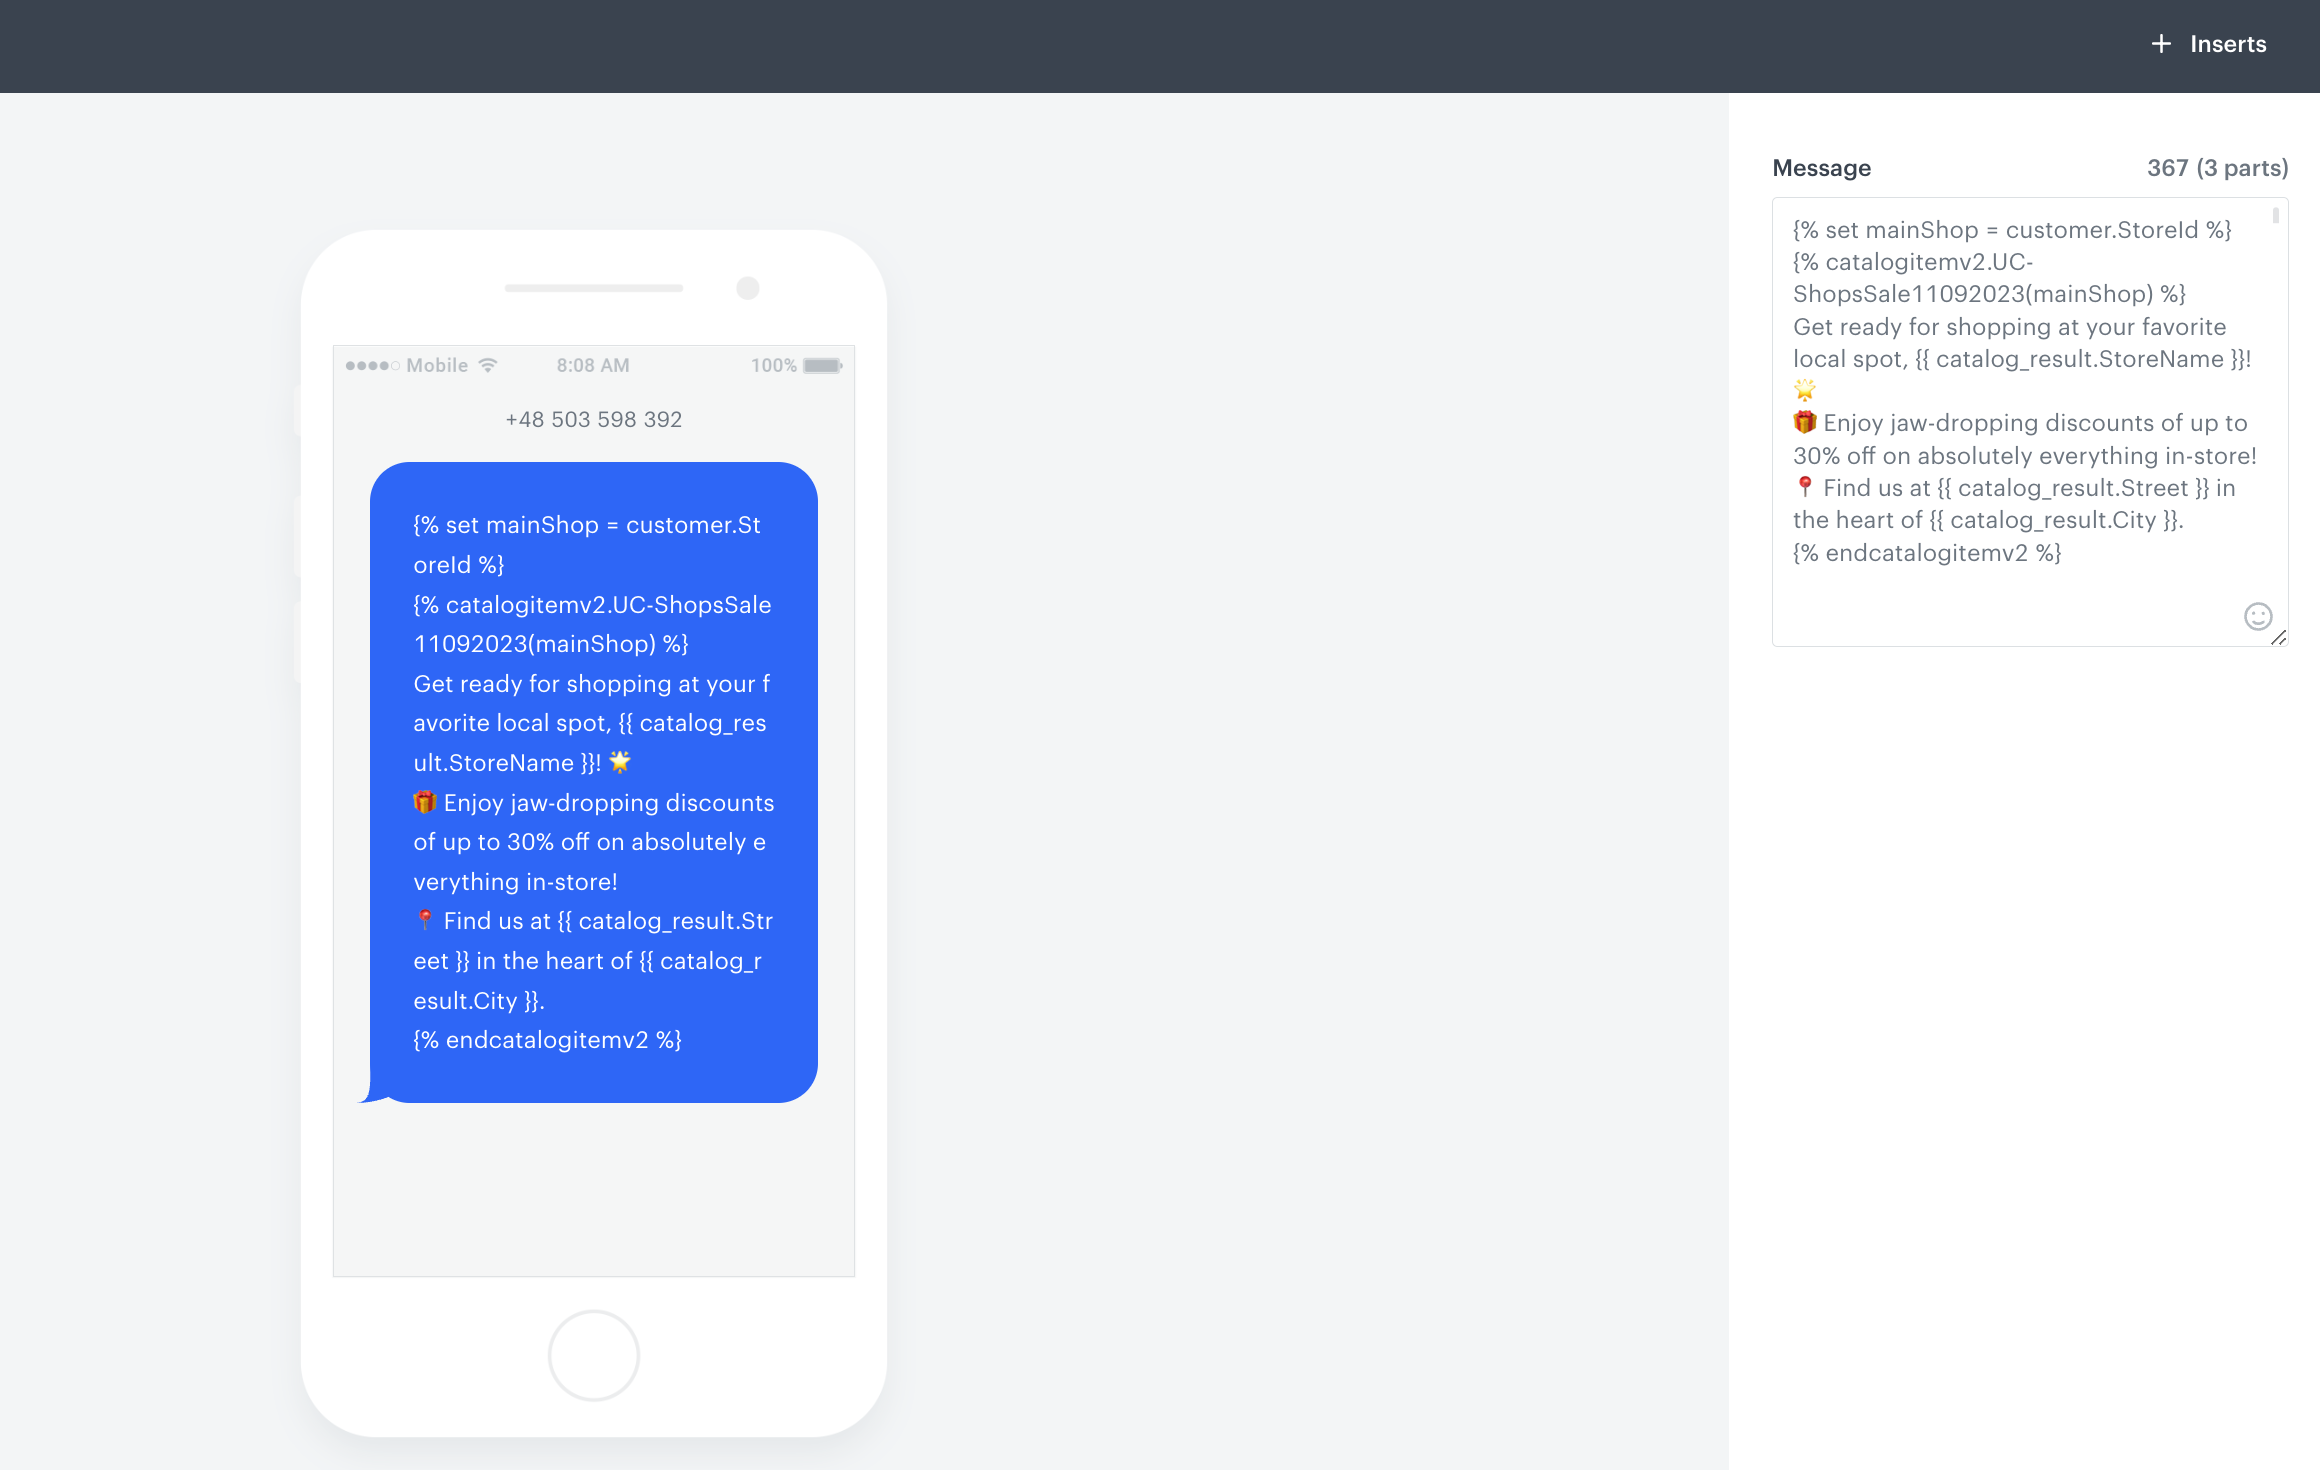
{% set mainShop = customer.StoreId %}
   {% catalogitemv2.UC-ShopsSale11092023(mainShop) %}
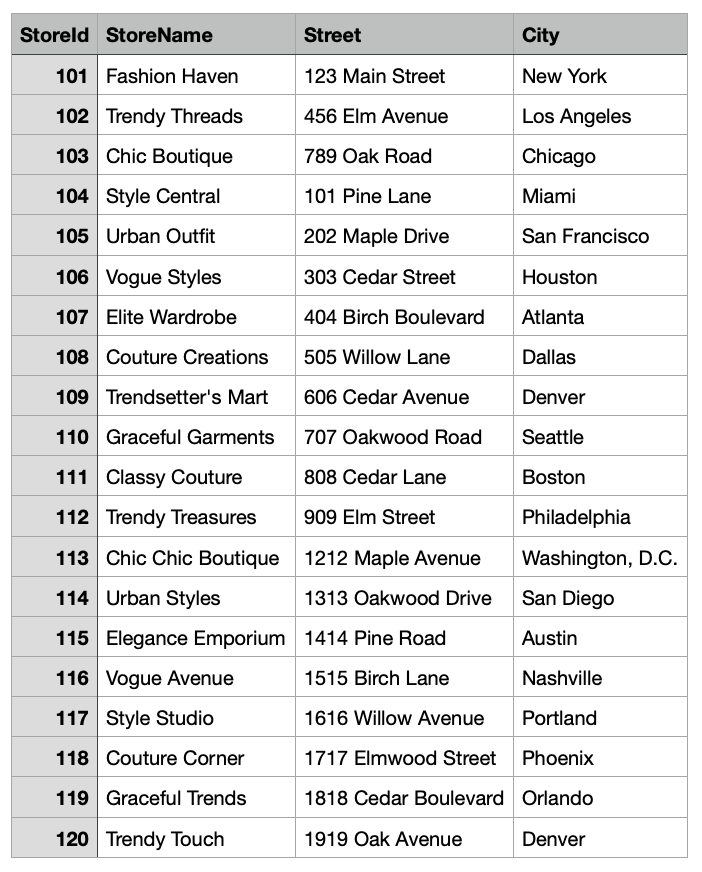
   Get ready for shopping at your favorite local spot, {{ catalog_result.StoreName }}! 🌟
   🎁 Enjoy jaw-dropping discounts of up to 30% off on absolutely everything in-store!
   📍 Find us at {{ catalog_result.Street }} in the heart of {{ catalog_result.City }}.
   {% endcatalogitemv2 %}</code></pre>

    Where:
    - `StoreId` - the name of the attribute assigned to the user profile reflecting the store ID,
    - `UC-ShopsSale11092023` - is the name of the created catalog,
    - `StoreName`, `Street`, `City` - are the names of the columns defined in the catalog. 
    <figure>
    <img src="/api/docs/image/54176ad07f146575310749eba44b7c2f42c1b327/use-cases/all-cases/_gfx/sms-dynamic-template.png" class="full" alt="SMS template example">
    <figcaption>Example of a SMS template</figcaption>
    </figure> 
6. Save the template.

### Create a workflow for the SMS campaign
---
Create a workflow that sends a personalized SMS message to a selected segment of customers, informing them of a promotion at a store of their choice.

1. Go to <img src="/api/docs/image/54176ad07f146575310749eba44b7c2f42c1b327/icons/automation-hub-icon.svg" alt="Automation Hub icon" class="icon" > **Automation Hub > Workflows > New workflow**.  
2. Enter the name of the workflow.

### Define the Audience node
---
Choose the **Audience** node as the trigger. In this scenario, we are creating a group of customers who have agreed to receive SMS messages and have assigned StoreId attribute to their profile.

<div class="admonition admonition-note"><div class="admonition-icon"><svg xmlns="http://www.w3.org/2000/svg" fill="none" viewBox="0 0 24 24" stroke="currentColor" stroke-width="2.5"><path stroke-linecap="round" stroke-linejoin="round" d="M13 16h-1v-4h-1m1-4h.01M21 12a9 9 0 11-18 0 9 9 0 0118 0z" /></svg></div><div class="admonition-body"><div class="admonition-content">

The audience should consist of users who have an attribute used as the **Primary key** in the catalog, otherwise the message will have an **sms.notSent** event with **Jinava rendering failed** as the parameter.

</div></div></div>


1. Start the workflow with the **Audience** node.
2. In the configuration of the node, leave the **Run trigger** as **one time**.
3. Choose the day and time when the process starts.
4. In **Define audience**, choose **New Audience** and define the conditions according to your needs.   
The following screen shows the audience configuration used in this use case.
    <figure>
    <img src="/api/docs/image/54176ad07f146575310749eba44b7c2f42c1b327/use-cases/all-cases/_gfx/audience-shop-promotion.png" class="large" alt="Audience configuration">
    <figcaption>Audience configuration</figcaption>
    </figure>

### Define the Send SMS node
---
 1. Add the **Send SMS** node. In the node settings:
    1. In the **Content** section, choose the phone number from which the message will be sent.
    2. From the **SMS template** drop-down, select [the template you created earlier in the process](/use-cases/dynamic-sms-campaign#prepare-an-sms-message-template).
2. Click **Apply**.

### Add the finishing node and set capping
---
1. Add the **End** node.
2. In the upper right corner, click **Save & Run**.

<figure>
    <img src="/api/docs/image/54176ad07f146575310749eba44b7c2f42c1b327/use-cases/all-cases/_gfx/sms-campaign-workflow.png" alt="Final configuration of the workflow" class="full">
    <figcaption> Final configuration of the workflow </figcaption>
</figure>


## Check the use case set up on the Synerise Demo workspace
---
You can check the configuration of each step directly in the Synerise Demo workspace:  
- [Aggregate](https://app.synerise.com/analytics/aggregates/6b686d01-758f-328a-859b-91e3542c5bbe)
- [Workflow to assign StoreId to customer profile](https://app.synerise.com/automations/workflows/automation-diagram/73ee4841-ffc1-48b1-a273-3f3e58415aac)
- [Catalog](https://app.synerise.com/assets/catalogs/182901)
- [Workflow for the SMS campaign](https://app.synerise.com/automations/automation-diagram/4c02a16a-4455-4f31-bc50-1b2a2f563281)

If you’re our partner or client, you already have automatic access to the **Synerise Demo workspace (1590)**, where you can explore all the configured elements of this use case and copy them to your workspace.  

If you’re not a partner or client yet, we encourage you to fill out the contact [form](https://demo.synerise.com/request) to schedule a meeting with our representatives. They’ll be happy to show you how our demo works and discuss how you can apply this use case in your business.

## Read more
---
- [Aggregates](/docs/analytics/aggregates)
- [Automation Hub](/docs/automation)
- [Catalogs](/docs/assets/catalogs/introduction-to-catalogs)
- [SMS campaigns](/docs/campaign/SMS)