To implement effective promotional campaigns, it is important to carefully analyze the results of past campaigns, draw conclusions and use this knowledge in the future. This use case describes how to calculate the number of transactions with the use of promotional codes.
## Prerequisites
---
- Implement a [tracking code](/developers/web/installation-and-configuration).
- Implement [transactional events](/developers/web/methods-reference#tracking-transactions).
- Create and activate a [promotion](/docs/ai-hub/promotions).
## Process
---
In this use case, you will go through the following steps:
1. [Prepare a regular expression](/use-cases/event_data_modification#prepare-a-regular-expression).
2. [Create an expression](/use-cases/event_data_modification#create-an-expression).
3. [Create an aggregate](/use-cases/event_data_modification#create-an-aggregate).
4. [Create a metric](/use-cases/event_data_modification/#create-a-metric).
## Prepare a regular expression
---
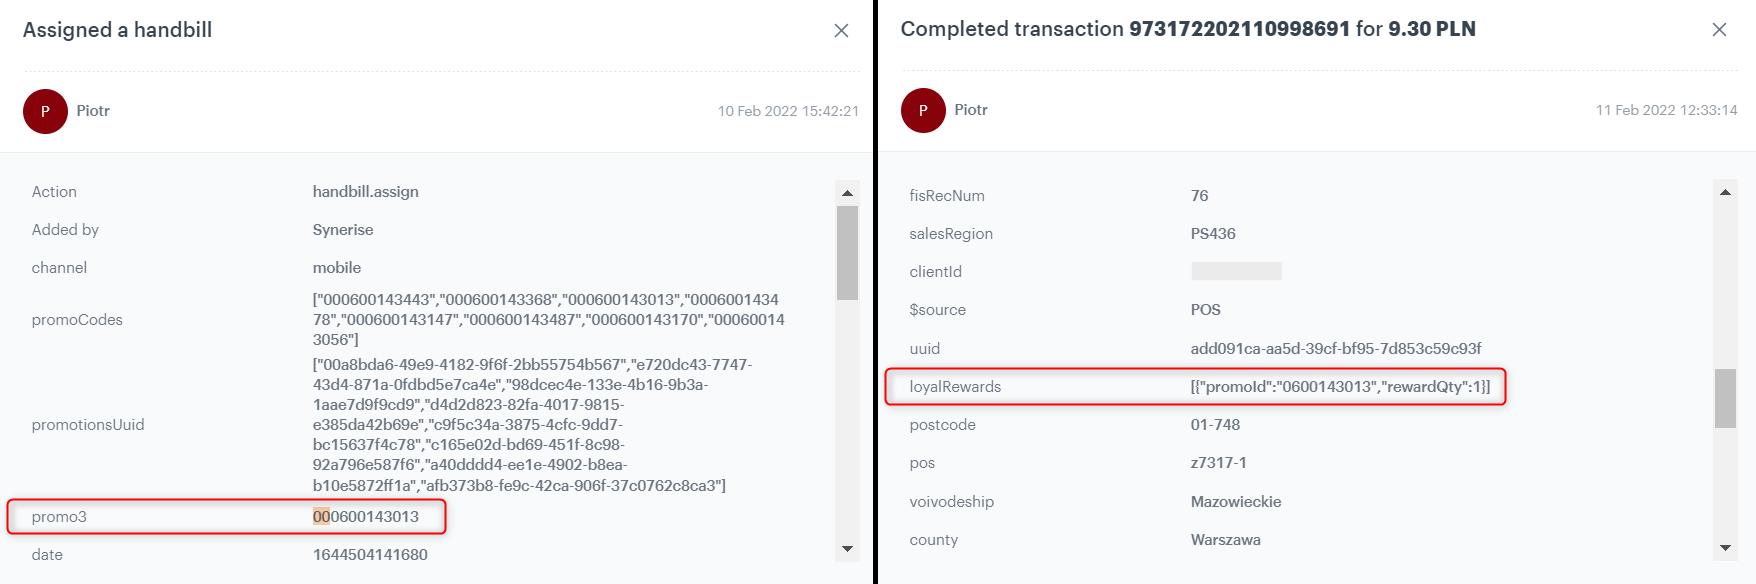
When a promotion is assigned to a customer, the event appears on the customer’s profile (for example, a `handbill.assign` event). This event contains a parameter (in this use case, `promo3`) with the promotion number.
If a customer uses the promotion code during the purchase, a transaction event appears on the customer’s profile with the parameter that contains the promotion number as well. However, the values of these parameters are slightly different for the two events.
In the transaction event, two zeros at the beginning of the promotion number are deducted, so the challenge is to turn these values into an identical format as it is in the **handbill.asign** event.
Comparison of the handbil.assign and transaction event
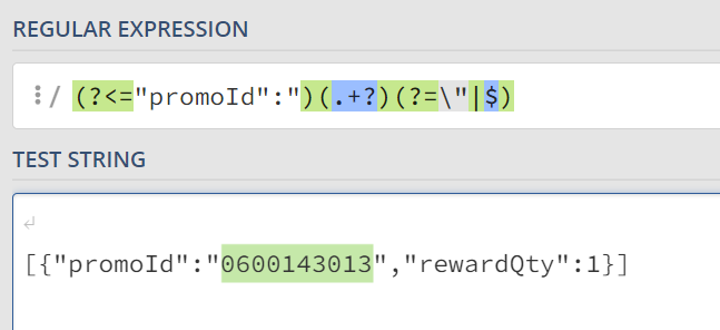
For this purpose, prepare a regular expression that will extract the number of promotion from the parameter of the transaction event. In our use case, the regular expression will take the following form `(?<="promoId":")(.+?)(?=\"|$)`. You will use it in the next part of the procedure.
The regular expression matches a promoID in an example value of the transaction event parameter
## Create an expression
---
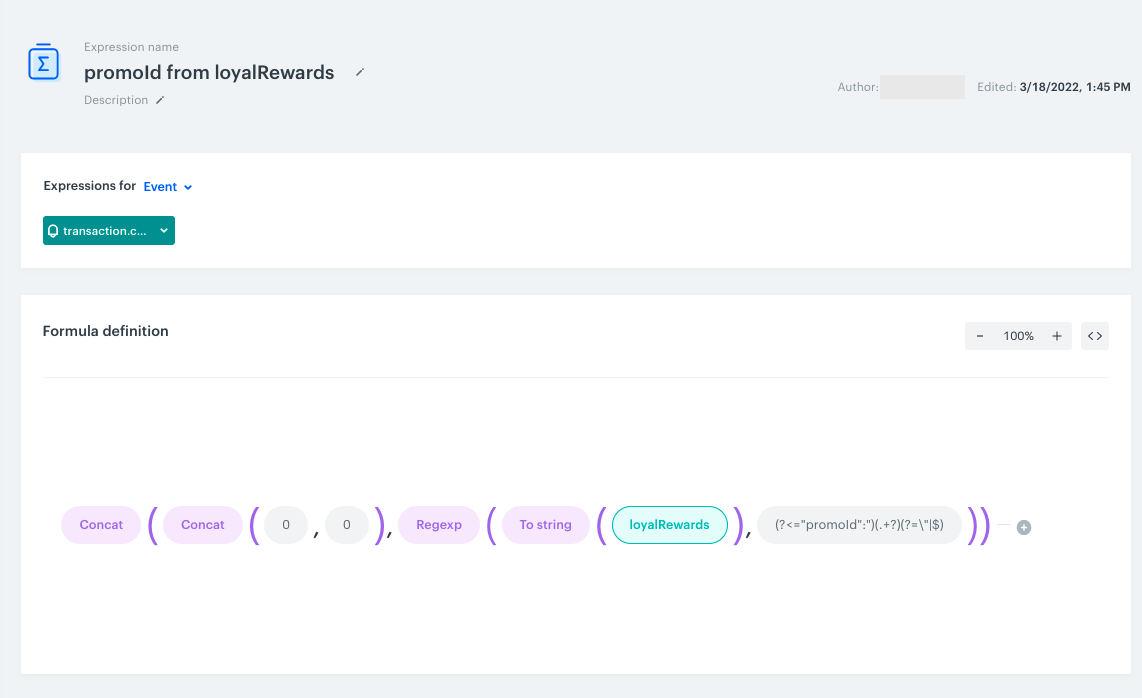
Create an expression for the transaction event. Using the **Concat** function in the expression, add two zeros to the **loyalRewards** parameter (which contains the number of the promotion). As a result, the two zeros are added at the beginning of the promotion number and the expression returns the number of promotion which matches the number of promotion in the **handbill.asign** event.
1. Go to **Behavioral Data Hub > Expression > New expression**.
2. Enter the name of the expression.
3. Set the Expression for option to **Event**.
4. From the dropdown list, select **transaction.charge**.
5. In the Formula definition section of the page, click **Select**.
Result: A dropdown list appears.
6. From the list that opens, select **Function > Concat**.
7. In the brackets, click the left **Select** button and from the list, select again **Function > Concat**.
8. In the brackets, click the left and right Select button from the list and select **Constant** with value `0`.
9. After the brackets click the **Select** button and from the list select **Function > Regexp**.
10. In the brackets, click the left Select button and from the list, select **Event attribute loyalRewards**.
11. Click the right **Select** button and from the list, select **Constant** with value `(?<="promoId":")(.+?)(?=\"|$)`.
12. Save the expression.
Expression adding zeros to the parameter
## Create an aggregate
---
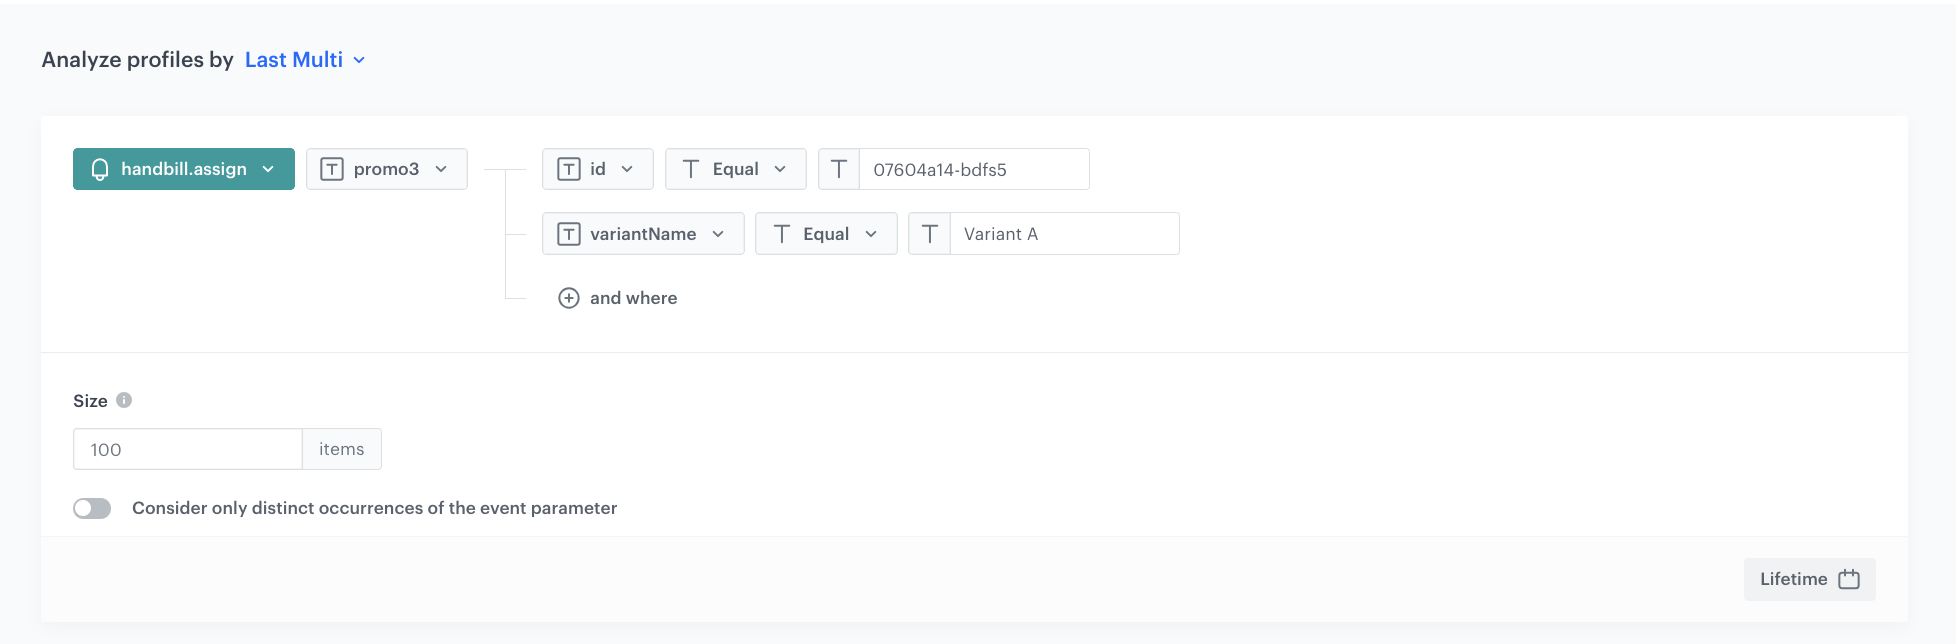
In this part of the process, create an aggregate that returns the id of the assigned promotion from promo3 parameter.
1. Go to **Behavioral Data Hub > Live Aggregates > Create aggregate**.
2. As the aggregate type, select **Profile**.
2. Click **Analyze profiles by** and select **Last Multi**.
3. In the Size field choose how many values you would like to return.
4. Select **Consider only distinct occurrences of the event parameter**.
5. Select the **handbill.assign** event.
6. Select the **promo3** parameter.
7. Select the **id** and **variantName** parameter for which you want to get results.
An aggregate that will return the most recently assigned promotions
## Create a metric
---
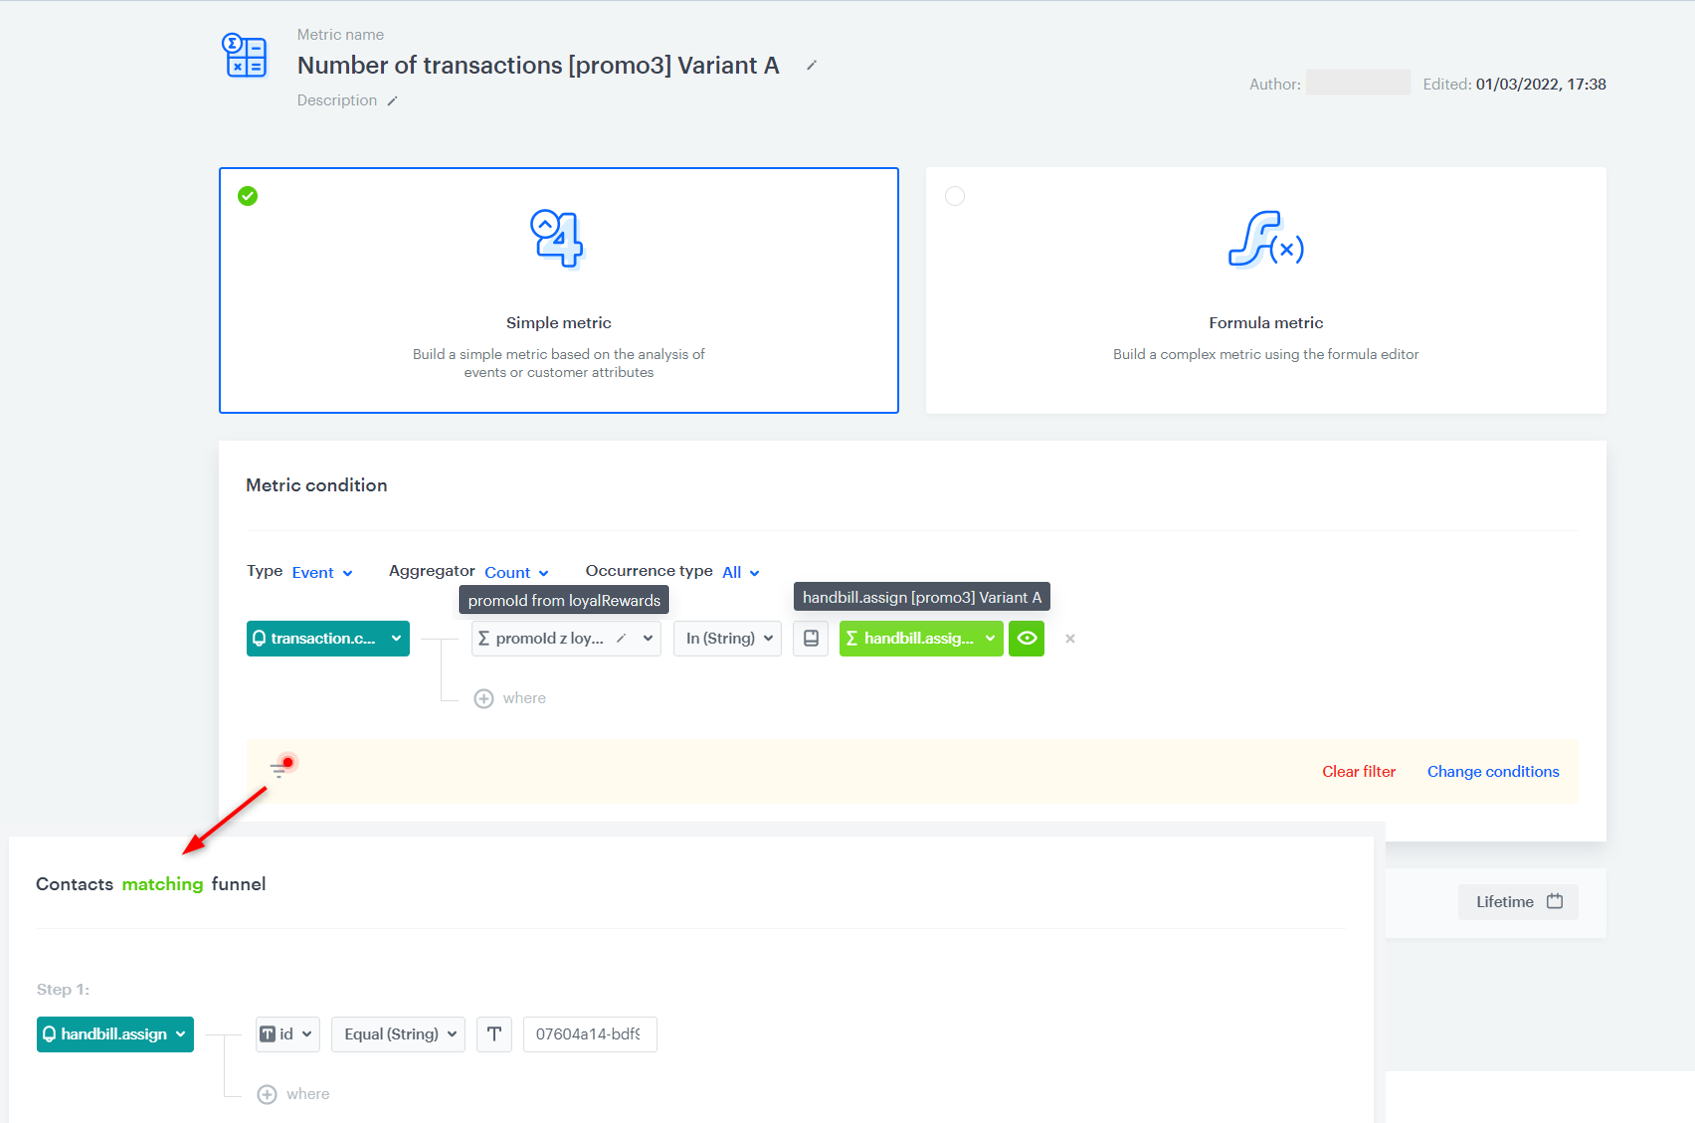
In this step you will create a metric that calculates the number of transactions made by customers who had the promotional code assigned to their profile and used it during the purchase process.
1. Go to **Decision Hub > Metrics > New metric**.
2. Enter the name of the metric.
3. Leave the Aggregator at default **(Count)**.
4. Select the **product.buy event**.
5. Add the ”**promoId z loyalRewards**” parameter - additional parameter created with [expression](/use-cases/event_data_modification#create-an-expression).
6. Select **In** operator.
7. Keep clicking the icon next to the logical operator until you get **Choose value** button.
8. Select the aggregate that returns last multi assigned personalized promotions created in [this step](/use-cases/event_data_modification#create-an-aggregate).
9. Add a filter with people who had a `handbill.assign` event from a specific campaign id.
10. Select the date range of the metric.
11. Save the metric.
Metrics configuration
## Check the use case set up on the Synerise Demo workspace
---
You can check the configuration of every element of this process directly in Synerise Demo workspace:
- [Expression](https://app.synerise.com/analytics/expressions/c0d65888-178e-4c48-84f1-f348b553c486)
- [Aggregate](https://app.synerise.com/analytics/aggregates/f1b6d24c-8541-3f85-b7e5-ec5482d0c3f4)
- [Metric](https://app.synerise.com/analytics/metrics/44da8800-568f-4f1c-9014-0627580225f1)
If you’re our partner or client, you already have automatic access to the **Synerise Demo workspace (1590)**, where you can explore all the configured elements of this use case and copy them to your workspace.
If you’re not a partner or client yet, we encourage you to fill out the contact [form](https://demo.synerise.com/request) to schedule a meeting with our representatives. They’ll be happy to show you how our demo works and discuss how you can apply this use case in your business.
## Read more
---
- [Aggregates](/docs/analytics/aggregates)
- [Expressions](/docs/analytics/expressions)
- [Metrics](/docs/analytics/metrics)