Attribute-based mobile push campaign
You can customize mobile push messages to display appropriate content based on your customer’s attributes. Personalize your outreach by tailoring messages to your audience’s gender preferences and understand and cater to the unique needs and interests of both male and female consumers for more successful marketing and sales strategies.
This use case describes how to create a mobile push notification for customers based on their gender with the use of attribute stored in the customer’s profile.
Prerequisites
- Integrate Synerise mobile SDK in your mobile application.
- Implement mobile pushes in your mobile application: iOS, Android.
- Store gender attribute on customer’s profile
Note:
In our example, a customer can have the attribute
user_gender, which stores one of values:- woman
- man
Create push notification
In this part of the process, you will create a simple mobile push notification that displays content based on the assigned gender attribute value.
- Go to
 Experience Hub > Mobile Push > Create new
 - Enter the name of the push notification (it is only visible on the list of notifications).
- As the mobile notification type, select Simple push.
- Specify Device type according to you business needs:
- Select one of the tabs: All, Android or iOS.
- Click Apply.
- Define your Audience according to you business needs.
Define Content
-
In the Content section, click Define.
-
Click Create message.
-
Select the Drag&drop builder.
-
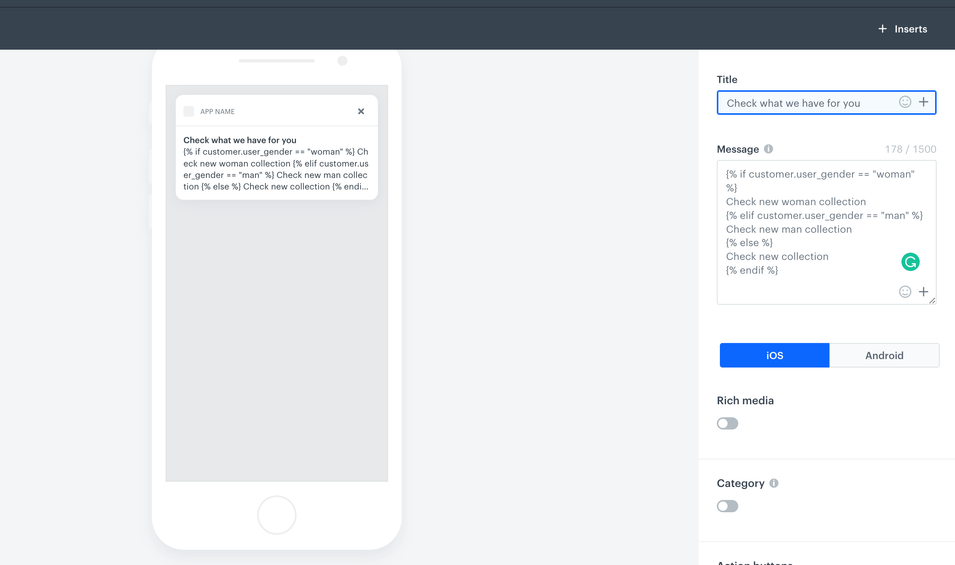
Prepare the message which your customer will get:
-
In the Title field, enter the text that will display in the header of the notification. You can use up to 160 characters.
-
In the Message field, enter the text that will display in the body of the notification. Use the below code, which will select the appropriate message depending on the user’s attribute:
<!-- Content for users with woman attribute value --> {% if customer.user_gender == "woman" %} Check new woman collection <!-- Content for users with man attribute value --> {% elif customer.user_gender == "man" %} Check new man collection <!-- Content for users without such attribute --> {% else %} Check new collection {% endif %} -
Optionally, you can define settings in OS tabs. Select the OS for which your notification is dedicated, if you create a template for both OS, fill out the settings in both tabs: iOS and Android.
-
In the Action type section, define what happens when the customer clicks the notification, choose Deep linking or Open URL. Use the same code as in the Message field:
<!-- Content for users with woman attribute value --> {% if customer.user_gender == "woman" %} Check new woman collection <!-- Content for users with man attribute value --> {% elif customer.user_gender == "man" %} Check new man collection <!-- Content for users without such attribute --> {% else %} Check new collection {% endif %} -
If your template is ready, click Next.

Mbile push notification configuration
-
-
Click Apply.
Schedule the notification and additional parameters
In this part of the process, you will define when the push notification will be sent.
- In the Schedule section, click Define.
- Choose Display time according to your business needs.
- Additionally, you can enable Silence Hours.
- Click Apply.
- Optionally, in the Additional parameters section, you can add up to 10 parameters which will be added to every event generated by this communication.
- Click Send.
Check the use case set up on the Synerise Demo workspace
You can check the mobile push configuration directly in Synerise Demo workspace.
If you’re our partner or client, you already have automatic access to the Synerise Demo workspace (1590), where you can explore all the configured elements of this use case and copy them to your workspace.
If you’re not a partner or client yet, we encourage you to fill out the contact form to schedule a meeting with our representatives. They’ll be happy to show you how our demo works and discuss how you can apply this use case in your business.