Efficiently managing and analyzing metrics is crucial for optimizing operations and making informed decisions. However, manually creating and maintaining separate metrics for different brands, segments, or reporting needs can be time-consuming and complex. Simplify the process with dynamic keys and reduce the number of metrics required to build reports.
In this use case, we will export three metrics for two different brands to Amazon S3 - with a total of six results. We want to report on the sales volume of products in a given category and brand, as well as the number of products sold for the previous week. The metrics and dynamic keys used in this use case are only an example. You can export any other metrics with dynamic keys as needed, the value of the dynamic key can be static or dynamic (Jinjava).
## Prerequisites
---
- You must have an account on AWS.
- You must be granted a user role that includes the `Data export > Export metrics result` permission.
## Process
---
In this use case, you will go through the following steps:
1. [Create metrics](#create-metrics) with dynamic key for value of sold products and number of sold products from a specific category, value of products sold from a particular brand.
2. [Create a workflow](#create-a-workflow) sending two different metric reports to Amazon S3.
## Create metrics
---
In this part of the process, you will create three metrics for the `product.buy` event.
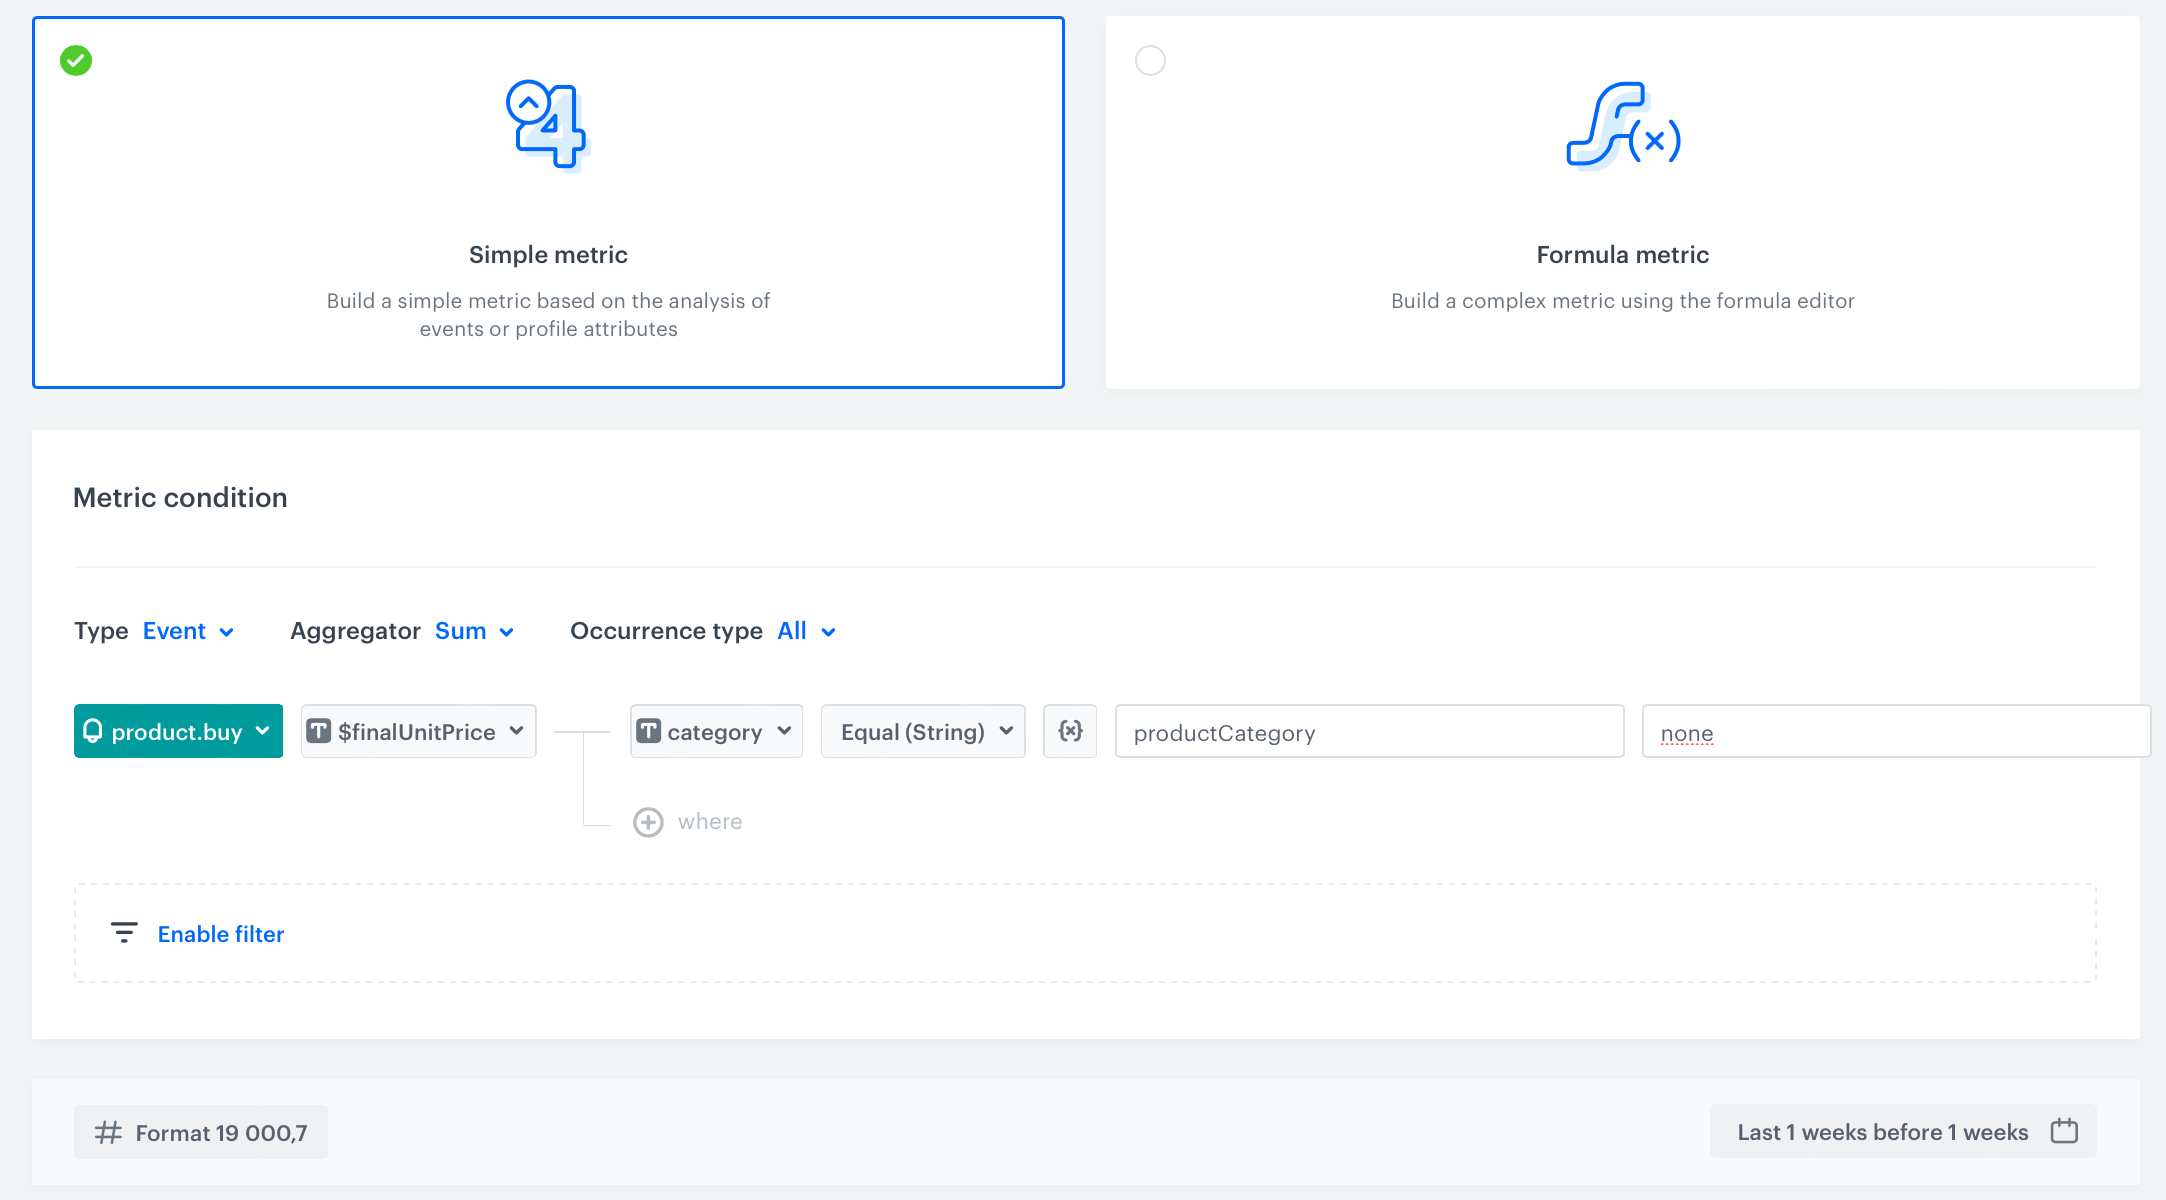
### Value of products sold from a category
1. Go to **Decision Hub > Metrics > New metric**.
2. Enter the name of the metric.
3. As a metric kind, select **Simple metric**.
4. As the type, set **Event**.
5. As the aggregator, set **Sum**.
4. As the occurrence type, set **All**.
5. From the **Choose event** dropdown list, select `product.buy`.
6. From the **Choose parameter** dropdown list, select the `finalUnitPrice` parameter.
7. Click the **+ where** button.
8. From the **Choose parameter** dropdown list, select the `category` parameter.
9. From the **Choose operator** dropdown list, choose **String**, and then select **Equal**.
10. Next to the operator, click the icon until you get two fields: **Dynamic key** and **Value**.
1. In the **Dynamic key** field, enter the name of the dynamic key, in our case: `productCategory`. The value for the key will be sourced from the `category` parameter.
2. In the **Value** field, enter `none`.
6. To select a specific time range, click the calendar icon. In our case, it will be **Last week**. Confirm your choice with the **Apply** button.
7. Click **Save**.
Configuration of the value of products sold from a category metric
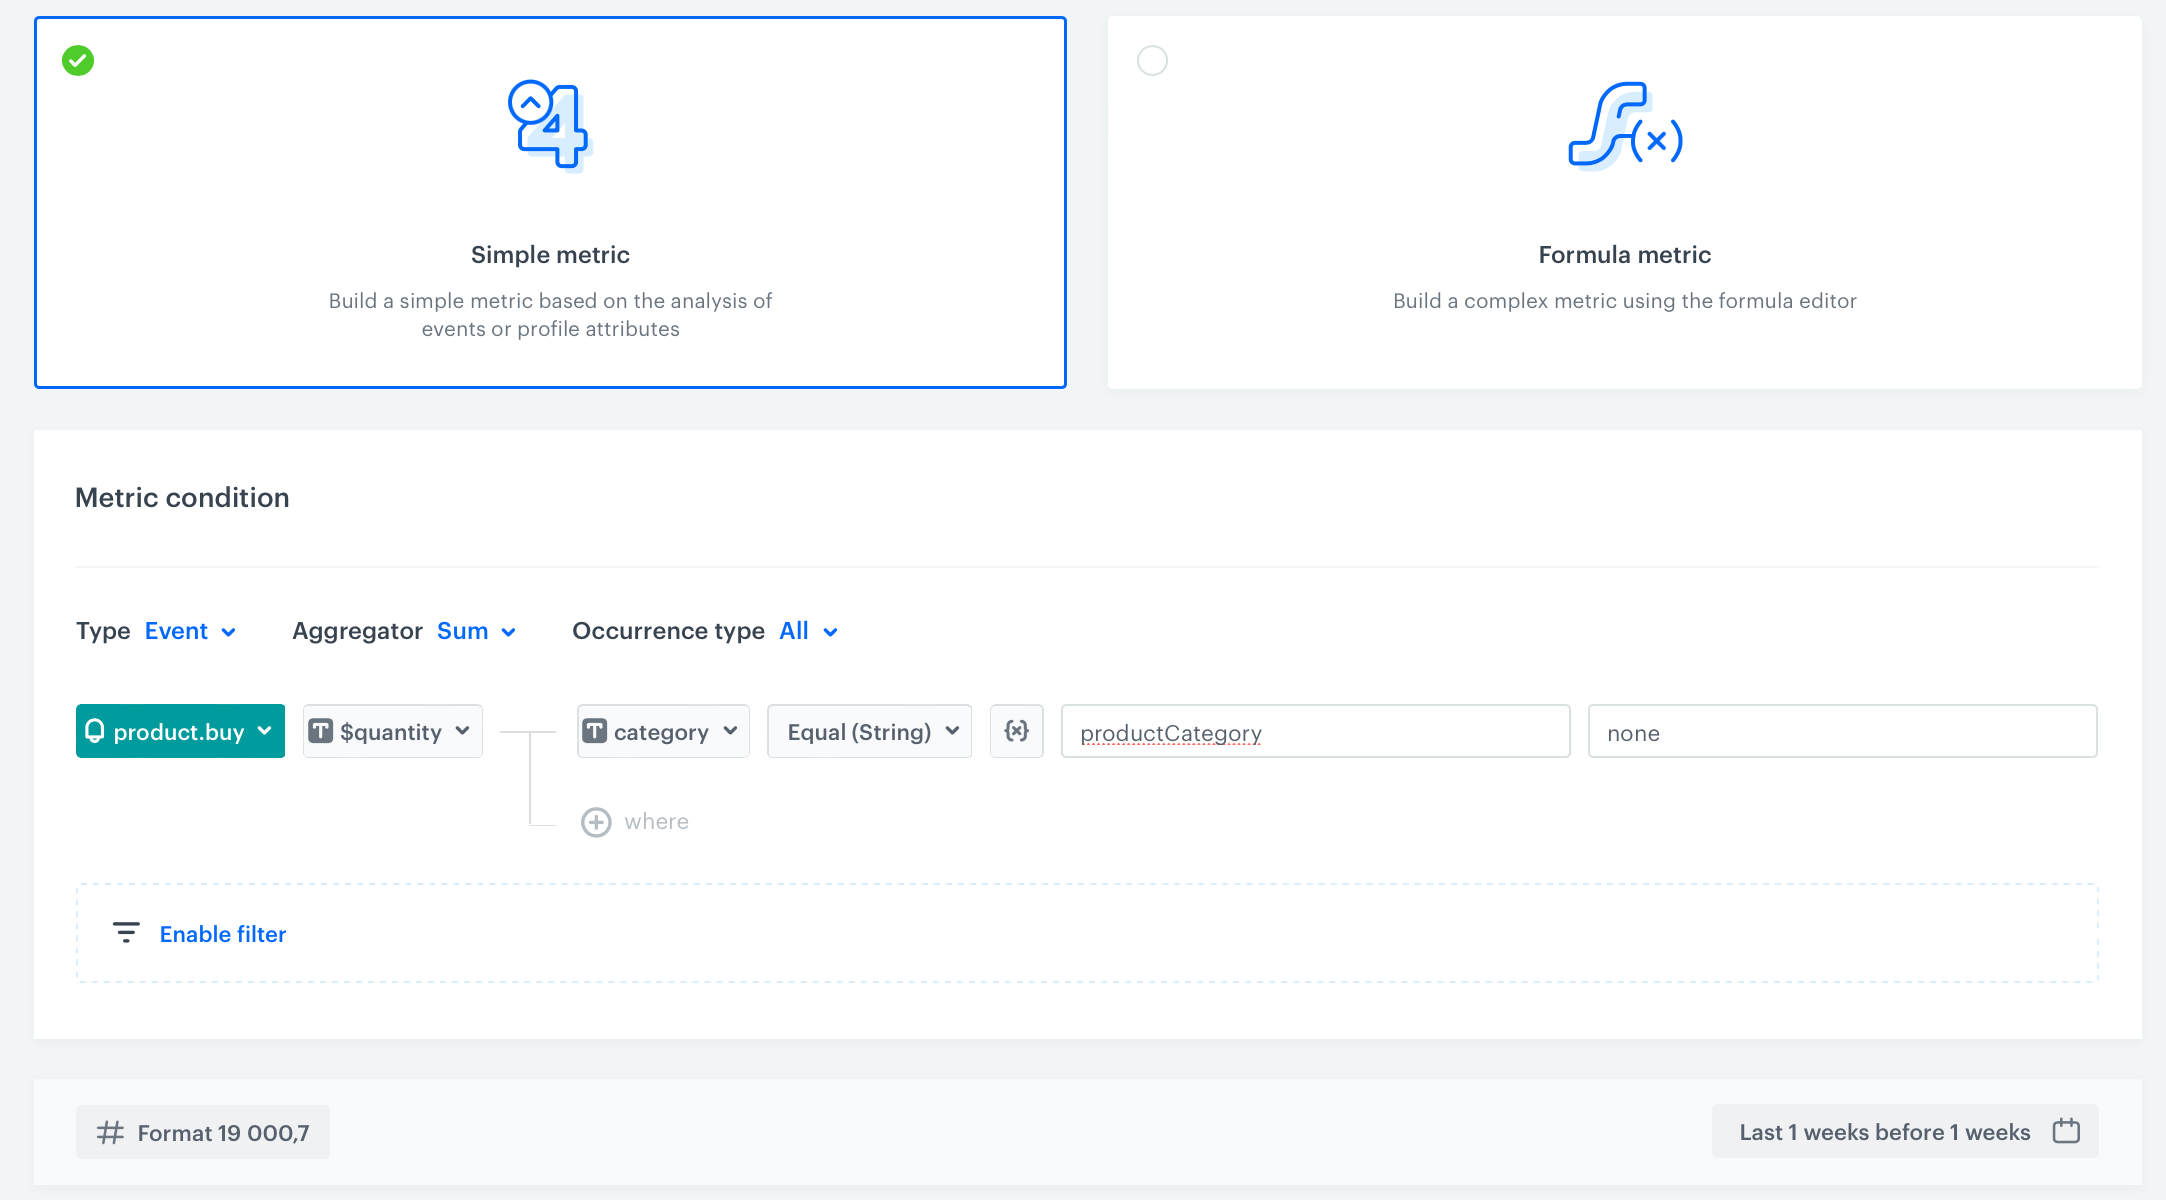
### Number of products sold from a category
1. Go to **Decision Hub > Metrics > New metric**.
2. Enter the name of the metric.
3. As a metric kind, select **Simple metric**.
4. As the type, set **Event**.
5. As the aggregator, set **Sum**.
4. As the occurrence type, set **All**.
5. From the **Choose event** dropdown list, select `product.buy`.
6. From the **Choose parameter** dropdown list, select the `quantity` parameter.
7. Click the **+ where** button.
8. From the **Choose parameter** dropdown list, select the `category` parameter.
9. From the **Choose operator** dropdown list, choose **String**, and then select **Equal**.
10. Next to the operator, click the icon until you get two fields: **Dynamic key** and **Value**.
1. In the **Dynamic key** field, enter the name of the dynamic key, in our case: `productCategory`. The value for the key will be sourced from the `category` parameter.
2. In the **Value** field, enter `none`.
6. To select a specific time range, click the calendar icon. In our case, it will be **Last week**. Confirm your choice with the **Apply** button.
7. Click **Save**.
Configuration of the number of products sold from a category metric
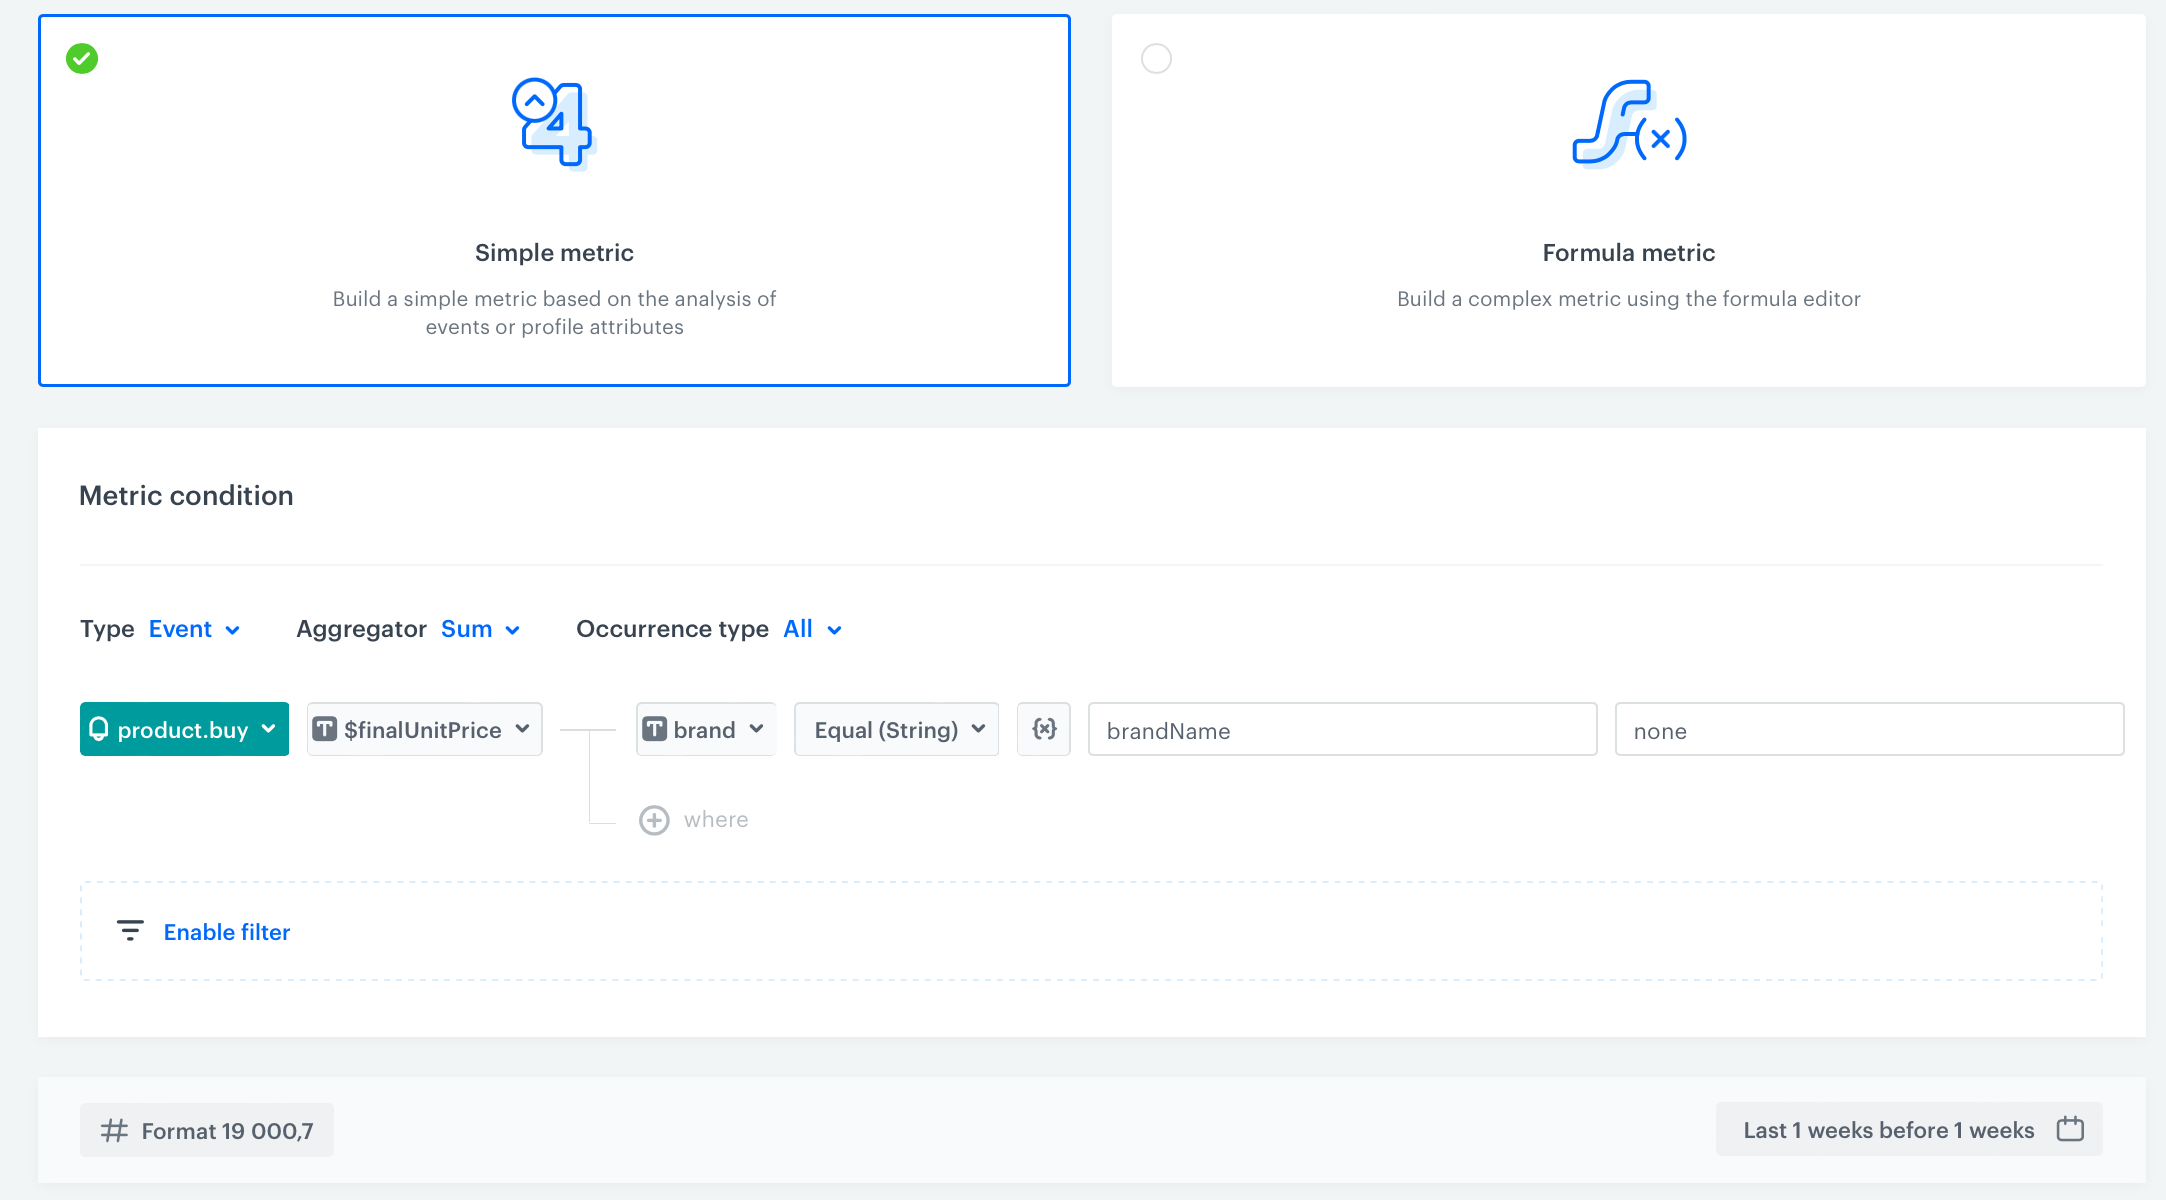
### Value of products sold from a brand
1. Go to **Decision Hub > Metrics > New metric**.
2. Enter the name of the metric.
3. As a metric kind, select **Simple metric**.
4. As the type, set **Event**.
5. As the aggregator, set **Sum**.
4. As the occurrence type, set **All**.
5. From the **Choose event** dropdown list, select `product.buy`.
6. From the **Choose parameter** dropdown list, select the `finalUnitPrice` parameter.
7. Click the **+ where** button.
8. From the **Choose parameter** dropdown list, select the `brand` parameter.
9. From the **Choose operator** dropdown list, choose **String**, and then select **Equal**.
10. Next to the operator, click the icon until you get two fields: **Dynamic key** and **Value**.
1. In the **Dynamic key** field, enter the name of the dynamic key, in our case: `brandName`. The value for the key will be sourced from the `brand` parameter.
2. In the **Value** field, enter `none`.
6. To select a specific time range, click the calendar icon. In our case, it will be **Last week**. Confirm your choice with the **Apply** button.
7. Click **Save**.
Configuration of the value of products sold from a brand metric
## Create a workflow
---
Create a workflow that sends the metrics data for two different brands to Amazon S3 once a week.
1. Go to **Automation Hub > Workflows > New workflow**.
2. Enter the name of the workflow.
### Define the Scheduled Run trigger node
---
At this stage, configure the conditions that trigger the workflow.
1. As the trigger node, select **Scheduled Run**.
2. In the configuration of the node:
1. Leave the **Run trigger** option at default (**all time**).
2. Select the timezone in which the workflow will be launched.
3. To launch the workflow every week at the defined time, click the **Every week** tab below.
4. Select the desired day, in our case **Monday**.
5. Click **Add time** and set it according to your needs, in our case to `9:45`.
6. Confirm by clicking **Apply**.
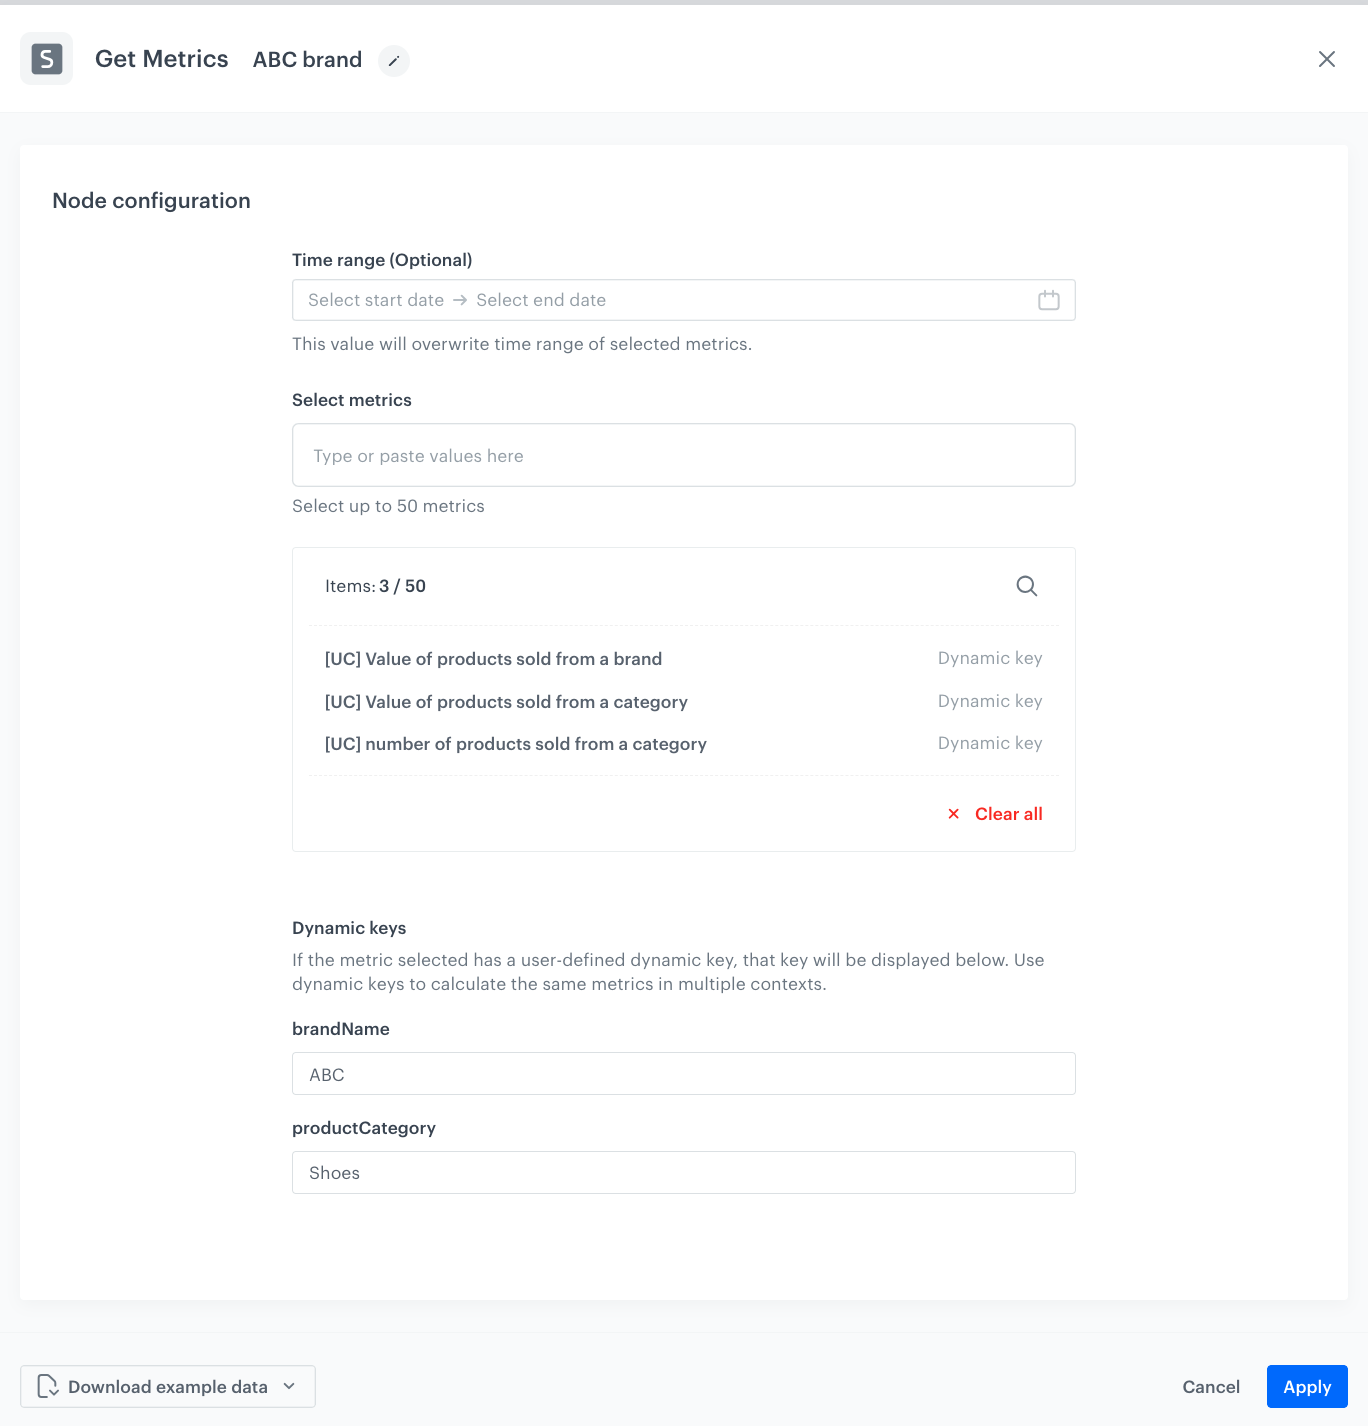
### Configure the Get Metrics node
---
As the next node, choose **Get Metrics** to retrieve metrics for specific categories and brand.
1. Optionally, in the **Time range** field, on the calendar, select the time range from which you want to get the results of the metric or metrics. The time range you select will override the original time range settings of the metrics.
2. In the **Select metrics** field, select [metrics created in the previous part of the process](#create-metrics).
3. In the **Dynamic keys** section:
- in the **brandName**, enter the name of the brand
- in the **productCategory**, enter the name of the category
4. Confirm by clicking **Apply**.
Get Metrics node configuration
### Configure Send file to Amazon S3 Bucket node
---
1. Click **Amazon S3 Bucket > Send File**.
2. Click **Select connection**.
3. From the dropdown list, select the connection.
- If no connections are available or you want to create a new one, see [Create a connection](/docs/automation/integration/amazon-s3-bucket/send-file-amazon-s3-bucket#create-a-connection).
- If you selected an existing connection, proceed with the integration settings.
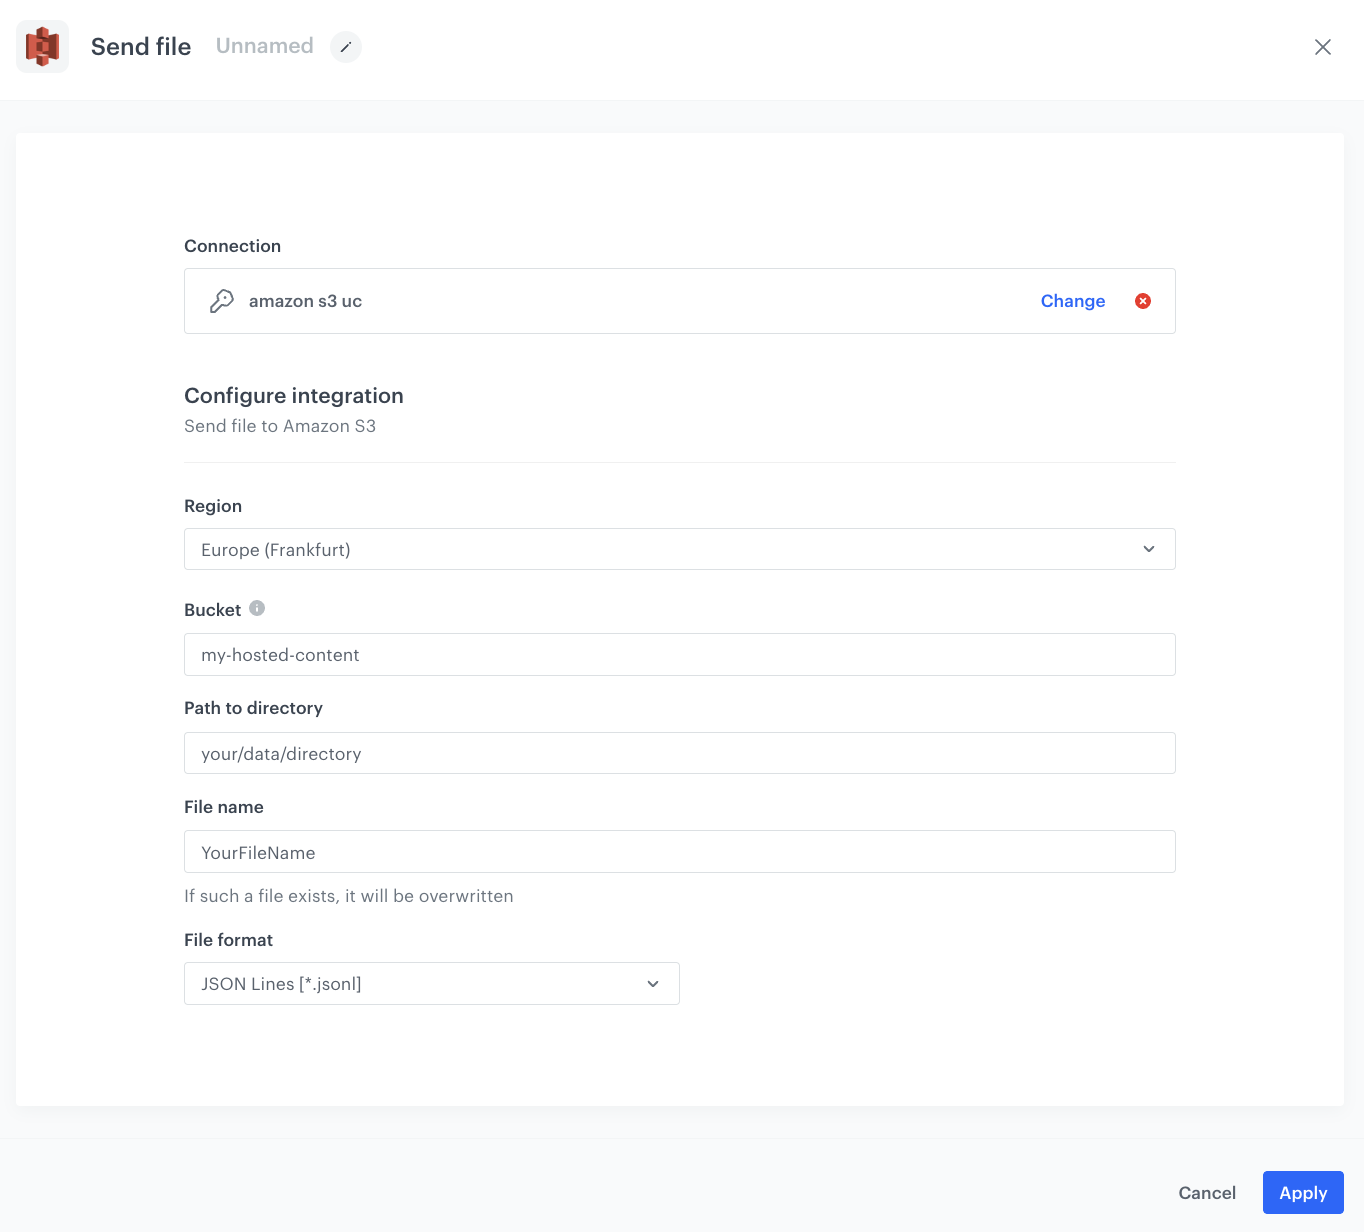
4. In the **Region** field, enter the region of your bucket.
5. In the **Bucket** field, enter the name of an existing container in your storage.
6. In the **Path to directory** field, enter the path to the existing bucket in which the file will be saved.
7. In the **File name** field, enter the name of the file you want to send to the storage. If the file already exists, the contents of the file will be overwritten.
8. From the **File format** dropdown list, select the format in which the file will be saved in the storage.
9. Confirm by clicking **Apply**.
The configuration of the Send File node
10. Repeat the configuration of the second **Get Metrics** node but for a different brand and **Send file to Amazon S3 Bucket** node.
Add the second **Get Metrics** node with the same settings except for values in **brandName** and **productCategory** fields. This way, the same set of metrics will produce results for different contexts.
### Add the finishing node
1. Add the **End** node.
2. In the upper right corner, click **Save & Run**.
The workflow configuration
## Check the use case set up on the Synerise Demo workspace
---
You can check the:
- [Value of products sold from a category metric](https://app.synerise.com/analytics/metrics/9721f381-8f18-4a40-aa86-25f2824f0d41)
- [Number of products sold from a category metric](https://app.synerise.com/analytics/metrics/b1469768-a17e-4985-9544-0d23dd612afc)
- [Value of products sold from a brand metric](https://app.synerise.com/analytics/metrics/39bcbcfc-9026-4cf8-a526-77926404fd56)
- [Workflow](https://app.synerise.com/automations/workflows/automation-diagram/f604360f-0003-4749-a97a-3703d9b11a5a)
directly in Synerise Demo workspace.
If you’re our partner or client, you already have automatic access to the **Synerise Demo workspace (1590)**, where you can explore all the configured elements of this use case and copy them to your workspace.
If you’re not a partner or client yet, we encourage you to fill out the contact [form](https://demo.synerise.com/request) to schedule a meeting with our representatives. They’ll be happy to show you how our demo works and discuss how you can apply this use case in your business.
## Read more
---
- [Automation Hub](/docs/automation)
- [Metrics](/docs/analytics/metrics)