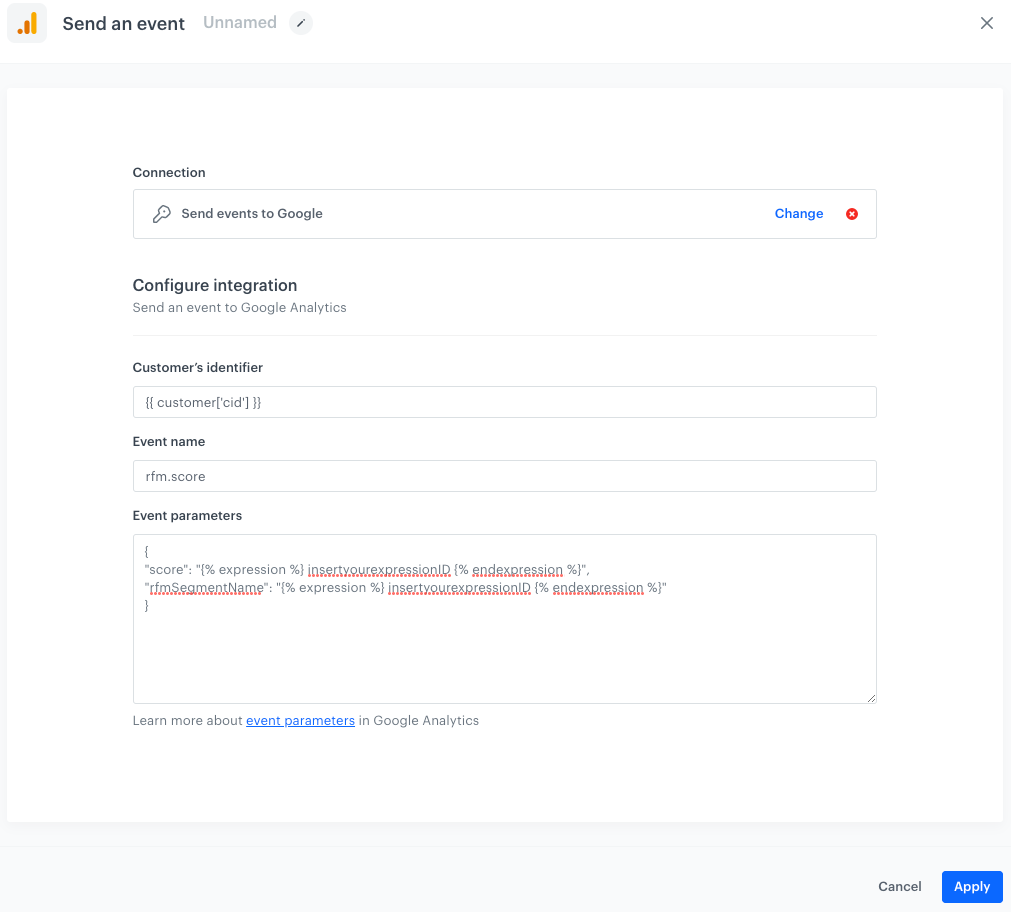
You can power your Google Analytics data with information collected in Synerise. You can do it by sending an event to Google Analytics with the data extracted from Synerise such as the customer attributes, customer activities, results of analyses, predictions, and so on.

In this particular use case, we use Automation Hub to send each visitor's result of an [RFM analysis](/use-cases/rfm-analysis) to Google Analytics. The workflow is triggered every week for visitors from the last 7 days and sends the RFM analysis results of each customer to Google Analytics as an `rfm.score` event. The event contains two parameters: 
- `score` contains numeric information about the customer's score,
- `rfmSegmentName` contains the name of the RFM segment the customer belongs to.


## Prerequisites
---
- Get the measurement ID associated with a stream in your Google Analytics panel. Navigate to **Admin > Data Streams > {stream name} > Measurement ID**.
- Create an API secret in your Google Analytics panel. To create a new secret, navigate to **Admin > Data Streams > {stream name} > Measurement Protocol > Create**.
- Implement [Synerise JS SDK](/developers/web/installation-and-configuration) on your website.
- Implement transaction events using [SDK](/developers/web/transactions-sdk) or [API](https://developers.synerise.com/DataManagement/DataManagement.html#operation/CreateATransaction). 
- [Enable saving Google Analytics ID in profiles](/docs/automation/integration/google-analytics/send-events-to-ga#getting-the-customer-id-from-google-analytics).
- [Create an RFM analysis](/use-cases/rfm-analysis).
- [Establish a connection between Synerise and Google Analytics](/docs/automation/integration/google-analytics/send-events-to-ga#create-a-connection).

## Process 
---
In this use case, you will go through the following steps:

1. [Create an expression that returns the name of the RFM segment a customer belongs to](/use-cases/google-analytics-integration#create-an-expression-that-returns-rfm-segment-name).
2. [Create a workflow that sends events to Google Analytics](#create-a-workflow).

## Create an expression that returns RFM segment name
---
In this part of the process, you will create an expression that retrieves a segment name from an [RFM segmentation to which a customer belongs](/use-cases/rfm-analysis#create-a-rfm-segmentation).

1. Go to <img src="/api/docs/image/54176ad07f146575310749eba44b7c2f42c1b327/icons/behavioral-data-hub-icon.svg" alt="Behavioral Data Hub icon" class="icon"> **Behavioral Data Hub > Expressions > New expression**.  
2. Enter a meaningful name of the expression.  
3. Leave the **Expression for** at default (**Attribute**).  
4. Click the **Select** node.
5. From the dropdown list, select **Profile**.  
6. Click the **unnamed** node.  
7. On the bottom of the page, click **Choose attribute**.  
8. From the dropdown list, select **Segmentations**.  
9. Find [the RFM segmentation](/use-cases/rfm-analysis#create-a-rfm-segmentation) and select it.
    <figure><img src="/api/docs/image/54176ad07f146575310749eba44b7c2f42c1b327/use-cases/all-cases/_gfx/expression-retrieve-rfm-segment.png" class="full" alt="The configuration of the expression that returns RFM segment name"><figcaption>The configuration of the expression that returns RFM segment name</figcaption></figure>
10. Save the expression.

## Create a workflow
---
Create a workflow that is triggered for the customers who visited your website during the last 7 days. The system will send an `rfm.score` event with the score a customer received in the RFM analysis and with the name of the segment they belong to. The RFM result will be saved in Google Analytics for each customer, using the customer's Google Analytics ID saved as a profile attribute in Synerise.

This workflow will be triggered once a week, for the group of customers who were active on the website during the last 7 days.

1. In Synerise, go to <img src="/api/docs/image/54176ad07f146575310749eba44b7c2f42c1b327/icons/automation-hub-icon.svg" alt="Automation Hub icon" class="icon" > **Automation Hub > Workflows > New workflow**.
2. Enter the name of the workflow.

### Define the audience of the workflow

The workflow is triggered for customers who visited a website during the last 7 days. Define the conditions in the following way:

3. As the first node, add **Audience**. In the configuration of the node:
    1. Set the **Run trigger** option to **repeatable**.
    2. Set the interval to 1 week.  
    3. In the **Begin at** field, select the first launch of the trigger.  
    4. From the **Timezone** dropdown list, select the time zone consistent with the time zone selected for your workspace.  
    5. In the **Define audience** section, click the **New audience** tab.  
    6. From the **Choose filter** dropdown list, select **page.visit**.  
    7. In the right bottom corner, set the date to **Last 7 days**. 
    4. Confirm by clicking **Apply**.

### Configure the Google Analytics node

In this step, you will configure the settings of the Google Analytics integration in the **Send Event** node. This includes:  
- Selecting the connection (for authorization purposes)
- Defining the customer identifier - you will use an insert that retrieves the value of the `cid` attribute that stores the Google Analytics ID 
- Defining the event and event parameters to be sent to Google Analytics

You can find the detailed instructions for each action below. 


<div class="admonition admonition-note"><div class="admonition-icon"><svg xmlns="http://www.w3.org/2000/svg" fill="none" viewBox="0 0 24 24" stroke="currentColor" stroke-width="2.5"><path stroke-linecap="round" stroke-linejoin="round" d="M13 16h-1v-4h-1m1-4h.01M21 12a9 9 0 11-18 0 9 9 0 0118 0z" /></svg></div><div class="admonition-body"><div class="admonition-content">

If you want to learn more about **Send Event** node, click [here](/docs/automation/integration/send-events-to-ga).

</div></div></div>


4. On the **Audience** node, click **THEN**.  
5. From the node list, select **Google Analytics > Send Event**.  
6. In the configuration of the node:  
    1. Select the connection.  
    If you haven’t established a connection yet, see [Create a connection](/docs/automation/integration/google-analytics/send-events-to-ga#create-a-connection).
    2. In the **Customer ID** field, enter `{{ customer['cid'] }}`  
        This way, you will retrieve the value of the `cid` attribute.
    3. In the **Event name** field, enter `rfm.score`
    4. In the **Event parameters** field, enter the parameters of the event in the form of the JSON object.  
        The object uses the `{% expression %}` insert to refer to the value of the RFM-related expressions.  
        For example:  
        
       <pre><code class="language-json">{
           "score": "{% expression %} rfm-score-expression {% endexpression %}",
           "rfmSegmentName": "{% expression %} rfm-segment-name-expression {% endexpression %}"
       }</code></pre>
 

        - Replace `rfm-score-expression` with the ID of [the expression that calculates the RFM score](/use-cases/rfm-analysis#create-an-expression).
        - Replace `rfm-segment-name-expression` with ID of the expression you created in [this part of the process](/use-cases/google-analytics-integration#create-an-expression-that-returns-rfm-segment-name).
7. Confirm by clicking **Apply**.  

<figure><img src="/api/docs/image/54176ad07f146575310749eba44b7c2f42c1b327/use-cases/all-cases/_gfx/send-events-to-ga.png" class="large" alt="The configuration of the Send Event node"><figcaption>The configuration of the Send Event node</figcaption></figure>

### Add the finishing node
8. On the **Send Event**, click **THEN**.
9. Add the **End** node.  
    <figure>
    <img src="/api/docs/image/54176ad07f146575310749eba44b7c2f42c1b327/use-cases/all-cases/_gfx/send-data-to-ga.png" alt="Final configuration of workflow" class="large">
    <figcaption> Final configuration of the workflow </figcaption>
    </figure>

9. Activate the workflow by clicking **Save & Run**.  
    
## Check the use case set up on the Synerise Demo workspace
---
You can check the configuration of:
- [The expression that retrieves the name of the RFM segment](https://app.synerise.com/analytics/expressions/6b15f344-94b1-49c3-85f3-e375bae7af7d)
- [The expression that calculates RFM](https://app.synerise.com/analytics/expressions/70716383-93cf-479c-99f0-15ad4c826472)
- [The workflow that sends events to Google Analytics with RFM results](https://app.synerise.com/automations/automation-diagram/d2b5a05c-aaae-431b-88b5-e1f285a39e09)

If you’re our partner or client, you already have automatic access to the **Synerise Demo workspace (1590)**, where you can explore all the configured elements of this use case and copy them to your workspace.  

If you’re not a partner or client yet, we encourage you to fill out the contact [form](https://demo.synerise.com/request) to schedule a meeting with our representatives. They’ll be happy to show you how our demo works and discuss how you can apply this use case in your business.

## Read more
---
- [Automation Hub](/docs/automation)
- [Dynamic content](/docs/campaign/dynamiccontent)
- [Integration](/docs/automation/integration)
- [Send Event node](/docs/automation/integration/send-events-to-ga)