
This use case demonstrates the integration between Synerise and HubSpot. The integration allows you to send any data collected in HubSpot to Synerise. In this way, you can supplement the data you collect in Synerise with additional information you gather in HubSpot, unlocking the full potential of your data.

In this use case, we will focus on creating an integration that imports customer's data from HubSpot into Synerise.

## Prerequisites  
--- 
- A HubSpot Pro account is required.
- Your workspace must have API key permission for creating profiles: `API_BATCH_CLIENT_CREATE`

## Process  
--- 
1. [Create an incoming integration](/use-cases/hubspot-integration#create-an-incoming-integration-for-hubspot-customer-data) for HubSpot clients data.
2. [Create a workflow](/use-cases/hubspot-integration#create-a-workflow-for-handling-incoming-data-from-hubspot) for handling incoming data from HubSpot. 

## Create an incoming integration for HubSpot customer data
--- 
In this part of the process, create incoming integrations in Synerise to which you will send customer's data from Hubspot.  

1. Go to <img src="/api/docs/image/54176ad07f146575310749eba44b7c2f42c1b327/icons/automation-hub-icon.svg" alt="Automation Hub icon" class="icon" > **Automation Hub > Incoming > New integration**. 
2. On the pop-up, select **Without authentication**. 
3. Enter the name of the webhook. 
4. In the **Endpoint** section, click **Define**.  

   <div class="admonition admonition-important"><div class="admonition-icon"><svg xmlns="http://www.w3.org/2000/svg" fill="none" viewBox="0 0 24 24" stroke="currentColor" stroke-width="2.5"><path stroke-linecap="round" stroke-linejoin="round" d="M12 8v4m0 4h.01M21 12a9 9 0 11-18 0 9 9 0 0118 0z" /></svg></div><div class="admonition-body"><div class="admonition-content">

   The URL field is already filled in with the endpoint to which the data from HubSpot will be sent.

   </div></div></div>
  
5. Optionally, you can add an icon to this integration. 
6. Confirm by clicking **Apply**.  

    <figure> 
    <img src="/api/docs/image/54176ad07f146575310749eba44b7c2f42c1b327/use-cases/all-cases/_gfx/hubspot-endpoint.png" alt="The view of configuration of the Endpoint section" class="full"> 
    <figcaption>Configuration of the Endpoint section</figcaption> 
    </figure>  

7. In the **Incoming data** section, click **Define**. 
8. Click **Retrieve data**.      
    **There are two ways of retreving data:**
    1. You can send direct cURL request.
  
       <details class="accordion"><summary>Click to expand the instruction on sending cURL request</summary><div class="accordion-content"><p>
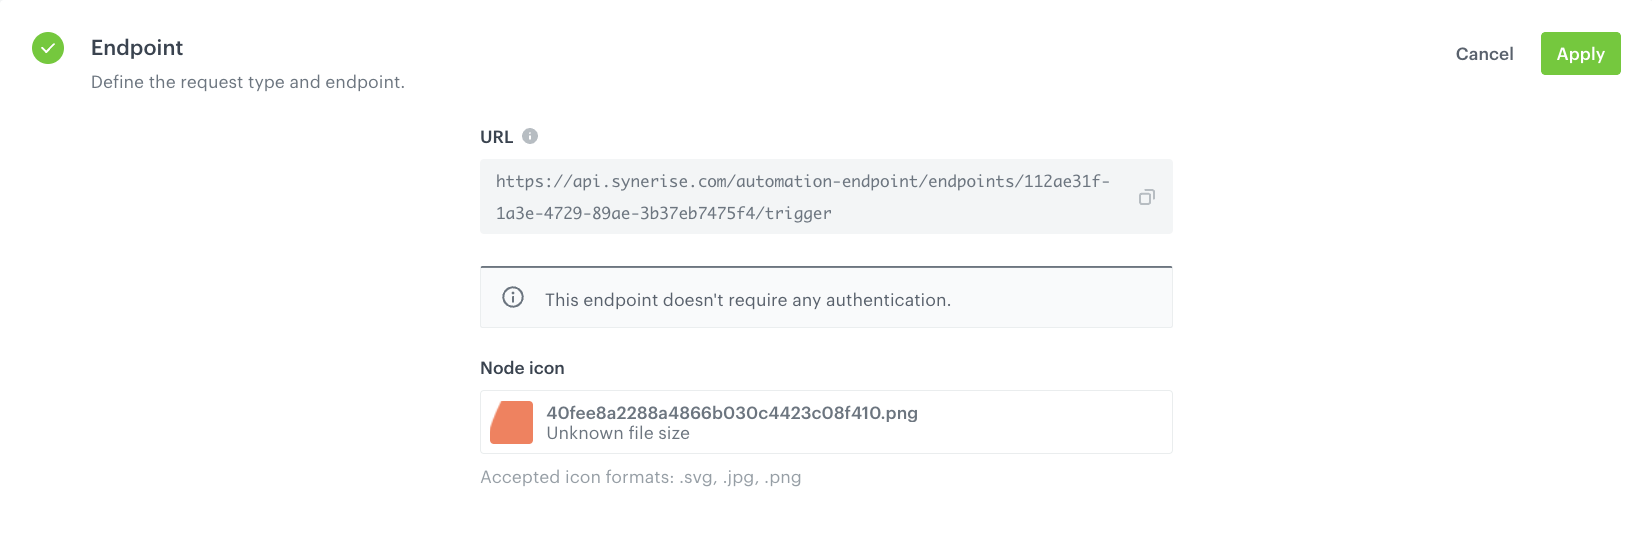
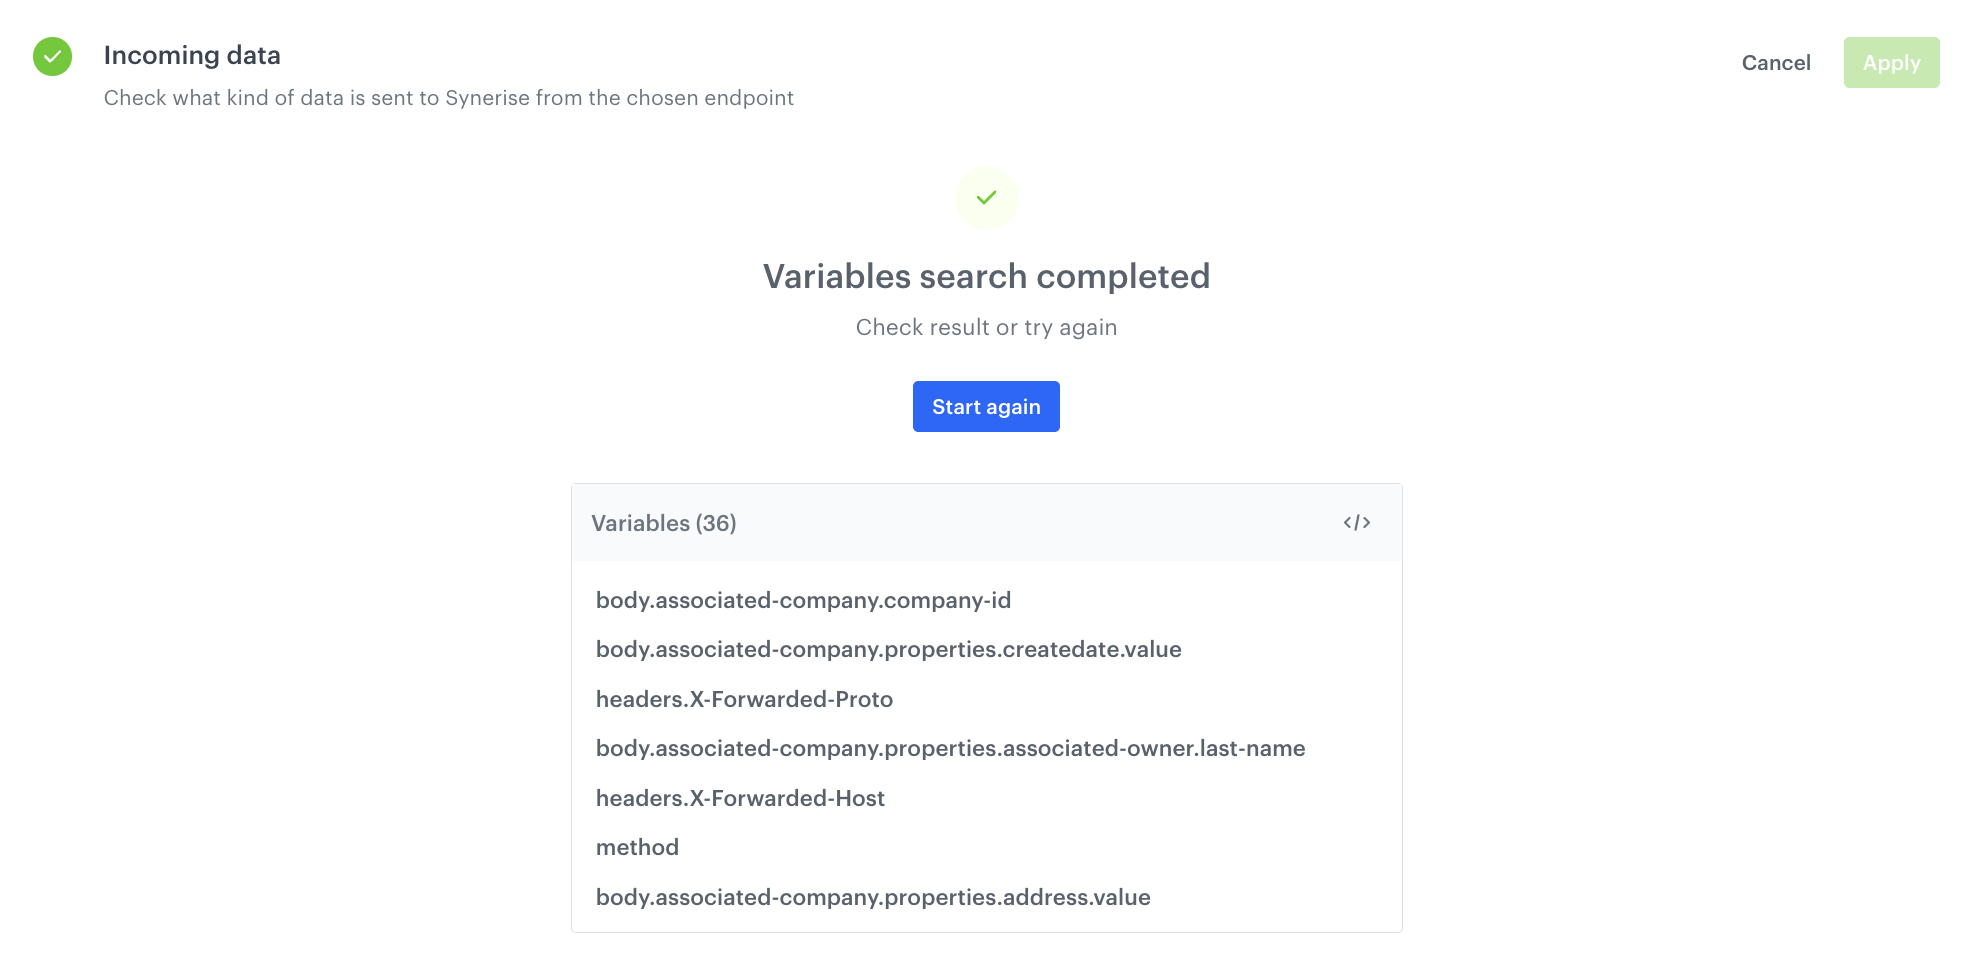
Right after you click the button, send a request to the endpoint in the <strong>Endpoint</strong> section with the sample of data that will be sent through HubSpot. The system waits for the incoming request for 1 minute and 30 seconds.</p> <div class="admonition admonition-important"><div class="admonition-icon"><svg xmlns="http://www.w3.org/2000/svg" fill="none" viewBox="0 0 24 24" stroke="currentColor" stroke-width="2.5"><path stroke-linecap="round" stroke-linejoin="round" d="M12 8v4m0 4h.01M21 12a9 9 0 11-18 0 9 9 0 0118 0z" /></svg></div><div class="admonition-body"><div class="admonition-content"> <p> Replace the endpoint URL from the example below with the endpoint URL from step 4.</p> </div></div></div> <p><strong>An example of cURL request:</strong></p> <pre><code class="language-plaintext">
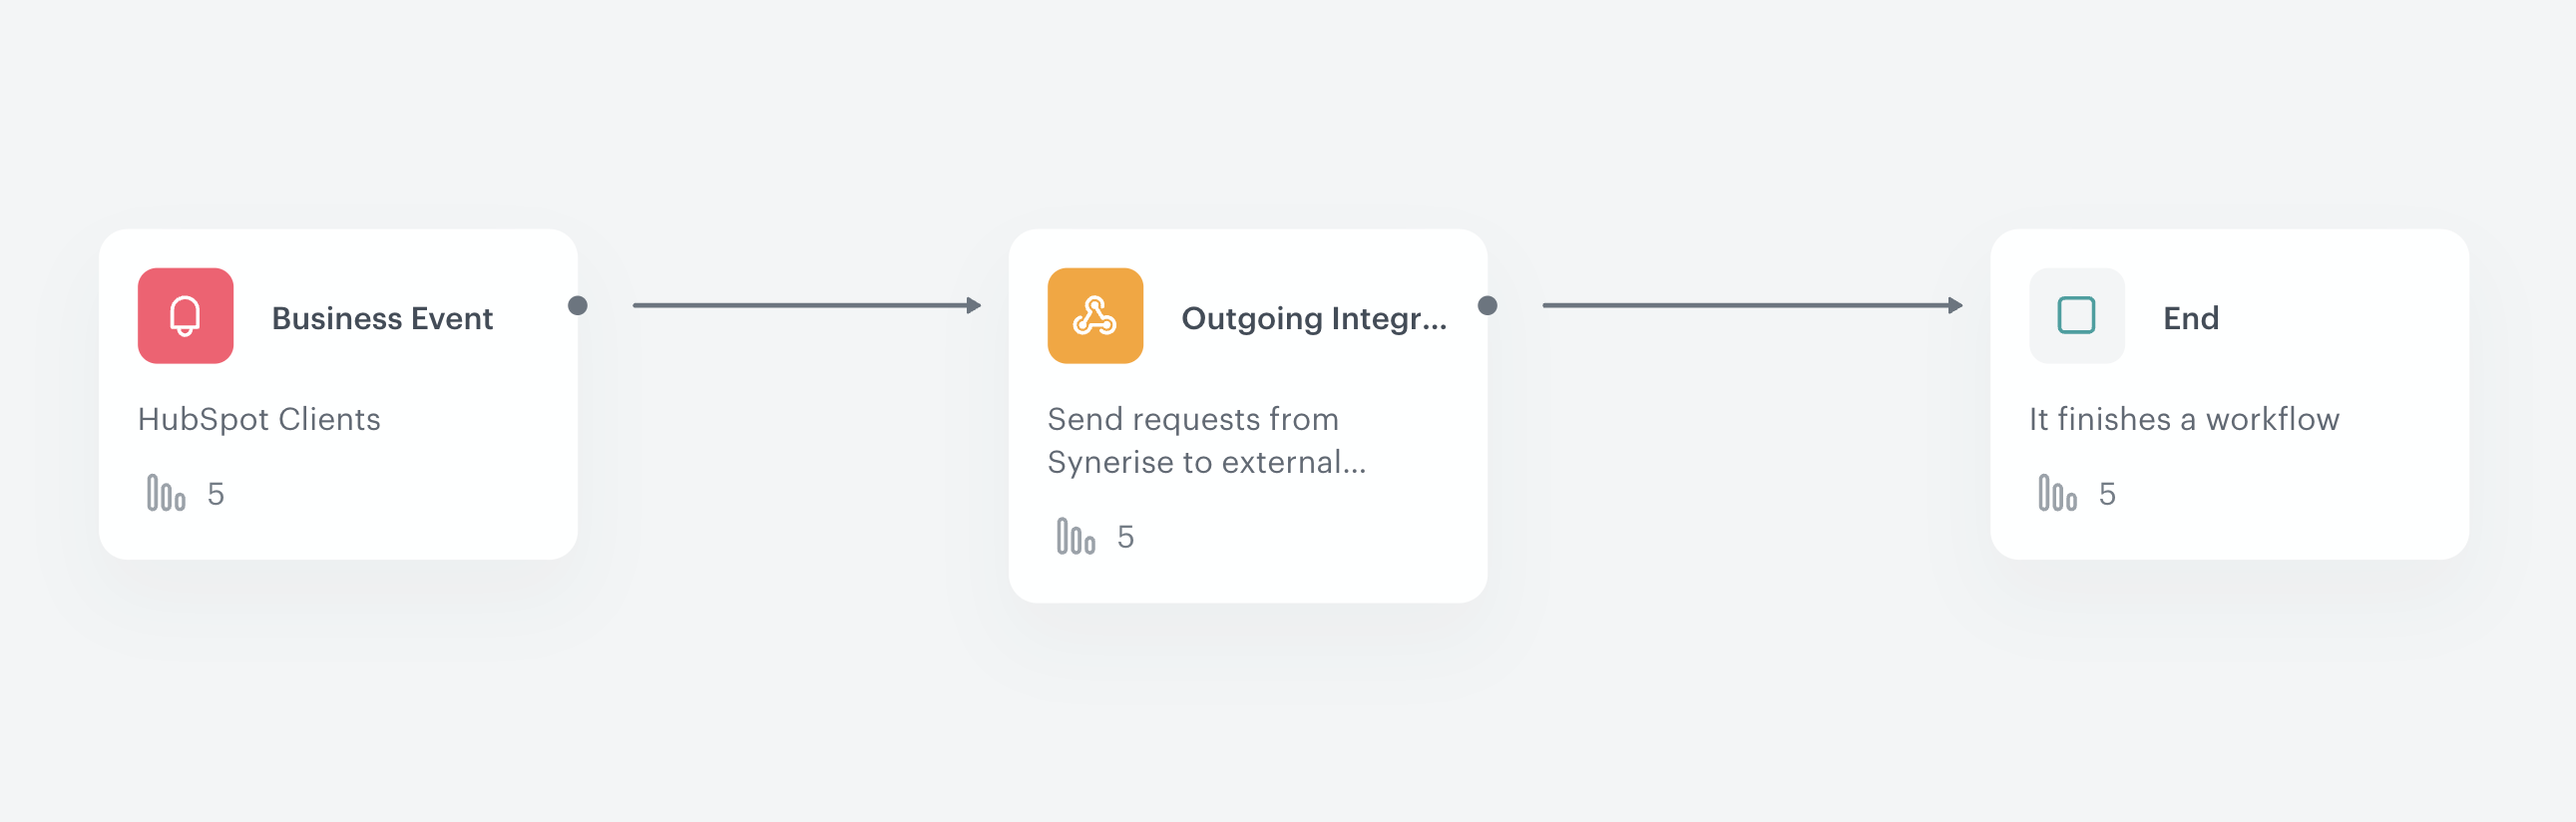
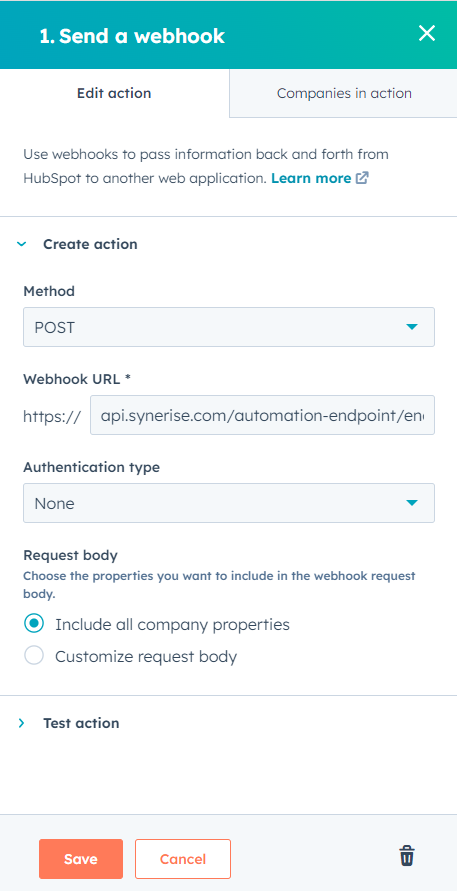
curl --location 'https://api.synerise.com/automation-endpoint/endpoints/112ae31f-1a3e-4729-89ae-3b37eb7475f4/trigger' \ --header 'Content-Type: application/json' \ --data-raw '{ "associated-company": { "company-id": 43535242, "portal-id": 123413, "properties": { "address": { "value": "NYC 123 Main Street, US" }, "city": { "value": "NEW YORK" }, "cliente": { "value": "123413" }, "closedate": { "value": "1519039262794" }, "country": { "value": "USA" }, "createdate": { "value": "1519038967696" }, "associated-owner": { "email": "joedoetesthb@example.com", "first-name": "", "hubspot-user-id": 123454321, "last-name": "", "type": "PERSON" } , "canonical-vid": 11 } } }'</code></pre></div></details>

  
    2. You can send Webhook from HubSpot to the endpoint you created [earlier in the process](/use-cases/hubspot-integration#create-an-incoming-integration-for-hubspot-customer-data). 
  
       <details class="accordion"><summary>Click to expand the instruction on sending webhook from Hubspot</summary><div class="accordion-content"><p>Navigate to the Workflows in the HubSpot and create a new workflow that will send a webhook with the selected clients segments to Synerise.
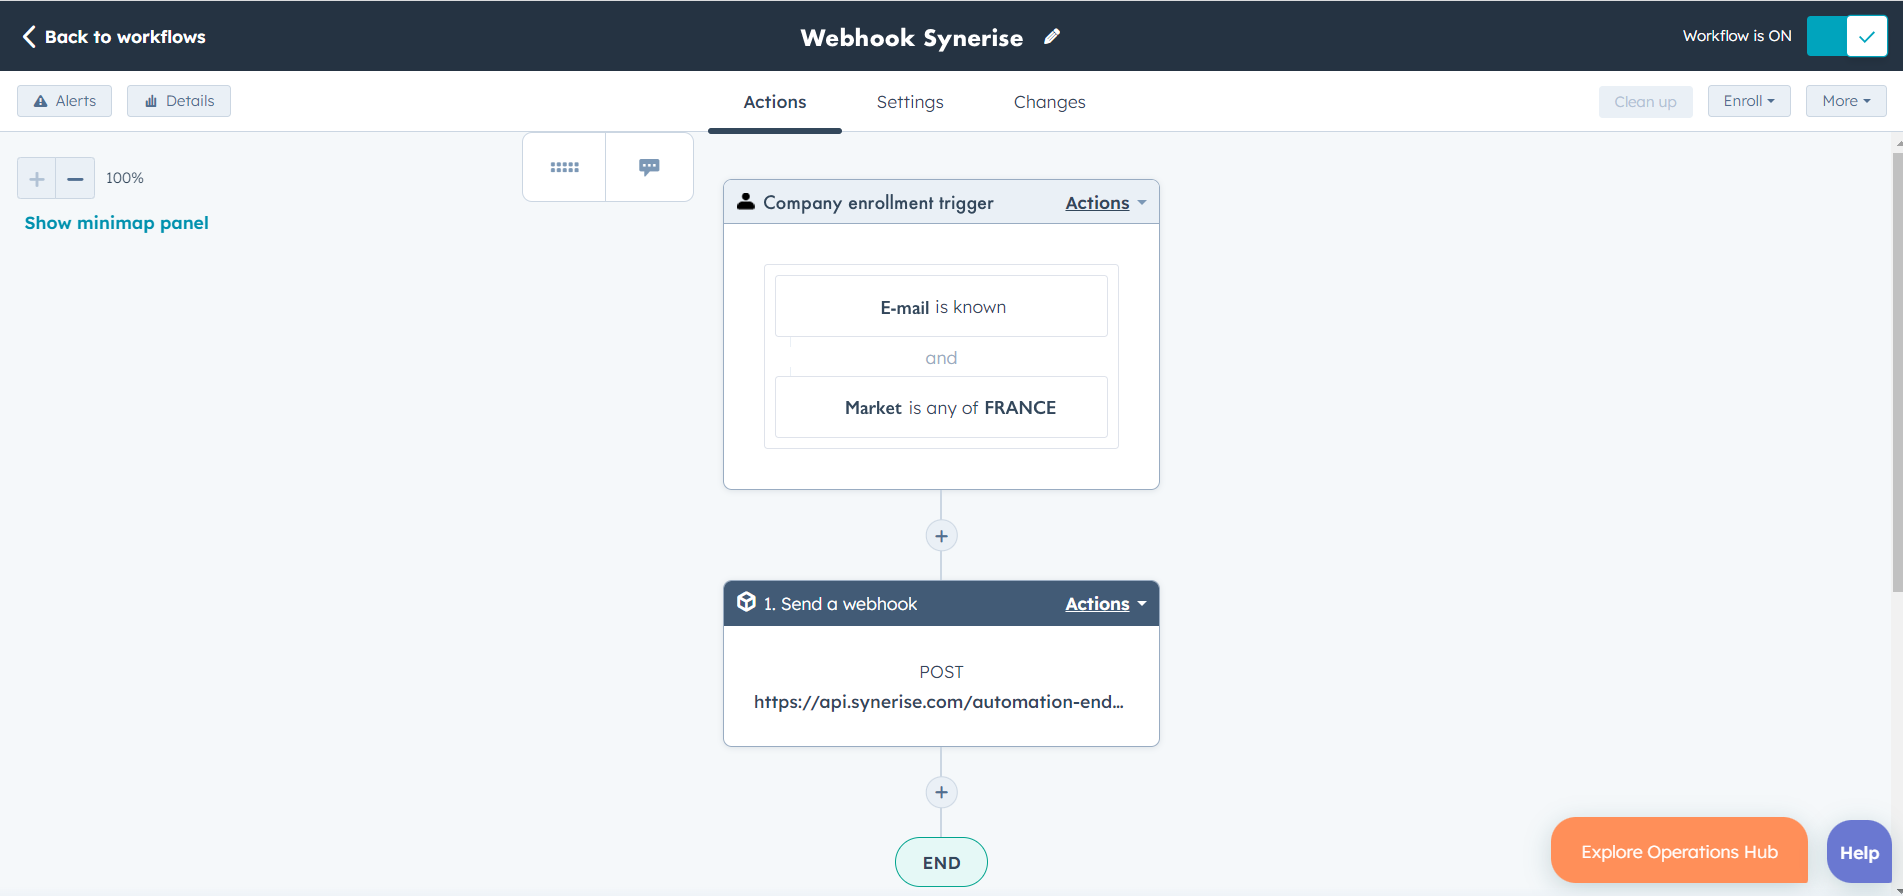
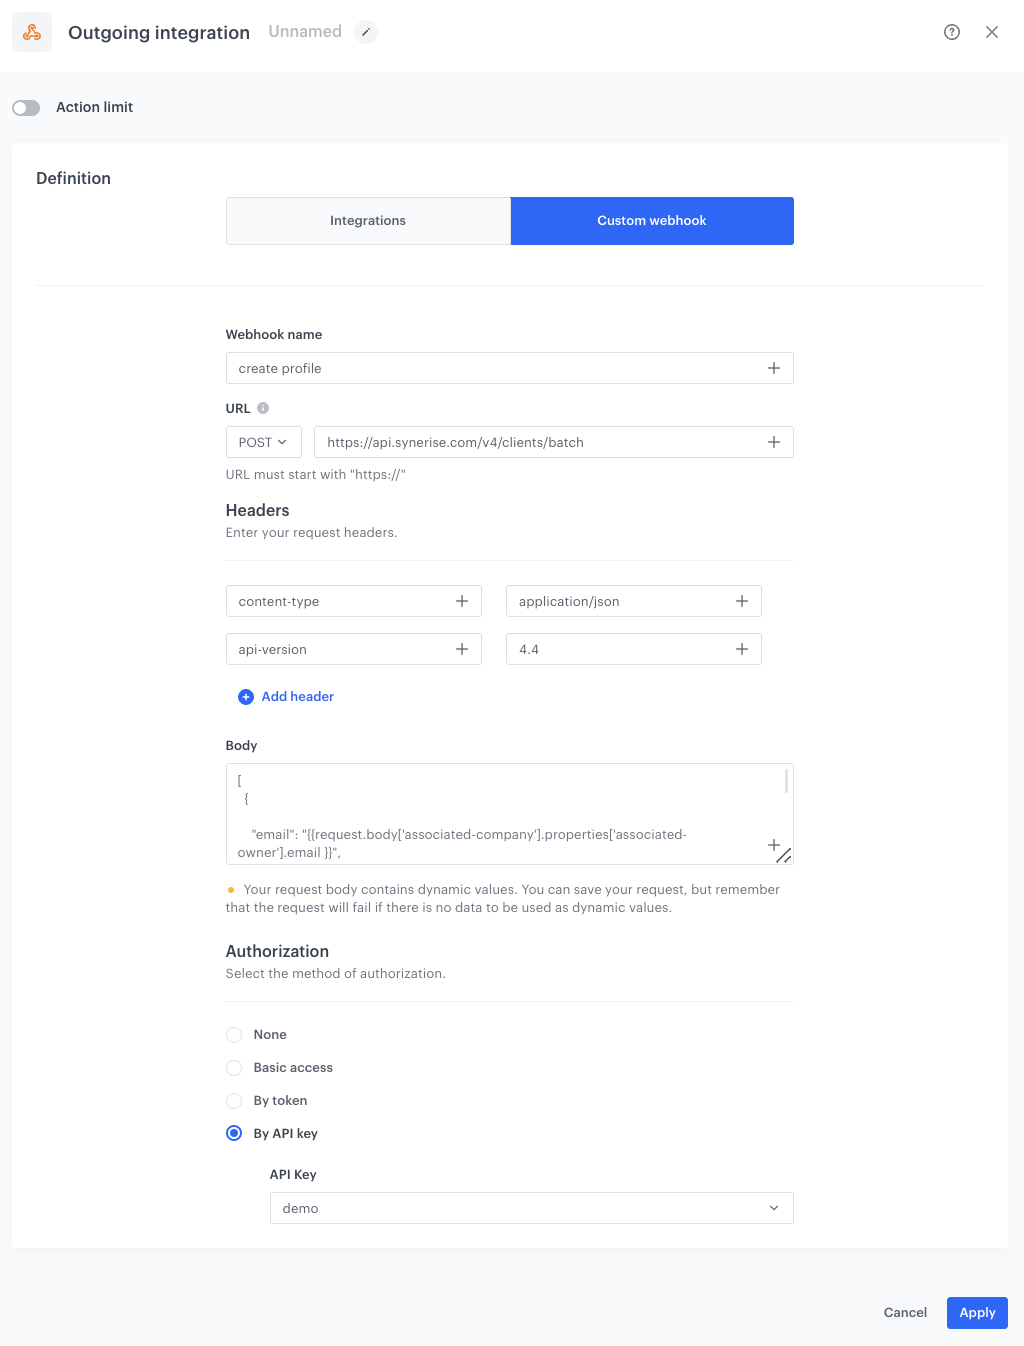
 <figure> <img src="/api/docs/image/54176ad07f146575310749eba44b7c2f42c1b327/use-cases/all-cases/_gfx/hubspot-full-workflow-configuration-custom.png" alt="HubSpot workflow configuration" class="full"> <figcaption>HubSpot workflow configuration</figcaption> </figure> </p> <ol> <li>Define the workflow trigger, which in our case should be a segment of clients which data will be send to Synerise. </li> <li>Configure the webhook:<ol> <li>Select <strong>POST</strong> method. </li> <li>Enter the webhook URL (the endpoint you created earlier in the process).</li> <li>Select the appropriate authentification type. </li> <li>Choose the properties you want to include in the webhook request body.</li> </ol> <figure> <img src="/api/docs/image/54176ad07f146575310749eba44b7c2f42c1b327/use-cases/all-cases/_gfx/hubspot-webhook-configuration-1.png" alt="Webhook configuration" class="medium"> <figcaption>Webhook configuration</figcaption> </figure> </li> <li>Test your webhook to see the response and be able to select which fields to output for use later in your workflow. </li> <li>Save your configuration and finish the workflow.</li> </ol></div></details>


9. When the endpoint receives data from the request, verify the list of variables. If the variables include those which are in the payload, click **Define**. If not, to re-send the request, click **Start again**, and wait for the results.
    <figure> 
    <img src="/api/docs/image/54176ad07f146575310749eba44b7c2f42c1b327/use-cases/all-cases/_gfx/incoming-data-hubspot.png" alt="The view of collected variables from the request" class="large"> 
    <figcaption>Collected variables from the request</figcaption> 
    </figure>  

10. Click **Save & publish**.  

## Create a workflow for handling incoming data from HubSpot
--- 
As the final part of the process, create a workflow which captures data sent to the incoming integration you created in the previous part of the process and creates customer's profiles with the attributes defined earlier in the process. The workflow starts with the business event trigger (for customer's data) that is launched every time the data from HubSpot is sent to Synerise. In response to that, customer's profiles are created.

1. Go to <img src="/api/docs/image/54176ad07f146575310749eba44b7c2f42c1b327/icons/automation-hub-icon.svg" alt="Automation Hub icon" class="icon" > **Automation Hub > Workflows > New workflow**.
2. Enter the name of the workflow.

### Define the business event node
3. As the trigger, select **Business Event**. In the configuration of the node, select the [incoming integration for customer's data](/use-cases/hubspot-integration#create-an-incoming-integration-for-hubspot-customer-data) you created as the first part of the process.
4. Confirm by clicking **Apply**.

    <figure> 
    <img src="/api/docs/image/54176ad07f146575310749eba44b7c2f42c1b327/use-cases/all-cases/_gfx/business-event-hubspot-integration.png" alt="Business Event node configuration" class="large"> 
    <figcaption>Business Event node configuration</figcaption> 
    </figure>  

### Define the Outgoing Integration node
In the **Outgoing Integration** node, create a webhook that will create a customer's profile with the selected attributes sent from HubSpot.

5. From the dropdown list, select the **Outgoing Integration** node.
6. Click the node. In the configuration of the node:  
    1. Select the **Custom webhook**.
    2. Enter the name of the webhook.
    2. Select the **POST** method.
    3. Enter the endpoint URL: `https://api.synerise.com/v4/clients/batch `
    4. Enter the following headers:  
        - set the `content-type` header to `application/json` (default),
        - set the `api-version` header to `4.4`
    5. Enter the request body. For the scenario described in this use case, the body is as follows:  
        
       <pre><code class="language-json">[
         {

           "email": "{{request.body['associated-company'].properties['associated-owner'].email }}",
           "city": "{{request.body['associated-company'].properties.city.value}}",

           "attributes": {
             "closedDate":"{{request.body['associated-company'].properties.closedate.value}}",
             "createdate": "{{request.body['associated-company'].properties.createdate.value}}"
           },
           "tags": [
             "hubspot integration"
           ]
         }
       ]</code></pre>


       <div class="admonition admonition-note"><div class="admonition-icon"><svg xmlns="http://www.w3.org/2000/svg" fill="none" viewBox="0 0 24 24" stroke="currentColor" stroke-width="2.5"><path stroke-linecap="round" stroke-linejoin="round" d="M13 16h-1v-4h-1m1-4h.01M21 12a9 9 0 11-18 0 9 9 0 0118 0z" /></svg></div><div class="admonition-body"><div class="admonition-content">

       This is just an example, you can create JSON according to your business needs. You can use any attribute that comes in the request from HubSpot. You can read more about it [here](/developers/inserts/automation#context).

       </div></div></div>
    

    6. In the **Authorization** section, select **By API key**.  
    6. From the dropdown list, select API key that has permissions to create customer's profile.  
    
   <div class="admonition admonition-tip"><div class="admonition-icon"><svg xmlns="http://www.w3.org/2000/svg" fill="none" viewBox="0 0 24 24" stroke="currentColor" stroke-width="2.5"><path stroke-linecap="round" stroke-linejoin="round" d="M9.663 17h4.673M12 3v1m6.364 1.636l-.707.707M21 12h-1M4 12H3m3.343-5.657l-.707-.707m2.828 9.9a5 5 0 117.072 0l-.548.547A3.374 3.374 0 0014 18.469V19a2 2 0 11-4 0v-.531c0-.895-.356-1.754-.988-2.386l-.548-.547z" /></svg></div><div class="admonition-body"><div class="admonition-content">

   You can read more about API keys [here](/docs/settings/tool/api) and you can find more information about the endpoint and required API key permissions [here](https://developers.synerise.com/ProfileManagement/ProfileManagement.html#operation/CreateAClientInCrm).

   </div></div></div>

6. Confirm by clicking **Apply**.  

    <figure> 
    <img src="/api/docs/image/54176ad07f146575310749eba44b7c2f42c1b327/use-cases/all-cases/_gfx/outgoing-integration-hubspot.png" alt="Final configuration of the Outgoing Integration node" class="large"> 
    <figcaption>Final configuration of the Outgoing Integration node</figcaption> 
    </figure>  

### Add final setting to your workflow
---
1. Add the **End** node. 
2. Launch the workflow by clicking **Save&Run**.

    <figure> 
    <img src="/api/docs/image/54176ad07f146575310749eba44b7c2f42c1b327/use-cases/all-cases/_gfx/hubspot-integration-workflow.png" alt="Final view of the workflow configuration" class="full"> 
    <figcaption>Final view of the workflow configuration</figcaption> 
    </figure>  

## Check the use case set up on the Synerise Demo workspace
---
You can check the configuration of all steps described in the use case directly in Synerise Demo workspace:

- [Incoming webhook configuration](https://app.synerise.com/automations/custom-blocks/integrations/incoming/edit/112ae31f-1a3e-4729-89ae-3b37eb7475f4)
- [Workflow configuration](https://app.synerise.com/automations/workflows/automation-diagram/122f399a-b9c2-4925-b643-32928c0f4f10)

If you’re our partner or client, you already have automatic access to the **Synerise Demo workspace (1590)**, where you can explore all the configured elements of this use case and copy them to your workspace.  

If you’re not a partner or client yet, we encourage you to fill out the contact [form](https://demo.synerise.com/request) to schedule a meeting with our representatives. They’ll be happy to show you how our demo works and discuss how you can apply this use case in your business. 
