
With Synerise you can process transactional data in many different ways. You can prepare advanced analysis or build marketing scenarios basing on them. You can also use transactions as a data set for AI engine.

This use case describes the process of transformation of a `.CSV` file with transactional data. The transformations performed on the file involve:
- adding missing columns with currency code
- creating eventSalt for the transactions


  <div class="admonition admonition-note"><div class="admonition-icon"><svg xmlns="http://www.w3.org/2000/svg" fill="none" viewBox="0 0 24 24" stroke="currentColor" stroke-width="2.5"><path stroke-linecap="round" stroke-linejoin="round" d="M13 16h-1v-4h-1m1-4h.01M21 12a9 9 0 11-18 0 9 9 0 0118 0z" /></svg></div><div class="admonition-body"><div class="admonition-content">

  The `eventSalt` parameter enables to deduplicate transactions when two or more are sent with the same eventSalt and time as the original transaction.

  </div></div></div>


After the transformation, the entries in the file will be imported to Synerise as transaction events.

## Prerequisites
---

- Save the file with transactional data to your computer.
You can find the general requirements for the `.CSV` file format [here](/docs/assets/catalogs/creating-catalogs#requirements). Make sure your file contains [required columns](/docs/automation/actions/synerise-integrations/import-transactions#requirements). If any column is missing, it needs to be added later in the Data Transformation rules. Values of columns need to meet requirements of the transactional data structure used in Synerise.
- Make a copy of the data file and remove rows from the copy until few are left. This copy will be used only as a sample for configuring the Data Transformation rules.


  <details class="accordion"><summary>Click to see a sample CSV file used in this use case</summary><div class="accordion-content"><p>
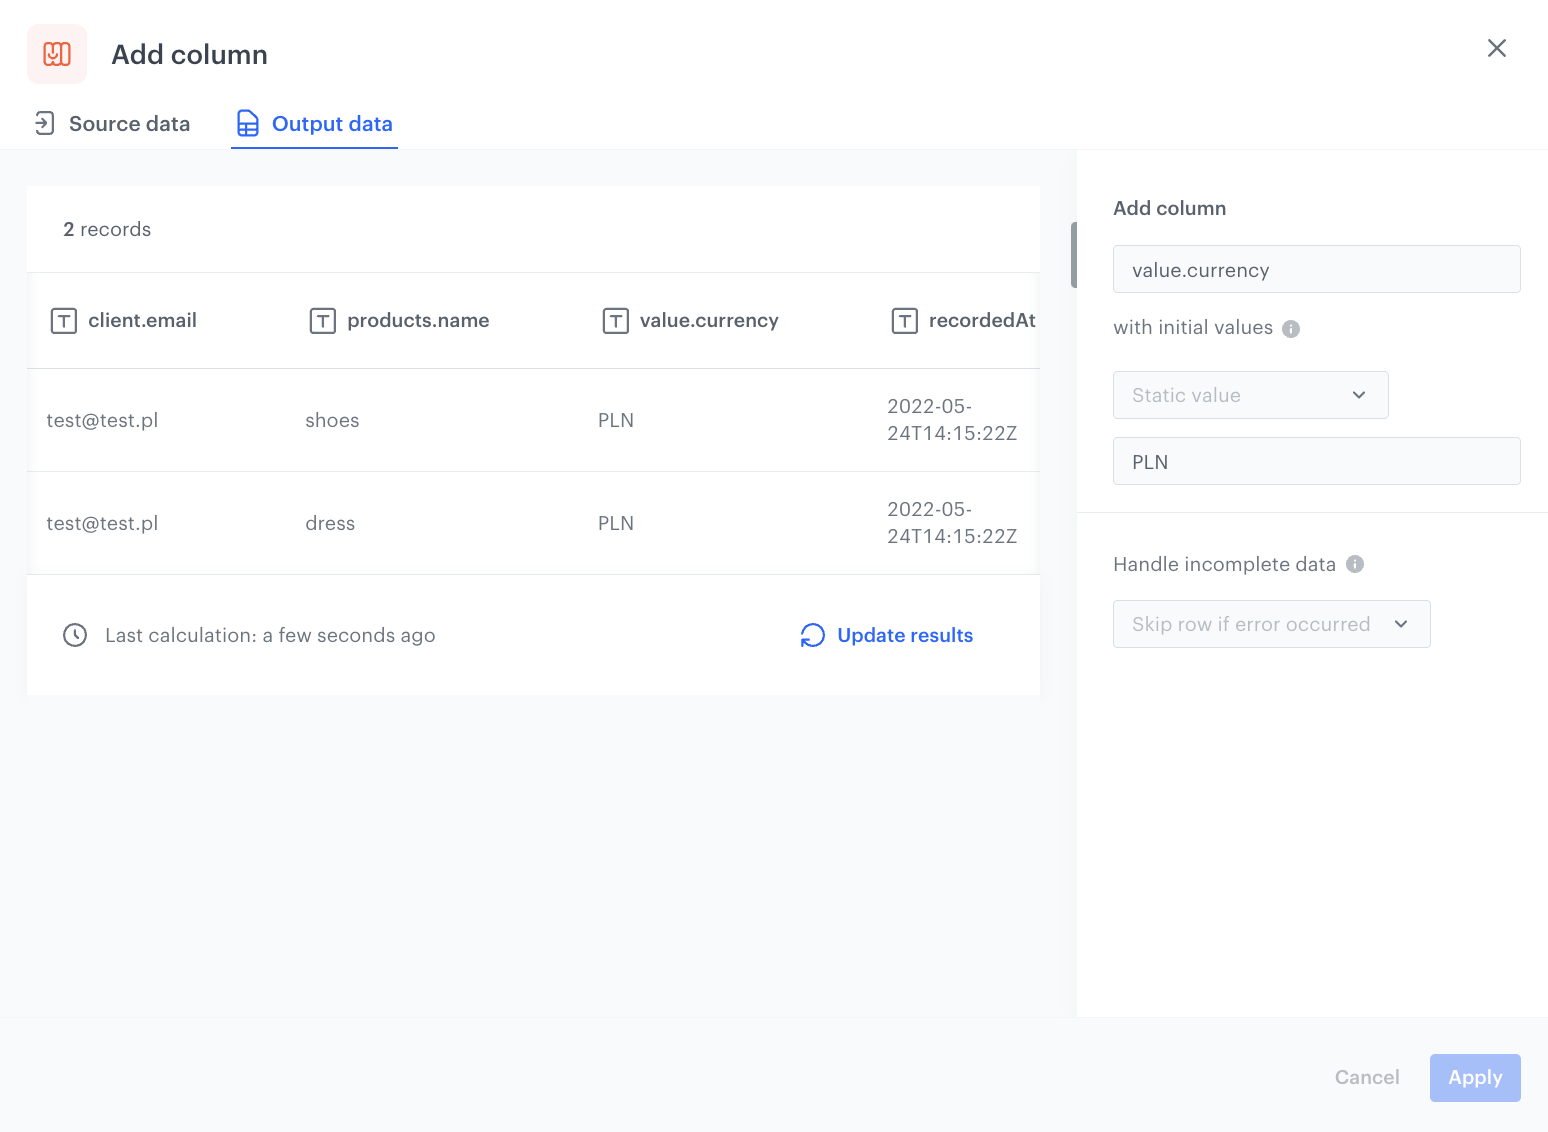
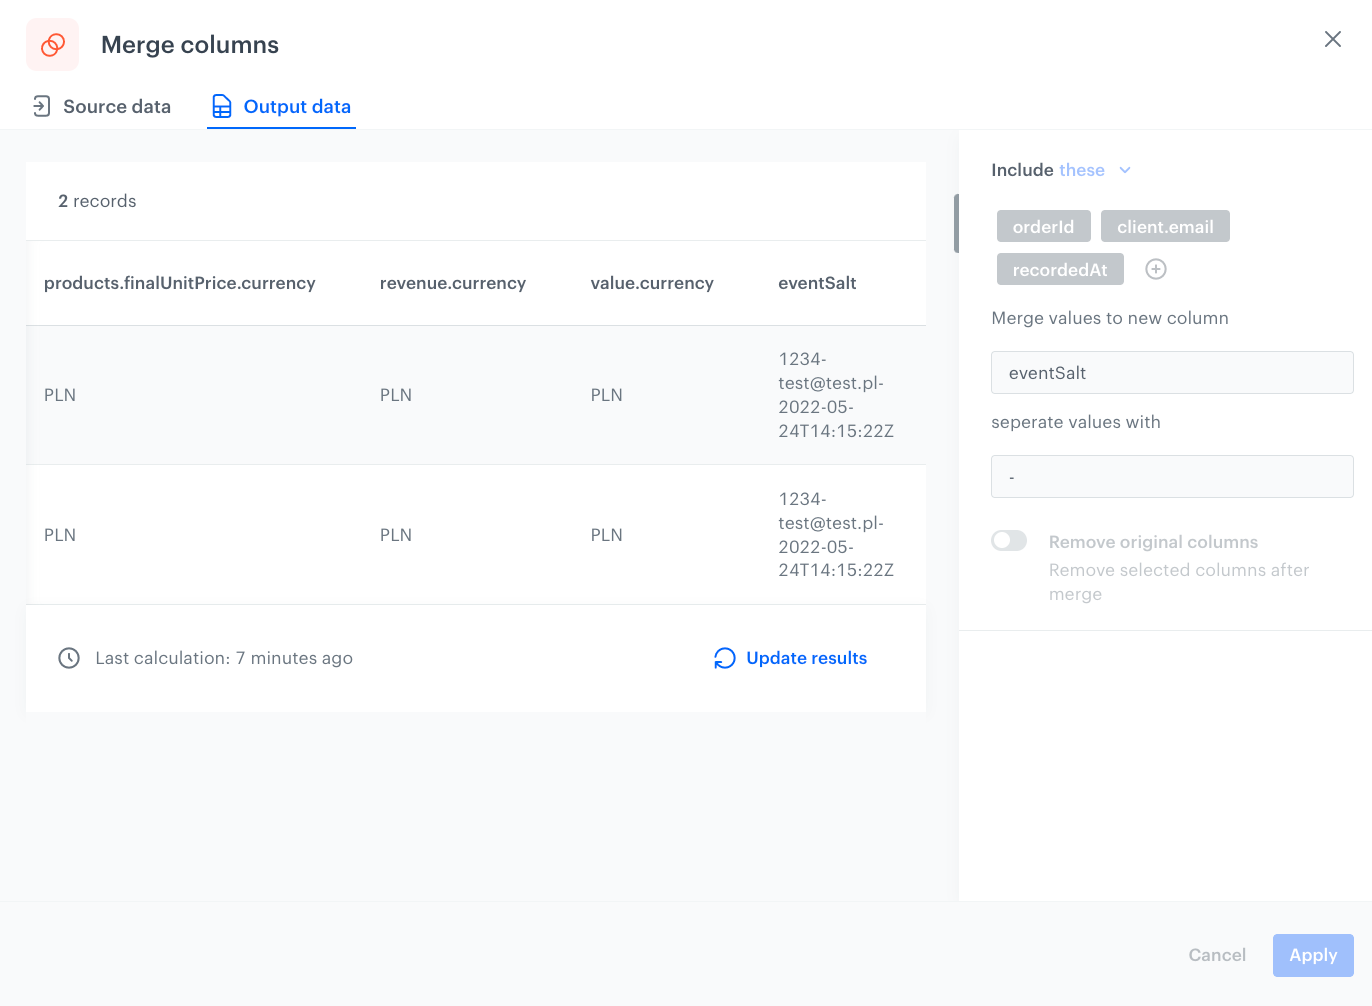
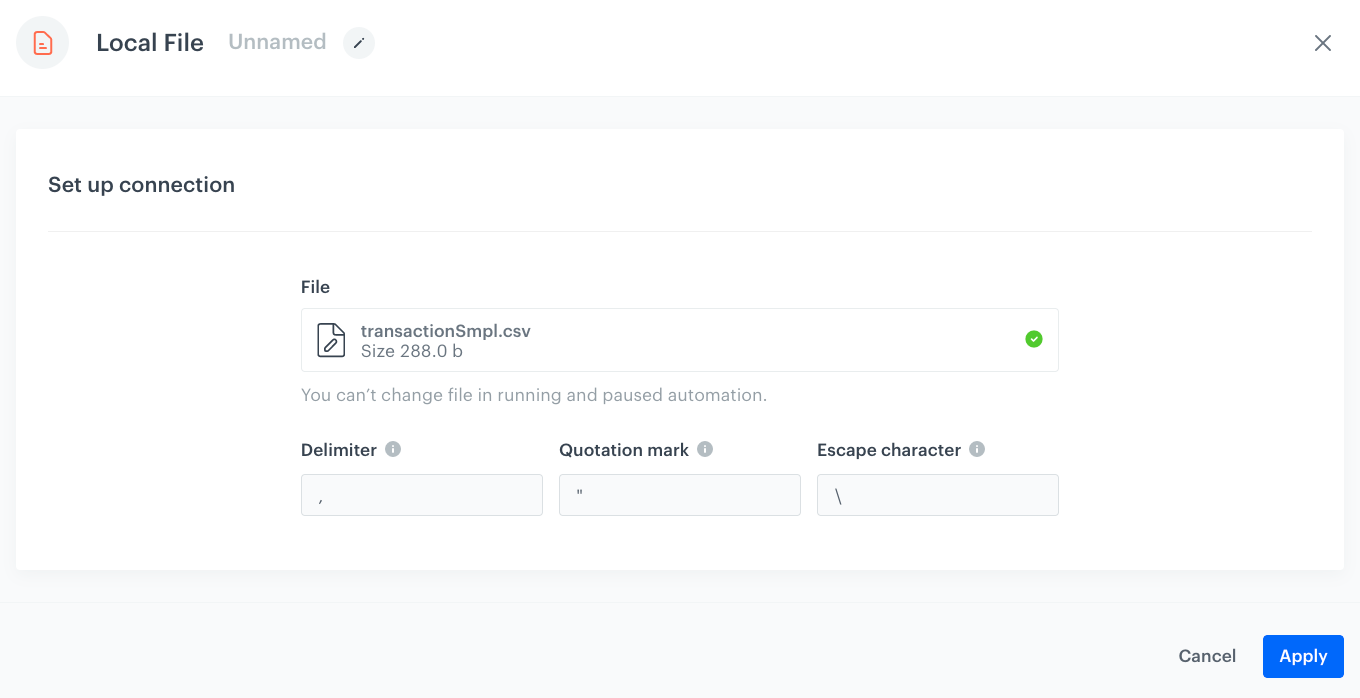
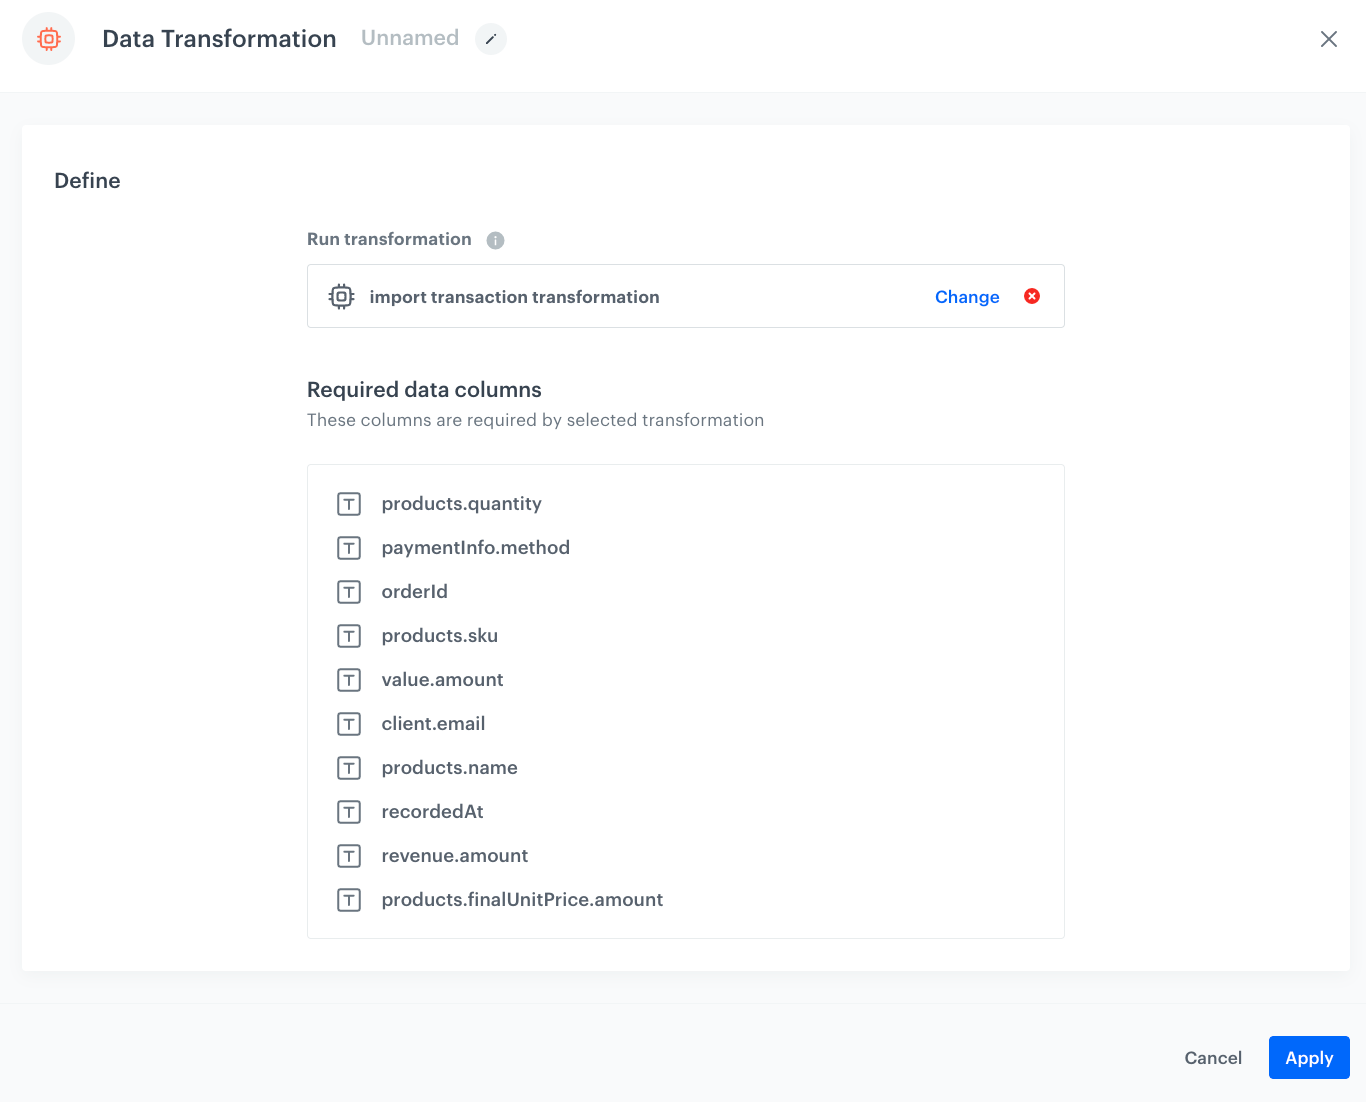
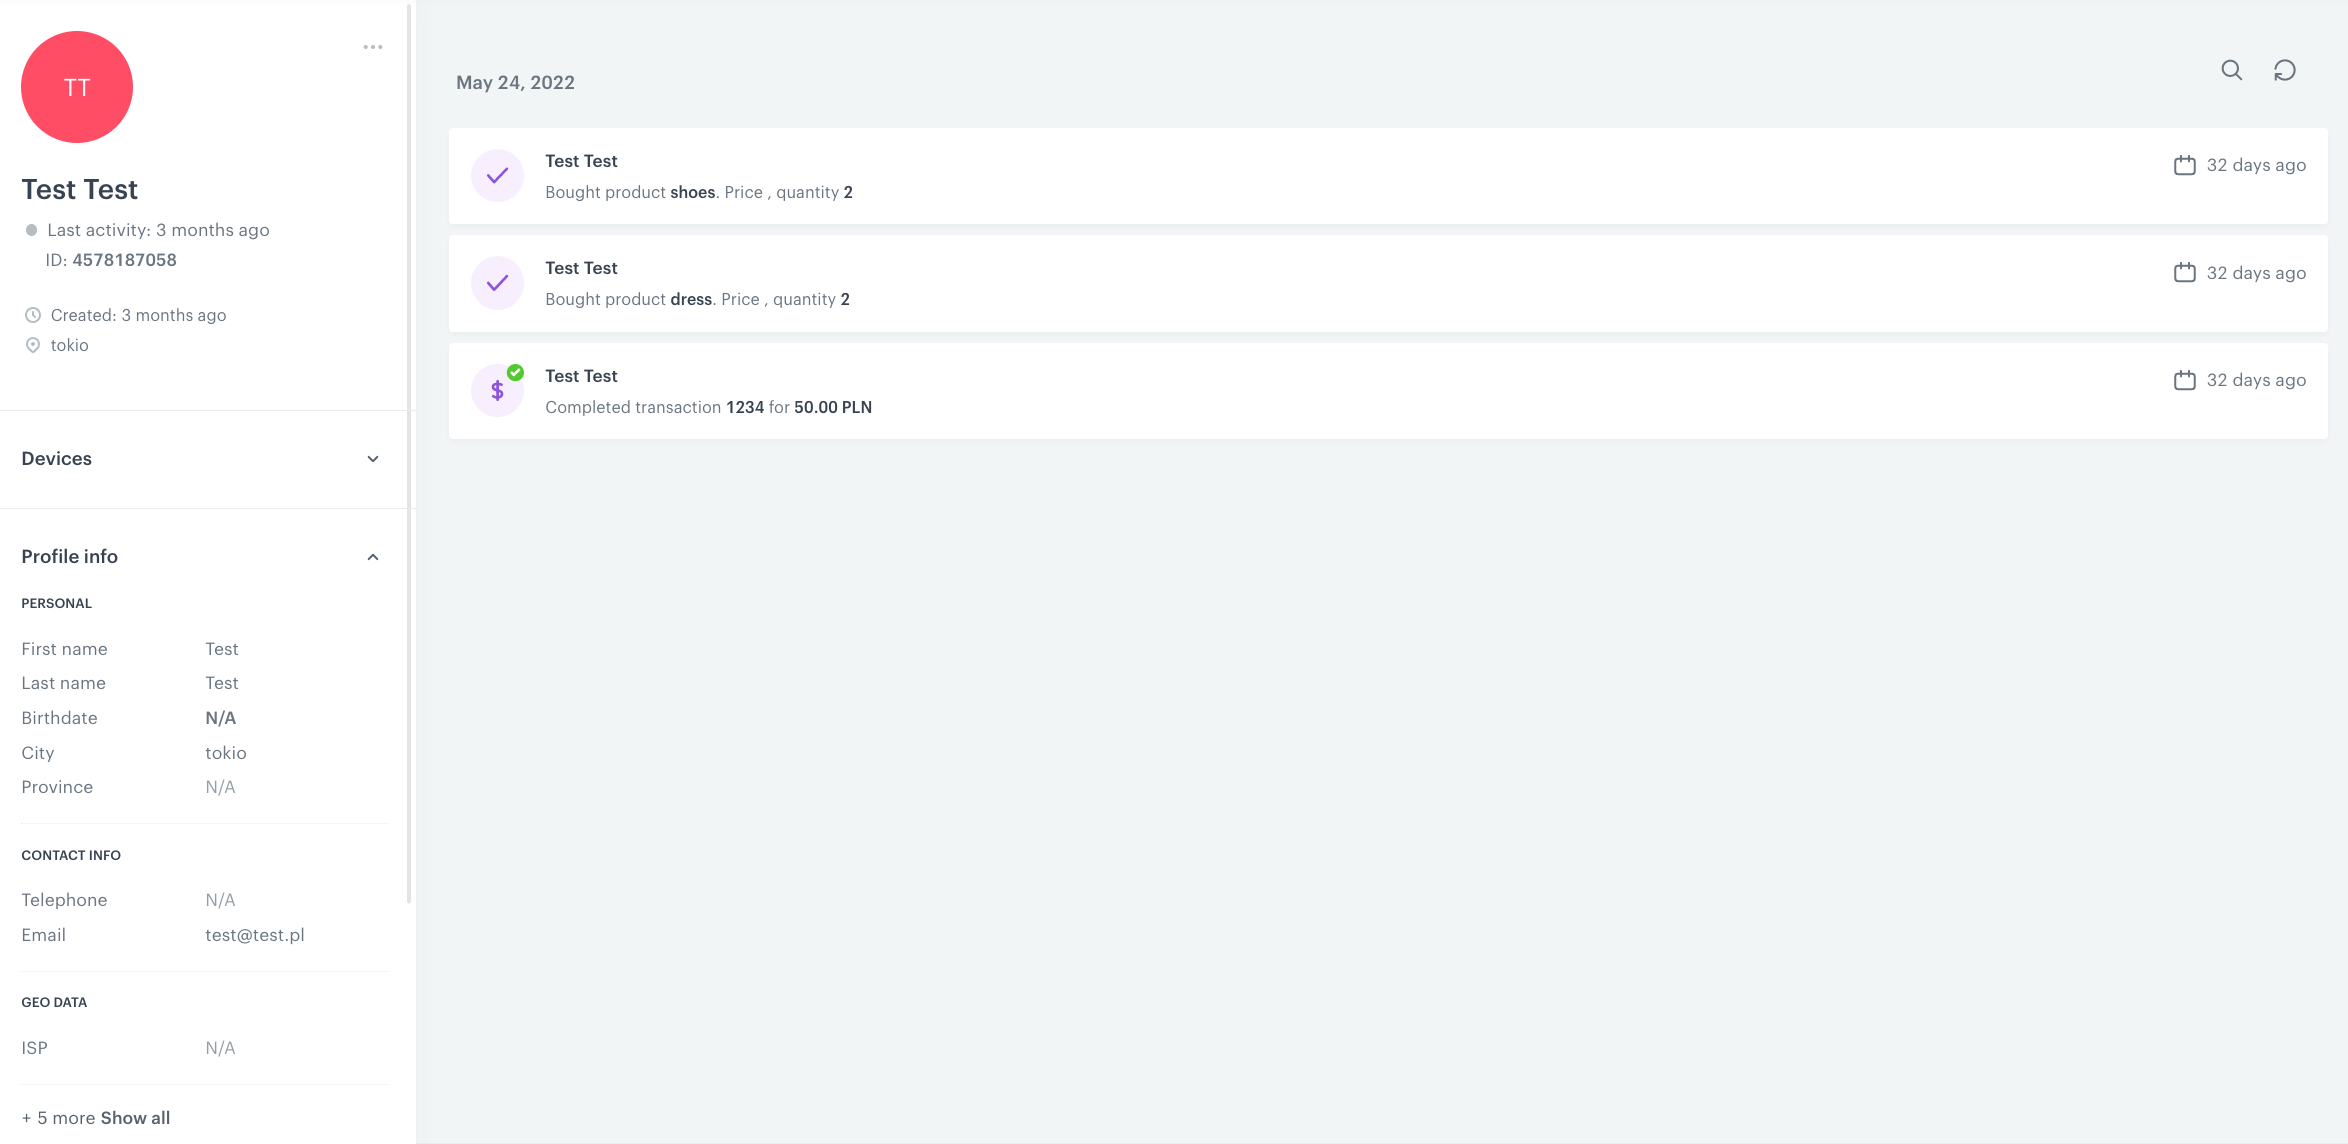
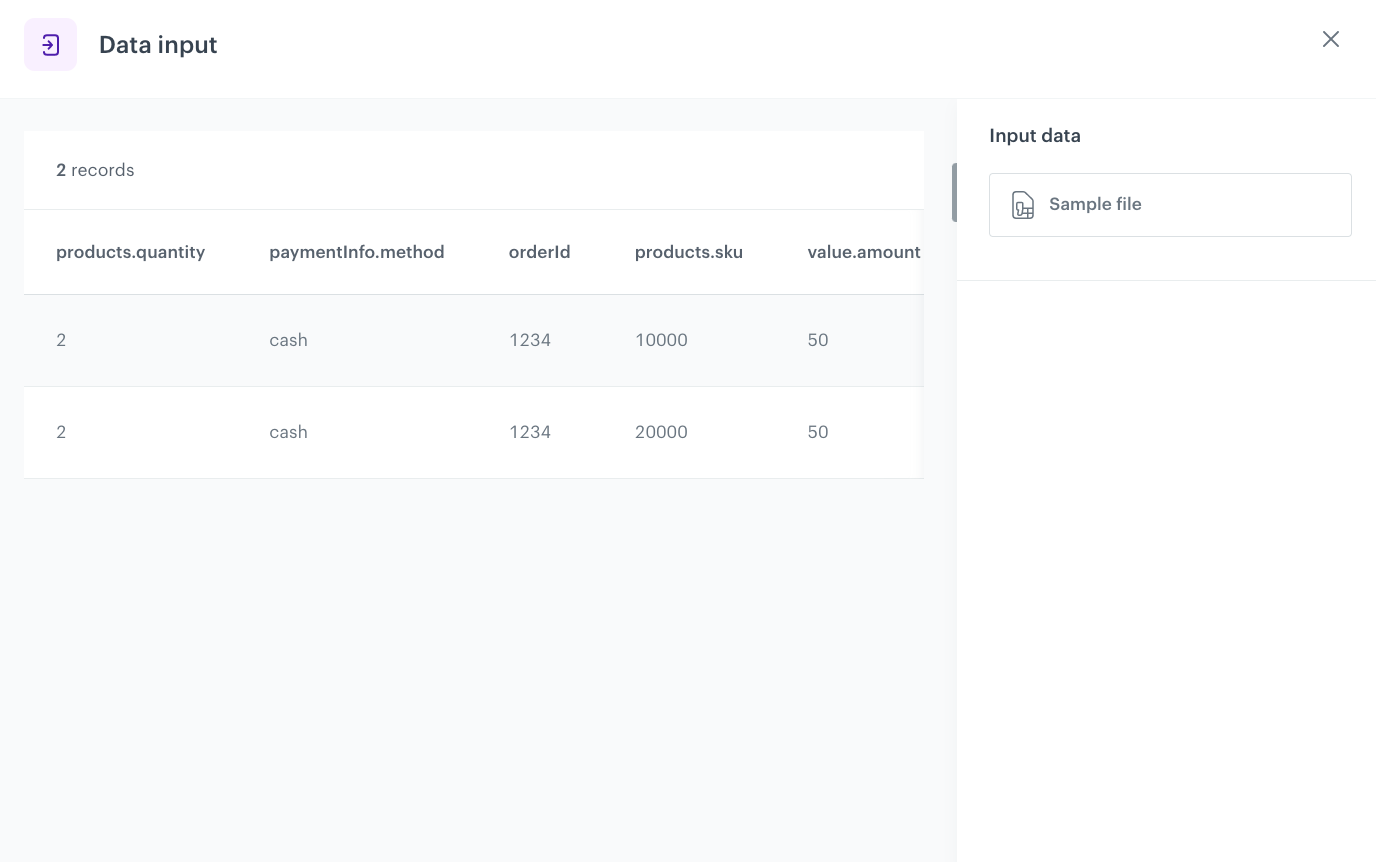
client.email,orderId,paymentInfo.method,products.finalUnitPrice.amount,products.quantity,products.sku,recordedAt,revenue.amount,value.amount,products.name <a href="mailto:test@test.pl">test@test.pl</a>,1234,cash,24,2,10000,2022-05-24T14:15:22Z,50,50,shoes <a href="mailto:test@test.pl">test@test.pl</a>,1234,cash,26,2,20000,2022-05-24T14:15:22Z,50,50,dress</p></div></details>


## Process
---

1. [Prepare a data transformation diagram](/use-cases/import-transactions-dt#create-data-transformation-rules) that will transform data from the `.CSV` file.
2. [Prepare a workflow](/use-cases/import-transactions-dt#prepare-a-workflow) that imports transactions to Synerise.

## Create data transformation rules
---
In this part of the process, you define the rules of modifying data. 
The data transformation diagram which is the output of this part of the process is used later to [automate sending the data](/use-cases/import-transactions-dt#prepare-a-workflow).

The sample file is used to configure the data transformation diagram and preview its results. With a [library of nodes](/docs/automation/data-transformation-and-imports/transformations-and-data-operators), you can modify the file by adding, renaming, and merging columns, as well as editing the values in the rows, and so on. 

In this example, we will use the **Add column** node to add columns with currency code and **Merge columns** to create eventSalt for the transactions

1. Go to <img src="/api/docs/image/54176ad07f146575310749eba44b7c2f42c1b327/icons/automation-hub-icon.svg" alt="Automation Hub icon" class="icon" > **Automation Hub > Data Transformation > Create transformation**.  
2. Enter the name of the transformation.  
3. Click **Add input**.  

### Add file with sample data

This node allows you to add a data sample. In further steps, you define how the data must be modified. Later, when this transformation is used in the  workflow, the system uses the rules created with the sample data as a pattern for modifying actual data.

4. On the pop-up, click **Add example**.  
5. Upload the file with the sample data.  
6. Click **Generate**.  

**Result:** The **Data input** view is filled with data from the sample.
<figure><img src="/api/docs/image/54176ad07f146575310749eba44b7c2f42c1b327/use-cases/all-cases/_gfx/dt-trans-input.png" class="full" alt="Data input of the sample file"><figcaption>Data input of the sample file</figcaption></figure>

### Add columns

You can use the **Add column** node to create a new column to the file, with a defined value. In this example, there are no columns with currency codes in the input file so, [following the transactions import requirements](/docs/automation/actions/synerise-integrations/import-transactions#requirements), we will add following columns: **products.finalUnitPrice.currency**, **revenue.currency**, **value.currency**. All of them will have the defined value: `PLN`.

1. On the canvas, click the right mouse button.
2. From the dropdown list, select **Add column**.
3. Click the Add column node.
4. In the configuration of the node:
    1. In the **Add column** field, enter the unique column name.
      In our case: `products.finalUnitPrice.currency`.
    2. Select the **Static value** option.  
        The rows in the new column will be filled with the value you define.
    3. As the value, enter `PLN`
    4. Confirm by clicking **Apply**. 
    5. Before you save the settings, you can check the preview of the file after changes on the **Output data** tab. 
5. Add two more **Add column** nodes by repeating steps 1-4 with the following changes:
    - as the second column, add `revenue.currency` and as the value to insert, enter `PLN`
    - as the third column, add `value.currency` and as the value to insert, enter `PLN`

 <figure><img src="/api/docs/image/54176ad07f146575310749eba44b7c2f42c1b327/use-cases/all-cases/_gfx/add-column.png" class="full" alt="Final configuration of the last Add column node, value.currency"><figcaption>Final configuration of the last Add column node that adds the value.currency column</figcaption></figure>


### Merge columns

You can use the **Merge columns** node to create a new column based on the values from other columns and to define the separator between the merged values. In this example, we want to add the `eventSalt` parameter to the transactions using this node. This parameter enables you to deduplicate transactions when two or more are sent with the same `eventSalt` and time as the original transaction. In our case, we will build this parameter by merging values of three columns: **orderId**, **client.email**, and **recordedAt**. We will add the `-` separator between the values. 


<div class="admonition admonition-tip"><div class="admonition-icon"><svg xmlns="http://www.w3.org/2000/svg" fill="none" viewBox="0 0 24 24" stroke="currentColor" stroke-width="2.5"><path stroke-linecap="round" stroke-linejoin="round" d="M9.663 17h4.673M12 3v1m6.364 1.636l-.707.707M21 12h-1M4 12H3m3.343-5.657l-.707-.707m2.828 9.9a5 5 0 117.072 0l-.548.547A3.374 3.374 0 0014 18.469V19a2 2 0 11-4 0v-.531c0-.895-.356-1.754-.988-2.386l-.548-.547z" /></svg></div><div class="admonition-body"><div class="admonition-content">

We recommend to always use `eventSalt` parameter while importing transactional data.

</div></div></div>


1. Click **Add rule**.  
3. Click **Add column**.
4. From the dropdown list, select the columns to be merged: **orderId**, **client.email** and **recordedAt**.  
5. In the **New column name** field, enter `eventSalt`.
6. In the **Separator** field, enter `-`.
5. Before you save the settings, you can check the preview of the file after changes in the **Output data** tab.
5. Confirm the settings by clicking **Apply**.  

<figure><img src="/api/docs/image/54176ad07f146575310749eba44b7c2f42c1b327/use-cases/all-cases/_gfx/merge.png" class="full" alt="Final configuration of the Merge column node"><figcaption>Final configuration of the Merge column node</figcaption></figure>

### Add the finishing node

This node ends the transformation and passes the modified data to the automation where the Data Transformation is used.

1. On the canvas, click the right mouse button.
2. From the dropdown list, select **Data output**.  
3. In the upper right corner, click **Save and publish**.  
    **Result**:  
    <figure><img src="/api/docs/image/54176ad07f146575310749eba44b7c2f42c1b327/use-cases/all-cases/_gfx/dt-flow.png" class="full" alt="The diagram of data transformation"><figcaption>The diagram of data transformation</figcaption></figure>

After the data transformation diagram is published, you can use it in the Data Transformation node while preparing a workflow that imports the files.

## Prepare a workflow 
---

The scenario for this use case involves a one-time transformation of a file uploaded from the user's local storage. The transformed data will be imported to Synerise as transaction events. 

1. Go to <img src="/api/docs/image/54176ad07f146575310749eba44b7c2f42c1b327/icons/automation-hub-icon.svg" alt="Automation Hub icon" class="icon" > **Automation Hub > Workflows > New workflow**.  
2. Enter the name of the workflow.  

### Define the launch date

3. As the trigger node, add **Scheduled Run**.  
4. In the configuration of the node:  
    1. Change the **Run trigger** option to **one time**.  
    2. Select **Immediately**.
        <figure><img src="/api/docs/image/54176ad07f146575310749eba44b7c2f42c1b327/use-cases/all-cases/_gfx/scheduled-run-dt.png" class="full" alt="The configuration of the Scheduled Run node"><figcaption>The configuration of the Scheduled Run node</figcaption></figure>
    3. Confirm by clicking **Apply**.

### Select file to export

1. Add a **Local File** node.  
2. In the configuration of the node:  
    1. Upload the file in which you want to perform the transformation.  
        <figure><img src="/api/docs/image/54176ad07f146575310749eba44b7c2f42c1b327/use-cases/all-cases/_gfx/inpt.png" class="full" alt="Local ile transfer"><figcaption>Local File transfer</figcaption></figure>    
    2. Confirm by clicking **Apply**.  

### Select the data transformation rules

1. Add a **Data Transformation** node.  
2. In the configuration of the node, select the [data transformation you have created before](/use-cases/import-transactions-dt#create-data-transformation-rules).  
    <figure><img src="/api/docs/image/54176ad07f146575310749eba44b7c2f42c1b327/use-cases/all-cases/_gfx/dt-trans.png" class="full" alt="The configuration of the Data Transformation node"><figcaption>The configuration of the Data Transformation node</figcaption></figure>

3. Confirm by clicking **Apply**.  

### Import transactions
1. Add the **Import Transactions** node.
2.  Confirm by clicking **Apply**.


### Add the finishing node

1. Add the **End** node. 
2. In the upper right corner, click **Save & Run**.  
    **Result**:  
    <figure><img src="/api/docs/image/54176ad07f146575310749eba44b7c2f42c1b327/use-cases/all-cases/_gfx/trans-workflow.png" class="full" alt="The workflow configuration"><figcaption>The workflow configuration</figcaption></figure>

You can monitor the flow of the workflow in the **Transformation logs** tab. It contains information about each execution of the workflow.  
    <figure><img src="/api/docs/image/54176ad07f146575310749eba44b7c2f42c1b327/use-cases/all-cases/_gfx/synchronize-logs.png" class="full" alt="The logs for the workflow"><figcaption>The logs for the workflow</figcaption></figure>

The imported transaction events will be visible in the customers' profiles.
    <figure><img src="/api/docs/image/54176ad07f146575310749eba44b7c2f42c1b327/use-cases/all-cases/_gfx/trans-events.png" class="full" alt="The transaction event visible in the customer's profile"><figcaption>The transaction event visible in the customer's profile</figcaption></figure>


<div class="admonition admonition-tip"><div class="admonition-icon"><svg xmlns="http://www.w3.org/2000/svg" fill="none" viewBox="0 0 24 24" stroke="currentColor" stroke-width="2.5"><path stroke-linecap="round" stroke-linejoin="round" d="M9.663 17h4.673M12 3v1m6.364 1.636l-.707.707M21 12h-1M4 12H3m3.343-5.657l-.707-.707m2.828 9.9a5 5 0 117.072 0l-.548.547A3.374 3.374 0 0014 18.469V19a2 2 0 11-4 0v-.531c0-.895-.356-1.754-.988-2.386l-.548-.547z" /></svg></div><div class="admonition-body"><div class="admonition-content">

This use case concerns one-time import of transaction events from the local storage. However, you can simply modify the flow and run import cyclically from external resource. Learn more how to set up the configuration of importing data from external resource at the following links: [import from SFTP](/docs/automation/integration/sftp-integrations/sftp-get-file), [import from HTTPS](/docs/automation/integration/http-integrations/http-get-file).

</div></div></div>


## Check the use case set up on the Synerise Demo workspace
---

You can also check [the Data Transformation diagram](https://app.synerise.com/automations/data-transformation/b92a97c3-6da7-4f84-8650-871df834a9ab) and [the workflow configuration](https://app.synerise.com/automations/automation-diagram/f9ffbda5-2509-4dbe-a5c3-3686f5312247) directly in Synerise Demo workspace.

If you’re our partner or client, you already have automatic access to the **Synerise Demo workspace (1590)**, where you can explore all the configured elements of this use case and copy them to your workspace.  

If you’re not a partner or client yet, we encourage you to fill out the contact [form](https://demo.synerise.com/request) to schedule a meeting with our representatives. They’ll be happy to show you how our demo works and discuss how you can apply this use case in your business. 
## Read more
---
- [Data Transformation](/docs/automation/data-transformation-and-imports/introduction) 
- [Enriching events from catalogs](/docs/assets/events/adding-event-parameters#enriching-events-with-data-from-catalogs)
- [Behavioral Data Hub](/docs/crm)
- [Transactional data structure](https://developers.synerise.com/ClientManagement/ClientManagement.html#operation/ClientCompletedTransaction)

