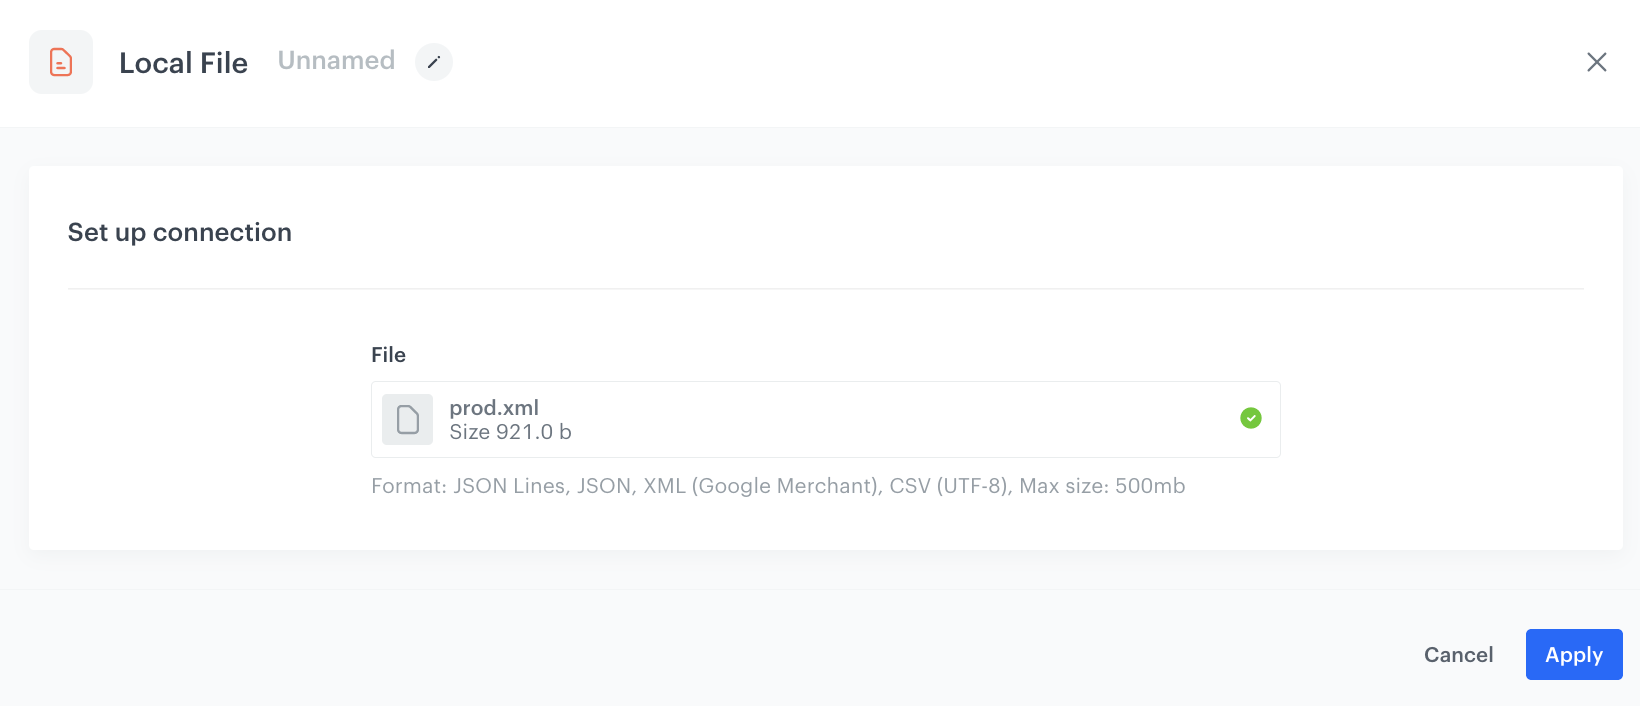
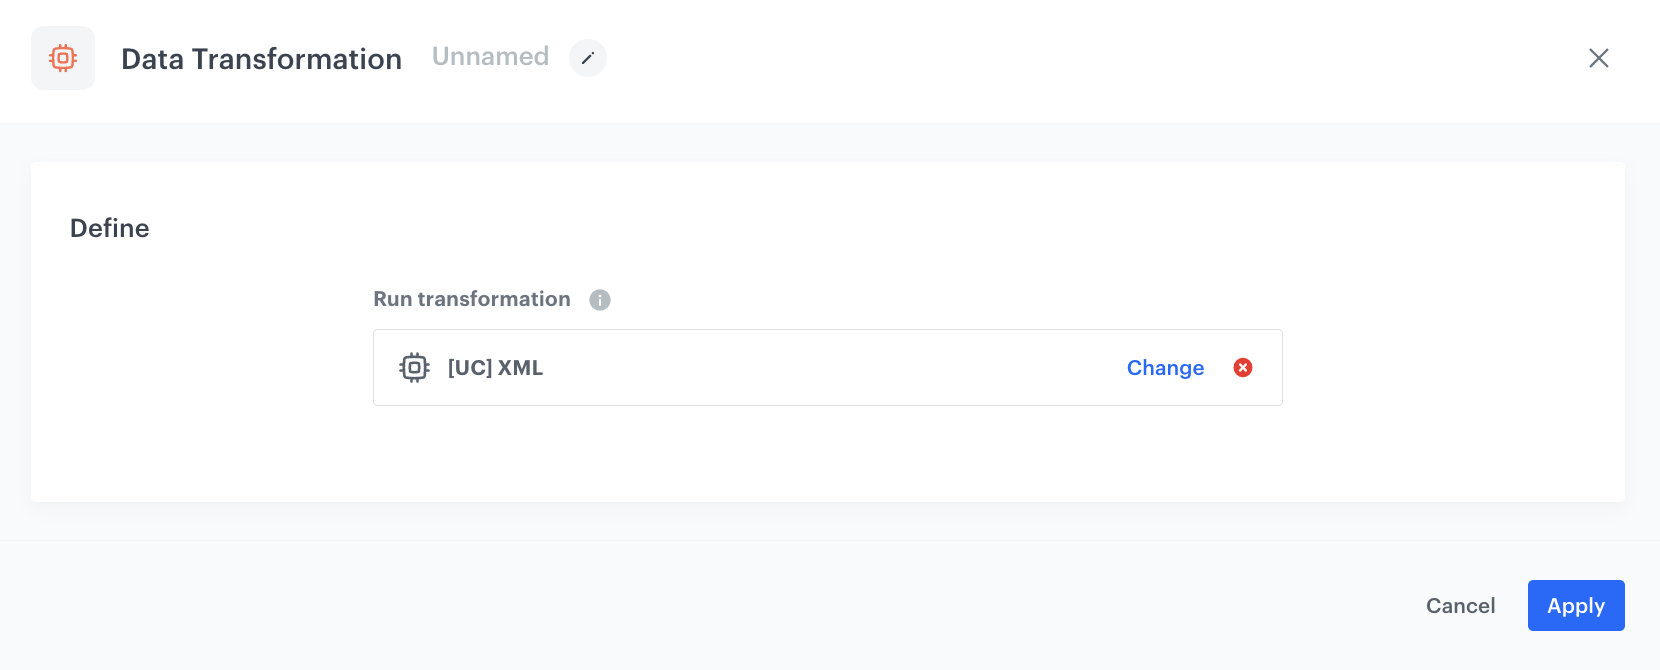
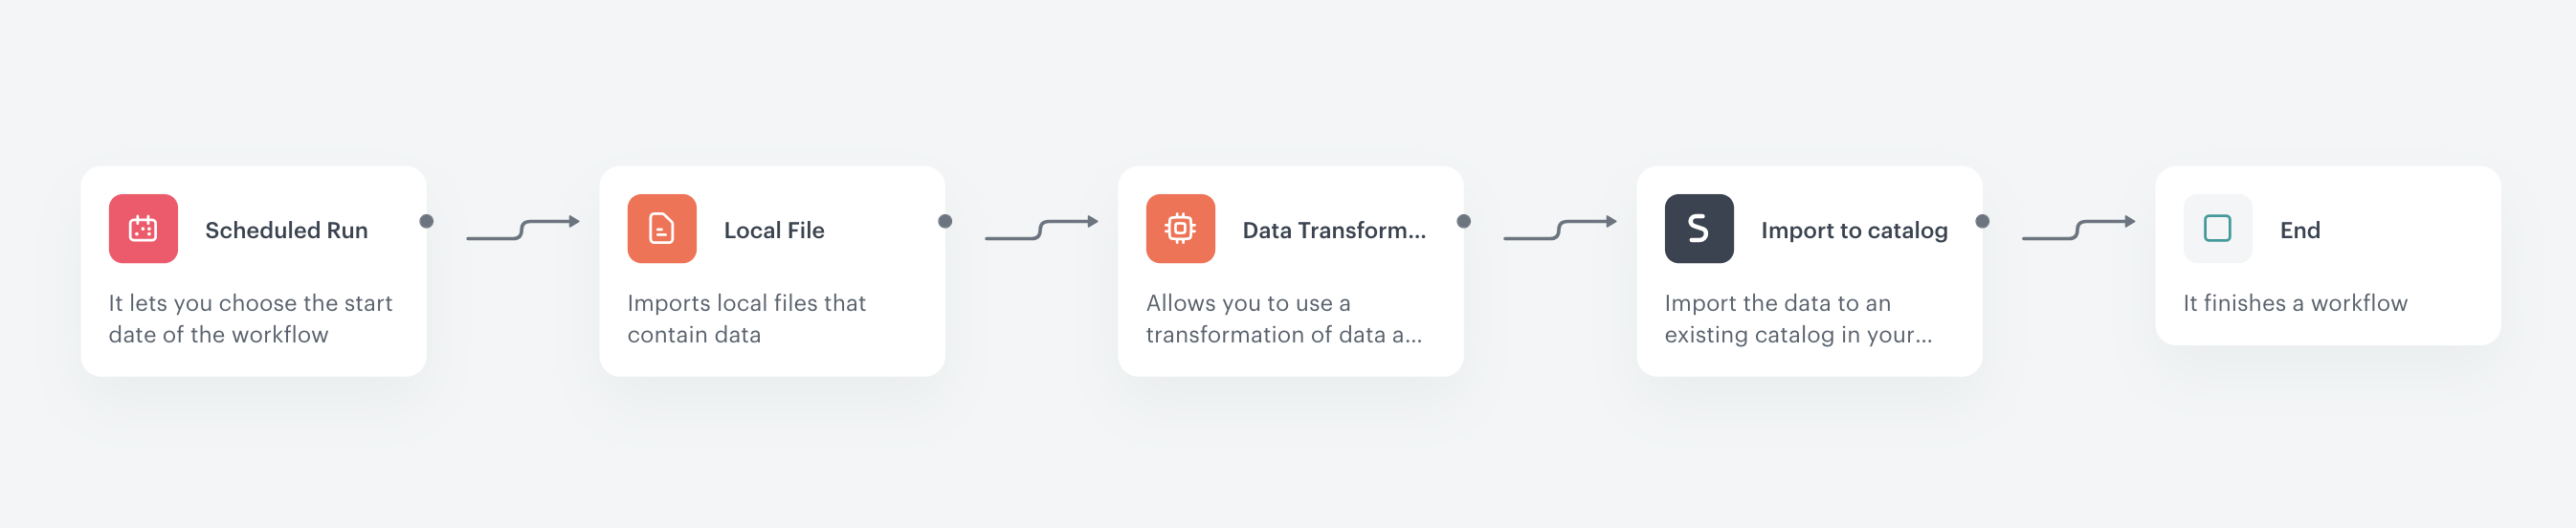
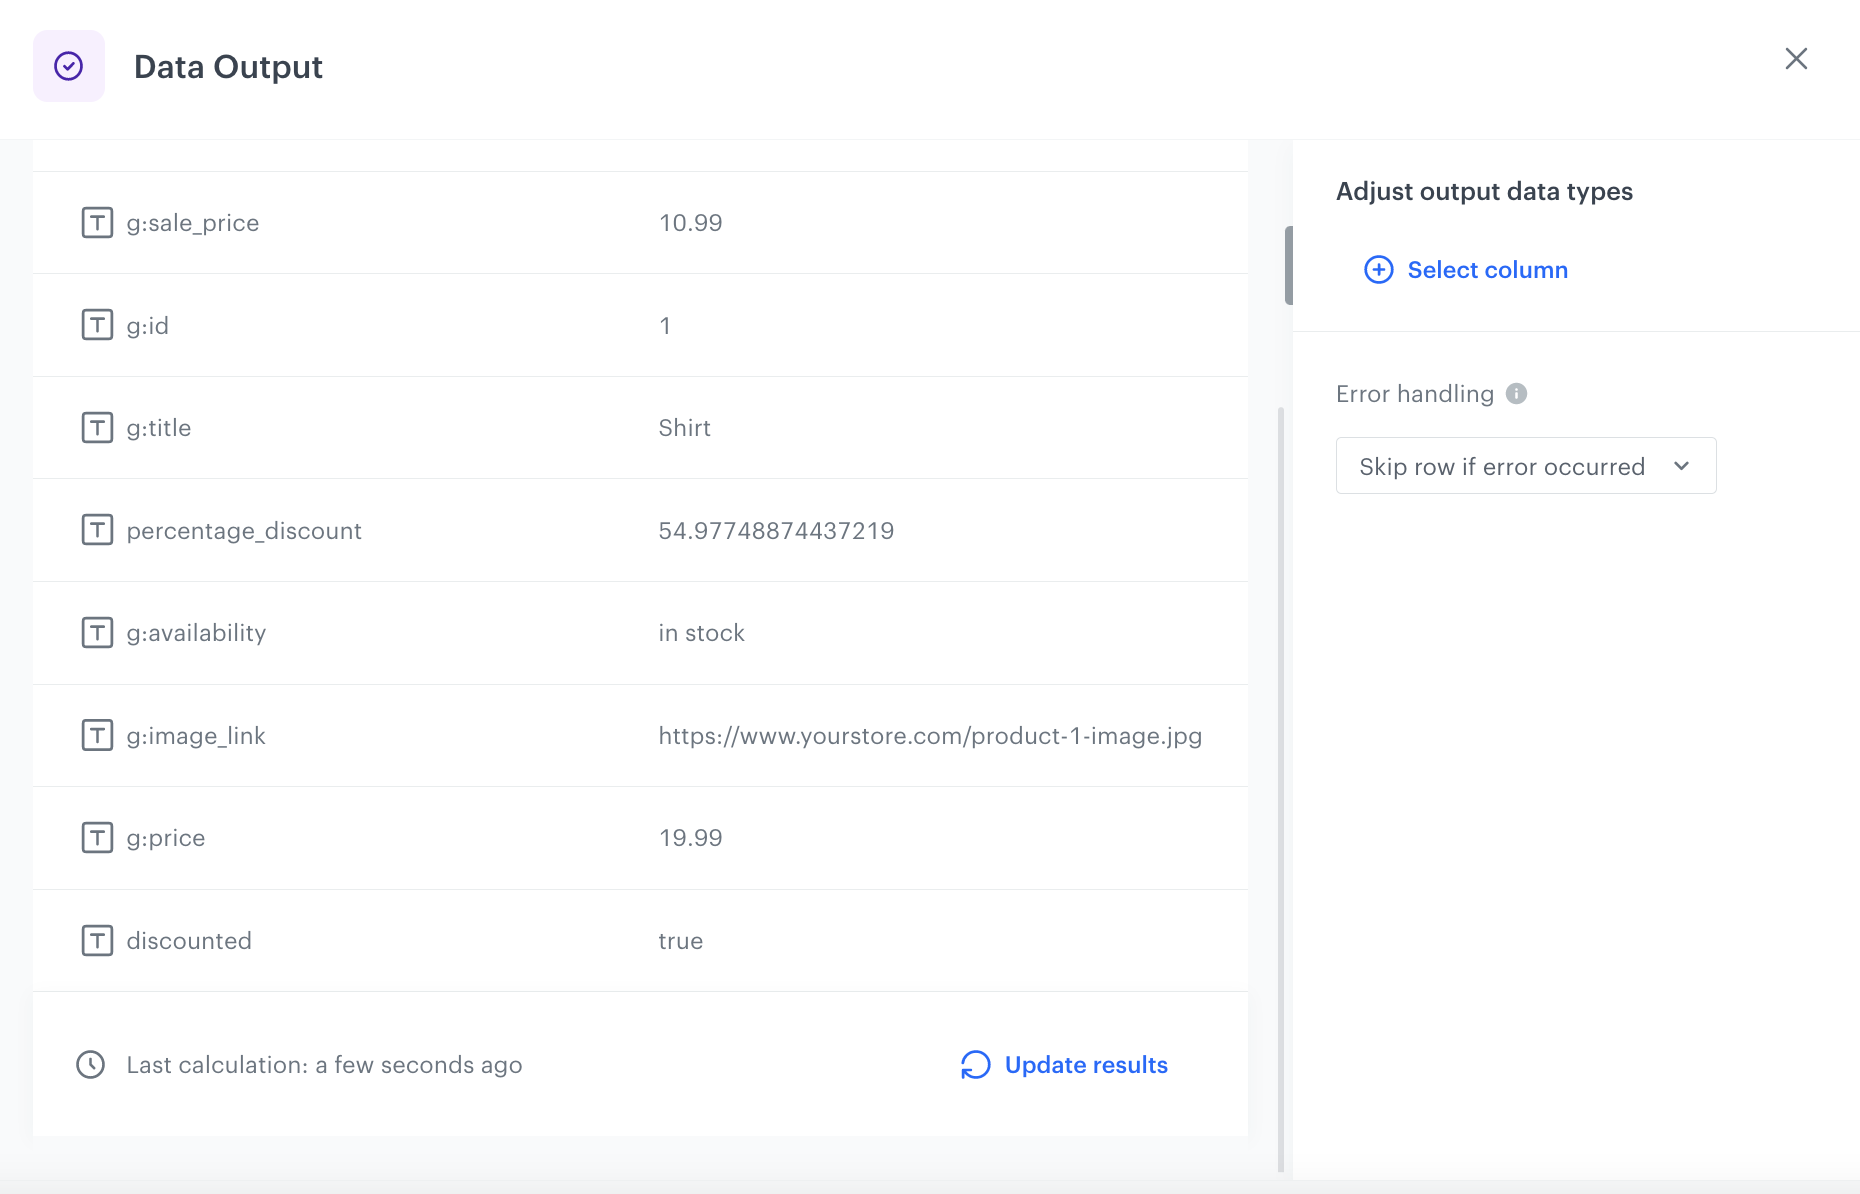
In this use case, we will focus on the process of importing and transforming product data from an `.XML` file using data transformation. This method of data transformation is beneficial as it eliminates the need for the data to be in a predetermined, structured format. 

In this use case, we will make the following modifications to the file:
- Add 2 new columns:
    - **discounted**: this column will contain the `true` value for all products which have a value (price) assigned in the `g:sale_price` column.
    - **percentage_discount**: this column contains the percentage value of the discount based on `g:price` and `g:sale_price` columns.
- Edit values:
    Replace the value of `g:availability` column from `1`/`0` to `in stock`/`out of stock`.

## Input data in use case
---

In this use case, we use two files:
- the complete `.XML` file in the Google Merchant Format which contains the full set of products. The file contains the following attributes: `g:id,g:title,g:description,g:image_link,g:price,g:sale_price,g:availability`.
- the sample of the product data in the `.XML` format.
To reproduce this scenario in your workspace, [create a catalog](/docs/assets/catalogs/creating-catalogs) and prepare the files.

<div class="admonition admonition-note"><div class="admonition-icon"><svg xmlns="http://www.w3.org/2000/svg" fill="none" viewBox="0 0 24 24" stroke="currentColor" stroke-width="2.5"><path stroke-linecap="round" stroke-linejoin="round" d="M13 16h-1v-4h-1m1-4h.01M21 12a9 9 0 11-18 0 9 9 0 0118 0z" /></svg></div><div class="admonition-body"><div class="admonition-content">

If your product data is complete, you can skip transforming data. But if you need to modify the file with product data before an import to Synerise, you can modify the data in **Automation > Data Transformation**. To do so, create a sample of your product data and include all attributes you want to modify. If you miss the attributes in the sample file, but import the actual product data with them, the data will be imported as delivered in the actual file.

</div></div></div>


<details class="accordion"><summary>Example XML file</summary><div class="accordion-content"><pre><code>&lt;?xml version=&quot;1.0&quot; encoding=&quot;UTF-8&quot;?&gt; &lt;rss version=&quot;2.0&quot; xmlns:g=&quot;http://base.google.com/ns/1.0&quot;&gt; &lt;channel&gt; &lt;title&gt;Your Store Name&lt;/title&gt; &lt;link&gt;https://www.yourstore.com&lt;/link&gt; &lt;description&gt;Your Store with clothes&lt;/description&gt; &lt;item&gt; &lt;g:id&gt;1&lt;/g:id&gt; &lt;g:title&gt;Shirt&lt;/g:title&gt; &lt;g:description&gt;white cotton shirt with a round neck&lt;/g:description&gt; &lt;g:link&gt;https://www.yourstore.com/product-1&lt;/g:link&gt; &lt;g:image_link&gt;https://www.yourstore.com/product-1-image.jpg&lt;/g:image_link&gt; &lt;g:price&gt;19.99&lt;/g:price&gt; &lt;g:sale_price&gt;10.99&lt;/g:sale_price&gt; &lt;g:availability&gt;1&lt;/g:availability&gt; &lt;/item&gt; &lt;item&gt; &lt;g:id&gt;2&lt;/g:id&gt; &lt;g:title&gt;Jeans&lt;/g:title&gt; &lt;g:description&gt;blue cotton jeans&lt;/g:description&gt; &lt;g:link&gt;https://www.yourstore.com/product-2&lt;/g:link&gt; &lt;g:image_link&gt;https://www.yourstore.com/product-2-image.jpg&lt;/g:image_link&gt; &lt;g:price&gt;29.99&lt;/g:price&gt; &lt;g:sale_price&gt;20.99&lt;/g:sale_price&gt; &lt;g:availability&gt;0&lt;/g:availability&gt; &lt;/item&gt; &lt;/channel&gt; &lt;/rss&gt; </code></pre></div></details>


## Process 
---

In this use case, you will go through the following steps:
1. [Create a data transformation rule](/use-cases/import-xml-file#create-a-data-transformation) to transform the data in the sample file.
2. [Create a workflow](/use-cases/import-xml-file#create-a-workflow) to import the .`XML` file to Synerise.

## Create a data transformation
---
In this part of the process, you define the rules of modifying data before sending it to the Synerise based on the sample file. Each of the following sub-steps describes the individual changes performed on the file.
We will add follwing rules:
- Add 2 new columns:
    - **discounted**: this column will contain the `true` value for all products which have a value (price) assigned in the `g:sale_price` column.
    - **percentage_discount**: this column contains the percentage value of the discount based on `g:price` and `g:sale_price` columns.
- Edit values:
    Replace the value of `g:availability` column from “1/0“ to “in stock/out of stock“

1. Go to <img src="/api/docs/image/54176ad07f146575310749eba44b7c2f42c1b327/icons/automation-hub-icon.svg" alt="Automation Hub icon" class="icon" > **Automation Hub > Data Transformation > Create transformation**.  
2. Enter the name of the transformation.
3. Click **Add input**.  

Before you proceed with selecting sample data and defining transformation rules, optionally, you can select a goal to help you structure the data. If you want to create a transformation diagram without a specific goal and you know the structure of the output data, skip this step.

Goals will suggest you the required data for the import into Synerise.

### Add file with sample data

This node allows you to add a data sample. In further steps, you define how the data will be modified. Later, when [this transformation is used in the Automation workflow](/docs/automation/operation/data-transformation-node), the system uses the rules created for the sample data as a pattern for modifying actual data.

1. On the canvas, click the **Add input** node.
2. On the pop-up, click **Upload a new file** or drag one here.
3. Upload the `.XML` file created as the part of prerequisites.
4. You can preview the file, then click **Apply**.

### Add the new column

7. On the **Data Input** node, click the grey dot.
8. From the dropdown list, select **Add column**.
9. Click the **Add column** node.  
10. In the configuration of the node:  
    1. In the **Add column** field, enter the name of the column. In this use case, it's `discounted`.  
    3. From the dropdown list, select **Dynamic value**. 
    4. In the **Type value** box, add the Jinja code, which adds the `true` value for all products with `g:sale_price` attribute in this new column. You can use the code presented below:
        
       <pre><code class="language-jinja">{% if root["g:sale_price"] is defined %}true{% endif %}</code></pre>

    5. Leave **Handle incomplete data** at default (**Skip row if error occurred**) to skip missing or invalid data which may occur during transformation.
    7. Confirm by clicking **Apply**.


### Add the new column

7. On the **Add column** node, click **THEN**.
8. From the dropdown list, select **Add column**.
9. Click the **Add column** node.  
10. In the configuration of the node:  
    1. In the **Add column** field, enter the name of the column. In this use case, it's `percentage_discount`. 
    3. From the dropdown list, select **Dynamic value**. 
    4. In the **Type value** box, add the Jinja code, which counts the percentage value of the discount based on `g:price` and `g:sale_price` attributes and adds it to this new column. You can use the code presented below:
        
       <pre><code class="language-jinja">{% if root["g:sale_price"] is defined %}{{ root["g:sale_price"]*100/root["g:price"] }}{% endif %}</code></pre>

    5. Leave **Handle incomplete data** at default (**Skip row if error occurred**) to skip missing or invalid data which may occur during transformation.
    7. Confirm by clicking **Apply**.


### Edit values

7. On the **Add column** node, click **THEN**.
8. From the dropdown list, select **Edit values**.
9. Click the **Edit values** node. In the configuration of the node:
 1. Click **Add rule**. 
 2. Click **Add column**.  
 3. From the dropdown list, select column name, in this case it's `g:availability`. 
 4. Set the **Edit values** values option to:
    1. **Replacing** 
    2.  **Dynamic value**.
 4. In the **Type value** field, enter the Jinja code which replaces the value of `g:availability` attribute from `1` and `0` to `in stock`/`out of stock`. You can use the code presented below:
        
    <pre><code class="language-jinja">{% if root['g:availability'] == 1 %}in stock{% else %}out of stock{% endif %}</code></pre>

 5. Leave **Handle incomplete data** at default (**Skip row if error occurred**) to skip missing or invalid data which may occur during transformation.
7. Confirm by clicking **Apply**.

### Add the finishing node

This node lets you preview the output of the modifications to the sample data.

1. On the **Edit values** node, click **THEN**.
2. From the dropdown list, select **Data Output**.  
3. To preview the results, click the **Data Output** node. 
    <figure><img src="/api/docs/image/54176ad07f146575310749eba44b7c2f42c1b327/use-cases/all-cases/_gfx/data-output.png" class="full" alt="The preview of modifications to the file"><figcaption>The preview of modifications to the file</figcaption></figure>
4. Close the preview
3. In the upper right corner, click **Save and publish**.  
    **Result**:  
    <figure><img src="/api/docs/image/54176ad07f146575310749eba44b7c2f42c1b327/use-cases/all-cases/_gfx/final-dt.png" class="full" alt="The diagram of data transformation"><figcaption>The diagram of data transformation</figcaption></figure>

## Create a workflow
---
The scenario for this use case describes a one-time import of the `.XML` file with a product database to Synerise.

1. Go to <img src="/api/docs/image/54176ad07f146575310749eba44b7c2f42c1b327/icons/automation-hub-icon.svg" alt="Automation Hub icon" class="icon" > **Automation Hub > Workflows > New workflow**.  
2. Enter the name of the workflow.  

### Define the launch date

3. As the trigger node, add **Scheduled Run**.  
4. In the configuration of the node:  
    1. Change the **Run trigger** option to **one time**.  
    2. Select **Immediately**.
    3. Confirm by clicking **Apply**.

     <figure><img src="/api/docs/image/54176ad07f146575310749eba44b7c2f42c1b327/use-cases/all-cases/_gfx/scheduled-run-dt.png" class="full" alt="The configuration of the Scheduled Run node"><figcaption>The configuration of the Scheduled Run node</figcaption></figure>

### Select file to import

1. Add a **Local File** node.  
2. In the configuration of the node:  
    1. Upload the file. 
    2. Confirm by clicking **Apply**.  

 <figure><img src="/api/docs/image/54176ad07f146575310749eba44b7c2f42c1b327/use-cases/all-cases/_gfx/local-filexml.png" class="full" alt="Local File transfer"><figcaption>Local File transfer</figcaption></figure>  

### Add data transformation node

1. Add a **Data Transformation** node.  
2. In the configuration of the node:  
    1. Choose the name of the data transformation, which you have created in the [previous part of the process](/use-cases/import-xml-file#create-a-data-transformation).
    2. Confirm by clicking **Apply**.  

 <figure><img src="/api/docs/image/54176ad07f146575310749eba44b7c2f42c1b327/use-cases/all-cases/_gfx/dt-xml.png" class="full" alt="Data Transformation node"><figcaption>Data Transformation node</figcaption></figure>  

### Add import to catalog

1. On the **Data Transformation** node, click **THEN**.
2. From the list that opens, select **Synerise > Import to Catalog**.
3. Open **Import to Catalog** node.
4. Choose the catalog from the list.
5. As a primary key, choose `g:id` parameter.
5. Click **Apply**.

### Add the finishing node

1. Add the **End** node. 
2. In the upper right corner, click **Save & Run**.  
    <figure><img src="/api/docs/image/54176ad07f146575310749eba44b7c2f42c1b327/use-cases/all-cases/_gfx/xmlimport.png" class="full" alt="The workflow configuration"><figcaption>The workflow configuration</figcaption></figure>

You can monitor the flow of the workflow in the **Transformation logs** tab. It contains information about the execution of the workflow.  
    <figure><img src="/api/docs/image/54176ad07f146575310749eba44b7c2f42c1b327/use-cases/all-cases/_gfx/synchronize-logs.png" class="full" alt="The logs for the workflow"><figcaption>The logs for the workflow</figcaption></figure>

## Check the use case set up on the Synerise Demo workspace
---
You can check the [data transformation](https://app.synerise.com/automations/data-transformation/baebb542-133f-4e13-9d18-29fdaef74fc8) and [automation process](https://app.synerise.com/automations/workflows/automation-diagram/4ccfae2d-3525-4cba-a7dc-0615e3f96cf3) directly in Synerise Demo workspace. 

If you’re our partner or client, you already have automatic access to the **Synerise Demo workspace (1590)**, where you can explore all the configured elements of this use case and copy them to your workspace.  

If you’re not a partner or client yet, we encourage you to fill out the contact [form](https://demo.synerise.com/request) to schedule a meeting with our representatives. They’ll be happy to show you how our demo works and discuss how you can apply this use case in your business. 

## Read more
---

- [Automation Hub](/docs/automation)
- [Data Transformation](/docs/automation/data-transformation-and-imports)
- [Data Transformation node](/docs/automation/operation/data-transformation-node)
