
Modern mobile UX encourages interactivity and continuity — allowing users to move smoothly between subtle notifications and immersive experiences without switching screens.  
The resize feature in in-app messages makes it possible to run a single campaign with multiple visual states (for example, a small top or bottom bar expanding into a full-screen story).

In this use case, you’ll build a two-stage in-app campaign for a specific brand.
At first, users see a compact banner (“top” bar) with a teaser message such as “Discover Brand X”.
After tapping the banner, the in-app message resizes to a full-screen story view, presenting brand details and AI-based recommendations of its bestsellers.

This approach combines subtle awareness with deeper engagement — all in a single, unified campaign.

It will be displayed after logging in to the application for users who have not viewed any product from this new brand yet. Additionally, the campaign will be active only for one month.

<div class="youtube-embed youtube-facade not-prose" data-youtube-id="QO7_JmbA1i4" role="button" tabindex="0" aria-label="Play YouTube video"><img src="https://img.youtube.com/vi/QO7_JmbA1i4/hq720.jpg" alt="YouTube video" class="youtube-facade-thumb" loading="lazy" /><span class="youtube-facade-play" aria-hidden="true"><svg viewBox="0 0 68 48" width="68" height="48"><path d="M66.52 7.74c-.78-2.93-2.49-5.41-5.42-6.19C55.79.13 34 0 34 0S12.21.13 6.9 1.55c-2.93.78-4.64 3.26-5.42 6.19C.06 13.05 0 24 0 24s.06 10.95 1.48 16.26c.78 2.93 2.49 5.41 5.42 6.19C12.21 47.87 34 48 34 48s21.79-.13 27.1-1.55c2.93-.78 4.64-3.26 5.42-6.19C67.94 34.95 68 24 68 24s-.06-10.95-1.48-16.26z" fill="red"/><path d="M45 24 27 14v20" fill="white"/></svg></span></div>

## Prerequisites 
---
- [Configure AI engine](/docs/settings/configuration/ai-engine-configuration/engine-configuration-for-recommendations) for recommendations; enable the personalized recommendation type.
- Implement the [transaction events](/developers/web/transactions-sdk) using [SDK](/developers/web/transactions-sdk) or [API](https://developers.synerise.com/DataManagement/DataManagement.html#operation/CreateATransaction).
- [Implement Synerise SDK in your mobile app](/developers/mobile-sdk).

## Process
---

In this use case, you will go through the following steps:
1. [Prepare the segmentation](#prepare-the-segmentation) of users who have never seen any product from this new brand.
2. [Create an in-app campaign](#create-an-in-app-campaign) as a top bar which, after tapping, resizes to the stories format automatically.


## Prepare the segmentation
---
In this part of the process, you will create a group of customers who have never seen any product from a new brand.

1. Go to <img src="/api/docs/image/54176ad07f146575310749eba44b7c2f42c1b327/icons/decision-hub-icon.svg" alt="Decision Hub icon" class="icon">**Decision Hub > Segmentations > New segmentation**.
3. Enter the name of the segmentation.
4. Click **Add condition**.
4. From the dropdown list, select the `page.visit` event.
7. As the parameter, choose **URL**.
6. From the **Choose operator** dropdown, choose **Contain**, and then select the name of the brand, in our case `Arcyber`.
10. Change **Performed** to **Not performed**.
7. Using the date picker in the lower-right corner, set the time range to **Lifetime**. Confirm by clicking **Apply**.
8. Click **Add condition**.
10. From the list, choose the `screen.view` event,
7. As the parameter, choose **URL**.
6. From the **Choose operator** dropdown, choose **Contain**, and then select the name of the brand, in our case `Arcyber`.
10. Change **Performed** to **Not performed**.
7. Using the date picker in the lower-right corner, set the time range to **Lifetime**. Confirm by clicking **Apply**.
12. Connect these conditions by the **AND** operator.  
6. Save the segmentation.

 <figure><img src="/api/docs/image/54176ad07f146575310749eba44b7c2f42c1b327/use-cases/all-cases/_gfx/segmentation11.png" class="full" alt="The view of the segmentation configuration"><figcaption>Segmentation configuration</figcaption></figure>  


   <div class="admonition admonition-note"><div class="admonition-icon"><svg xmlns="http://www.w3.org/2000/svg" fill="none" viewBox="0 0 24 24" stroke="currentColor" stroke-width="2.5"><path stroke-linecap="round" stroke-linejoin="round" d="M13 16h-1v-4h-1m1-4h.01M21 12a9 9 0 11-18 0 9 9 0 0118 0z" /></svg></div><div class="admonition-body"><div class="admonition-content">

   You can use different settings of the segment based on the way you have implemented brands to your website - if their name is added to the URL address or if you have different category for products from specific brand, or in any other way.

   </div></div></div>


## Create an in-app campaign
---

In this part of the process, you will create an in-app campaign. You will use a predefined template for the message with interactive in-app stories, so there is no need to create a template from scratch.

1. Go to <img src="/api/docs/image/54176ad07f146575310749eba44b7c2f42c1b327/icons/experience-hub-icon.svg" alt="Experience Hub icon" class="icon" > **Experience Hub > In-app messages> Create in-app**.
2. Enter the name of the in-app.

### Define the audience
---
As the first step, define the target group of customers for the in-app message. In this case, you will use the segmentation created in the [previous step](#prepare-the-segmentation).

1. In the **Audience** section, click **Define**.
2. Click **Segmentations**.
3. Click **Select segmentation** and choose the segmentation created in the [previous step](#prepare-the-segmentation).
3. Save the settings in the **Audience** section by clicking **Apply**.

### Define content
---
In this part of the process, you will use a ready-made template to create the content of the in-app message that will be displayed in the mobile application.

1. In the **Content** section, click **Define**.
2. Click **Create message** and from the list of template folders, select **Predefined templates**.
3. Select the **Resize Stories** template.

**Result:** You are redirected to the code editor.

<div class="admonition admonition-note"><div class="admonition-icon"><svg xmlns="http://www.w3.org/2000/svg" fill="none" viewBox="0 0 24 24" stroke="currentColor" stroke-width="2.5"><path stroke-linecap="round" stroke-linejoin="round" d="M13 16h-1v-4h-1m1-4h.01M21 12a9 9 0 11-18 0 9 9 0 0118 0z" /></svg></div><div class="admonition-body"><div class="admonition-content">

You can edit the template in two ways:
- by editing the code of the template, [adding inserts](/docs/campaign/in-app-messages/creating-inapp-templates/creating-inapp-template#adding-a-snippet-to-the-template-code), [adding variables](/docs/campaign/in-app-messages/creating-inapp-templates/creating-inapp-template#adding-a-variable)
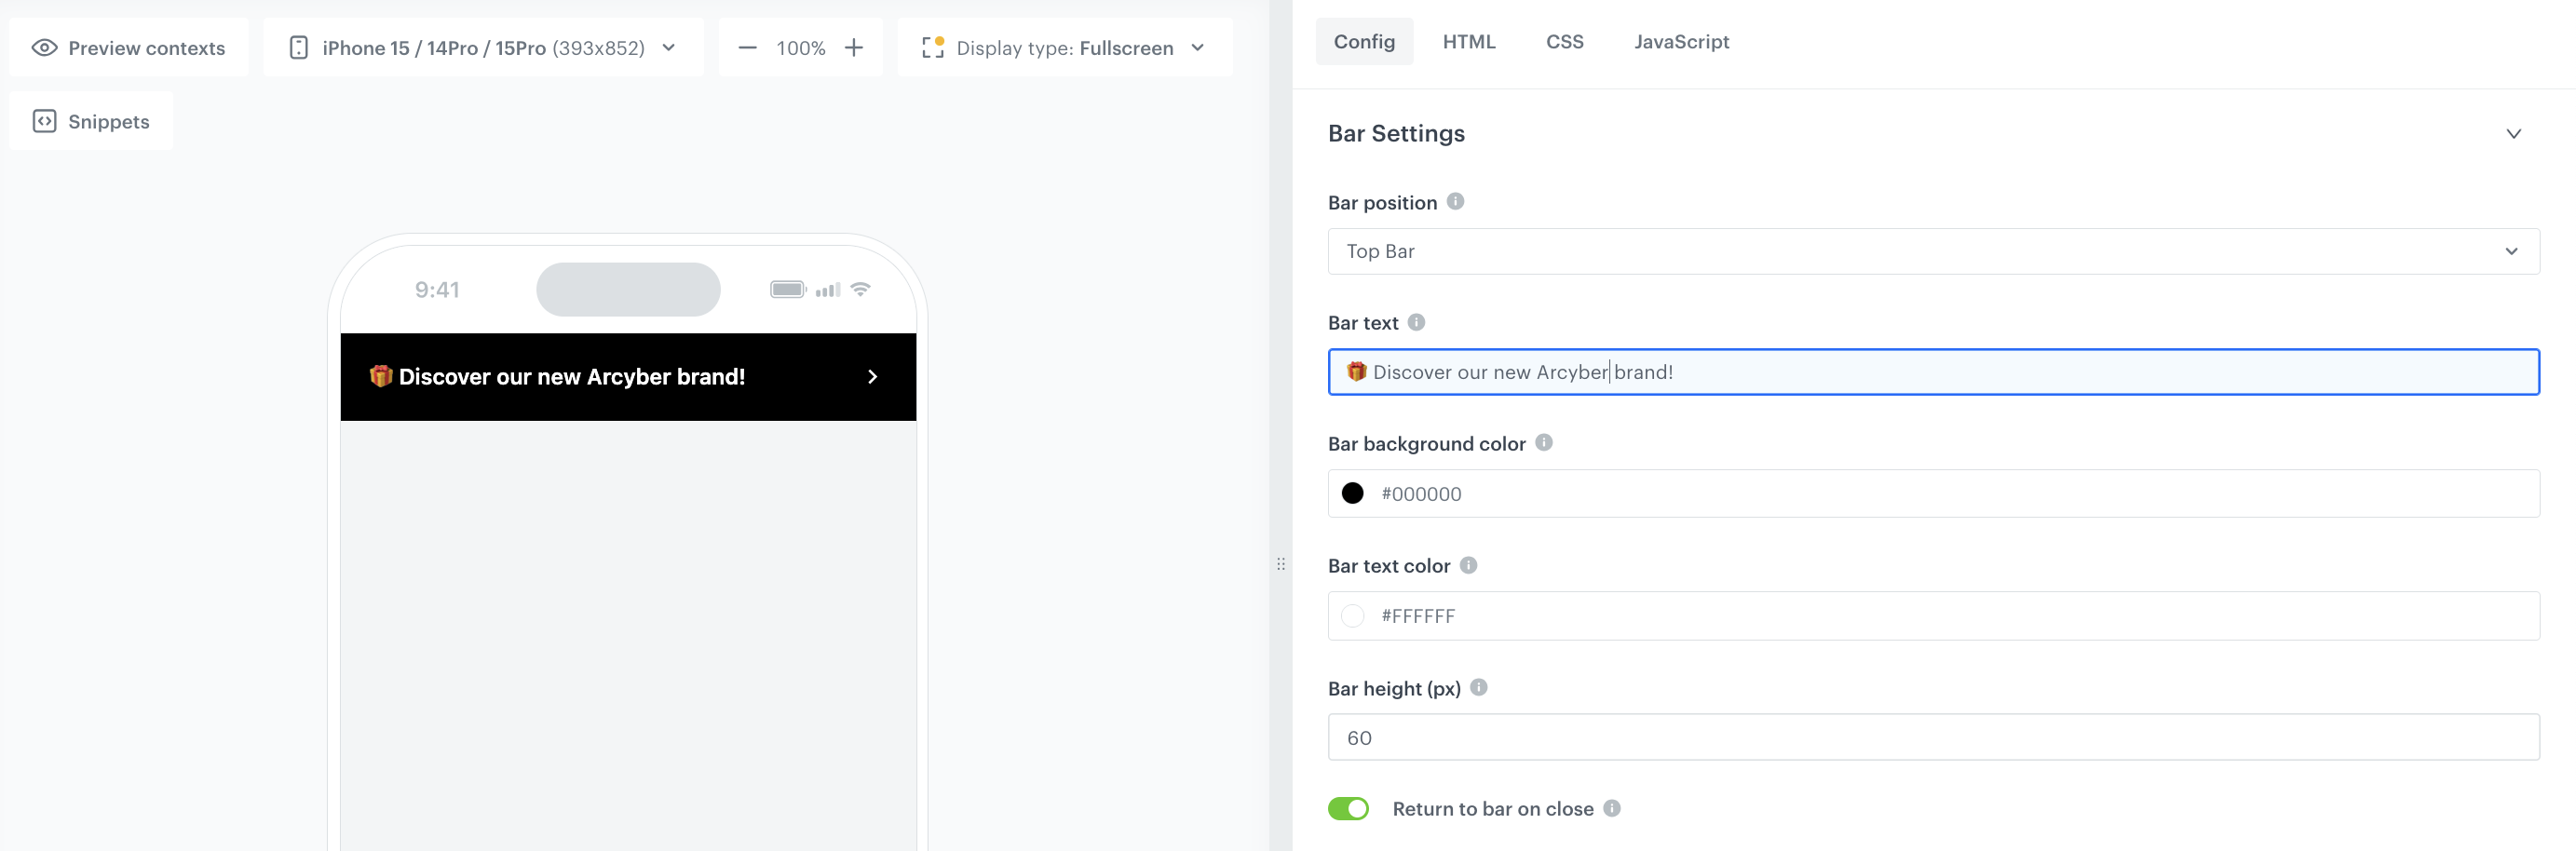
- by filling out the form on the **Config** tab.  

In this use case, we will use the capabilities of the predefined Config tab.

</div></div></div>


#### Edit form in the Config tab 
---
The form in the **Config** tab is already filled in with default values. You can keep them or change them to fit your business needs.  

 <figure><img src="/api/docs/image/54176ad07f146575310749eba44b7c2f42c1b327/use-cases/all-cases/_gfx/inappstories-config2.png" class="full" alt="In-app configuration"><figcaption>In-app configuration</figcaption></figure>  


1. In the **Bar settings** section, set up the copy and style of the first banner. Choose the bar position (top or bottom bar).
1. To lock a specific slide that you want to preview and edit, to prevent it from switching automatically, enable the **Config Mode**.
2. In the **General Settings** section:
    - In  **Number of stories**, enter the number of slides in the stories (no more than 5).
    - In **Stories order**, define the order of stories (for example, 2,3,5,1).
    - In **Title** and **Subtitle**, define the title and subtitles of the stories respectively. If you don't want to display them, enter a dash (`-`).
    - If you want to display the avatar, enable the **Display avatar image** option and in **Avatar image**, enter a link to the source of avatar image.  
3. In the **Button** section:
    - Customize the action button by defining the text on the button (**Text on the button**), the URL to which a user will be redirected (**Destination link**), colors of the button (**Button text color** and **Button color**).  
4. Configure the settings for each story:
    - Each story can be customized separately. You can customize the copy in a story, select the colors of text and background, provide the links to image or video included in the story, and define the display time.  
5. After you complete editing the form, disable the **Config mode** option.
5. After you make changes to the template, you can check the preview.
    1. Click the **Preview contexts** button on the upper left side.
    2. Enter the ID of a customer.
    3. Click **Apply**.

     
   <div class="admonition admonition-important"><div class="admonition-icon"><svg xmlns="http://www.w3.org/2000/svg" fill="none" viewBox="0 0 24 24" stroke="currentColor" stroke-width="2.5"><path stroke-linecap="round" stroke-linejoin="round" d="M12 8v4m0 4h.01M21 12a9 9 0 11-18 0 9 9 0 0118 0z" /></svg></div><div class="admonition-body"><div class="admonition-content">

   Considering that the in-app is very interactive, the preview in the platform may not be enough to test the in-app performance. That’s why we suggest checking the campaign preview directly in the mobile app.

   </div></div></div>


6. If the template is ready, in the upper right corner click **Save this template > Save as**.
7. On the pop-up:
    1. In the **Template name field**, enter the name of the template.
    2. From the **Template folder** dropdown list, select the folder where the template will be saved.
    3. Confirm by clicking **Apply**.
8. To continue the process of configuring the in-app campaign, click **Use in communication**.
9. To save your content changes, click **Apply**.

### Select events that trigger the in-app message display
---
In this part of the process, you will define the event triggering the display of the in-app message. In this case it will be visible after opening the application, but - as it was specified in the campaign settings - only for users who have not seen any product from the new brand yet.

1. In the **Trigger events** section, click **Define**.
2. Select **Add event** and from the dropdown list, choose `screen.view` event.
3. Click the **+ where** button and select `source`.
4. As the logical operator, select **Equal**.
5. As the value add `MOBILE`.
5. Click **Apply**.

 <figure>
   <img src="/api/docs/image/54176ad07f146575310749eba44b7c2f42c1b327/use-cases/all-cases/_gfx/inapp-stories-trigger.png" alt="The view of the in-app trigger event configuration" class="full">
   <figcaption> In-app trigger event configuration </figcaption>
   </figure>

### Schedule the message and configure display settings
---
As the final part of the process, you will set the display settings of the in-app message such as schedule, capping, priority of the message among other in-app messages.

1. In the **Schedule** section, click **Define** and set the time when the message will be active. In this case - 1 month.
2. In the **Display Settings** section, click **Change**.
3. Define the **Delay display**, **Priority index** and enable the **Frequency limit** toggle to manage the frequency of in-app message display in the application.  
16. Click **Apply**. 
17. Optionally, you can define the UTM parameters and additional parameters for your in-app campaign.
18. Click **Activate**.

### Test the in-app campaign
---

Read the ["Testing" section](/docs/campaign/in-app-messages/create-inapp-message#testing) to discover how to test your in-app campaign.

## Check the use case set up on the Synerise Demo workspace
---
You can check the [segmentation](https://app.synerise.com/analytics-v2/segmentations/0c938198-6d2f-41b2-8211-9126b1a97725) and [in-app message campaign](https://app.synerise.com/communications/in-app/6dc6673a-4e87-4fa7-af03-44de61ee2b44) configuration directly in Synerise Demo workspace. 

If you’re our partner or client, you already have automatic access to the **Synerise Demo workspace (1590)**, where you can explore all the configured elements of this use case and copy them to your workspace.  

If you’re not a partner or client yet, we encourage you to fill out the contact [form](https://demo.synerise.com/request) to schedule a meeting with our representatives. They’ll be happy to show you how our demo works and discuss how you can apply this use case in your business.

## Read more
---
- [In-app messages](/docs/campaign/in-app-messages)
- [Using in-app template builder](/docs/campaign/in-app-messages/creating-inapp-templates/creating-inapp-template)