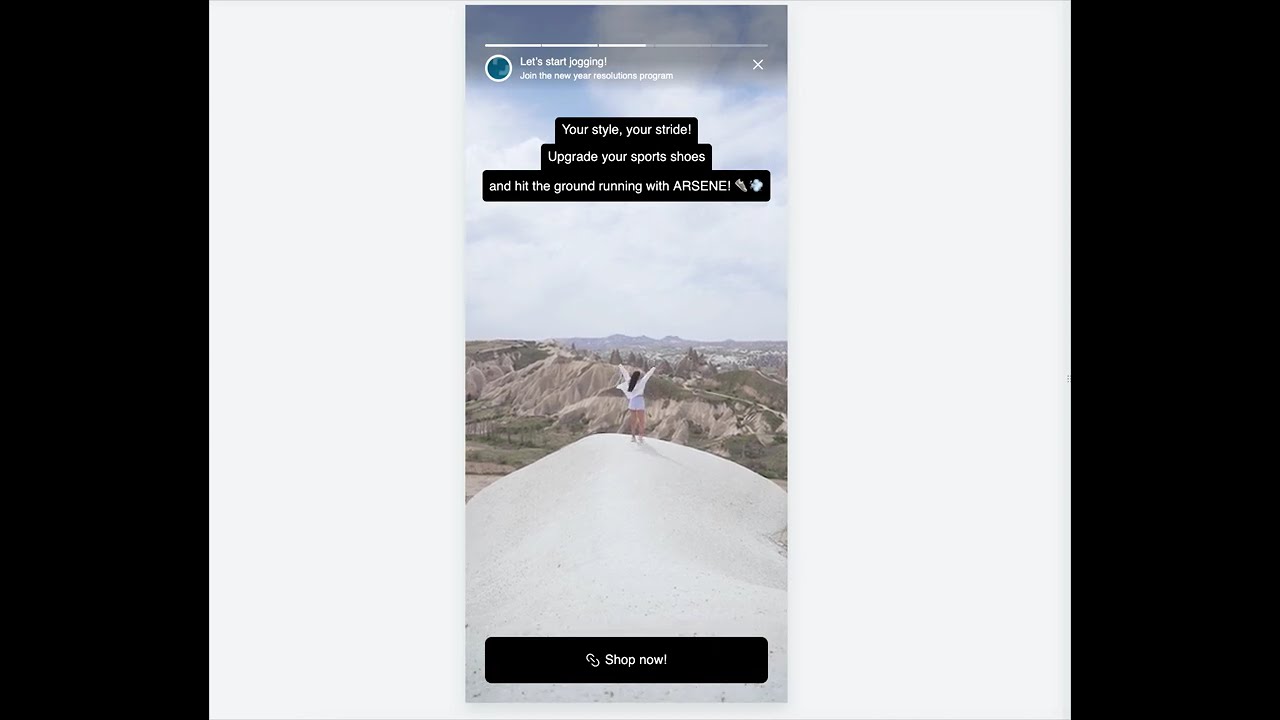
Display an engaging in-app story that combines interactive storytelling with AI-driven product recommendations. This feature allows businesses to present relevant products in a dynamic and visually appealing format, enhancing user engagement and increasing conversion opportunities. By leveraging predefined, ready-to-use templates, brands can easily create and adapt stories to their specific needs.
In this use case, you'll discover how to create an interactive in-app story promoting a running challenge and specific brand of running shoes. The guide offers detailed steps for using a predefined template, customizing content, and including AI-based recommendations for a personalized and engaging user experience. The target audience consists of women who visited the shoes category in the last 30 days without making a purchase.
Prerequisites
- Configure AI engine for recommendations; enable the personalized recommendation type.
- Implement the transaction events using SDK or API.
- Implement Synerise SDK in your mobile app.
Process
In this use case, you will go through the following steps:
- Prepare the segmentation of women who have visited the shoes category during the last 30 days and have not made any transaction.
- Create an in-app message with product recommendations using the predefined template.
Prepare the segmentation
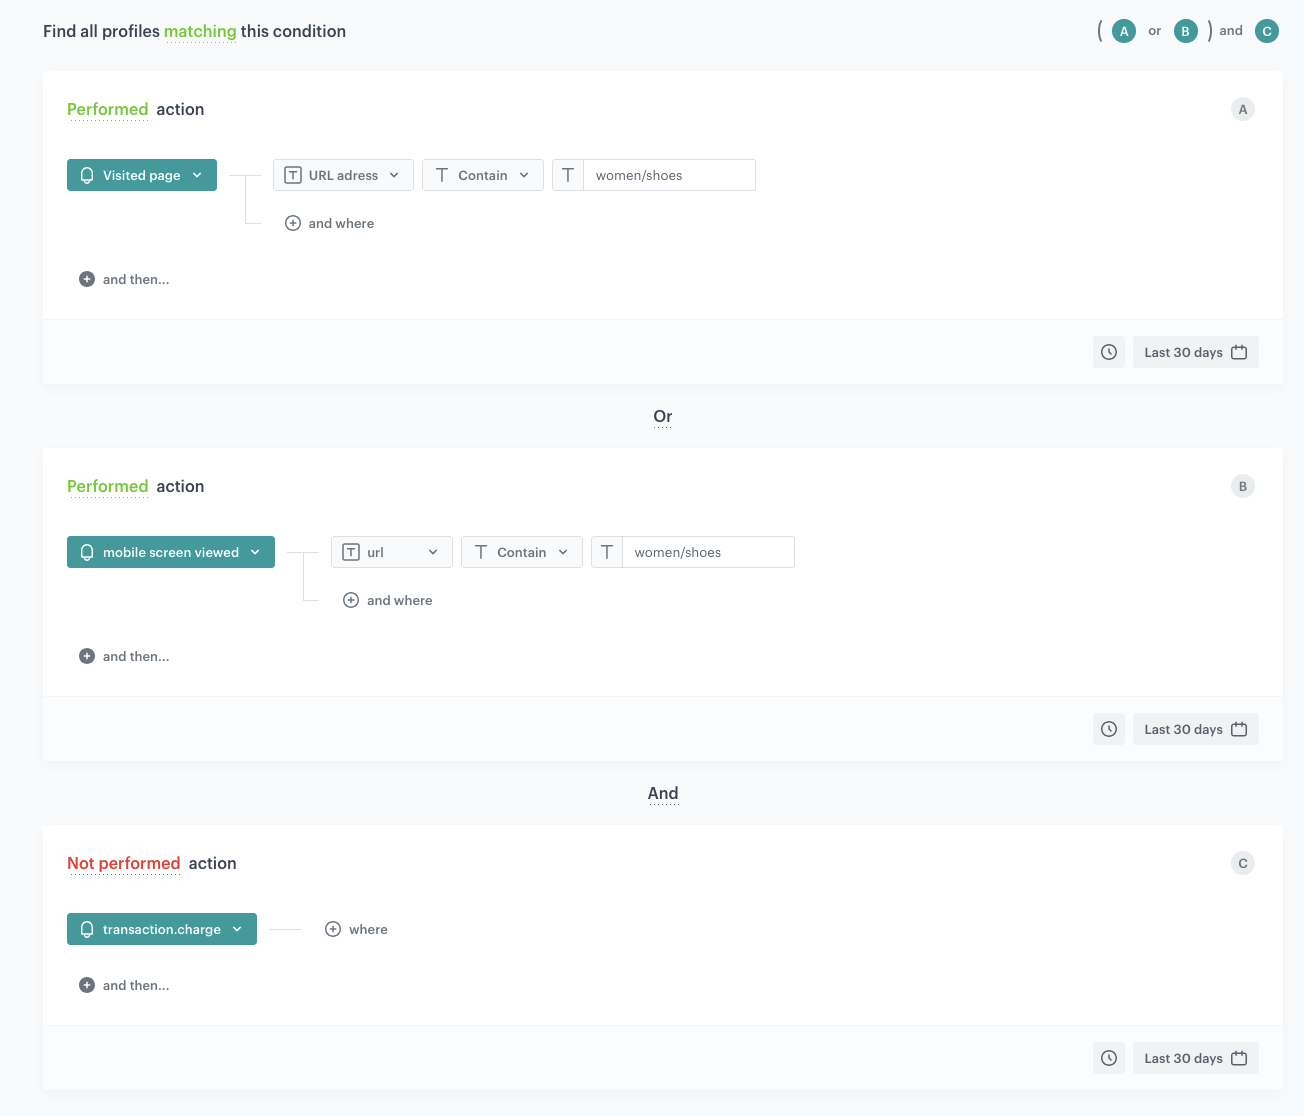
In this part of the process, we will create a segmentation of users who have visited the women/shoes category in the last 30 days (website of mobile) but have not made any transaction during that time.
- Go to
 Decision Hub > Segmentations > New segmentation.
 - Enter the name of the segmentation.
- Click Add condition.
- From the dropdown list, select the
page.visitevent. - Click + where and from the dropdown list, select
url. - Choose the Contain operator and enter the fragment of the URL for the specific category. In our case it will be
women-shoes. Alternatively, you can build the following condition: category equal [category name]. - Using the date picker in the lower-right corner, set the time range to Last 30 days.
- Click Add condition.
- From the list, choose the
screen.viewevent, - Click + where and from the dropdown list, select
url. - Choose the Contain operator and enter the fragment of the URL for the specific category. In our case it will be
women-shoes. Alternatively, you can build the following condition: category equal [category name]. - Connect these conditions by the OR operator.
- Using the date picker in the lower-right corner, set the time range to Last 30 days.
- Click Add condition.
- From the list, choose the
transaction.chargeevent. - By clicking Performed above the event name change the condition to Not performed.
- Save the segmentation.
Create an in-app message
In this part of the process, you will create an in-app campaign. We will use a predefined template for the message with interactive in-app stories, so there is no need to create a template from scratch.
- Go to
 Experience Hub > In-app messages> Create in-app.
 - Enter the name of the in-app.
Define the audience
As the first step, define the target group of customers for the in-app message. In this case, we will use the segmentation created in the previous step.
- In the Audience section, click Define.
- Click Segmentations.
- Click Select segmentation and choose the segmentation created in the previous step.
- Save settings in the Audience section by clicking Apply.
Define content
In this part of the process, you will use a ready-made template to create the content of the in-app message that will be displayed in the mobile application.
- In the Content section, click Define.
- Click Create message and from the list of template folders, select Predefined templates.
- Select the STORIES template.
Result: You are redirected to the code editor.
You can edit the template in two ways, by editing the code of the template, add inserts, add variables and/or by filling out the form in the Config tab. In this use case, we will use the capabilities of the predefined Config tab.
Edit form in the Config tab
The form in the Config tab is already filled in with default values. You can keep them or change them to fit your business needs.
- To lock a specific slide that you want to preview and edit, to prevent it from switching automatically, enable the Config Mode.
- In the Slide number field, enter the slide number from which you want to edit.
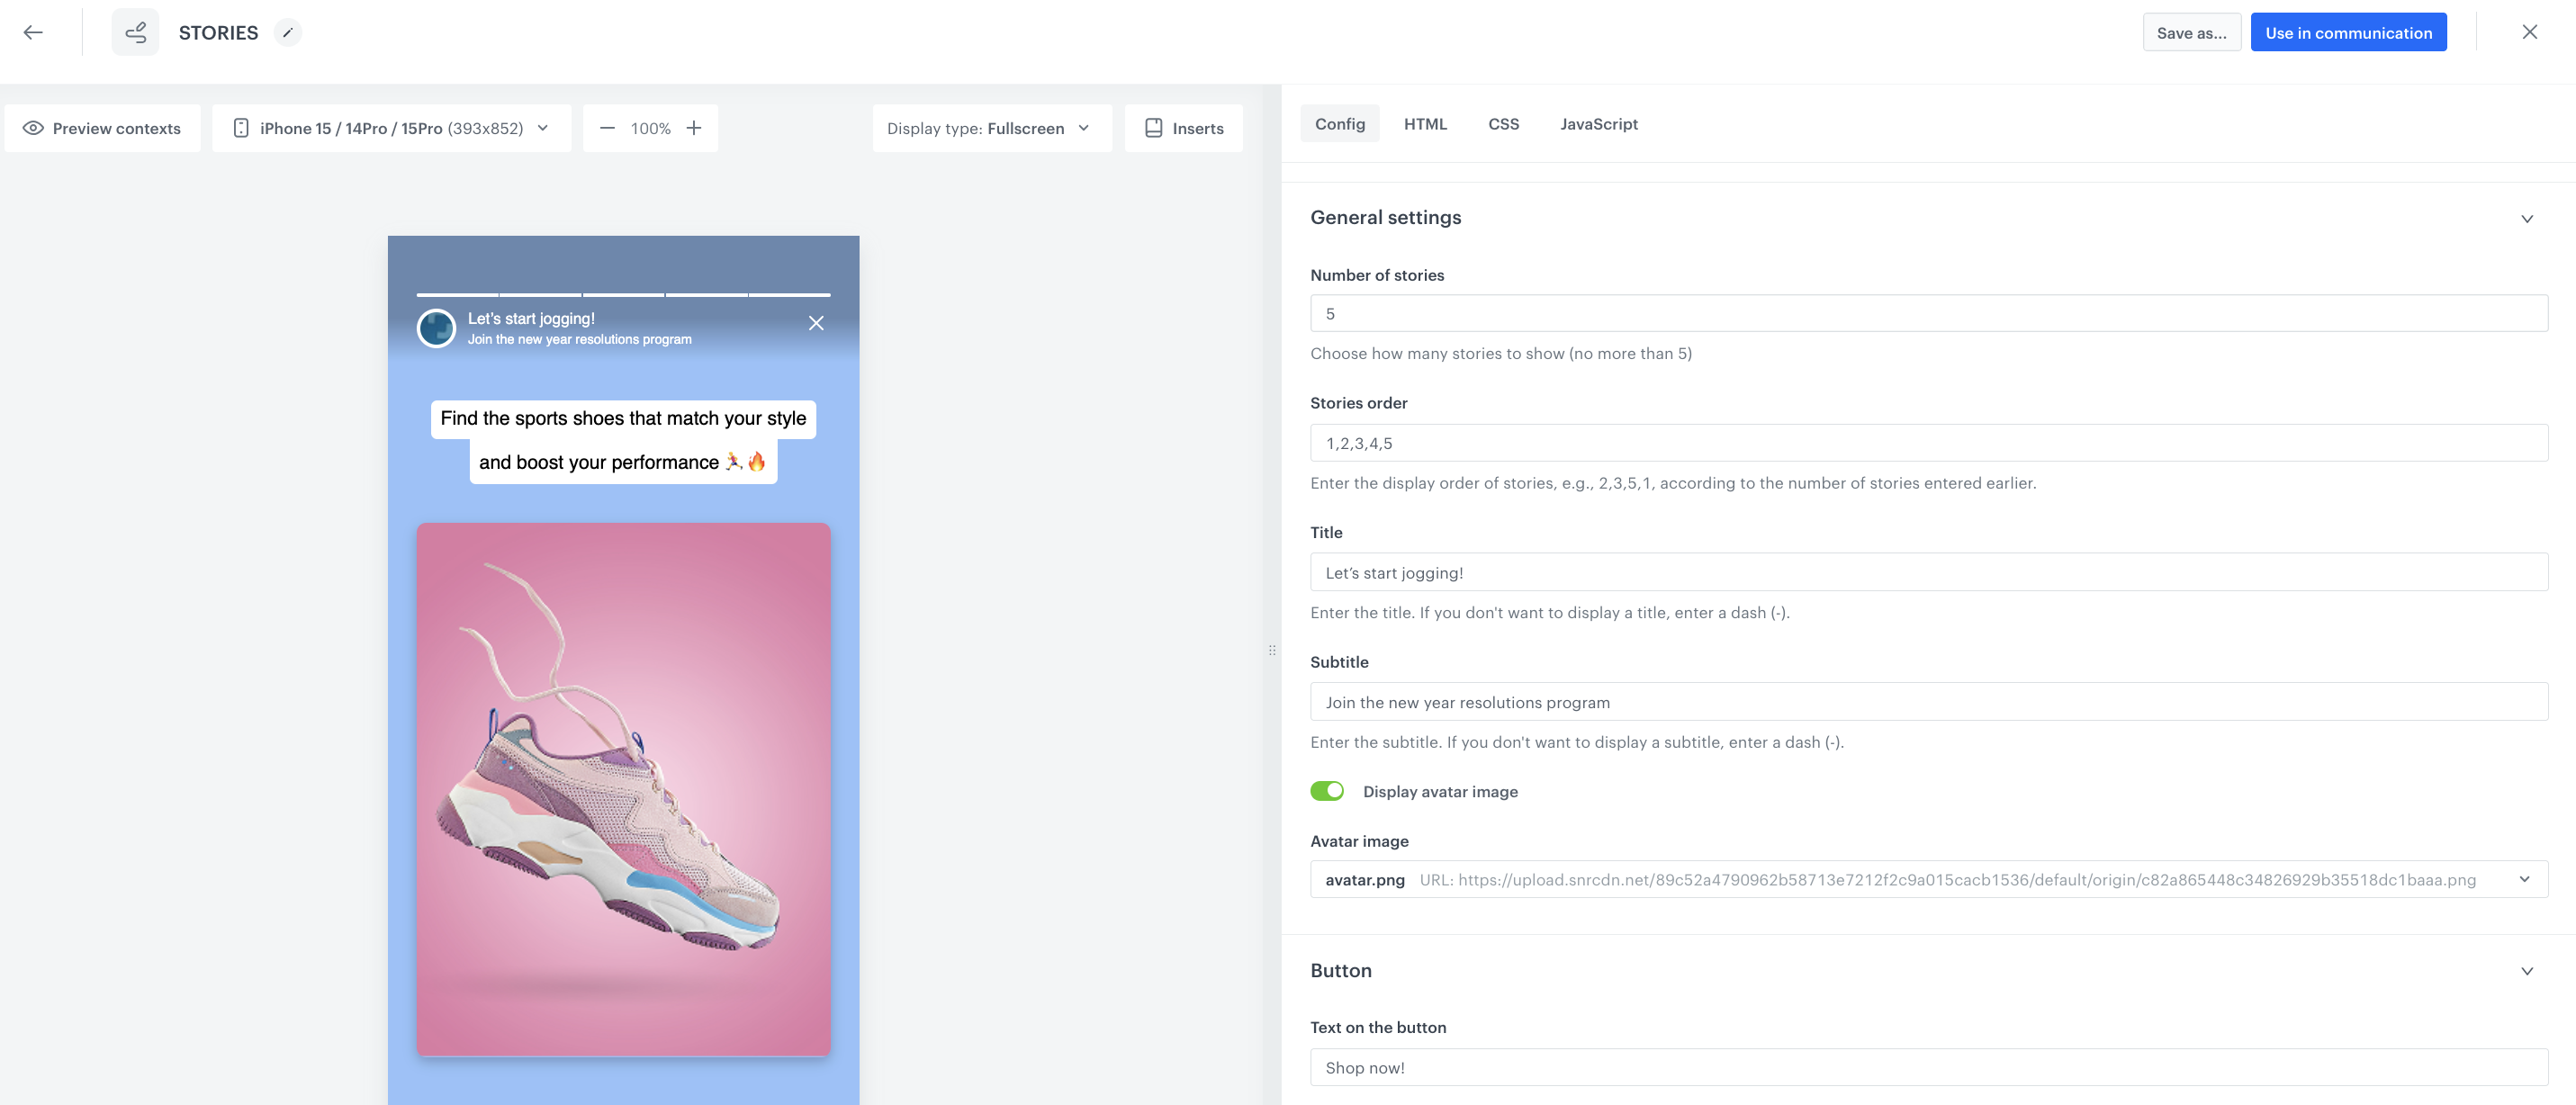
In the General Settings section:
- In Number of stories, enter the number of slides in the stories (no more than 5).
- In Stories order, define the order of stories (for example, 2,3,5,1).
- In Title and Subtitle, define the title and subtitles of the stories respectively. If you don't want to display them, enter a dash (-).
- If you want to display the avatar, enable the Display avatar image option and in Avatar image, enter a link to the source of avatar image.
In the Button section:
- Customize the action button by defining the text on the button (Text on the button), the URL to which a user will be redirected (Destination link), colors of the button (Button text color and Button color).
Configure the settings for each story
- Each story can be customized separately. You can customize copy in a story, select colors of text and background, provide the links to image or video included in the story, and define the display time.
- After you complete editing the form, disable the Config mode option.
After you make changes to the template, you can check the preview.
- Click the Preview contexts button on the upper left side.
- Enter the ID of a customer.
- Click Apply.
Considering that the in-app is very interactive, the preview in the platform may not be enough to test the in-app performance. That’s why we suggest checking the campaign preview directly in the mobile app.
- If the template is ready, in the upper right corner click Save this template > Save as.
On the pop-up:
- In the Template name field, enter the name of the template.
- From the Template folder dropdown list, select the folder where the template will be saved.
- Confirm by clicking Apply.
- To continue the process of configuring the in-app campaign, click Use in communication.
- To save your content changes, click Apply.
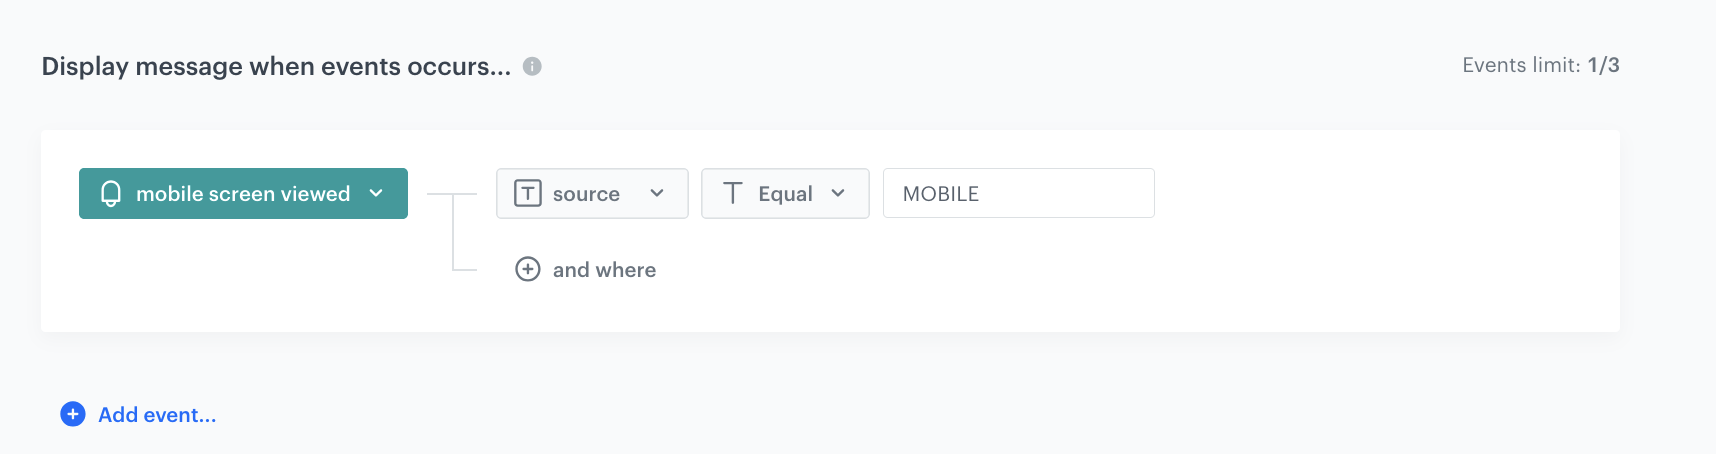
Select events that trigger the in-app message display
In this part of the process, you will define the event triggering the display of the in-app message.
- In the Trigger events section, click Define.
- Select Add event and from the dropdown list, choose
screen.viewevent. - Click the + where button and select
source. - As the logical operator, select Equal.
- As the value add
MOBILE. - Click Apply.
Schedule the message and configure display settings
As the final part of the process, you will set the display settings of the in-app message such as schedule, capping, priority of the message among other in-app messages.
- In the Schedule section, click Define and set the time when the message will be active.
- In the Display Settings section, click Change.
- Define the Delay display, Priority index and enable the Frequency limit toggle to manage the frequency of in-app message display in the application.
- Click Apply.
- Optionally, you can define the UTM parameters and additional parameters for your in-app campaign.
- Click Activate.
Test the in-app campaign
Read the "Testing" section to discover how to test your in-app campaign.
Check the use case set up on the Synerise Demo workspace
You can check the segmentation and in-app message campaign configuration directly in Synerise Demo workspace.
If you’re our partner or client, you already have automatic access to the Synerise Demo workspace (1590), where you can explore all the configured elements of this use case and copy them to your workspace.
If you’re not a partner or client yet, we encourage you to fill out the contact form to schedule a meeting with our representatives. They’ll be happy to show you how our demo works and discuss how you can apply this use case in your business.