In-app survey
Understanding user preferences from the start is essential for creating a personalized app experience. A well-timed in-app survey after a user’s first visit can capture valuable insights into their interests, expectations, and reasons for downloading the app. This direct engagement helps businesses tailor their offerings, improve user satisfaction, and foster long-term engagement.
In this specific use case, we plan to introduce a first-time user survey triggered after the app’s introductory tour.
This use case provides instructions on how to implement a ready-made survey template designed to gather key user insights and enhance the overall experience.
Prerequisites
- Implement Synerise SDK in your mobile app.
- Implement a dedicated custom event that is sent to the customer’s profile when they first enter the mobile app. This event should be sent only one time, during the first visit to the mobile application. In this use case, we use the
app.firstVisitevent.
Create an in-app message
Create an in-app campaign triggered by the app.firstVisit event for customers who logged into the mobile application for the first time. We will use a predefined template for this message, so there is no need to create a template from scratch.
- Go to
 Communication > In-app messages> Create in-app.
 - Enter the name of the in-app.
Define the audience
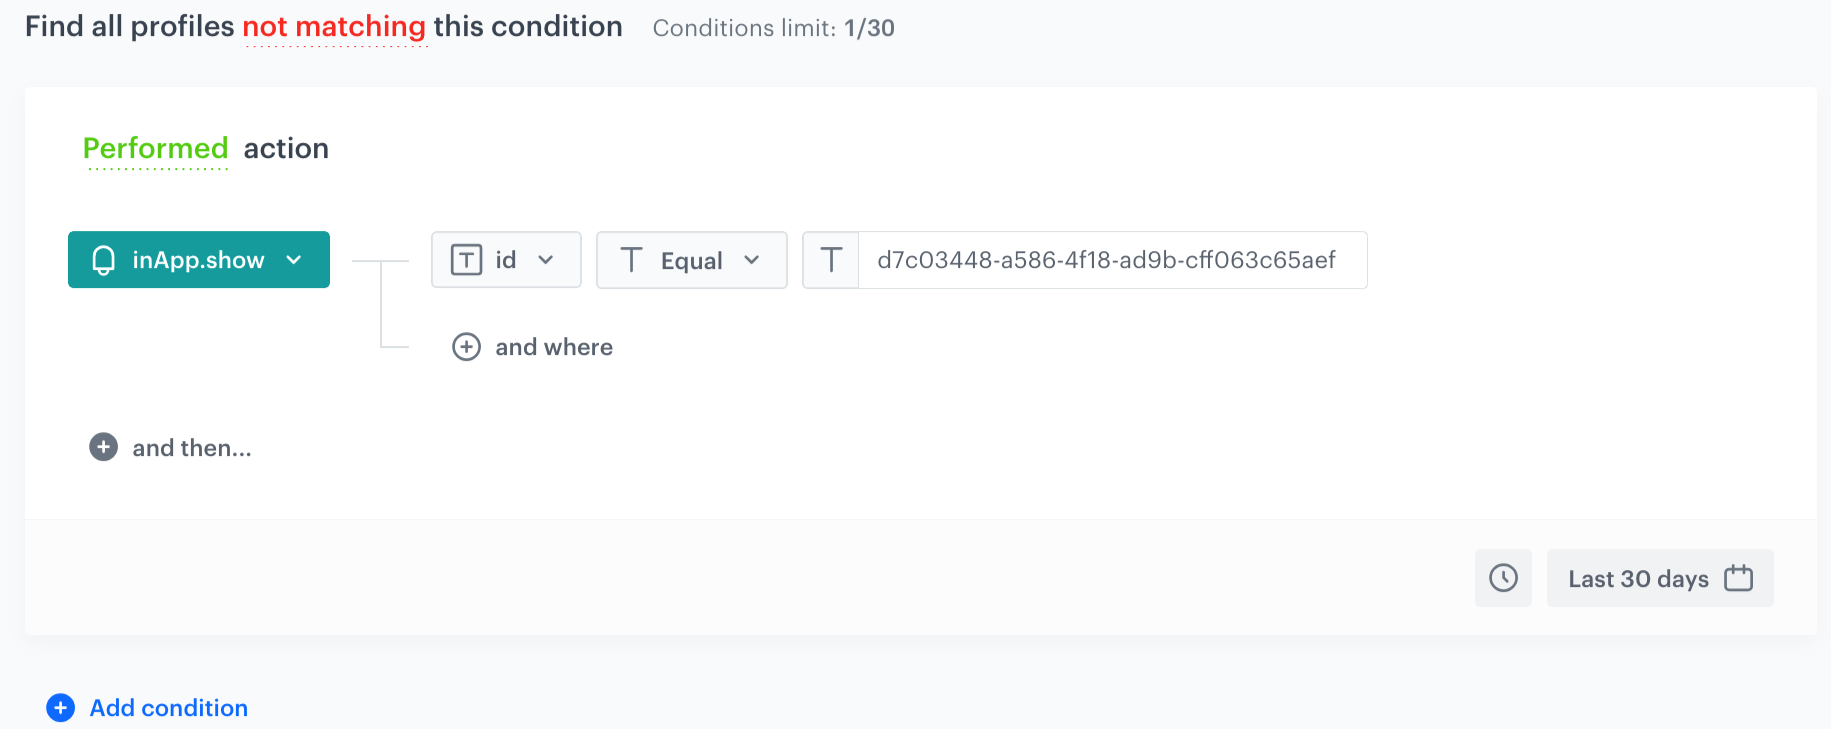
As the first step, define the target group of customers for the in-app message. In this use case, segmentation based on the inApp.show event acts as an additional security measure that helps to include only people who have never seen this in-app message before.
- In the Audience section, click Define.
- Click New Audience and then Define conditions.
- Click Add condition, from the dropdown list, select the inApp.show event.
- Next to the inApp.show, click +where.
- From the dropdown list, select id.
- As the operator, choose Equal.
- Enter the In-app campaign ID in the text field. You can locate the ID in the campaign’s URL link.
For instance, in the URL https://app.synerise.com/communications/in-app/d7c03448-a586-4f18-ad9b-cff063c65aef the ID isd7c03448-a586-4f18-ad9b-cff063c65aef. - Change matching condition to not matching to find all profiles that don’t meet the defined condition.
- Use the time filter to define analysed time period.
- Click Apply.
- To save the audience, click Apply.

Define content
In the next step, you will create the content of the in-app message that will appear in the mobile application with the help of ready-made template.
-
In the Content section, click Define.
-
Click Create message and from the list of template folders, select Predefined templates.
-
Select the Survey form template.
Result: You are redirected to the code editor.
-
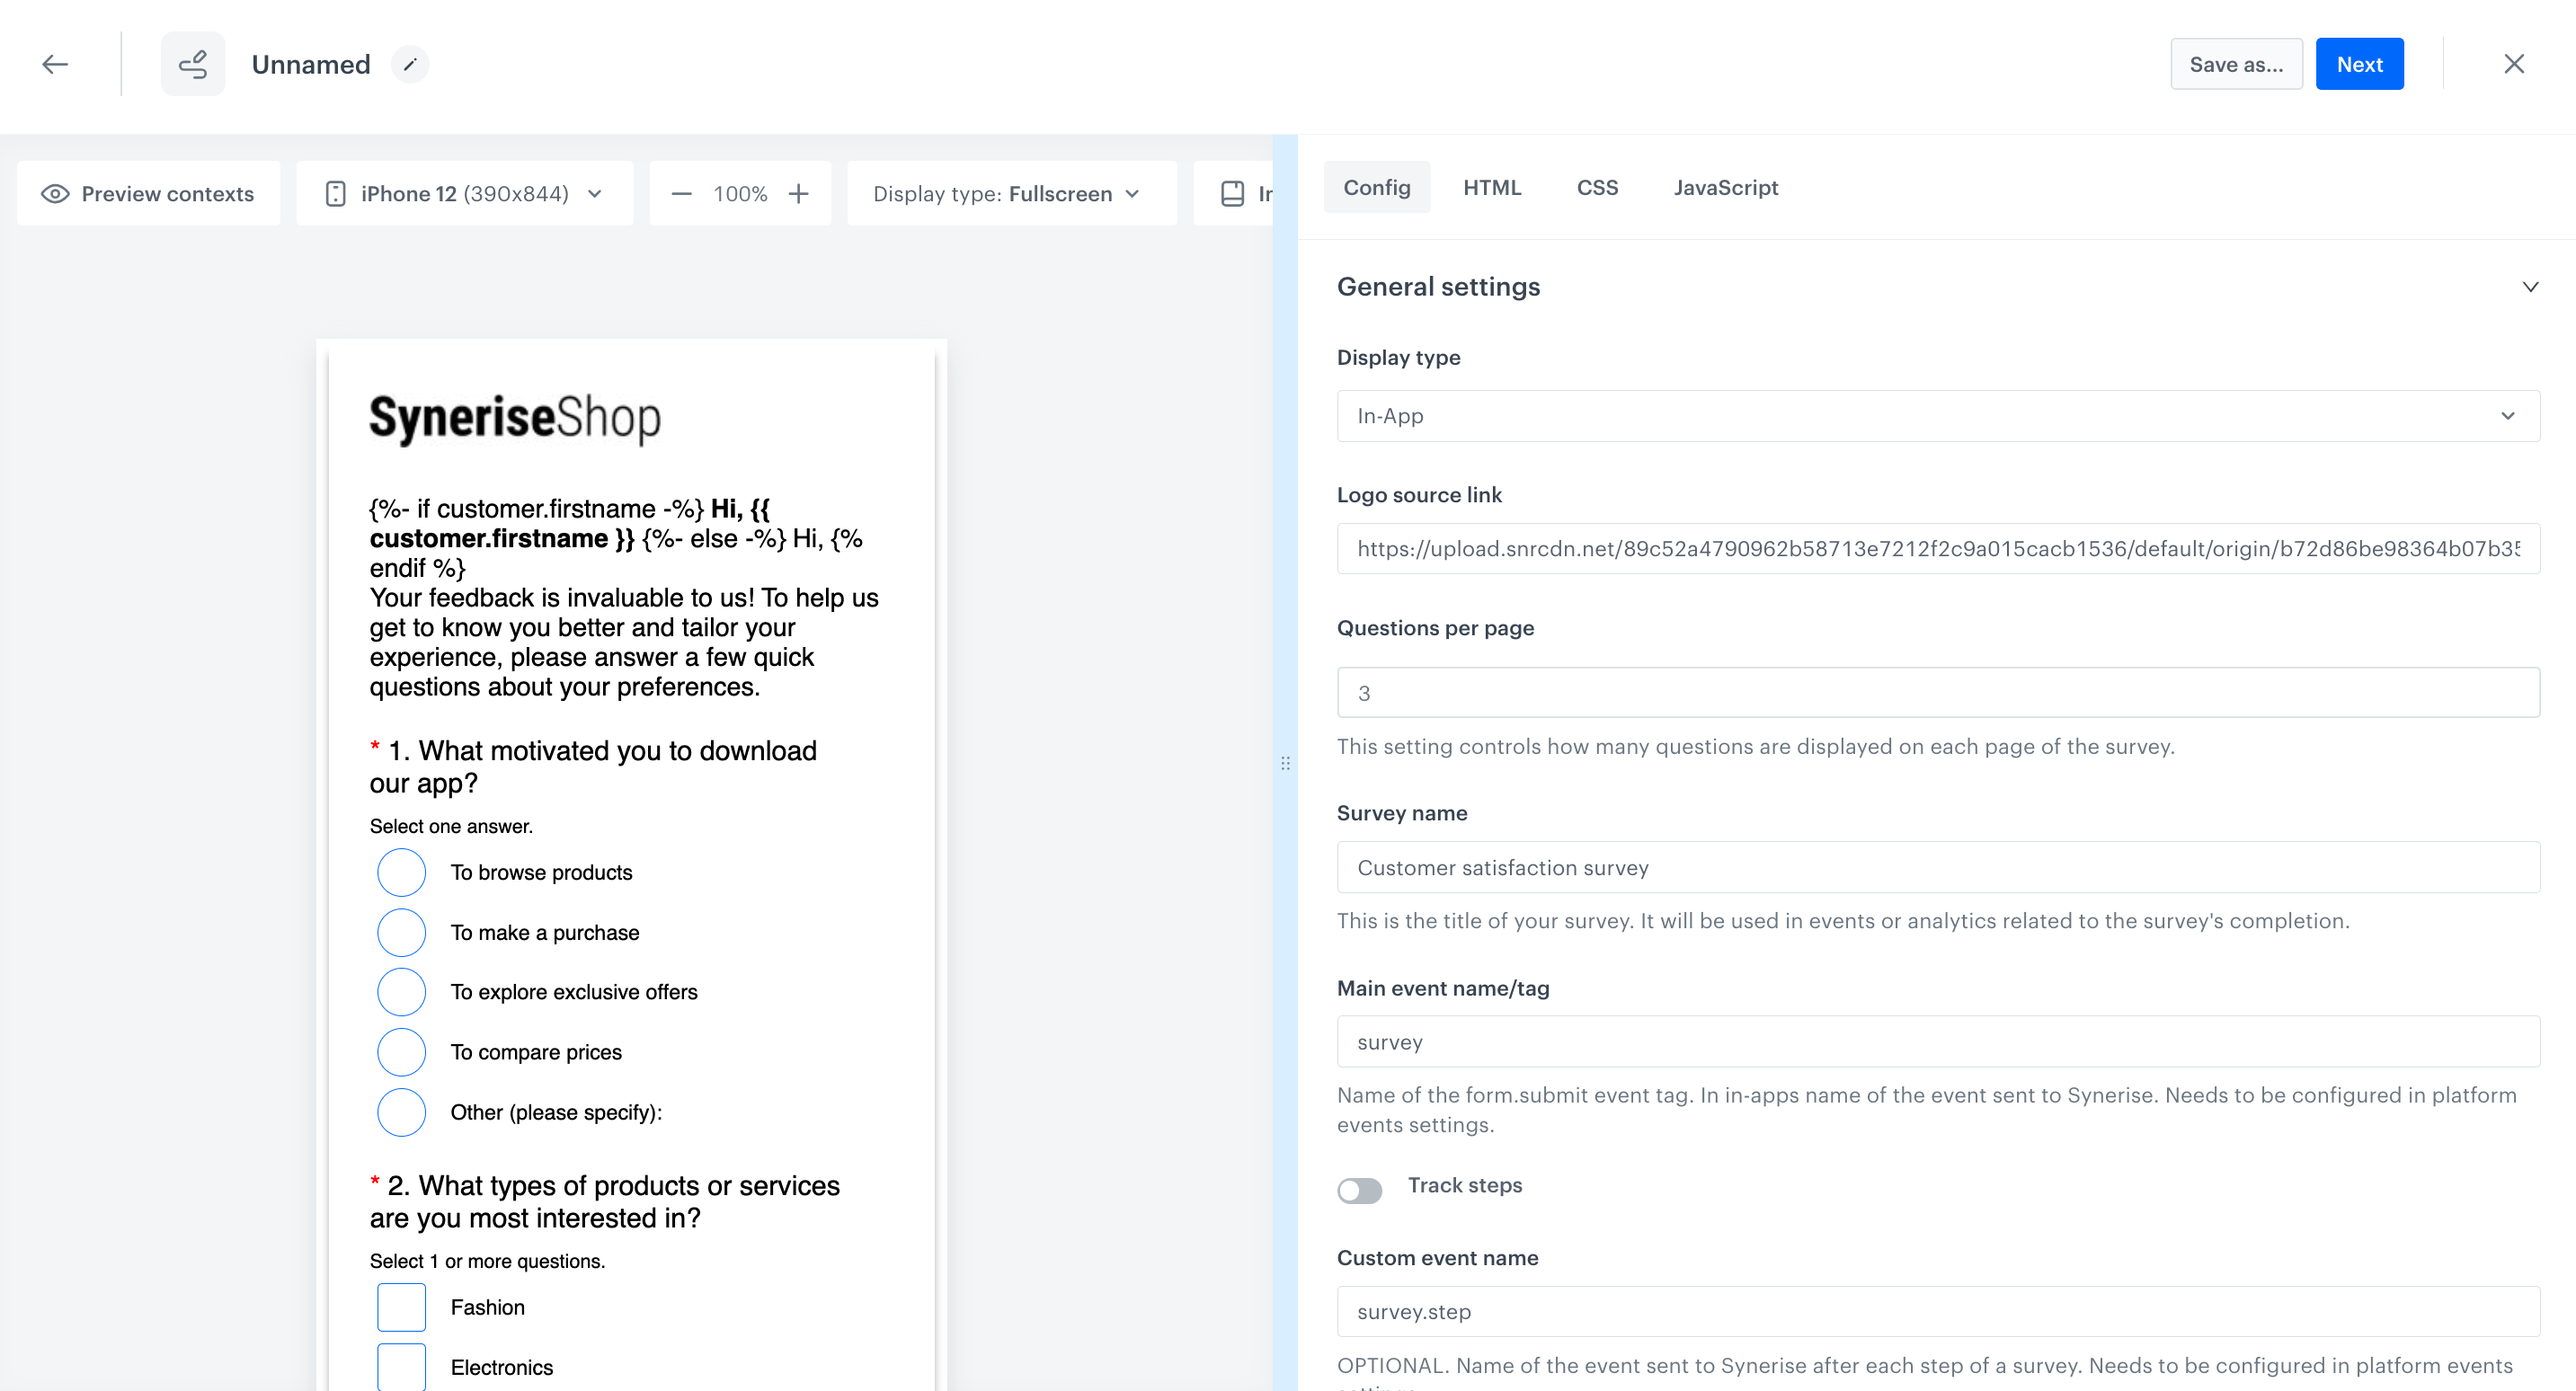
Edit the template according to your needs. In the Configuration panel, you’ll find a comprehensive list with descriptions of the core components that make up your survey.

Config panel The configuration of the questions and answers themselves happens in JavaScript panel.
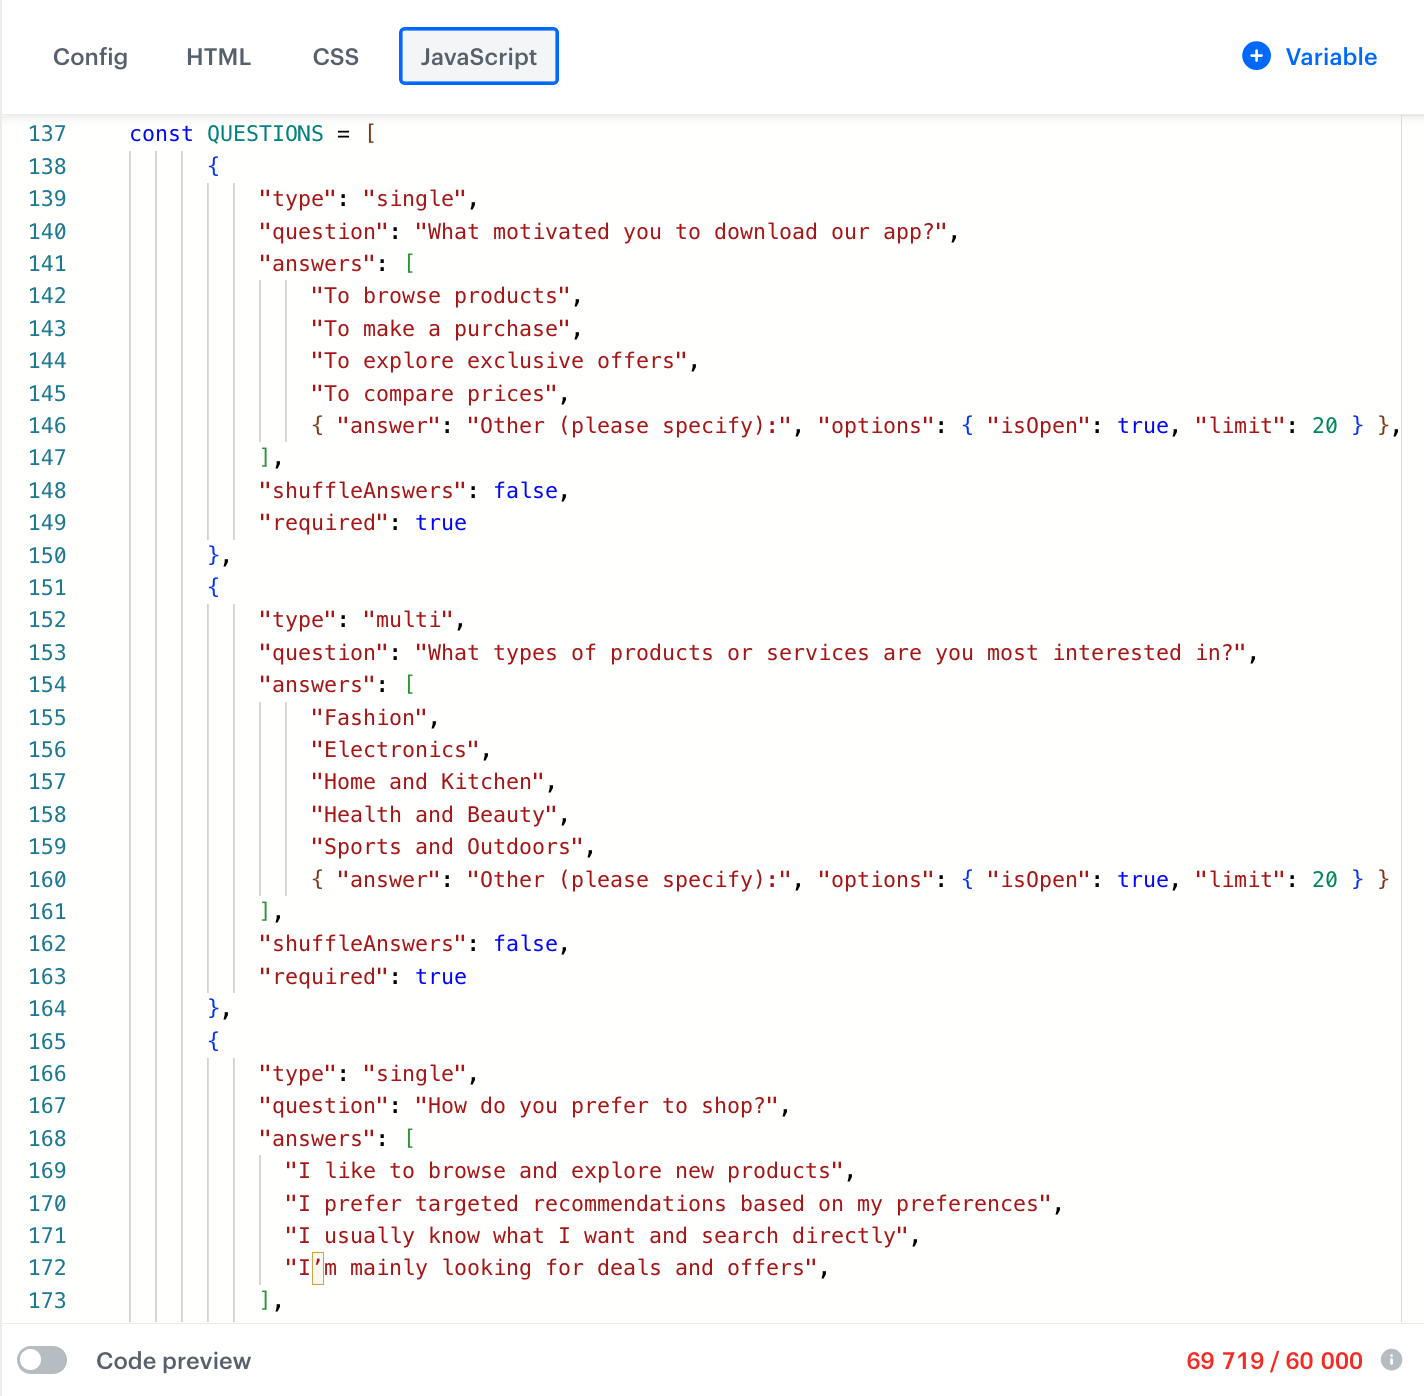
There is an object that you have to fill, according to the example given. It is an array of questions, where each question has its answers and settings depending on the type.
Javascript object with questions and answers Example: You want to add/edit question
To add an additional question to the QUESTIONS array, you’ll want to follow the pattern established by the existing questions. Each question is an object that may contain different properties depending on its type (single, multi, scale, text). Here’s a step-by-step guide on how to do it:
Decide on the question you want to add and the type of question it will be. The type determines what properties the question object should have. For instance:
singleandmultitypes need question,answers, andtype.scaleneedsquestion,type, andlength.textneedsquestion,type, and optionallylimitfor the character limit.
Construct the question object according to the type you’ve chosen.
Add the new question object to the
QUESTIONSarray.Here’s an example of how you can add a new question that asks about a favorite color (a single type question with predefined answers):
const QUESTIONS = [ { "type": "single", "question": "What motivated you to download our app?", "answers": [ "To browse products", "To make a purchase", "To explore exclusive offers", "To compare prices", { "answer": "Other (please specify):", "options": { "isOpen": true, "limit": 20 } }, ], "shuffleAnswers": false, "required": true }, { "type": "multi", "question": "What types of products or services are you most interested in?", "answers": [ "Fashion", "Electronics", "Home and Kitchen", "Health and Beauty", "Sports and Outdoors", { "answer": "Other (please specify):", "options": { "isOpen": true, "limit": 20 } } ], "shuffleAnswers": false, "required": true }, { "type": "single", "question": "How do you prefer to shop?", "answers": [ "I like to browse and explore new products", "I prefer targeted recommendations based on my preferences", "I usually know what I want and search directly", "I’m mainly looking for deals and offers", ], "shuffleAnswers": false, "required": true }, { "type": "multi", "question": "What factors influence your purchasing decisions the most?", "answers": [ "Product quality", "Price", "Brand reputation", "Customer reviews", "Sustainability", { "answer": "Other (please specify):", "options": { "isOpen": true, "limit": 20 } } ], "shuffleAnswers": false, "required": true }, { "type": "scale", "question": "How likely would you recommend our company to your friends and known ones?", "length": 10, "required": true, }, ]; -
After customising your survey, save the template.
Select events that trigger the in-app message display
In this part of the process, you will define the event triggering the display of the in-app message.
- In the Trigger events section, click Define.
- Select Add event… and from the dropdown list, choose
app.firstVisitevent. - Click the + where button and select
source. - As the logical operator, select Equal.
- In the text field enter MOBILE_APP.
- Click Apply.
Schedule the message and configure display settings
As the final part of the process, you will set the display settings of the in-app message such as schedule, capping, priority of the message among other in-app messages.
- In the Schedule section, click Define and set the time when the message will be active.
- In the Display Settings section, click Define.
- Define the Delay display, Priority index, Frequency limit and/or Capping limit.
- In our case, we want to display the message once per user. To do this, switch on Capping limit, and in the Show maximum section text field type
1.
- Click Apply.
- Optionally, you can define the UTM parameters, additional parameters or test your in-app campaign.
- Click Activate.
Check the use case set up on the Synerise Demo workspace
You can check the in-app message configuration directly in Synerise Demo workspace.
If you’re our partner or client, you already have automatic access to the Synerise Demo workspace (1590), where you can explore all the configured elements of this use case and copy them to your workspace.
If you’re not a partner or client yet, we encourage you to fill out the contact form to schedule a meeting with our representatives. They’ll be happy to show you how our demo works and discuss how you can apply this use case in your business.