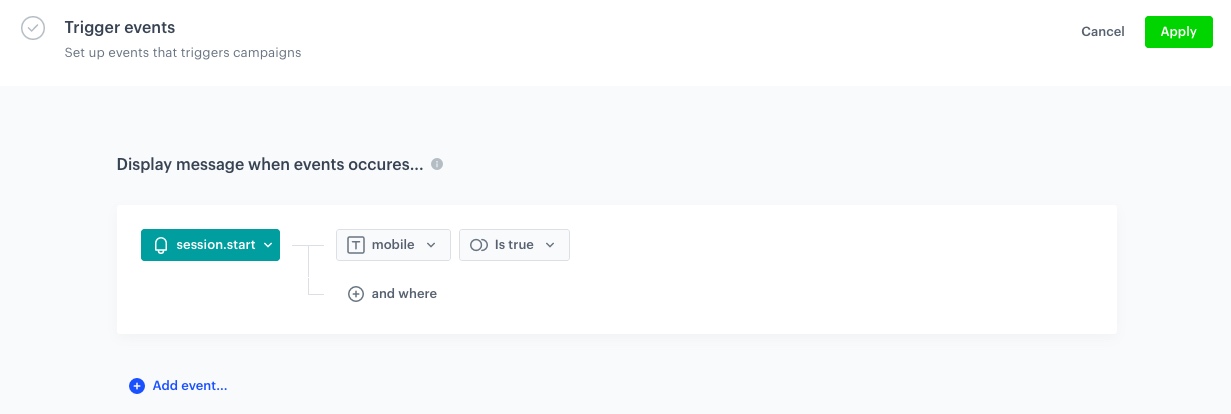
In-app messages are another efficient way to reach your customers in the mobile app. By providing targeted and relevant messages to users who are actively using your app, in-app messages can assist you in retaining their attention. They can be used, for example, to remind your customers they have a promo code they can use for their cart.

This use case describes the process of creating a reminder that a customer received a promo code and sending it through an in-app message. In this case, we assume that the promo code was sent by an email and the customer hasn't redeemed it yet.  

In this use case we provide you with a ready-made campaign code that can be used 1:1 in a business scenario.

<figure>
<img src="/api/docs/image/54176ad07f146575310749eba44b7c2f42c1b327/use-cases/all-cases/_gfx/inapp_main_promo.png" alt="The view of an in-app message in the mobile application"  class="full no-frame">
</figure>

## Prerequisites 
---
- [Implement Synerise SDK in your mobile app](/developers/mobile-sdk).
- Implement transaction events using [SDK](/developers/web/transactions-sdk) or [API](https://developers.synerise.com/DataManagement/DataManagement.html#operation/CreateATransaction).

  <div class="admonition admonition-important"><div class="admonition-icon"><svg xmlns="http://www.w3.org/2000/svg" fill="none" viewBox="0 0 24 24" stroke="currentColor" stroke-width="2.5"><path stroke-linecap="round" stroke-linejoin="round" d="M12 8v4m0 4h.01M21 12a9 9 0 11-18 0 9 9 0 0118 0z" /></svg></div><div class="admonition-body"><div class="admonition-content">

  Transactions that were made using a promo code must have an additional parameter that will store the code content. In this case, `coupon`.

  </div></div></div>

- [Send an email campaign](/docs/campaign/e-mail/creating-email-campaigns) with a promo code to customers.

  <div class="admonition admonition-note"><div class="admonition-icon"><svg xmlns="http://www.w3.org/2000/svg" fill="none" viewBox="0 0 24 24" stroke="currentColor" stroke-width="2.5"><path stroke-linecap="round" stroke-linejoin="round" d="M13 16h-1v-4h-1m1-4h.01M21 12a9 9 0 11-18 0 9 9 0 0118 0z" /></svg></div><div class="admonition-body"><div class="admonition-content">

  It can be any channel, in this use case we assume that the voucher was sent by an email. [Learn more about Experience Hub in Synerise](/docs/campaign).

  </div></div></div>


  <div class="admonition admonition-tip"><div class="admonition-icon"><svg xmlns="http://www.w3.org/2000/svg" fill="none" viewBox="0 0 24 24" stroke="currentColor" stroke-width="2.5"><path stroke-linecap="round" stroke-linejoin="round" d="M9.663 17h4.673M12 3v1m6.364 1.636l-.707.707M21 12h-1M4 12H3m3.343-5.657l-.707-.707m2.828 9.9a5 5 0 117.072 0l-.548.547A3.374 3.374 0 0014 18.469V19a2 2 0 11-4 0v-.531c0-.895-.356-1.754-.988-2.386l-.548-.547z" /></svg></div><div class="admonition-body"><div class="admonition-content">

  Optionally, you can implement [coupons](/docs/assets/code-pools) which you can import and add to your email template as an [insert](/developers/inserts/insert-usage#code-pools).

  </div></div></div>


## Create an in-app message
---
1. Go to <img src="/api/docs/image/54176ad07f146575310749eba44b7c2f42c1b327/icons/experience-hub-icon.svg" alt="Experience Hub icon" class="icon" > **Experience Hub > In-app messages> Create in-app**.
2. Enter the name of the in-app.

### Define the audience
---
As the first step, define the target group of customers for the in-app message. In this case, the group will consist of the customers who received an email with a promo code and didn't redeem it in the last 30 days.

1. In the **Audience** section, click **Define**.
4. Click **New Audience** and then **Define conditions**.
5. Click **Add condition**, from the dropdown list, select the `message.send` event.
2. Click the **+ and where** button and select `id` as the parameter.
4. As an operator, choose **Equal** and enter the ID of the email campaign that was sent to customers as a part of [prerequisites](#prerequisites).
6. Click **and then...**.
    **Result**: A dropdown menu and an input field appear below.
7. From the dropdown, select `transaction.charge` event.
8. Click the **+ and where** button and select a parameter assosciated with promo codes. In this case, `coupon`.
10. As an operator, choose **Regular expression** and in the text field, enter `.`.
11. Change **Performed** to **Not performed**.
12. Click **Add condition**, and from the dropdown list, select the `message.send` event.
2. Click the **+ and where** button and select `id` as the parameter.
4. As an operator, choose **Equal** and enter the ID of the email campaign that was sent to customers as a part of [prerequisites](#prerequisites).

   <div class="admonition admonition-note"><div class="admonition-icon"><svg xmlns="http://www.w3.org/2000/svg" fill="none" viewBox="0 0 24 24" stroke="currentColor" stroke-width="2.5"><path stroke-linecap="round" stroke-linejoin="round" d="M13 16h-1v-4h-1m1-4h.01M21 12a9 9 0 11-18 0 9 9 0 0118 0z" /></svg></div><div class="admonition-body"><div class="admonition-content">

   This way the audience will exclude customers who made the transactions using the promo codes. To include purchases from a specific campaign with codes, you can use a fixed prefix or suffix for every promo code.

   </div></div></div>

6. In the calendar in the right bottom of the page, define the period from which the segmentation will return the customers. In this case, last 30 days.
7. Click **Apply**.

    <figure>
    <img src="/api/docs/image/54176ad07f146575310749eba44b7c2f42c1b327/use-cases/all-cases/_gfx/inapp_aud_promo.png" alt="The view of In app campaign configuration"  class="large">
    <figcaption>In app campaign configuration</figcaption>
    </figure> 

8. To save the audience, click **Apply**.

### Define content
---
In this part of the process, you will create the content of the in-app message that will appear in the mobile application.

1. In the **Content** section, click **Define**.
2. Click **Create Message** and select **Code Editor** to create the code for your in-app message.
3. Style the message according to your design assumptions by using the HTML, CSS, and JS sections. 
Below you can find an example of the code that you can use to create in-app message. 

    
<details class="accordion"><summary>HTML</summary><div class="accordion-content"><pre><code class="language-html">&lt;div class="in-app-wrapper"&gt; &lt;div class="in-app-wrapper-inner"&gt; &lt;div class="in-app__upper"&gt; &lt;div class="in-app-close"&gt;&lt;/div&gt; &lt;p class="in-app-title"&gt; Hello {% customer firstname %}&lt;/p&gt; &lt;p class="in-app__upper--text"&gt;We've sent you an email with the promo code.&lt;/strong&gt;&lt;/p&gt; &lt;/div&gt; &lt;div class="in-app__lower"&gt; &lt;p class="in-app__lower--text changeDate"&gt;20% discount!&lt;/p&gt; &lt;p class="in-app__lower--text--second"&gt;You haven't used it yet,&lt;/br&gt;maybe you can redeem it now?&lt;/p&gt; &lt;/div&gt; &lt;/div&gt; &lt;/div&gt;</code></pre></div></details>


<details class="accordion"><summary>CSS</summary><div class="accordion-content"><pre><code class="language-css">.in-app-wrapper * { font-family: sans-serif; } .in-app-wrapper { text-align: center; position: relative; background: #00000045; box-shadow: 0 30px 80px 0 rgba(35, 41, 54, 0.2); width: auto; height: 100vh; display: flex; flex-direction: column; flex-wrap: nowrap; align-content: center; justify-content: center; align-items: center; } .in-app-title { font-size: 20px; font-weight: normal; font-stretch: normal; font-style: normal; line-height: 1.5; letter-spacing: -0.67px; text-align: center; color: white; margin: 0; padding-top: 20px; } .in-app-subtitle { font-size: 16px; font-weight: normal; font-stretch: normal; font-style: normal; line-height: 1.43; letter-spacing: -0.47px; text-align: center; color: #13171e; } .in-app-close { position: absolute; z-index: 1; width: 50px; height: 50px; border: 0; top: 10px; right: 10px; cursor: pointer; background-color: transparent; } .in-app-close:after, .in-app-close:before { content: ''; position: absolute; height: 2px; width: 50%; top: 50%; left: 12px; margin-top: -1px; background: white; } .in-app-close:after { -webkit-transform: rotate(-45deg); -moz-transform: rotate(-45deg); -ms-transform: rotate(-45deg); -o-transform: rotate(-45deg); transform: rotate(-45deg); height: 2px; margin-top: -2px; } .in-app-close:before { -webkit-transform: rotate(45deg); -moz-transform: rotate(45deg); -ms-transform: rotate(45deg); -o-transform: rotate(45deg); transform: rotate(45deg); height: 2px; margin-top: -2px; } .in-app-wrapper-inner { background: #fff; border-radius: 6px; position: relative; border-radius: 20px; margin-left: 20px; margin-right: 20px; width: 300px; } .in-app__upper { background-color: #0b68ff; border-radius: 4% 4% 50% 50% / 4% 4% 15% 15%; height: 170px; } .in-app__lower { height: 200px; } .in-app__upper--text { font-size: 20px; color: white; word-spacing: 2px; } .in-app__lower--text { font-size: 17px; color: black; padding-top:20px; } .in-app__lower--text--second{ font-size: 17px; color: black; margin-top:50px; }</code></pre></div></details>


<details class="accordion"><summary>JS</summary><div class="accordion-content"><pre><code class="language-javascript">(function () { var closeButton = document.querySelector(".in-app-close"); closeButton.addEventListener("click", function () { SRInApp.close(); SRInApp.trackCustomEvent( "inapp.custom", { action: "close", }, "Custom event from In-App message" ); }); var modalBackground = document.querySelector(".in-app-wrapper"); modalBackground.addEventListener("click", function (event) { if (event.target.getAttribute("class") == "in-app-wrapper") { SRInApp.close(); SRInApp.trackCustomEvent( "inapp.custom", { action: "click outside modal", }, "Custom event from In-App message" ); } }); })();</code></pre></div></details>

   
4. Click **Next**.
5. Click **Apply**. 

### Select events that trigger the in-app message display
---
In this part of the process, you will define the event triggering the display of the in-app message.

1. In the **Trigger events** section, click **Define**.
2. Select **Add event** and from the dropdown list, choose `session.start` event.
3. Click the **+ and where** button and select `mobile`.
4. As the logical operator, select **Is true**.
5. Click **Apply**.

<figure>
<img src="/api/docs/image/54176ad07f146575310749eba44b7c2f42c1b327/use-cases/all-cases/_gfx/inapp_coupon-trigg.png" alt="The view of In app trigger event configuration"  class="large">
<figcaption>In app trigger event configuration</figcaption>
</figure> 

### Schedule the message and configure display settings
---
As the final part of the process, you will set the display settings of the in-app message such as schedule, capping, priority of the message among other in-app messages.

1. In the **Schedule** section, click **Define** and set the time when the message will be active. 
2. In the **Display Settings** click **Change**.
3. Define the **Delay display**, **Priority index** and enable the **Frequency limit** toggle to manage the frequency of in-app message display in the application.  
   In our case, we want to display the massage to the customer a maximum of 1 time in period of 7 days. 

    
   <div class="admonition admonition-note"><div class="admonition-icon"><svg xmlns="http://www.w3.org/2000/svg" fill="none" viewBox="0 0 24 24" stroke="currentColor" stroke-width="2.5"><path stroke-linecap="round" stroke-linejoin="round" d="M13 16h-1v-4h-1m1-4h.01M21 12a9 9 0 11-18 0 9 9 0 0118 0z" /></svg></div><div class="admonition-body"><div class="admonition-content">

   You can additionaly enable the **Capping limit** toggle to limit the amount of time the in-app message can be displayed to a user in general.

   </div></div></div>
  

16. Click **Apply**. 

    <figure>
    <img src="/api/docs/image/54176ad07f146575310749eba44b7c2f42c1b327/use-cases/all-cases/_gfx/display_coupon.png" alt="The view of In app schedule and display configuration"  class="large">
    <figcaption>In app schedule and display configuration</figcaption>
    </figure> 

17. Optionally, you can define the **UTM parameters** and **Additional parameters** for your in-app campaign.
18. Click **Activate**.

## Check the use case set up on the Synerise Demo workspace
---
You can check the [In-app message configuration](https://app.synerise.com/communications/in-app/502bf3a3-827a-4c93-828d-1f8d58ffc25a) directly in the Synerise Demo workspace.

If you’re our partner or client, you already have automatic access to the **Synerise Demo workspace (1590)**, where you can explore all the configured elements of this use case and copy them to your workspace.  

If you’re not a partner or client yet, we encourage you to fill out the contact [form](https://demo.synerise.com/request) to schedule a meeting with our representatives. They’ll be happy to show you how our demo works and discuss how you can apply this use case in your business. 
## Read more
---
- [Email campaigns](/docs/campaign/e-mail)
- [In-app messages](/docs/campaign/in-app-messages)
- [Jinjava inserts](/developers/inserts)


