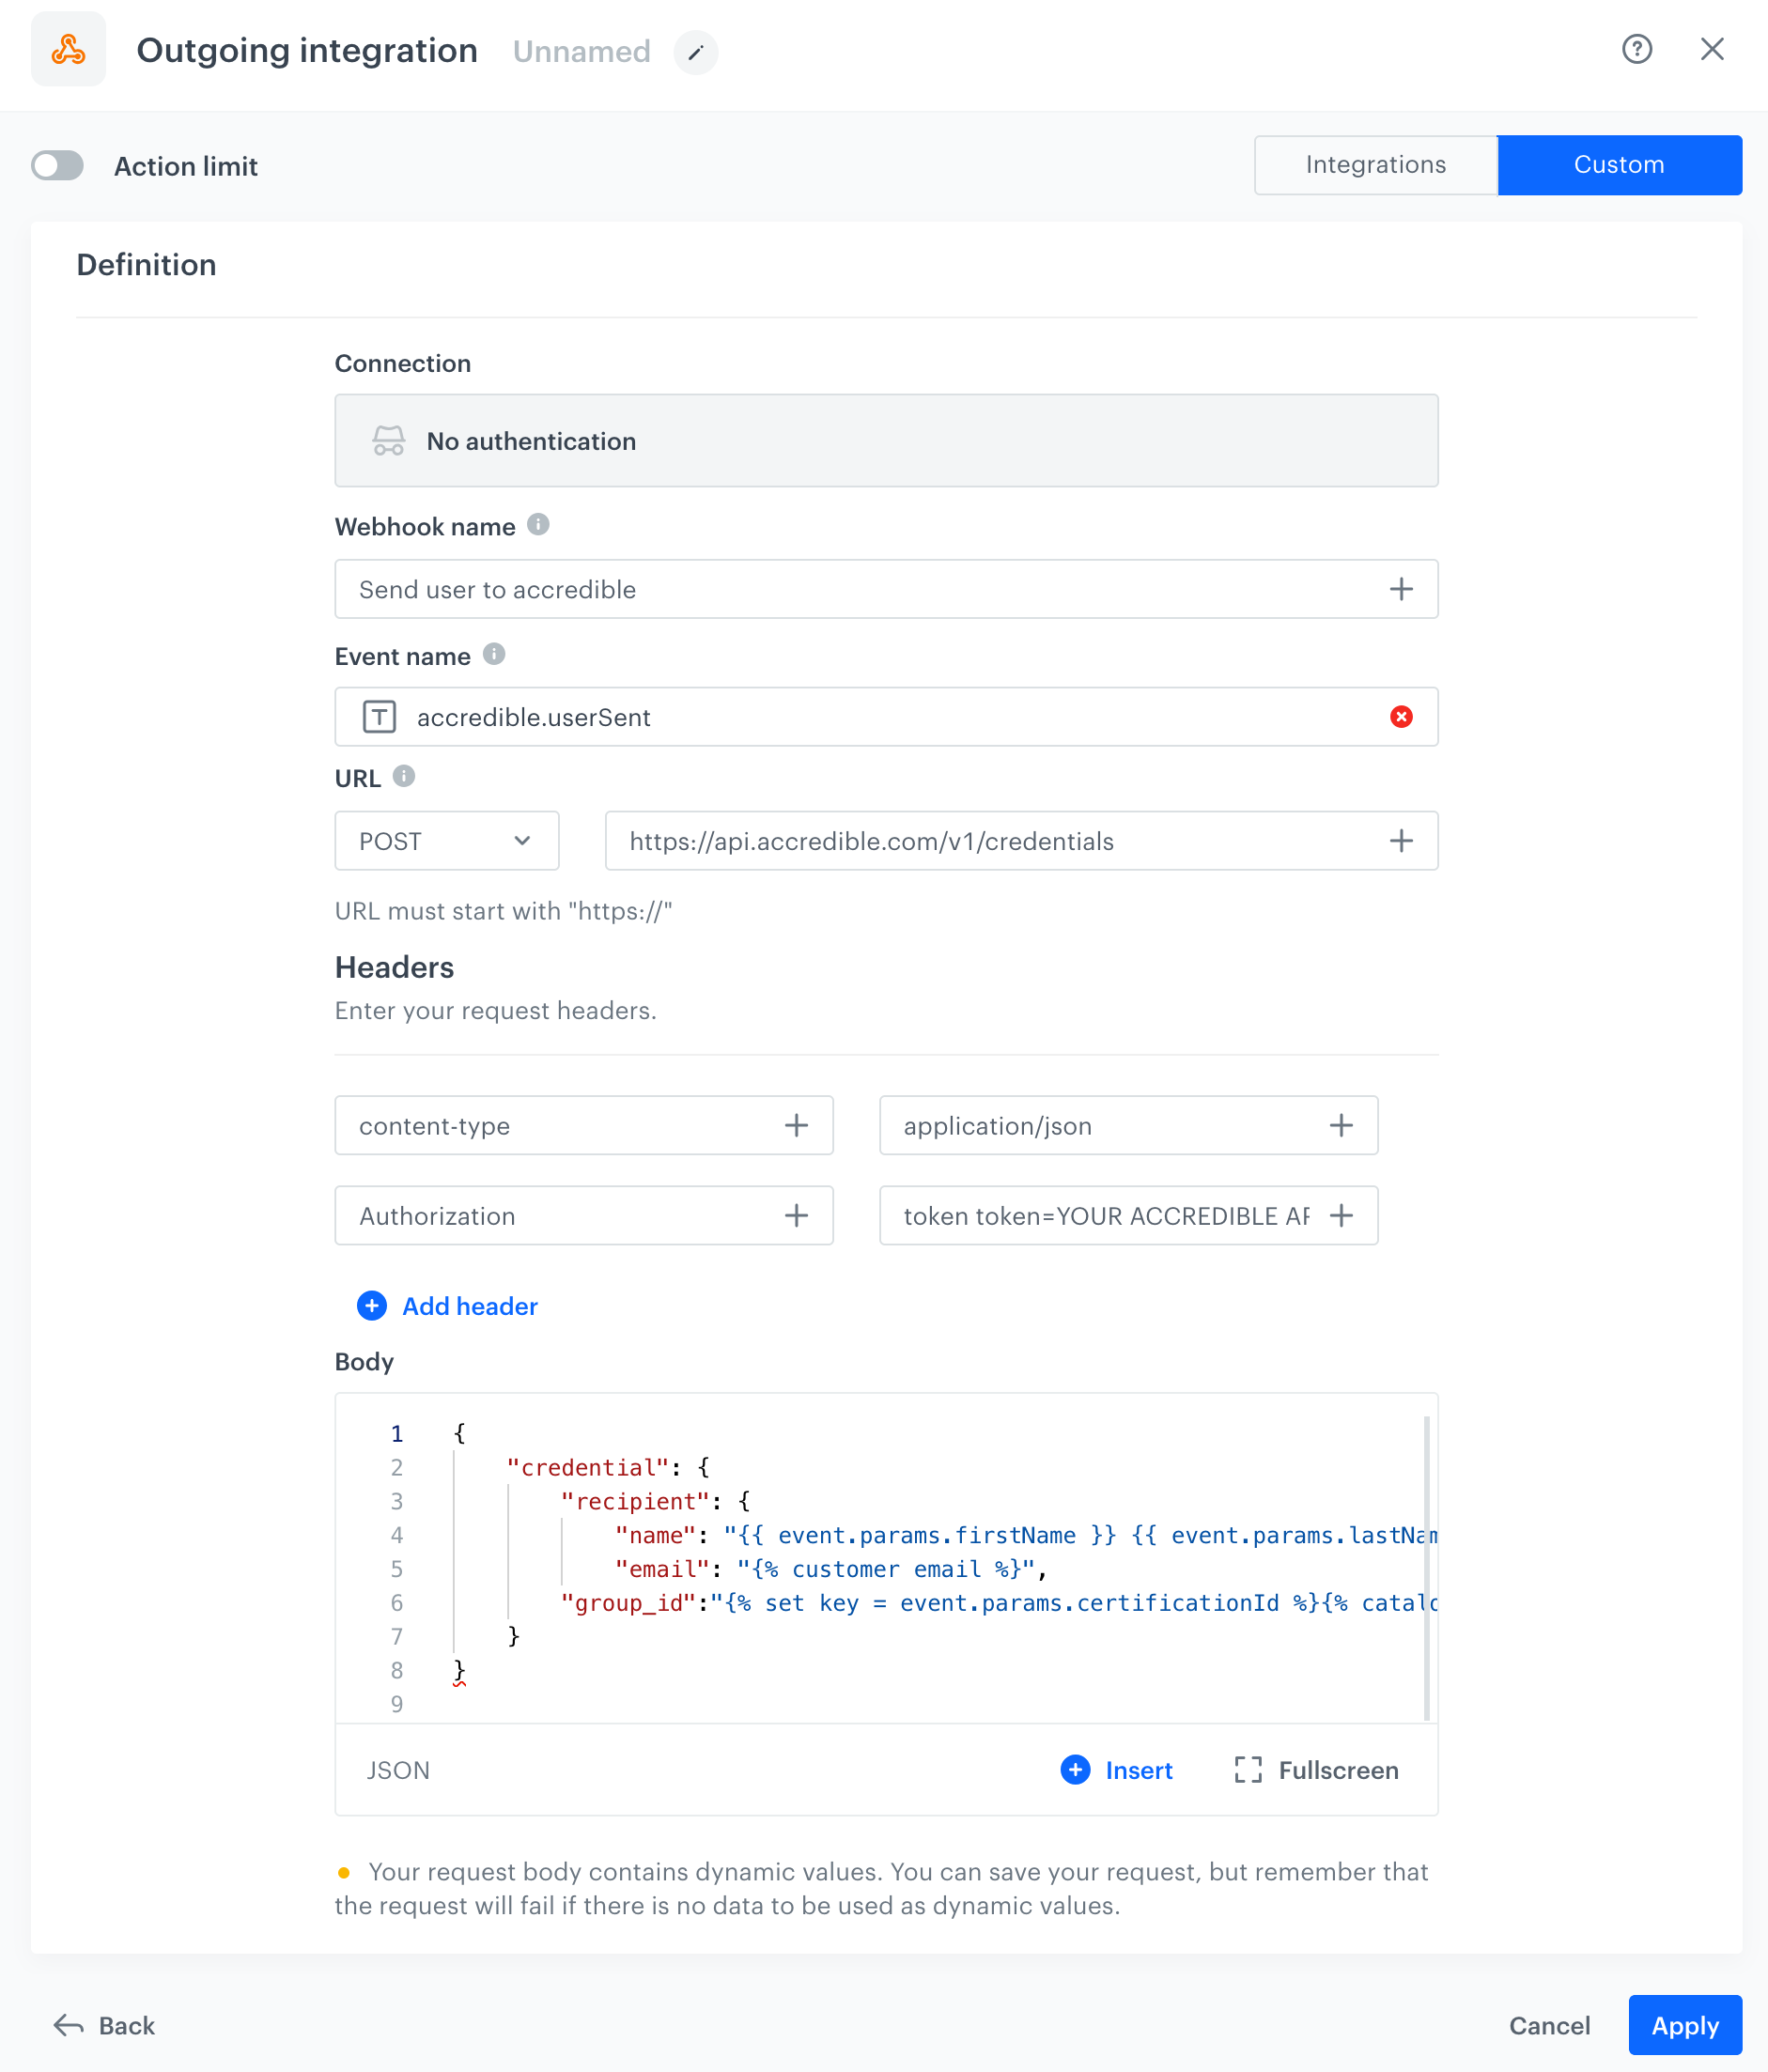
You can integrate a full-service digital credentialing solution, Accredible, with Synerise to issue digital certificates, diplomas, badges, and many other credentials to the users based on their profiles and activity in Synerise. 

This use case presents the integration used for the purposes of user certification in Synerise. The workflows include sending data of users who reached a certification level in Synerise to Accredible in order to issue their certificate and badge.  


<div class="admonition admonition-important"><div class="admonition-icon"><svg xmlns="http://www.w3.org/2000/svg" fill="none" viewBox="0 0 24 24" stroke="currentColor" stroke-width="2.5"><path stroke-linecap="round" stroke-linejoin="round" d="M12 8v4m0 4h.01M21 12a9 9 0 11-18 0 9 9 0 0118 0z" /></svg></div><div class="admonition-body"><div class="admonition-content">

In this use case, we cover only the part of issuing the digital credentials.

</div></div></div>
  

<figure>
<img src="/api/docs/image/54176ad07f146575310749eba44b7c2f42c1b327/use-cases/all-cases/_gfx/accredible-usecase.png" alt="Accredible integration" class="full no-frame" >
<figcaption> Accredible integration </figcaption>
</figure>

## Prerequisites
--- 
- Access to Accredible.
- If you want to [trigger the workflow](/use-cases/integration-with-accredible#create-a-workflow) by occurrence of a custom event, you must add one in Synerise in **Data Modeling Hub > Events** and implement it in your application. You can read more about adding events [here](/docs/assets/events).
- Create a schema that stores the certification questions in [Schema Builder](/docs/assets/schema-builder).

## Process
---
In this use case, you will go through the following steps:
1. [Create credentials in Accredible](/use-cases/integration-with-accredible#create-credentials-in-accredible).
3. [Create a catalog](/use-cases/integration-with-accredible#create-a-catalog).
4. [Create a workflow](/use-cases/integration-with-accredible#create-a-workflow).
5. [Test](/use-cases/integration-with-accredible#testing) your integration.


## Create credentials in Accredible
---
In this part of the process, in your Accredible account, create a group of credentials.  

<figure>
<img src="/api/docs/image/54176ad07f146575310749eba44b7c2f42c1b327/use-cases/all-cases/_gfx/accredible1.png" alt="Groups in Accredible" class="full">
<figcaption>Groups in Accredible</figcaption>
</figure>


<div class="admonition admonition-note"><div class="admonition-icon"><svg xmlns="http://www.w3.org/2000/svg" fill="none" viewBox="0 0 24 24" stroke="currentColor" stroke-width="2.5"><path stroke-linecap="round" stroke-linejoin="round" d="M13 16h-1v-4h-1m1-4h.01M21 12a9 9 0 11-18 0 9 9 0 0118 0z" /></svg></div><div class="admonition-body"><div class="admonition-content">

You can find the full documentation [here](https://help.accredible.com/how-do-i-create-a-group).

</div></div></div>


A group receives a unique identifier.

<figure>
<img src="/api/docs/image/54176ad07f146575310749eba44b7c2f42c1b327/use-cases/all-cases/_gfx/accredible2.png" alt="ID of the group" class="full">
<figcaption>ID of the group</figcaption>
</figure>

## Create a catalog 
---
In this part of the process, prepare a CSV file that contains Accredible group identifier and Synerise ID of the certificate level. Next, create a catalog to which you import the file.

1. Go to **Data Modeling Hub > Catalogs > Create new**.
2. Enter the name of the catalog.  
    
   <div class="admonition admonition-important"><div class="admonition-icon"><svg xmlns="http://www.w3.org/2000/svg" fill="none" viewBox="0 0 24 24" stroke="currentColor" stroke-width="2.5"><path stroke-linecap="round" stroke-linejoin="round" d="M12 8v4m0 4h.01M21 12a9 9 0 11-18 0 9 9 0 0118 0z" /></svg></div><div class="admonition-body"><div class="admonition-content">

   Don't use diacritical letters and spaces.

   </div></div></div>

3. Click **Import CSV**.  
    
If you prepared a CSV file in Excel, open it in a text editor to check whether commas are used as separators. If not, replace them with commas.
    
4. Upload the file by clicking **Upload file**.
5. In the **Order key** field, type the name of the column which values are treated as the key - `syneriseID`.  
    
   <div class="admonition admonition-note"><div class="admonition-icon"><svg xmlns="http://www.w3.org/2000/svg" fill="none" viewBox="0 0 24 24" stroke="currentColor" stroke-width="2.5"><path stroke-linecap="round" stroke-linejoin="round" d="M13 16h-1v-4h-1m1-4h.01M21 12a9 9 0 11-18 0 9 9 0 0118 0z" /></svg></div><div class="admonition-body"><div class="admonition-content">

   The value of `syneriseID` is the ID of the schema created as a part of [prerequisites](#prerequisites).

   </div></div></div>

6. Complete the process by clicking **Import**.  
    **Result**:  
    <figure>
    <img src="/api/docs/image/54176ad07f146575310749eba44b7c2f42c1b327/use-cases/all-cases/_gfx/accredible-catalog.png" alt="CSV file imported to catalog" class="full">
    <figcaption>CSV file imported to catalog</figcaption>
    </figure>

## Create a workflow
---
In this part of the process, create a workflow that is triggered by receiving a certification. Then, a request is sent to Accredible to issue credentials for the user who received the required score.  

1. In Synerise, go to **Automation Hub > Workflows > New workflow**.
2. Enter the name of the workflow. 
3. As the first node, add **Profile Event**. In the configuration of the node, select the event that triggers the workflow. In this use case, it's a custom event - `certification.acquired`.  
    
   <div class="admonition admonition-tip"><div class="admonition-icon"><svg xmlns="http://www.w3.org/2000/svg" fill="none" viewBox="0 0 24 24" stroke="currentColor" stroke-width="2.5"><path stroke-linecap="round" stroke-linejoin="round" d="M9.663 17h4.673M12 3v1m6.364 1.636l-.707.707M21 12h-1M4 12H3m3.343-5.657l-.707-.707m2.828 9.9a5 5 0 117.072 0l-.548.547A3.374 3.374 0 0014 18.469V19a2 2 0 11-4 0v-.531c0-.895-.356-1.754-.988-2.386l-.548-.547z" /></svg></div><div class="admonition-body"><div class="admonition-content">

   If it suits your business scenario, you may use default Synerise events, or instead of **Profile Event**, you may use the **Audience** node to trigger the workflow for the selected group.

   </div></div></div>

4. Confirm the settings by clicking **Apply**.
4. Add the **Outgoing integration** to the workflow. In the configuration of the node:  
    1. Change the webhook type to **Custom**.
    2. As the connection type, select **No authentication**.
    3. Click **Select connection** and select a connection.
        If you want to create a connection, click **Add connection** and [create it](/docs/automation/actions/webhook-node#set-up-a-connection).

    1. Select **Custom** and **no authentication**.
    1. Enter the name of the node.
    2. In the **Webhook name** field, enter the value of the `name` parameter of the event generated by this node.
    3. In **Webhook event name**, click **Create event** and create a new event:
        1. As **Name**, enter `accredible.userSent`
        2. As **Display name**, enter `User sent to Accredible`  
    3. Select the **POST** method.  
    4. In the **URL** field, enter `https://api.accredible.com/v1/credentials`  
    
       <div class="admonition admonition-note"><div class="admonition-icon"><svg xmlns="http://www.w3.org/2000/svg" fill="none" viewBox="0 0 24 24" stroke="currentColor" stroke-width="2.5"><path stroke-linecap="round" stroke-linejoin="round" d="M13 16h-1v-4h-1m1-4h.01M21 12a9 9 0 11-18 0 9 9 0 0118 0z" /></svg></div><div class="admonition-body"><div class="admonition-content">

       You can find more information about this endpoint [here](https://docs.api.accredible.com/#tag/Credentials).

       </div></div></div>

    5. In the **Headers** section, use the following headers:  
        - Set `Content-type` to `application/json`.  
        - Set `Authorization` to `Token token=YOUR ACCREDIBLE API_KEY`  
    6. Enter the request body, you may reuse and modify the example request below according to your needs:  
        
       <pre><code class="language-json">{
               "credential": {
                   "recipient": {
                       "name": "{{ event.params.firstName }} {{ event.params.lastName }}",
                       "email": "{% customer email %}",
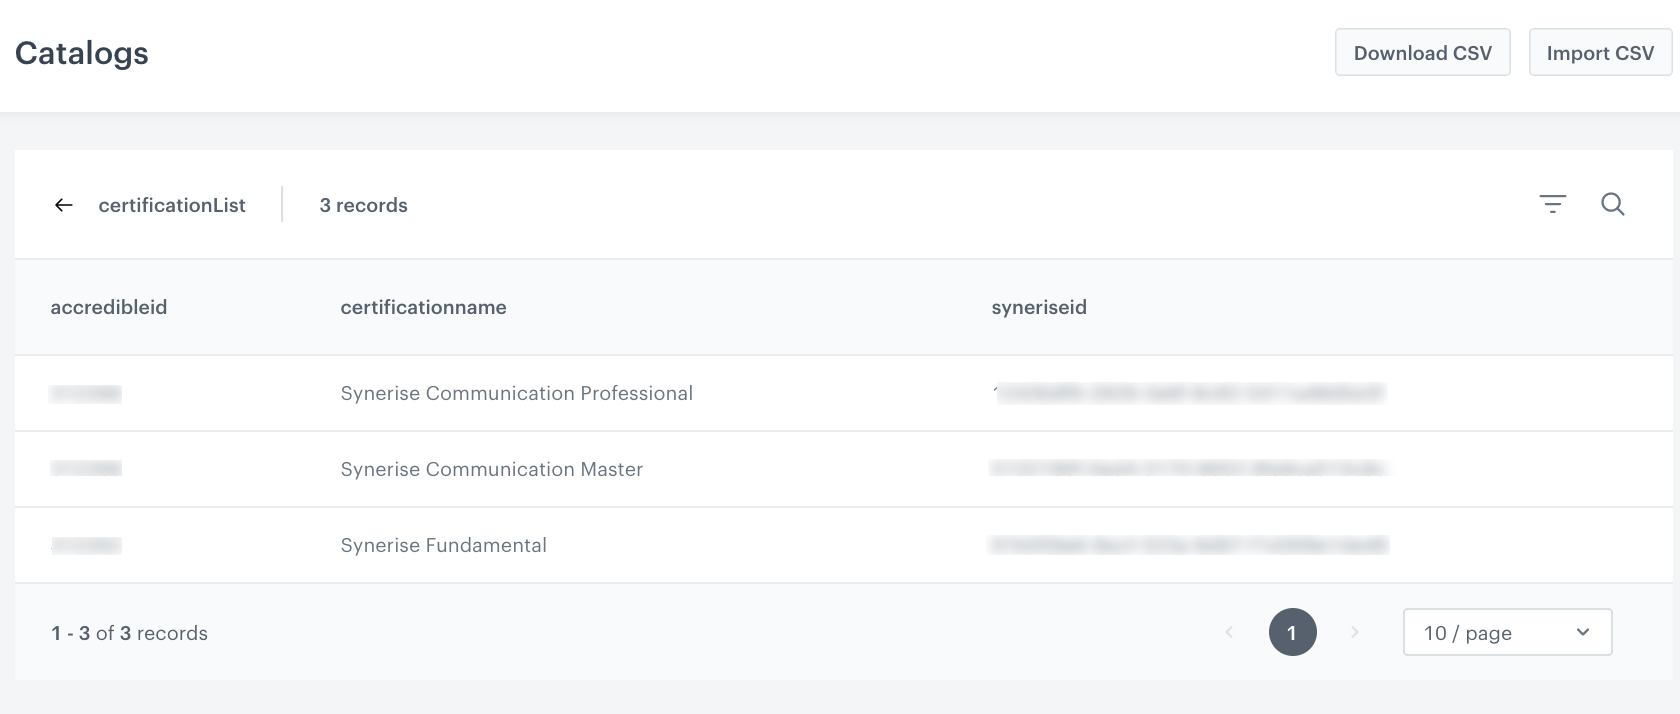
                   "group_id":"{% set key = event.params.certificationId %}{% catalogitem.certificationList(key) %}{% set object = catalog_result %}{{ object.get('accredibleid')}}{% endcatalogitem %}"
               }
           }}</code></pre>

        
   <div class="admonition admonition-note"><div class="admonition-icon"><svg xmlns="http://www.w3.org/2000/svg" fill="none" viewBox="0 0 24 24" stroke="currentColor" stroke-width="2.5"><path stroke-linecap="round" stroke-linejoin="round" d="M13 16h-1v-4h-1m1-4h.01M21 12a9 9 0 11-18 0 9 9 0 0118 0z" /></svg></div><div class="admonition-body"><div class="admonition-content">

   The example request contains three Jinjava inserts: 
   1. Customer's name sourced from Profile Event node, [read more about reusing information in nodes](/docs/automation/event-params-reuse)
   2. Customer's email address according to the context
   3. Reference to the catalog column  
   You can read more about inserts in Automation [here](/developers/inserts/automation).

   </div></div></div>

    <figure>
    <img src="/api/docs/image/54176ad07f146575310749eba44b7c2f42c1b327/use-cases/all-cases/_gfx/accredible-outgoing-integration.png" alt="Configuration of the Outgoing Integration node" class="full">
    <figcaption>Configuration of the Outgoing Integration node</figcaption>
    </figure>

    8. Confirm by clicking **Apply**.
9. Add the **End** node.
10. Click **Save&Run**.  

<figure>
<img src="/api/docs/image/54176ad07f146575310749eba44b7c2f42c1b327/use-cases/all-cases/_gfx/accredible-workflow-final.png" alt="Final configuration of the workflow" class="full">
<figcaption>Final configuration of the workflow</figcaption>
</figure>

## Testing
---
1. Use the API to send a test event and simulate a user completing a certification
2. Open the **Statistics** tab available in your workflow.
3. Click the **Outgoing Integration** node. If the **Entered** and **Executed** counters have incremented after you sent the test certification, your survey triggered the workflow and completed it.
4. Go to the profile of the test user, look for the `automation` event. Double-click it to see the details. If the `status` parameter is `200`, the workflow works. 

<figure>
<img src="/api/docs/image/54176ad07f146575310749eba44b7c2f42c1b327/use-cases/all-cases/_gfx/accredible-testing-event.png" alt="Event generated on the customer's profile" class="full">
<figcaption>Event generated on the customer's profile</figcaption>
</figure>

You can use this webhook response to trigger further campaigns to the user as well as create analytical dashboards with clear information on how many users received their credentials.


## Check the use case set up on the Synerise Demo workspace
---
You can check the configuration of use case in Synerise Demo workspace:
- [Catalog](https://app.synerise.com/assets/catalogs/200765)
- [Workflow](https://app.synerise.com/automations/workflows/automation-diagram/d62c7285-1698-48a7-b5be-a6238679c78e)

If you’re our partner or client, you already have automatic access to the **Synerise Demo workspace (1590)**, where you can explore all the configured elements of this use case and copy them to your workspace.  

If you’re not a partner or client yet, we encourage you to fill out the contact [form](https://demo.synerise.com/request) to schedule a meeting with our representatives. They’ll be happy to show you how our demo works and discuss how you can apply this use case in your business. 
## Read more
---
- [Automation Hub](/docs/automation)
- [Integration](/docs/automation/integration)