
<div class="youtube-embed youtube-facade not-prose" data-youtube-id="lq__p_Ok7z8" role="button" tabindex="0" aria-label="Play YouTube video"><img src="https://img.youtube.com/vi/lq__p_Ok7z8/hq720.jpg" alt="YouTube video" class="youtube-facade-thumb" loading="lazy" /><span class="youtube-facade-play" aria-hidden="true"><svg viewBox="0 0 68 48" width="68" height="48"><path d="M66.52 7.74c-.78-2.93-2.49-5.41-5.42-6.19C55.79.13 34 0 34 0S12.21.13 6.9 1.55c-2.93.78-4.64 3.26-5.42 6.19C.06 13.05 0 24 0 24s.06 10.95 1.48 16.26c.78 2.93 2.49 5.41 5.42 6.19C12.21 47.87 34 48 34 48s21.79-.13 27.1-1.55c2.93-.78 4.64-3.26 5.42-6.19C67.94 34.95 68 24 68 24s-.06-10.95-1.48-16.26z" fill="red"/><path d="M45 24 27 14v20" fill="white"/></svg></span></div>

In a highly competitive digital environment, personalization is key to capturing user attention and driving higher conversion rates. Personalized promotions based on customer behavior, purchase history, and preferences can significantly enhance user experience, especially when delivered through targeted channels such as SMS notifications. By redirecting users to a personalized landing page with tailored promotions, businesses can increase engagement and sales.

This use case illustrates how personalized promotional offers can be curated and presented on a landing page that is customized for each user. The landing page displays a list of promotions based on the user’s profile, with the information gathered from their purchase history, on-site activity, and preferences. Users are directed to this landing page through an SMS campaign. This process ensures that the user is exposed only to the most relevant offers, increasing the likelihood of conversion.

In this use case, we will configure a promotion in Synerise, create an SMS campaign, and set up a landing page displaying the promotions. When the customer clicks the link in the SMS, they will be redirected to the personalized landing page with the relevant promotional content. The landing page will be created based on a predefined template which make the scenario easy to prepare by adapting the ready project to your business needs.


## Prerequisites 
---
To be able to implement this use case, you must:
- [SMS account](/docs/settings/configuration/sms-account) configuration (integration e.g. with SMS API). 
- Implement transaction events using [SDK](/developers/web/transactions-sdk) or [API](https://developers.synerise.com/DataManagement/DataManagement.html#operation/CreateATransaction).
- If you plan to publish a landing page within your own domain, follow [the listed requirements in "Creating landing page" documentation in "Requirements for custom domains" section](/docs/campaign/landing-page/creating-landing-page); if you choose to publish it on the Synerise domain, no additional requirements are necessary.

## Process
---
In this use case, you will go through the following steps:

1. [Create promotions](/use-cases/landing-page-promotions#create-promotions).
4. [Create a landing page](/use-cases/landing-page-promotions#create-a-landing-page).
3. [Create a SMS campaign](/use-cases/landing-page-promotions#create-a-sms-campaign).


## Create promotions
---

In this part of the process, create a promotion (or more) which will be displayed on the landing page. You can create a promotion with the following scopes:
- [For selected items](/docs/ai-hub/promotions/creating-promotions) - you can select items to which you want to apply a discount
- [For entire basket](/docs/ai-hub/promotions/creating-promotions-for-entire-basket) - you can reduce the value of the whole shopping cart if its value matches the fixed price limit,
Regardless of the promotion scope, in the configuration of the promotion, in the **Content** section:
- find the **Add tag** field and add a tag of your choice. The selection of the promotions of the landing page will be narrowed down to those labeled with this tag.


    <figure>
    <img src="/api/docs/image/54176ad07f146575310749eba44b7c2f42c1b327/use-cases/all-cases/_gfx/promo-tag.png" class="full" alt="Example of tag">
    <figcaption>Example of tag</figcaption>
    </figure>
    
- include all necessary promotional elements such as the product image, promotion name, description, and any other details required for displaying the promotion on the landing page. This ensures a clear presentation of the promotion to the customer, enhancing their engagement and understanding of the offer.


  <div class="admonition admonition-tip"><div class="admonition-icon"><svg xmlns="http://www.w3.org/2000/svg" fill="none" viewBox="0 0 24 24" stroke="currentColor" stroke-width="2.5"><path stroke-linecap="round" stroke-linejoin="round" d="M9.663 17h4.673M12 3v1m6.364 1.636l-.707.707M21 12h-1M4 12H3m3.343-5.657l-.707-.707m2.828 9.9a5 5 0 117.072 0l-.548.547A3.374 3.374 0 0014 18.469V19a2 2 0 11-4 0v-.531c0-.895-.356-1.754-.988-2.386l-.548-.547z" /></svg></div><div class="admonition-body"><div class="admonition-content">

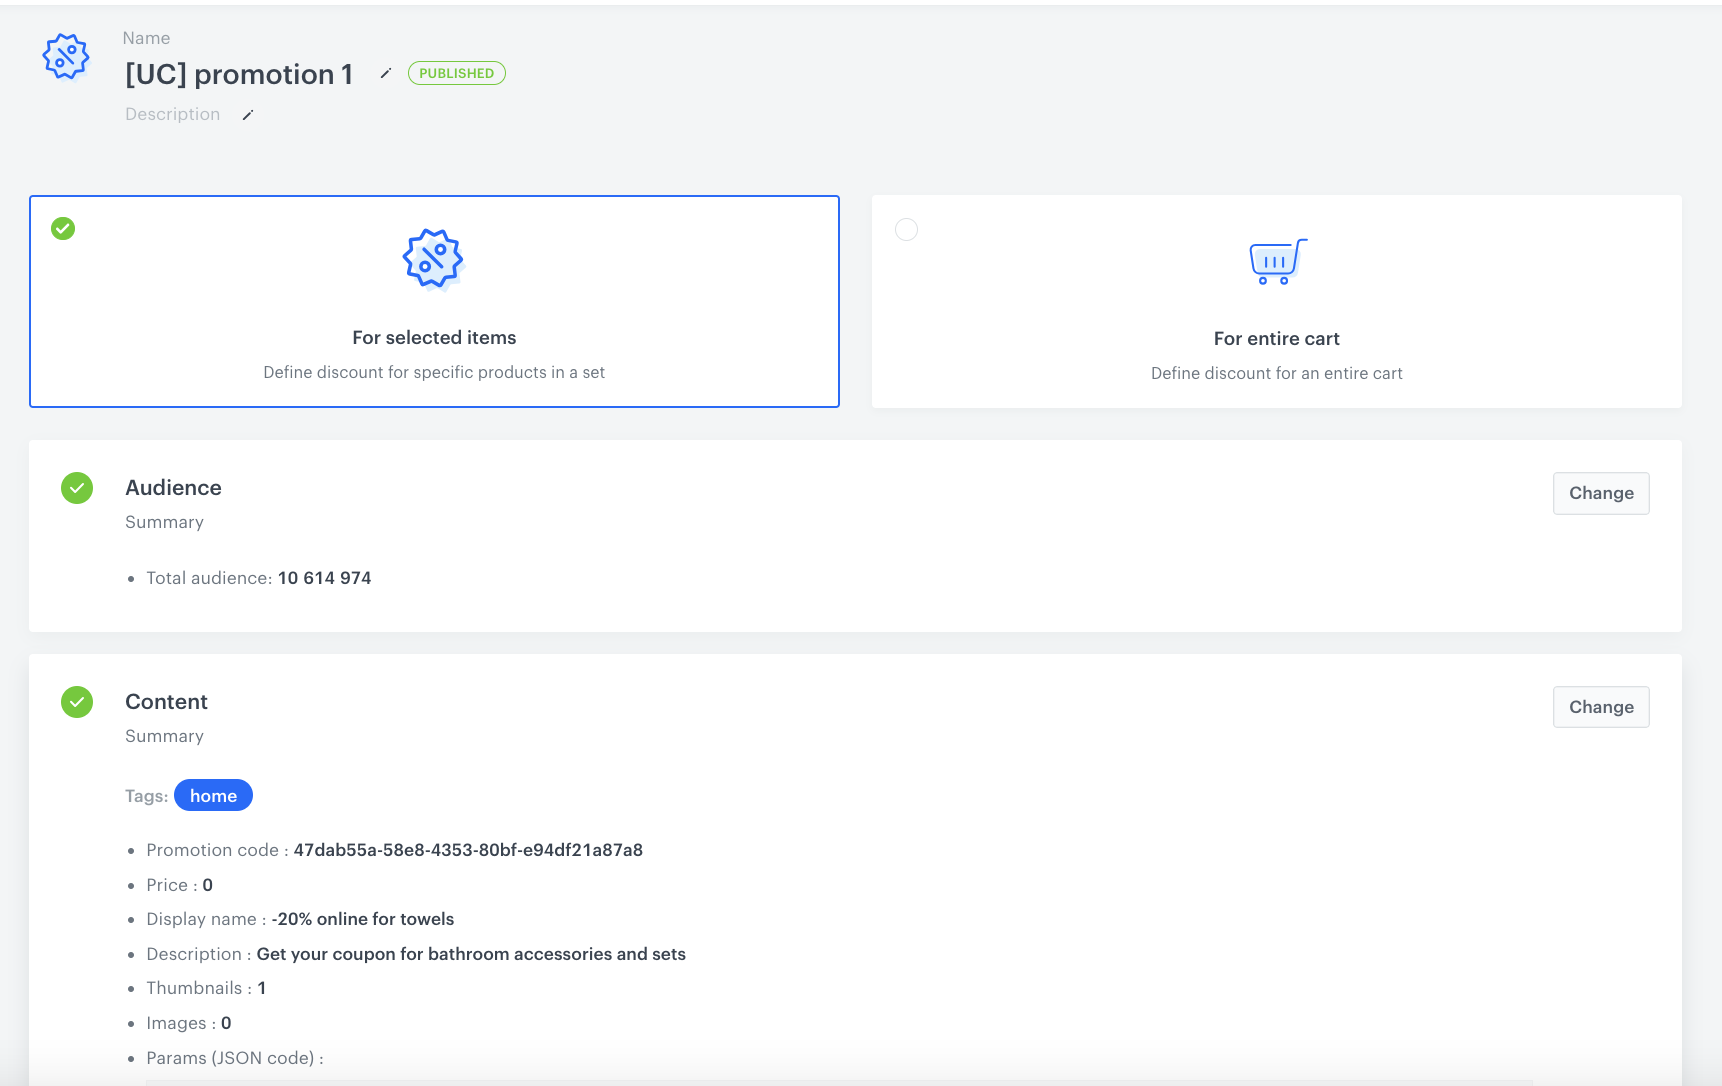
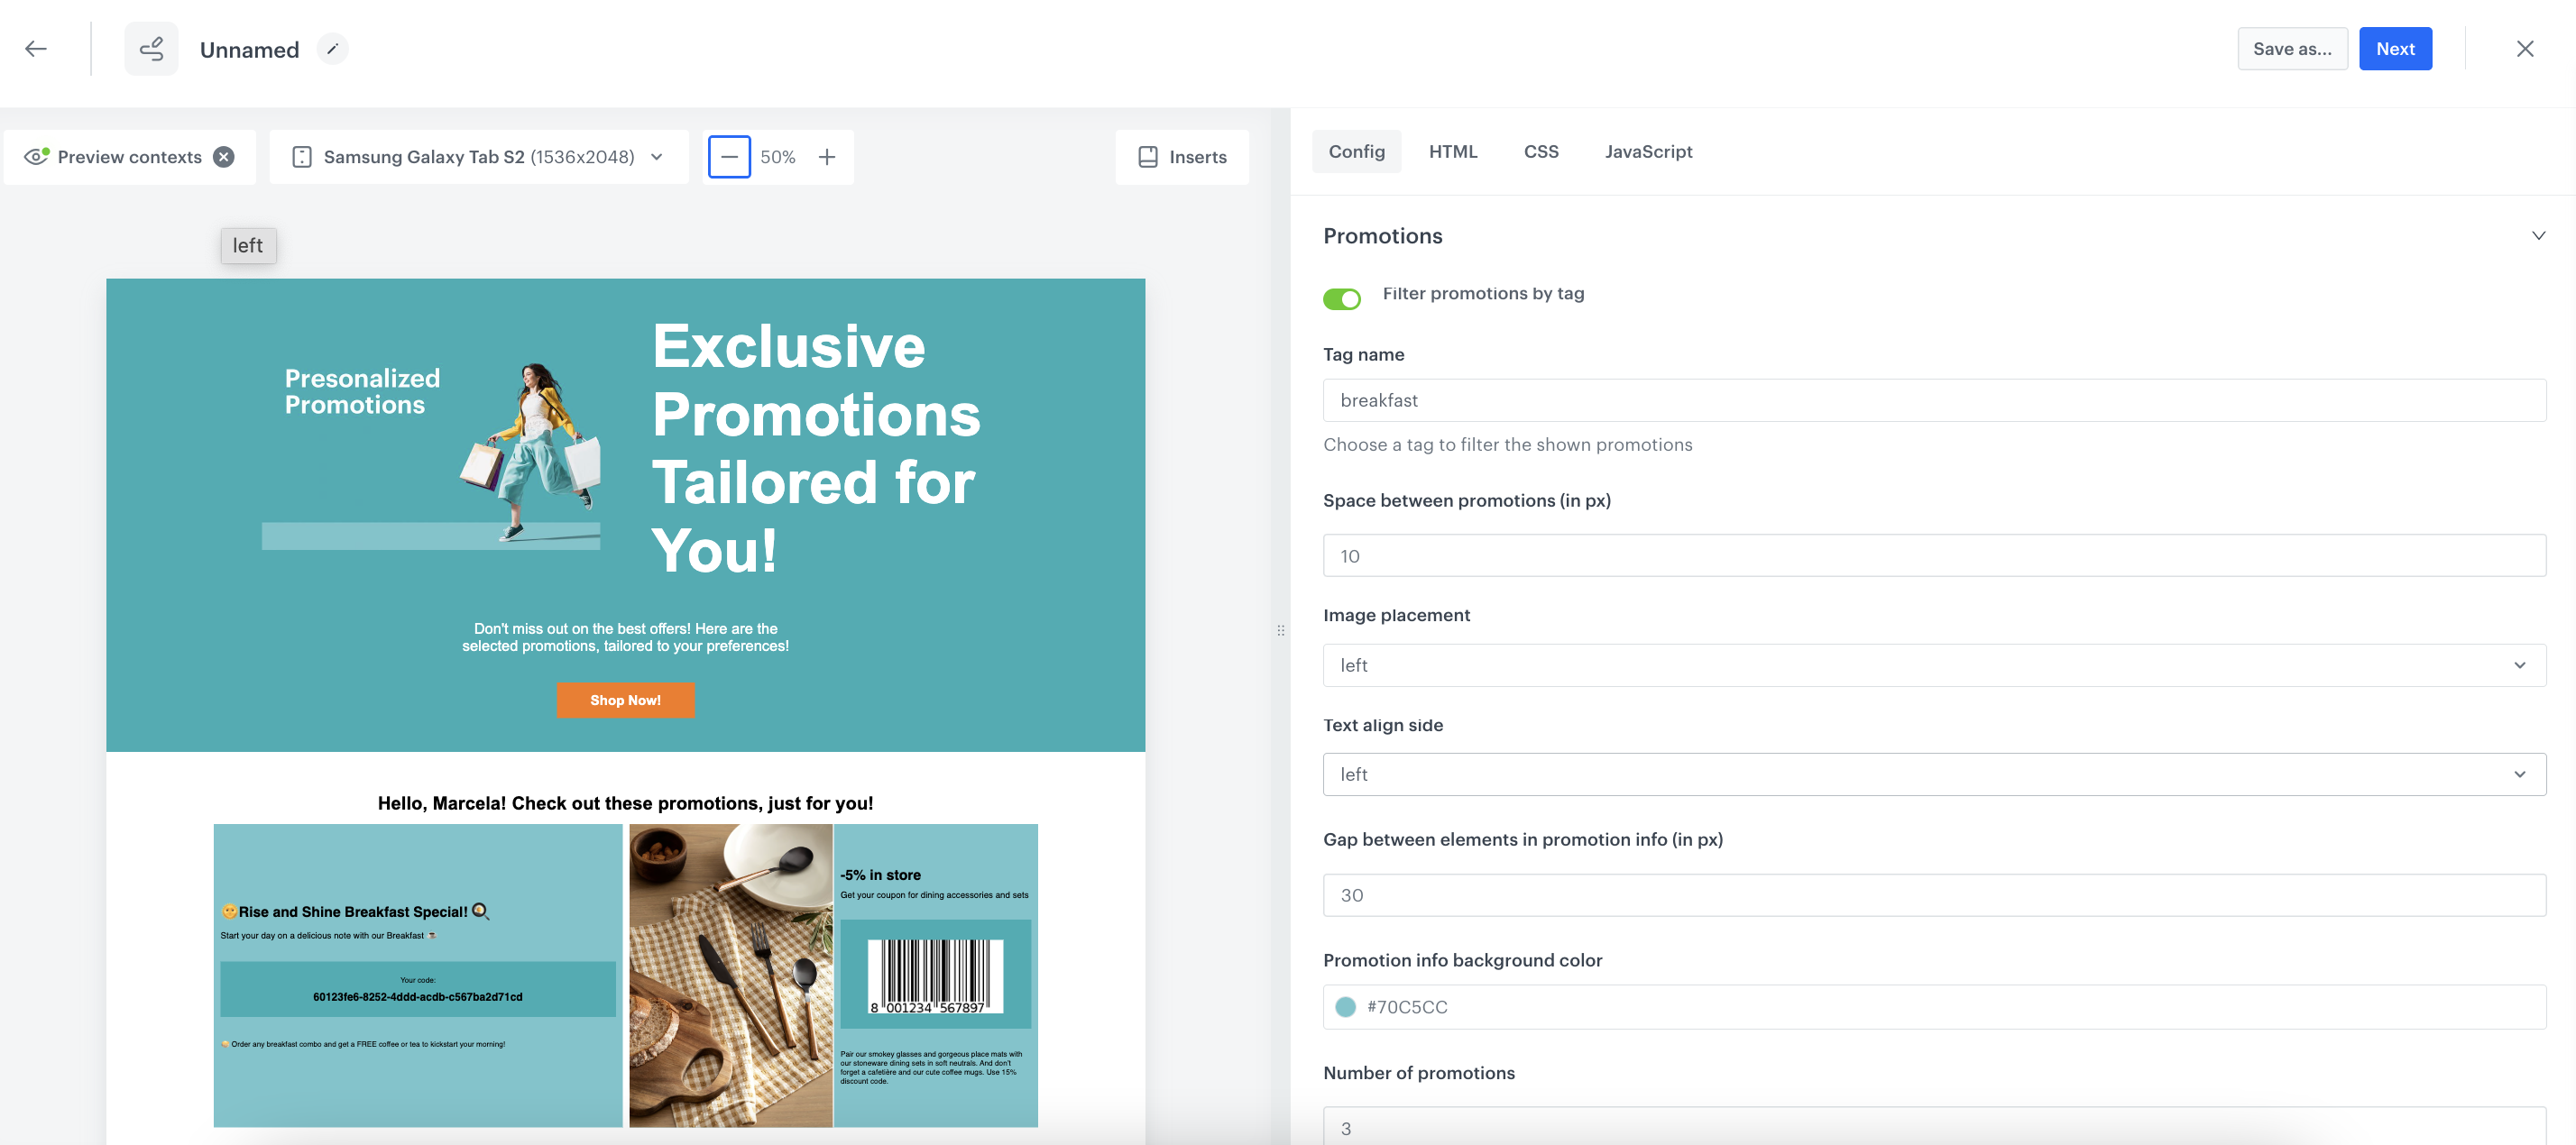
  Make sure that all necessary promotional elements are included in the content, such as the product image, name, description, and any other details required for displaying the promotion on the landing page. Including all key elements ensures that the promotion is presented clearly and effectively to the customer, enhancing their engagement and understanding of the offer.

  </div></div></div>


Alternatively, if you already created promotions in an external service, you can [import them to Synerise](/docs/automation/actions/synerise-integrations#import-promotions).


## Create a Landing Page
---

In this part of the process, you will create a landing page. We will use a predefined one, so there is no need to create the content from scratch.

1. Go to <img src="/api/docs/image/54176ad07f146575310749eba44b7c2f42c1b327/icons/experience-hub-icon.svg" alt="Image presents the Experience Hub icon" class="icon"> **Experience Hub > Landing Page**.  
2. Enter the name of the campaign.

### Define content
---
1. In the **Content** section, click **Create Message**.
2. From the list of template folders, select a folder with the predefined **Landing Page templates**.  
    **Result:** You are redirected to the list of predefined templates.
3. Select the **Promotions** template. The form in the **Config** tab is pre-filled with default values, which you can modify to suit your business needs.  

    **Result:** You are redirected to the code editor.

4. In the **Promotions section** set up all the settings connected with promotions like the **Number of promotions** and **Number of promotions in row**. Add additional elements like **Space between promotions**, **Gap between elements in promotion**, **Background**.
    
   <div class="admonition admonition-note"><div class="admonition-icon"><svg xmlns="http://www.w3.org/2000/svg" fill="none" viewBox="0 0 24 24" stroke="currentColor" stroke-width="2.5"><path stroke-linecap="round" stroke-linejoin="round" d="M13 16h-1v-4h-1m1-4h.01M21 12a9 9 0 11-18 0 9 9 0 0118 0z" /></svg></div><div class="admonition-body"><div class="admonition-content">

   Optionally: If you used a tag to categorize promotions while creating them and want to display only those with the selected tag, click **Filter promotions by tag** option and enter the tag in the **Tag name** field. This way, only the active promotions that have the specified tag will be shown on the landing page. If you leave this field empty, all activated promotions available for the given customer will be displayed.

   </div></div></div>

5. In the **Enable Elements** you can decide which element should be visible on your landing page. 
6. In the **Buttons, Hero, Footer,** and **General** sections, you can configure the layout and appearance of your landing page, including fonts, colors, and backgrounds, to ensure it matches your branding.

    
   <div class="admonition admonition-note"><div class="admonition-icon"><svg xmlns="http://www.w3.org/2000/svg" fill="none" viewBox="0 0 24 24" stroke="currentColor" stroke-width="2.5"><path stroke-linecap="round" stroke-linejoin="round" d="M13 16h-1v-4h-1m1-4h.01M21 12a9 9 0 11-18 0 9 9 0 0118 0z" /></svg></div><div class="admonition-body"><div class="admonition-content">

   To preview the template without switched off sections, use the **Preview Contexts** option.

   </div></div></div>


7. After you make changes to the template, you can check the preview. 
    1. Click the **Preview Contexts** button on the upper left side.
    2. Enter the ID of a customer.
    3. Click **Apply**.

    <figure>
    <img src="/api/docs/image/54176ad07f146575310749eba44b7c2f42c1b327/use-cases/all-cases/_gfx/lp-promo.png" alt="The view of the Edit form in the Config tab"  class="full">
    <figcaption>Edit form in the Config tab</figcaption>
    </figure> 


8. If the template is ready, click the arrow next to **Use in communication** in the upper right corner.


### Define schedule settings 
---
1. In the **Schedule** section, click **Define**.
1. Select the timezone.
2. Select the time when the landing page will be active.
6. Click **Apply**


### Define the SEO settings
---
In this part of the process you can define technical details concerning search engine optimization and increase the chances of placing high in search results. 

### Set up the URL
---
In this part of the process, you will define the URL to your landing page.

1. From the **Domain** dropdown list, select the address of your landing page.
2. Optionally, if you want to add a part to the address after the domain, in **Nice URL** provide this part, for example, `dresses-and-skirts` (don't use a slash, it is added automatically).
3. In **URL for redirecting users when the landing expires (optional)** enter the URL to which you will redirect users after the landing page expires.
4. Optionally, in **Fallback URL** enter the URL to which users will be redirected if your landing page is unavailable due to errors (for example, when it can't be rendered due to Jinjava syntax error). If you leave this field empty, users will be redirected to a generic error page.
4. In **URL preview**, you are provided with a final link to your landing page. The preview is in real time, so if you fill a domain or URL, you get the preview of the address simultaneously.
5. Confirm the settings by clicking **Apply**.

### Add optional settings
---
1. In the **HTTP headers** section, you can add custom HTTP headers to your landing page. In the **Key** and **Value** fields, enter a header and its value, respectively.
2. In the **Customize** section:
    - you can add CSS and scripts to your landing page 
    - you can define the URLs to external sources or paste the snippets
    - in the JS section under the **Advanced options** option, to enable tracking users on your landing page, you can paste the [tracking code](/developers/web/installation-and-configuration#adding-the-tracking-code-to-your-site).

### Save your campaign
---
1. After you make changes to the campaign, you can check the preview. Click the **Preview** button on the upper right  side.
2. When your landing page is ready you can **Save it as a draft** or directly click **Publish**.

## Create a SMS campaign
---
In this step, create the SMS campaign with the link to the landing page with personalized list of promotions.

1. Go to **Experience Hub > SMS > Create new**
2. In the **Audience** section, choose the campaign recipients.
3. In **Content** section, click **Define**.  
4. From the **Sender name** dropdown list, select the account from which the campaign will be sent. 
5. Click **Create message > New template**.
    The template must contain a link to the landing page. You can read more on SMS templates in ["Creating SMS templates" documentation](/docs/campaign/SMS/creating-SMS-template) .


   <div class="admonition admonition-note"><div class="admonition-icon"><svg xmlns="http://www.w3.org/2000/svg" fill="none" viewBox="0 0 24 24" stroke="currentColor" stroke-width="2.5"><path stroke-linecap="round" stroke-linejoin="round" d="M13 16h-1v-4h-1m1-4h.01M21 12a9 9 0 11-18 0 9 9 0 0118 0z" /></svg></div><div class="admonition-body"><div class="admonition-content">

   To ensure that the landing page content is personalized and rendered specifically for the customer who is being redirected, you must pass the UUID of the customer in the link. This can be done by adding `snrs_cl` parameter in the URL in the following ways:  
- by adding manually the Jinjava insert that retrieves UUID to the link, for example: `https://your.landingpage.com?snrs_cl={{customer.uuid}}`
- by inserting the link using `{% preparelink %}YOUR_LANDING_PAGE_URL{% endpreparelink %}` tags which automatically adds the `snrs_cl` parameter to the link. 

   You can read more about customer context in landing pages in ["Establishing customer context" section](/docs/campaign/landing-page/creating-landing-page).

   </div></div></div>


6. After finishing the template, click **Use in communication**.  
7. In the **Content** section, confirm the settings by clicking **Apply**.
7. In **Schedule** section, choose what time the campaign will be sent.  
8. If you want to test your SMS, add your phone number and click **Send test** to check how the message is displayed.  
9. To launch the campaign, in the upper right corner, click **Send**.


## Check the use case set up on the Synerise Demo workspace
---
You can check the configuration of the [landing page](https://app.synerise.com/campaigns/landing-pages/create/357dd8d8-e298-4254-9dd6-d2cf66269ee6:2024-10-07T07:58:32.436674852) with personalized product listing directly in Synerise Demo workspace.

If you’re our partner or client, you already have automatic access to the **Synerise Demo workspace (1590)**, where you can explore all the configured elements of this use case and copy them to your workspace.  

If you’re not a partner or client yet, we encourage you to fill out the contact [form](https://demo.synerise.com/request) to schedule a meeting with our representatives. They’ll be happy to show you how our demo works and discuss how you can apply this use case in your business.   

## Read more 
---
- [Jinjava inserts](/developers/inserts)
- [Landing page](/docs/campaign/landing-page)
- [Promotions](/docs/ai-hub/promotions)
- [SMS campaigns](/docs/campaign/SMS)

