
Customer churn is a major challenge for businesses looking to maintain engagement and revenue. Instead of reacting to churn after it happens, predictive analytics allows us to intervene before customers leave. In this use case, we use machine learning to predict both a **customer's likelihood to churn** and their **preferred brand**. By combining these insights, we can craft highly targeted retention campaigns.

Our approach begins with two key predictions: 
- identifying each customer’s best-fit brand,
- assessing their churn probability. 

Customers with a high risk of churn are then segmented based on their preferred brand. Using this segmentation, we launch a personalized email campaign featuring product recommendations from their favorite brand. The final step involves integrating this process into an automated workflow, ensuring that high-risk customers receive timely, brand-aligned email with optimized delivery timing for the best engagement results.

## Prerequisites 
---

- Implement the [transaction events](/developers/web/transactions-sdk).
- [Enable Time Optimizer](/docs/settings/configuration/time-optimizer#enabling-time-optimizer) in Synerise settings.
- Enable the personalized recommendation type in [AI Engine Configuration](/docs/settings/configuration/ai-engine-configuration/engine-configuration-for-recommendations).
- Configure [a sender account](/docs/campaign/e-mail/configuring-email-account).

**Prepare 2 predictions**
 1. **Churn prediction** (for example, as described in [Predict churn](/use-cases/churn-prediction)).

  
    <details class="accordion"><summary>See an example preview of the Churn Prediction</summary><div class="accordion-content"><figure> <img src="/api/docs/image/54176ad07f146575310749eba44b7c2f42c1b327/use-cases/all-cases/_gfx/predi1.png" alt="Example of what happens if the conditions are fulfilled" class="full no-frame"> </figure></div></details>


   2. **Bestfit brand prediction** (for example, as described in [Boosting item selection with best fit predictions](/use-cases/bestfit-brand)).
   
      <details class="accordion"><summary>See an example preview of the Bestfit Brand Prediction</summary><div class="accordion-content"><figure> <img src="/api/docs/image/54176ad07f146575310749eba44b7c2f42c1b327/use-cases/all-cases/_gfx/predi2.png" alt="Example of what happens if the conditions are fulfilled" class="full no-frame"> </figure></div></details>


## Process
---

1. [Create a segmentation](/use-cases/lapsing-customer#create-a-segmentation) that retrieves the result of the churn prediction prepared as a part of [prerequisites](#prerequisites) - users with high and very high churn risk.
2. [Create an aggregate for best brand](/use-cases/lapsing-customer#create-an-aggregate-for-best-brand) with best fit brand recommendation, thet retrieves the result of a prediction.
2. [Create AI recommendations](/use-cases/lapsing-customer#create-ai-recommendations) with personalized products from specific, personalized brand based on the results of the bestfit brand prediction prepared as a part of [prerequisites](#prerequisites).
3. [Create a workflow](/use-cases/lapsing-customer#create-a-workflow) sending email with AI recommendations with personalized brand to users with the high risk of churn.


## Create a segmentation
---
In this part of the process, we will create a group of customers who have the high and very high risk of churn - based on the churn prediction prepared as a part of [prerequisites](#prerequisites).

1. Go to <img src="/api/docs/image/54176ad07f146575310749eba44b7c2f42c1b327/icons/decision-hub-icon.svg" alt="Decision Hub icon" class="icon"> **Decision Hub > Segmentations > New segmentation**.
2. Give the segmentation a meaningful name, for example `High churn risk`.
3. Click **Choose filter** and select the `snr.prediction.score` event.  
    
   <div class="admonition admonition-tip"><div class="admonition-icon"><svg xmlns="http://www.w3.org/2000/svg" fill="none" viewBox="0 0 24 24" stroke="currentColor" stroke-width="2.5"><path stroke-linecap="round" stroke-linejoin="round" d="M9.663 17h4.673M12 3v1m6.364 1.636l-.707.707M21 12h-1M4 12H3m3.343-5.657l-.707-.707m2.828 9.9a5 5 0 117.072 0l-.548.547A3.374 3.374 0 0014 18.469V19a2 2 0 11-4 0v-.531c0-.895-.356-1.754-.988-2.386l-.548-.547z" /></svg></div><div class="admonition-body"><div class="admonition-content">

   The event may have a custom label in the list, but can always be found by entering the system name (`snr.prediction.score`) in the search field.

   </div></div></div>

3. Add the following conditions to the event:
    - `modelId` parameter equals the ID of the prediction you want to use.  
    - `score_label` parameter contains `High`, as this will cover customers with High and Very High probability of churning.
        
   <div class="admonition admonition-tip"><div class="admonition-icon"><svg xmlns="http://www.w3.org/2000/svg" fill="none" viewBox="0 0 24 24" stroke="currentColor" stroke-width="2.5"><path stroke-linecap="round" stroke-linejoin="round" d="M9.663 17h4.673M12 3v1m6.364 1.636l-.707.707M21 12h-1M4 12H3m3.343-5.657l-.707-.707m2.828 9.9a5 5 0 117.072 0l-.548.547A3.374 3.374 0 0014 18.469V19a2 2 0 11-4 0v-.531c0-.895-.356-1.754-.988-2.386l-.548-.547z" /></svg></div><div class="admonition-body"><div class="admonition-content">

   The model ID can be copied from the <img src="/api/docs/image/54176ad07f146575310749eba44b7c2f42c1b327/icons/threedoticon.png" alt="Three-dot icon" class="icon"> menu in the Prediction list. Remember, that the values are examples and the model ID needs to be changed.

   </div></div></div>

4. Click **Save**.  

 <figure>
    <img src="/api/docs/image/54176ad07f146575310749eba44b7c2f42c1b327/use-cases/all-cases/_gfx/brand4.png" alt="The view of the segment"  class="large">
    <figcaption>The segment</figcaption>
    </figure> 


## Create an aggregate for best brand
---

Create an aggregate which will return the latest value from the `topValue` parameter of the **snr.bestfit.score** event with modelID representing bestfit brand prediction. This aggregate will be referenced in the filters of AI recommendation configuration.

1. Go to <img src="/api/docs/image/54176ad07f146575310749eba44b7c2f42c1b327/icons/behavioral-data-hub-icon.svg" alt="Behavioral Data Hub icon" class="icon"> **Behavioral Data Hub > Live Aggregates > Create aggregate**.
2. As the aggregate type, select **Profile**. 
2. Enter the name of the aggregate.
3. Click **Analyze profiles by** and select **Last**.
5. From the **Choose event** dropdown list, select the **snr.bestfit.score** event.
6. As the event parameter, select **topValue**.
7. Click **+ where** button.
8. From the **Choose parameter** dropdown list, select the **modelID** parameter.
9. From the **Choose operator** dropdown list, select **Equal (string)**.
10. Enter the ID of the created prediction. 
 
    <div class="admonition admonition-note"><div class="admonition-icon"><svg xmlns="http://www.w3.org/2000/svg" fill="none" viewBox="0 0 24 24" stroke="currentColor" stroke-width="2.5"><path stroke-linecap="round" stroke-linejoin="round" d="M13 16h-1v-4h-1m1-4h.01M21 12a9 9 0 11-18 0 9 9 0 0118 0z" /></svg></div><div class="admonition-body"><div class="admonition-content">

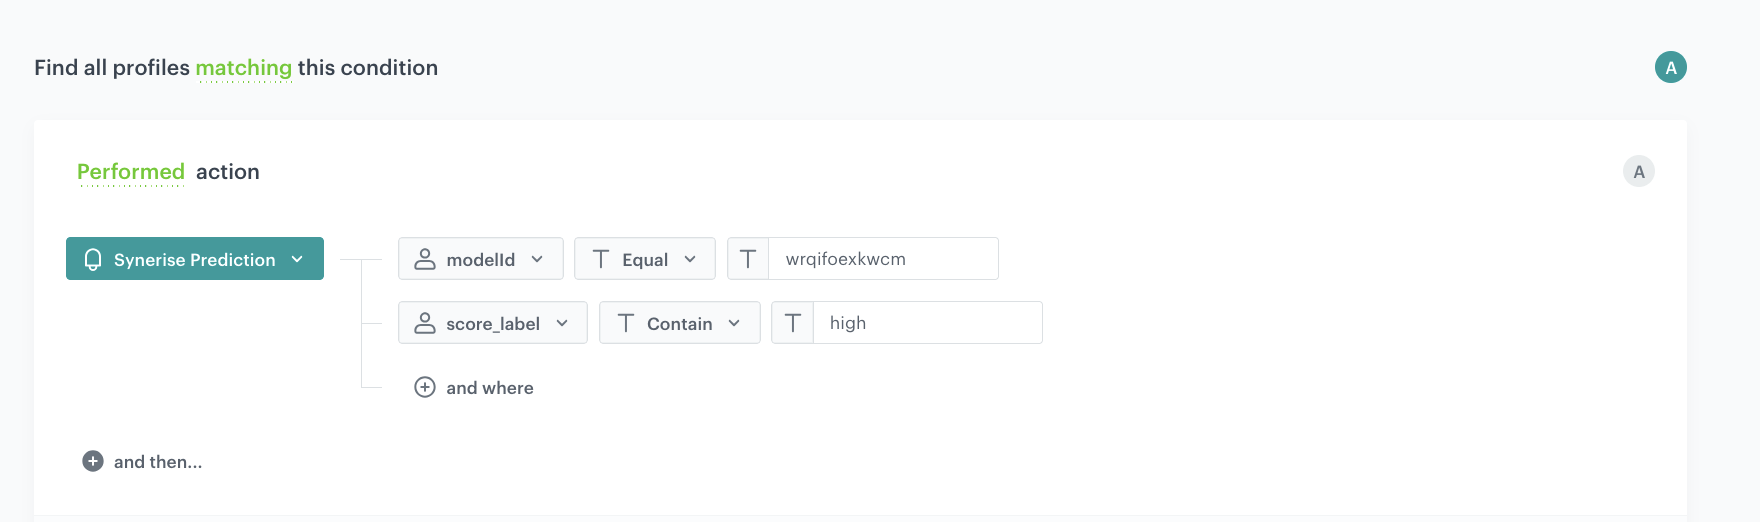
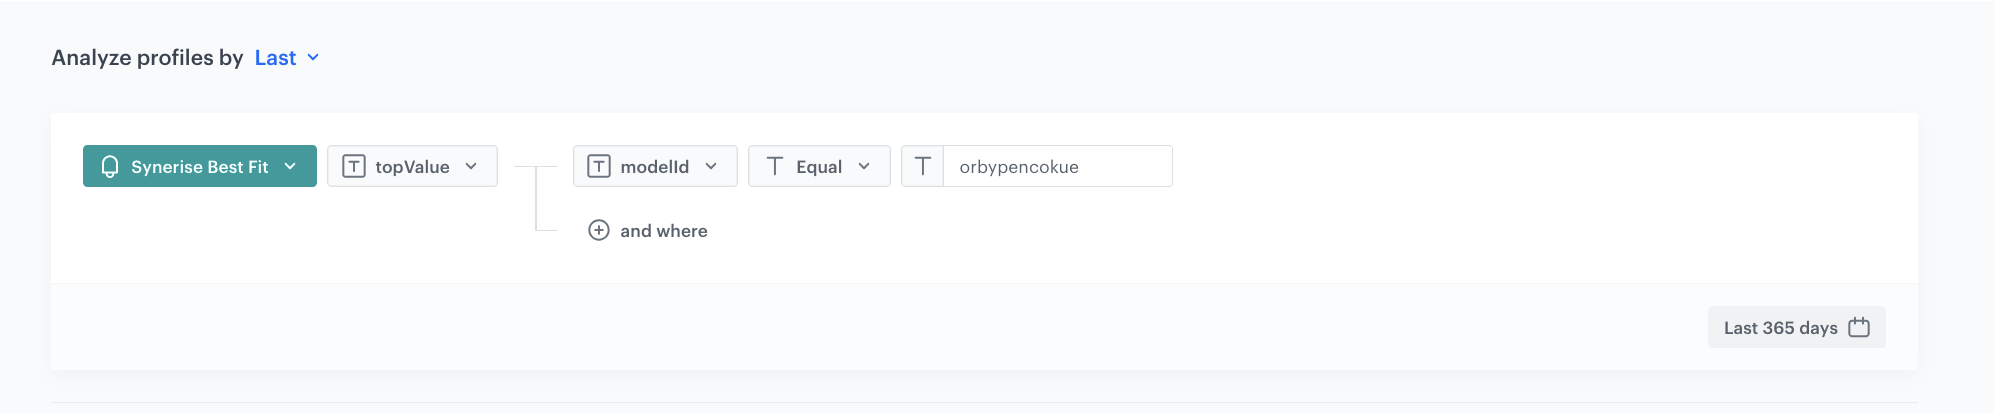
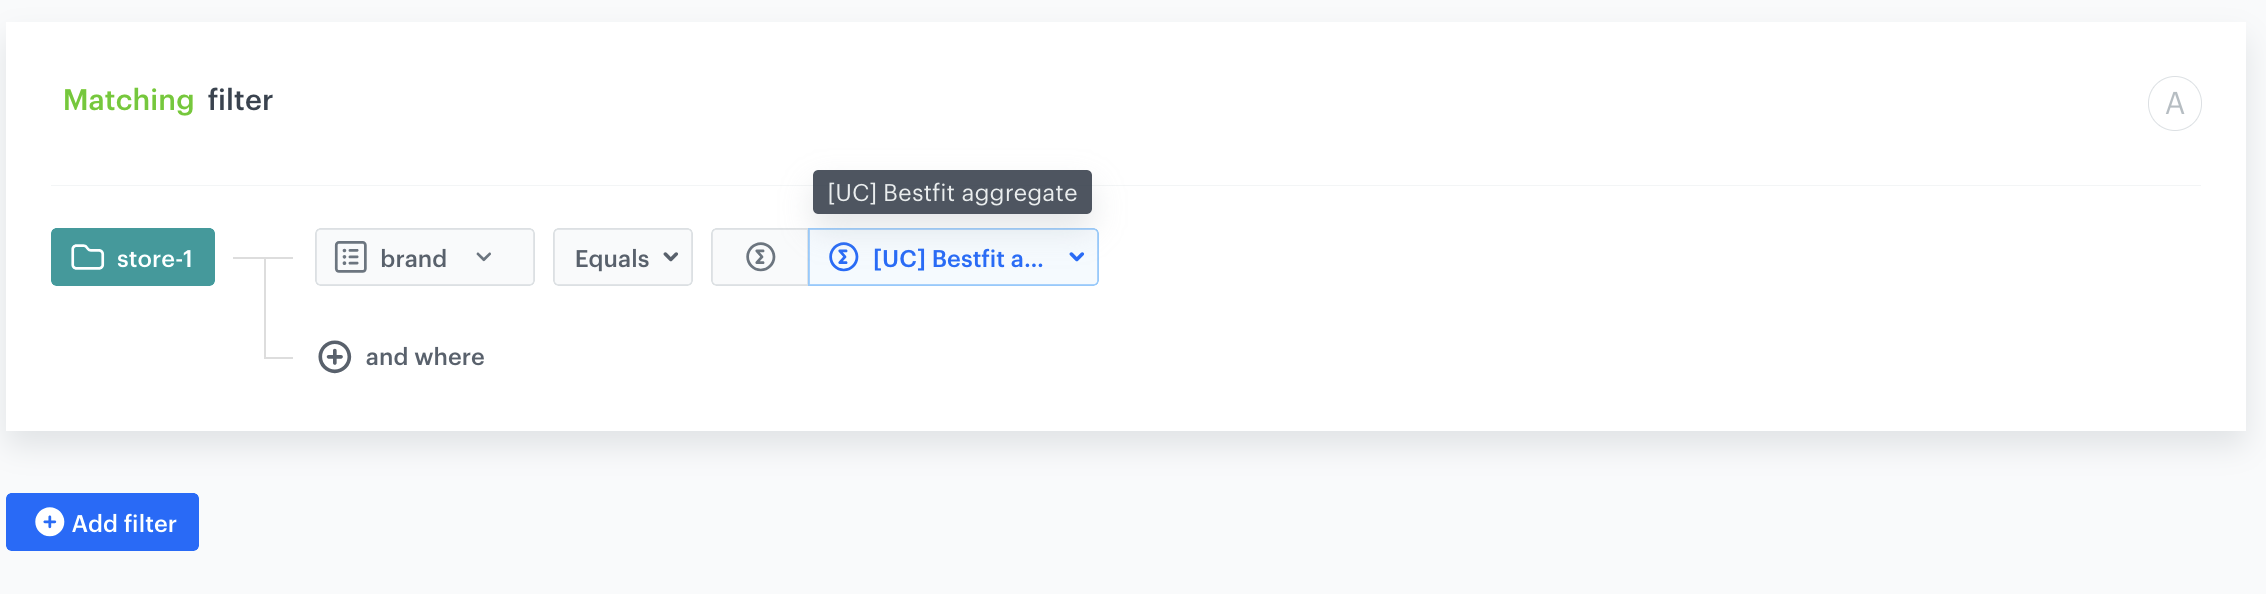
    You can find the ID in the URL of the Prediction, it is the last string of characters. Below you can find a screenshot which represents exemplary value, and the place in the URL of the prediction where you can find the prediction ID. Remember that the values presented below are examples and the model ID needs to be changed.

    </div></div></div>


    <figure>
    <img src="/api/docs/image/54176ad07f146575310749eba44b7c2f42c1b327/use-cases/all-cases/_gfx/bestfit-aggregate2.png" class="full" alt="ID of the prediction">
    <figcaption>ID of the prediction</figcaption>
    </figure>
 
11. Set the period from which the aggregate will analyze the results to the last **365 days**. 
12. Save the aggregate.

<figure>
<img src="/api/docs/image/54176ad07f146575310749eba44b7c2f42c1b327/use-cases/all-cases/_gfx/bestfit-aggregate.png" class="full" alt="Configuration of the aggregate">
<figcaption>Configuration of the aggregate</figcaption>
</figure>
    
## Create AI recommendations
---
In this part of the process, you will create an AI recommendation that will display items from the customer's favorite brand returned in the prediction results.

1. Go to <img src="/api/docs/image/54176ad07f146575310749eba44b7c2f42c1b327/icons/ai-hub-icon.svg" alt="AI Hub icon" class="icon" > **AI Hub > (AI Recommendations) Models > Add recommendation**.
2. Enter the name of the recommendation (it is only visible on the list of recommendations).
3. In the **Type & Items feed** section, click **Define**.
4. From the **Items feed** dropdown list, select a product feed.
5. Select the **Personalized** recommendation type.  
6. Confirm the recommendation type by clicking **Apply**.  
6. In the **Items** section, click **Define**.  
8. Define the minimum and maximum number of products displayed in the frame according to your needs.
9. Use filters to include specific items in the recommendation frame.
6. Click **Elastic filter**.  
    
   <div class="admonition admonition-note"><div class="admonition-icon"><svg xmlns="http://www.w3.org/2000/svg" fill="none" viewBox="0 0 24 24" stroke="currentColor" stroke-width="2.5"><path stroke-linecap="round" stroke-linejoin="round" d="M13 16h-1v-4h-1m1-4h.01M21 12a9 9 0 11-18 0 9 9 0 0118 0z" /></svg></div><div class="admonition-body"><div class="admonition-content">

   Learn about the difference among [elastic, static filters](/docs/ai-hub/recommendations-v2/creating-recommendation-campaign#select-conditions-of-displaying-items), and [distinct filters](/docs/ai-hub/recommendations-v2/creating-recommendation-campaign#distinct-filter).

   </div></div></div>

7. From the dropdown list, choose **Visual Builder**.
7. Click **Select attribute**.
7. From the dropdown list, choose the **brand** attribute.
8. Click **Operator**.
9. From the dropdown menu, choose **Equals**.
10. Click the icon next to **Select value**.
11. Select **Aggregate**
12. Click **Select value**.
11. From the dropdown list, choose the aggregate created in the [previous step](#create-an-aggregate-for-best-brand).
11. At the bottom of the elastic filter pop-up, click **Apply**.

    <figure>
    <img src="/api/docs/image/54176ad07f146575310749eba44b7c2f42c1b327/use-cases/all-cases/_gfx/brand7.png" alt="Recommendations configuration"  class="full">
    <figcaption>Recommendations configuration</figcaption>
    </figure> 

12. In the **Items** section, click **Apply**. 
10. In the **Slots and items ordering**, click **Define**. 
    1. Define how you want to arrange the order of slots and their items in the recommendation frame.
    2. In the **Items sorting method within slots** section, select your desired item sorting method within slots.
1.  In **Boosting**, you can enable [boosting](/docs/ai-hub/recommendations-v2/creating-recommendation-campaign#define-the-boosting-factors).
13. In **Additional settings**, optionally you can exclude already bought products and set a metric to sort by. Remember that you can define the order of slots if you have created more than one.
14. Save the recommendation by clicking **Save**. 

## Create a workflow
---
In this part of the process, create a workflow which sends an email with the recommendations of the products from a favorite brand to the customers with the high and very high risk of churn. Additionally you can add the time optimizer node to optimize the time of sending the email.

1. Go to <img src="/api/docs/image/54176ad07f146575310749eba44b7c2f42c1b327/icons/automation-hub-icon.svg" alt="Automation Hub icon" class="icon" > **Automation Hub > Workflows > New workflow**.  
2. Enter the name of the workflow.

### Define the Audience node
---
Choose the **Audience** node as the trigger. 

1. Start the workflow with the **Audience** node.
2. Leave the **Run trigger** as one time or repeatable with period configured depending on your needs.
3. Choose the day and time when the process starts.
4. In **Define audience**, choose **Segments** and choose the segmentation created in the [previous step](#create-a-segmentation).

The following screen shows the audience configuration used in this use case.
    <figure>
    <img src="/api/docs/image/54176ad07f146575310749eba44b7c2f42c1b327/use-cases/all-cases/_gfx/brand5.png" class="large" alt="Audience configuration">
    <figcaption>Audience configuration</figcaption>
    </figure>

### Define the Optimize Time node to the Matched path
---
1.  Optionally you can add the **Optimize Time** node. In the node settings:
    1. From the **AI optimization mode** dropdown list, choose **Web**.
    2. In **Time period to analyze**, choose the best moment to activate the node that follows the **Optimize Time** node. In our case it will be **Custom time period**.
    3. In the **Time period** field, enter specific number of hours, for example, `12`
2. Click **Apply**.


## Define the Send Email node
---

To distribute the product recommendations based on the results from the best fit prediction, prepare an email template that contains the recommendation you created in the previous part of the process.


1. Add the **Send Email** node. 
2. In the **Sender details** section, choose the email account from which the email will be sent.
3. In the **Content** section, in the **Subject** field, enter the subject of the email. You can use the template from the folder or create your own one using the email code editor.  
To use the template, click **New Template**. 
4. Create your email according to your business needs. 
5. Click **Inserts** in the upper right corner, find **AI Recommendations** on the list of inserts, then choose the recommendation you prepared in the [previous step](/use-cases/bestfit-brand#create-ai-recommendations). 
6. Save the template.

### Add the finishing node
---
1. Add the **End** node.
2. In the upper right corner, click **Save & Run**.

<figure>
<img src="/api/docs/image/54176ad07f146575310749eba44b7c2f42c1b327/use-cases/all-cases/_gfx/brand6.png" alt="The view of the workflow configuration"  class="full">
<figcaption>Workflow configuration</figcaption>
</figure> 

## Check the use case set up on the Synerise Demo workspace
---

You can also check on our demo account the:
- [churn prediction](https://app.synerise.com/ai-v2/predictions/wrqifoexkwcm)
- [bestfit prediction](https://app.synerise.com/ai-v2/predictions/orbypencokue)
- [segmentation](https://app.synerise.com/analytics-v2/segmentations/134c8225-72da-4cd9-90c5-c9f1a4cfe541)
- [aggregate](https://app.synerise.com/analytics-v2/aggregates/673eb2b8-8869-329c-b6d4-b79e3a0f99bf)
- [AI recommendations](https://app.synerise.com/ai-v2/recommendations/eb5qO10yrfXe)
- [workflow](https://app.synerise.com/automations/workflows/automation-diagram/0fd6f246-b12d-485b-9baf-2e470f7d6639)

If you’re our partner or client, you already have automatic access to the **Synerise Demo workspace (1590)**, where you can explore all the configured elements of this use case and copy them to your workspace.  

If you’re not a partner or client yet, we encourage you to fill out the contact [form](https://demo.synerise.com/request) to schedule a meeting with our representatives. They’ll be happy to show you how our demo works and discuss how you can apply this use case in your business. 

## What's next 
---

Once the initial workflow is in place, there are several ways to enhance and optimize it further. 
Here are some ideas:

- **A/B Testing** – Split high-risk churn customers into different test groups using **A/B/X node**, choose the group percentage allocation to analyze what works best. For example:
    - Each segmentation receives different types of recommendations,
    - Each segmentation gets various discount level (e.g., 10%, 20%, or free shipping).

This allows us to determine the most effective tactics for re-engagement and customer recovery.

- **Multi-Channel Optimization** – Identify the preferred communication channel for each customer based on historical interactions (e.g., push, email, SMS, in-app messages) as in this use case [Identifying Customers' Preferred Communication Channel](/use-cases/channel-preference). Adapt the workflow to automatically select the most effective channel for each individual. This ensures higher deliverability and engagement by reaching customers where they are most active. Read more about [recommendation ABX testing](/docs/ai-hub/recommendations-v2/recommendation-abx-test)

## Check our latest Case Study
---

Check our [Case Study](https://www.synerise.com/case-study/modivo) with **Modivo** and discover how they leveraged Synerise BaseModel.AI to send personalized mailing with customers's favourite brand.

## Read more
---
- [Aggregates](/docs/analytics/aggregates)
- [Creating recommendations](/docs/ai-hub/recommendations-v2/creating-recommendation-campaign)
- [Email](/docs/campaign/e-mail)
- [Predictions](/docs/ai-hub/predictions/predictions-introduction)


