
Encourage your customers to buy the products they have looked at and potentially found interesting. Sometimes what they need to finalize the transaction is a reminder of their previous activity. 

Use email communication to remind customers about their last-viewed product. If the customers entered the store and viewed many products from your offer but in the end, they did not buy any of them and they left the site, you can wait for the selected period of time (for example, 3 hours) and send an email with pictures of the products they viewed. Sending the email an hour after the customer closes the session, can encourage them to return. 

You can also include information about things like free delivery, information about the product.

## Example of use - Retail industry

A client from the retail industry (fashion) sent a communication with last seen products to customers who were on the site but did not make a transaction. In this email they could find products that they have recently viewed.

<figure>
 <img src="/api/docs/image/54176ad07f146575310749eba44b7c2f42c1b327/use-cases/all-cases/_gfx/last_viewed_product.png" alt="Screenshot presenting email with last viewed products" class="full no-frame">
 <figcaption> Email with last viewed products </figcaption>
 </figure>

**Results**

Results from email:

- 3,18% CTR,
- 29,44% CTOR.

## Prerequisites 
---

To be able to implement this use case, check out articles:
- [Implement a tracking code](/docs/settings/tool/tracking_codes).
- [Create a sender account](/docs/campaign/e-mail/configuring-email-account).

## Process
---
Creating an email with last viewed products, perform the steps in the following order:

1. [Prepare an aggregate](/use-cases/last-viewed-products#prepare-an-aggregate).
2. [Prepare the email template](/use-cases/last-viewed-products#prepare-the-email-template).
3. [Configure automation](/use-cases/last-viewed-products#configure-automation).

## Prepare an aggregate
---
Build an aggregate which collects the SKUs of recently viewed products.

1. Go to <img src="/api/docs/image/54176ad07f146575310749eba44b7c2f42c1b327/icons/behavioral-data-hub-icon.svg" alt="Behavioral Data Hub icon" class="icon"> **Behavioral Data Hub > Live Aggregates > Create aggregate**.
2. As the aggregate type, select **Profile**.  
1. Set **Analyze profiles by** to **Last Multi**.
2. In the **Size** field, enter the number of recent events (for example, 10).
3. Select the **Consider only unique occurrence of the event parameter** option. 
4. Select the event **page visit** and the aggregate - in this case it will be the product id, which is stored in the OG tag called **retailer_part_no**. 

<figure>
 <img src="/api/docs/image/54176ad07f146575310749eba44b7c2f42c1b327/use-cases/all-cases/_gfx/lastviewed1.png" alt="Screenshot presenting aggregate" class="large">
 <figcaption> Configuration of the aggregate </figcaption>
 </figure>

## Prepare the email template
---

Prepare an email template and include the ID of the catalog that contains items and the ID of the aggregate you prepared in the previous step. Those two ID will let you display last seen products by an individual customer in the email.  

1. Go to **Experience Hub** > **Email**.
2. Click the <img src="/api/docs/image/54176ad07f146575310749eba44b7c2f42c1b327/icons/email-campaign-template.png" alt="Email template icon" class="icon"> icon.
3. To create a new template, click Create new.
4. To create a template out of an existing template, click From template.
5. Select the template.
6. Select the form of template, more information about create template you will find [here](/docs/campaign/e-mail/creating-email-templates):
    1. **Drag&drop builder** - Create email templates with ready-made components.
    2. **Code editor** - Create email templates in CSS and HTML.


   <div class="admonition admonition-tip"><div class="admonition-icon"><svg xmlns="http://www.w3.org/2000/svg" fill="none" viewBox="0 0 24 24" stroke="currentColor" stroke-width="2.5"><path stroke-linecap="round" stroke-linejoin="round" d="M9.663 17h4.673M12 3v1m6.364 1.636l-.707.707M21 12h-1M4 12H3m3.343-5.657l-.707-.707m2.828 9.9a5 5 0 117.072 0l-.548.547A3.374 3.374 0 0014 18.469V19a2 2 0 11-4 0v-.531c0-.895-.356-1.754-.988-2.386l-.548-.547z" /></svg></div><div class="admonition-body"><div class="admonition-content">

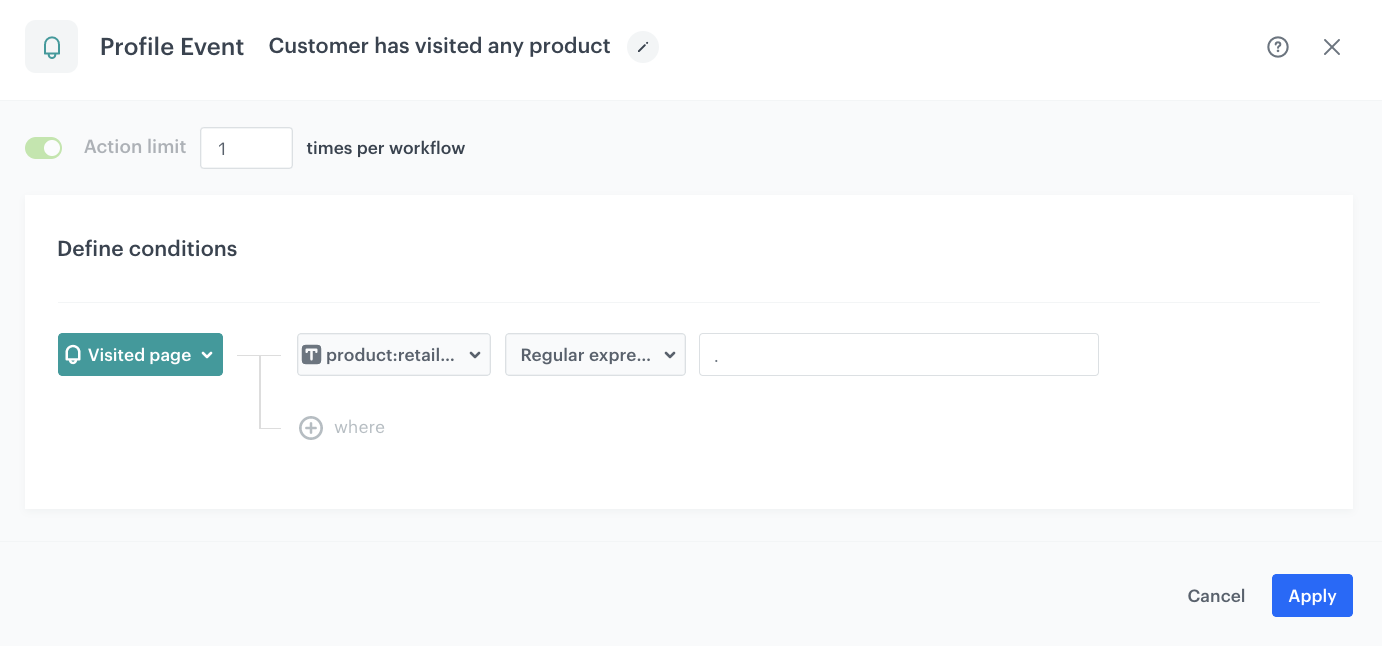
   **Snrs-product-ogTag** catalog is built in Synerise by default if you have og tags on product page. Depending what OG tags you have, you can collect information like product id, title, price, brand etc. in the catalog, every time somebody visits a product.

   </div></div></div>


## Configure automation
---

To start sending emails to customers you will have to prepare a workflow, which in basic configuration may look like the one below - let’s take a closer look at each node. 

1. Start with the **Profile Event** trigger and in the settings of the node, select the **page.visit** event.
2. As the event parameter, select **retailer_part_no** - this way, the workflow starts only when a customer visits a product page. 

   
   <div class="admonition admonition-tip"><div class="admonition-icon"><svg xmlns="http://www.w3.org/2000/svg" fill="none" viewBox="0 0 24 24" stroke="currentColor" stroke-width="2.5"><path stroke-linecap="round" stroke-linejoin="round" d="M9.663 17h4.673M12 3v1m6.364 1.636l-.707.707M21 12h-1M4 12H3m3.343-5.657l-.707-.707m2.828 9.9a5 5 0 117.072 0l-.548.547A3.374 3.374 0 0014 18.469V19a2 2 0 11-4 0v-.531c0-.895-.356-1.754-.988-2.386l-.548-.547z" /></svg></div><div class="admonition-body"><div class="admonition-content">

   Use "." in a regular expression to accept a valid value of this parameter (except for null). This way, you know that this event has the **retailer_part_no** parameter.

   </div></div></div>


   <figure>
     <img src="/api/docs/image/54176ad07f146575310749eba44b7c2f42c1b327/use-cases/all-cases/_gfx/lastviewed3.png" alt="Screenshot presenting automation" class="large">
     <figcaption> Profile Event </figcaption>
     </figure>

3. Add **Delay** and define the lag between the page visit and sending the message, in our example it is 2 hours.

   <figure>
     <img src="/api/docs/image/54176ad07f146575310749eba44b7c2f42c1b327/use-cases/all-cases/_gfx/lastviewed4.png" alt="Screenshot presenting automation" class="large">
     <figcaption> Configuration of the Delay node </figcaption>
     </figure>

4. Using the **Profile Filter** node, exclude users who have made a transaction in the last 2 hours – it's important to use minutes instead of hours. 

   <figure>
     <img src="/api/docs/image/54176ad07f146575310749eba44b7c2f42c1b327/use-cases/all-cases/_gfx/lastviewed5.png" alt="Screenshot presenting automation" class="large">
     <figcaption> Configuration of the Profile Filter node </figcaption>
     </figure>

5. Configure the **Send Email** node by selecting the appropriate email account, choosing the template that you prepared in the previous step. 

   <figure>
     <img src="/api/docs/image/54176ad07f146575310749eba44b7c2f42c1b327/use-cases/all-cases/_gfx/lastviewed6.png" alt="Screenshot presenting automation" class="large">
     <figcaption> Configuration of the Send Email node </figcaption>
     </figure>

6. Prepare the final settings 

- Add **End** nodes where the workflow should finish for users. 
- Specify capping (here 1 for 1 day). 
- Optionally add titles to each node so the workflow will be more understandable to your colleagues.
- Name the workflow and Save it or Save & Run. 

<figure>
 <img src="/api/docs/image/54176ad07f146575310749eba44b7c2f42c1b327/use-cases/all-cases/_gfx/lastviewed2.png" alt="Screenshot presenting automation" class="large">
 <figcaption> Workflow </figcaption>
 </figure>

## Check the use case set up on the Synerise Demo workspace
---
You can check the configuration of use case in Synerise Demo workspace:
- [Aggregate](https://app.synerise.com/analytics/aggregates/892528ec-12d5-3e7b-987f-f3e2f79ed349)
- [Workflow configuration](https://app.synerise.com/automations/workflows/automation-diagram/24cab624-aaa3-4d5a-a60f-6b0c4e963920)

If you’re our partner or client, you already have automatic access to the **Synerise Demo workspace (1590)**, where you can explore all the configured elements of this use case and copy them to your workspace.  

If you’re not a partner or client yet, we encourage you to fill out the contact [form](https://demo.synerise.com/request) to schedule a meeting with our representatives. They’ll be happy to show you how our demo works and discuss how you can apply this use case in your business. 

## Read more
---
- [Creating aggregates](/docs/analytics/aggregates/creating-aggregates)
- [Creating workflow](/docs/automation)
- [Email templates](/docs/campaign/e-mail/creating-email-templates)
