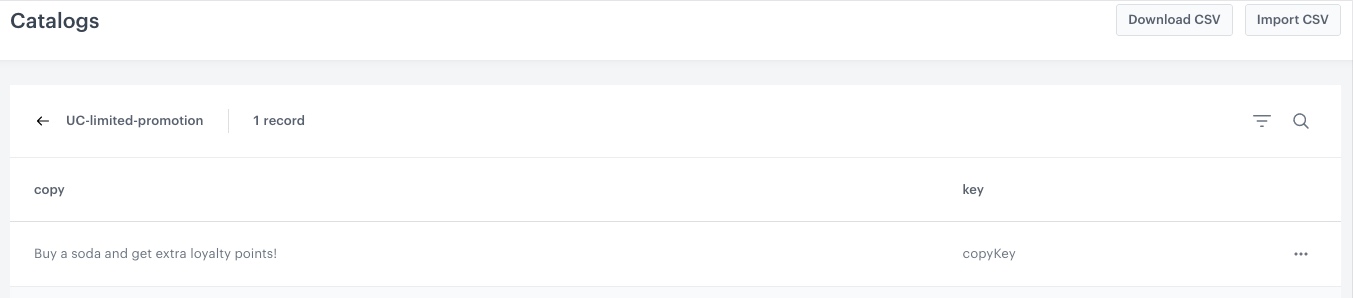
Synerise offers endless possibilities for creating  business loyalty scenarios. One of them may be a campaign that ends after a specific number of redemptions and revokes every day. It can increase the traffic in your mobile app. Combining this with additional loyalty points may bring you new customers.

In this use case, you will create a scenario that awards customers with additional 1500 loyalty points for the purchase of a soda. The promotion works every day for the first 1000 buyers. The mechanism controls the number of purchases and informs the mobile app user if they can still get the additional points, or if they are late and need to try again on another day.

<figure>
<img src="/api/docs/image/54176ad07f146575310749eba44b7c2f42c1b327/use-cases/all-cases/_gfx/limited-promo.png" alt="Mobile view of an example of promotion content"  class="full no-frame">
</figure>

## Prerequisites 
---
- [Create a workspace API key](/docs/settings/tool/api#adding-api-keys) with permissions allowing to calculate metrics and update the catalog.
- [Create a schema type](https://developers.synerise.com/AssetManagement/AssetManagement.html#operation/addSchemaType).
- Implement transaction events using [SDK](/developers/web/transactions-sdk) or [API](https://developers.synerise.com/DataManagement/DataManagement.html#operation/CreateATransaction).
- Integrate Synerise [mobile SDK](/developers/) in your mobile application. 
- Integrate mechanism for awarding loyalty points.

  <div class="admonition admonition-note"><div class="admonition-icon"><svg xmlns="http://www.w3.org/2000/svg" fill="none" viewBox="0 0 24 24" stroke="currentColor" stroke-width="2.5"><path stroke-linecap="round" stroke-linejoin="round" d="M13 16h-1v-4h-1m1-4h.01M21 12a9 9 0 11-18 0 9 9 0 0118 0z" /></svg></div><div class="admonition-body"><div class="admonition-content">

  Find more in the [Loyalty programs basics](/use-cases/loyalty-programs-basics) use case.

  </div></div></div>


## Security configuration
---
Before you start working with this hub, if you are a Synerise customer or partner, consider reading [the section about denylisting events](/docs/settings/tool/api#denylist). This natively accessible configuration will allow you to manage the restrictions in points management that may help you prevent fraud.

## Process
---

In this use case, you will go through the following procedures:
1. [Create a metric](#create-a-metric) that calculates the number of purchases of soda on the current day.
2. [Create a catalog](#create-a-catalog) which stores the current information for the customers: whether they can get additional points or not.
3. [Create an automation updating the catalog content and awarding points](#create-an-automation-updating-the-catalog-content-and-awarding-points).
4. [Create an automation updating the catalog content to the default value](#create-an-automation-updating-the-catalog-content-to-the-default-value). Thanks to this, the mechanism will reset the information about promotion availability every day.
5.  [Create a document with a catalog content](#create-a-document-with-a-catalog) which sends the content of the catalog with information for the customer to the mobile app.

## Create a metric
---
In this part of the process, you will create a metric which counts how many times the product on promotion was bought on the current day.

1. Go to <img src="/api/docs/image/54176ad07f146575310749eba44b7c2f42c1b327/icons/decision-hub-icon.svg" alt="Behavioral Data Hub icon" class="icon"> **Decision Hub > Metrics > New metric**.
2. Enter the name of the metric.
2. As the metric type, select **Simple metric**.
3. Leave the **Aggregator** at default (Count).
5. As the occurrence type, set **All**.
6. From the **Choose event** dropdown list, select the **product.buy** event.
7. Click the <img src="/api/docs/image/54176ad07f146575310749eba44b7c2f42c1b327/docs/analytics/_gfx/where-icon.png" alt="where icon" class="icon"> button.  
8. From the **Choose parameter** dropdown list, select **$sku**.
10. From the **Choose operator** dropdown list, select **Equal**.
12. As the value of the operator, add the SKU of the product for which you award the additional points.
13. Open the time range settings by clicking the calendar icon.
    1. In the **Relative date range** section, choose **Today**.
    2. Click **Apply**.
13. Click **Save**.

<figure>
<img src="/api/docs/image/54176ad07f146575310749eba44b7c2f42c1b327/use-cases/all-cases/_gfx/metric_limited_promo.png" alt="The view of the metric configuration"  class="large">
<figcaption>Configuration of the metric</figcaption>
</figure> 


## Create a catalog
---
In this part of the process, you need to create a catalog, which will store the current information about promotion availability. At later stages of the process, this catalog will be updated on the basis of how many soda transactions have been made on a given day. Also, it will be separately updated at midnight every day when resetting the daily redemption counter.


1. Prepare a CSV file of your promotion content, according to [requriements](/docs/assets/catalogs/creating-catalogs#requirements).
   Below is the sample file used in this article. It consists of two columns, where the first is a message that will be shown to customers and the second is the key of the promotion.
    ```
   copy;key
    Buy a soda and get extra loyalty points!;copyKey
    ```
    
   <div class="admonition admonition-note"><div class="admonition-icon"><svg xmlns="http://www.w3.org/2000/svg" fill="none" viewBox="0 0 24 24" stroke="currentColor" stroke-width="2.5"><path stroke-linecap="round" stroke-linejoin="round" d="M13 16h-1v-4h-1m1-4h.01M21 12a9 9 0 11-18 0 9 9 0 0118 0z" /></svg></div><div class="admonition-body"><div class="admonition-content">

   You can use this file in your implementation, after changing the message to your business needs.

   </div></div></div>

2. Go to <img src="/api/docs/image/54176ad07f146575310749eba44b7c2f42c1b327/icons/data-modeling-hub-icon.svg" alt="Data Modeling Hub icon" class="icon"> **Data Modeling Hub > Catalogs > New Catalog**.
3. Enter the name of the catalog.
4. Click **Apply** to confirm. The catalog will appear on the list.
5. Click on the created catalog.
5. In the upper right corner, click **Import**.
    **Result:** A pop-up appears.
6. As the import method, select **Import a local file**. 
7. Click **Next**.
7. Upload the CSV file you prepare by using the **+ Upload file or drop one here** field.
8. Optionally, you can customize the file metacharacters by clicking the arrow down icon.
    1. From the **Delimiter** dropdown, select the character that marks the end of a column.
    2. From the **Quotation** mark dropdown list, select the characters that contain the text or data type.
    4. From the **Escape character** dropdown lists, select the character which changes the default interpretation of a character or a string followed by the escape character.
9. To proceed to the next step, click the **Next** button.
10. Select the name of the column which is treated as the primary key. 
In our example, it’s `key`.
11. Click **Next**.
12. Click **Run import**.

<figure>
<img src="/api/docs/image/54176ad07f146575310749eba44b7c2f42c1b327/use-cases/all-cases/_gfx/lim_promo_cat.png" alt="The view of the CSV file upploaded to catalog"  class="large">
<figcaption>Configuration of the catalog</figcaption>
</figure> 

## Create an automation updating the catalog content and awarding points
---
In this part, you will create a workflow which triggers when the product for which you assign additional points is bought. If the [result of the metric created earlier](#create-a-metric) is greater than 1000, it will update the catalog with the message that the promotion is over today. If the metric's result is smaller than 1000, it will grant extra points to the customer.

1. Go to <img src="/api/docs/image/54176ad07f146575310749eba44b7c2f42c1b327/icons/automation-hub-icon.svg" alt="Automation Hub icon" class="icon" > **Automation Hub > Workflows > New workflow**.  
2. Enter the name of the workflow.

### Define the trigger node
---
At this stage, you will configure the conditions that trigger the workflow.

1. Add the first node - **Profile Event**. In the node configuration:  
    1. From the **Choose event** dropdown list, choose the **product.buy** event.
    2. Click <img src="/api/docs/image/54176ad07f146575310749eba44b7c2f42c1b327/docs/analytics/_gfx/where-icon.png" alt="where icon" class="icon"> button.  
    3. From the **Choose parameter** dropdown list, select **$sku**.
    5. From the **Choose operator** dropdown list, select **Equal**.
    7. As the value of the operator, add the SKU of the product for which you want to award additional points.
2. Click **Apply**.

<figure>
<img src="/api/docs/image/54176ad07f146575310749eba44b7c2f42c1b327/use-cases/all-cases/_gfx/lim_promo_trigg1.png" alt="The view of the Profile Event node configuration"  class="large">
<figcaption>Configuration of the Profile Event node</figcaption>
</figure> 

### Define the Outgoing Integration node 
---
In the **Outgoing Integration** node, you will create a webhook calculating the metric from [the previous step](/use-cases/limited-promotion#create-a-metric). The continuation of the workflow will depend on the result of the metric.

1. After the trigger node, add **Outgoing Integration**.
2. Select **Synerise API key** as your method of authorization.
    1. From the dropdown list below, select your **API key**.
3. In the **Webhook name**, field enter a name for the webhook. In this case, `Metric recalculation`.
4. Optionally, in the **Webhook event name** field, choose an action name for the event that will be generated when Synerise receives a response from your selected endpoint.
4. In the **URL** section, select the **POST** method.
    1. In the URL of the endpoint, enter `https://api.synerise.com/analytics/analytics/v3/metrics/ID/recalculate`, where the **ID** is the ID of your [metric created earlier](#create-a-metric).
5. Optionally, add key-value pairs for headers and the body of the request in the **Body** section.
5. Confirm the settings by clicking **Apply**.

<figure>
<img src="/api/docs/image/54176ad07f146575310749eba44b7c2f42c1b327/use-cases/all-cases/_gfx/lim_promo_outgint1.png" alt="The view of the Outgoing Integration node configuration"  class="large">
<figcaption>Configuration of the Outgoing Integration node</figcaption>
</figure> 

### Define two Event Filter nodes on the metric result
---
In this step, you will split the automation path, so different actions can happen according to the [metric result created earlier](#create-a-metric). If the result is greater than 1000, it will update the catalog with copy that today the promotion is over. If the metrics result is smaller than 1000, it will grant extra points to the customer.

1. Click **THEN** on the **Outgoing Integration** node, and add **Split Path**.
2. Add two **Event Filter** nodes. 
3. Configure the first **Event Filter** node:
    1. Enter the meaningful name of the node, ex. `when promotion is over on the current day`.
    1. From the **Choose event** dropdown list, choose the **webhook.response** event.
    2. Click <img src="/api/docs/image/54176ad07f146575310749eba44b7c2f42c1b327/docs/analytics/_gfx/where-icon.png" alt="where icon" class="icon"> button.  
    3. From the **Choose parameter** dropdown list, select **name**.
    5. From the **Choose operator** dropdown list, select **Equal**.
    6. As the value of the operator, add the name of [the webhook created earlier](#define-the-outgoing-integration-node).  
        In this case, it's `Metric recalculation`.
    7. Click the <img src="/api/docs/image/54176ad07f146575310749eba44b7c2f42c1b327/docs/analytics/_gfx/where-icon.png" alt="where icon" class="icon"> button.  
    8. From the **Choose parameter** dropdown list, choose  **body.result**.
    9. From the **Choose operator** dropdown list, select **More than (Number)**.
    10. As the value of the operator, type `1000`.
    11. Click **Apply**.
    <figure>
    <img src="/api/docs/image/54176ad07f146575310749eba44b7c2f42c1b327/use-cases/all-cases/_gfx/webhook_more.png" alt="The view of the Event Filter for metric result grater than 1000"  class="large">
    <figcaption>Configuration of the first Event Filter node</figcaption>
    </figure> 
4. Configure the second **Event Filter** node:
    1. Enter the meaningful name of the node, ex. `when promotion still lasts on the current day`.
    1. From the **Choose event** dropdown list, choose the **webhook.response** event.
    2. Click <img src="/api/docs/image/54176ad07f146575310749eba44b7c2f42c1b327/docs/analytics/_gfx/where-icon.png" alt="where icon" class="icon"> button.  
    3. From the **Choose parameter** dropdown list, select **name**.
    5. From the **Choose operator** dropdown list, select **Equal**.
    6. As the value of the operator, add the name of [the webhook created earlier](#define-the-outgoing-integration-node).  
        In this case, it's `Metric recalculation`.
    7. Click <img src="/api/docs/image/54176ad07f146575310749eba44b7c2f42c1b327/docs/analytics/_gfx/where-icon.png" alt="where icon" class="icon"> button.  
    8. From the **Choose parameter** dropdown list, choose  **body.result**.
    9. From the **Choose operator** dropdown list, select **Less or equal to (Number)**.
    10. As the value of the operator, type `1000`.
    11. Click **Apply**.
    <figure>
    <img src="/api/docs/image/54176ad07f146575310749eba44b7c2f42c1b327/use-cases/all-cases/_gfx/webhook_less.png" alt="The view of the Event Filter for metric result less than 1000"  class="large">
    <figcaption>Configuration of the second Event Filter node</figcaption>
    </figure> 

### Define the Outgoing Integration node changing the catalog copy
---
This **Outgoing Integration** node will be connected to the first **Event Filter** node (where the condition is that the metric result is above 1000). When the number of sold sodas exceeds 1000, the automation will update the text in the catalog to inform that the offer is no longer available for the current day and the customer will receive such information in the mobile app.

1. To the first **Event Filter**, add the **Outgoing Integration** node.
2. As your method of authorization, select **Synerise API key**.
    1. From the dropdown list below, select your **API key**.
3. In the **Webhook name**, field enter name for the webhook. In this case, it's `change.documentCopy`.
4. Optionally, in the **Webhook event name** field, choose an action name for the event that will be generated when Synerise receives a response from your selected endpoint.
4. In the **URL** section, select the **POST** method.
    1. In the URL of the endpoint, enter `https://api.synerise.com/catalogs/bags/ID/items`, where the **ID** is the ID of your [catalog created earlier](#create-a-catalog).
5. Enter the request body. For the form used in this case, the body is as follows:

    
   <pre><code class="language-json">{
           "value": {
               "key": "copyKey",
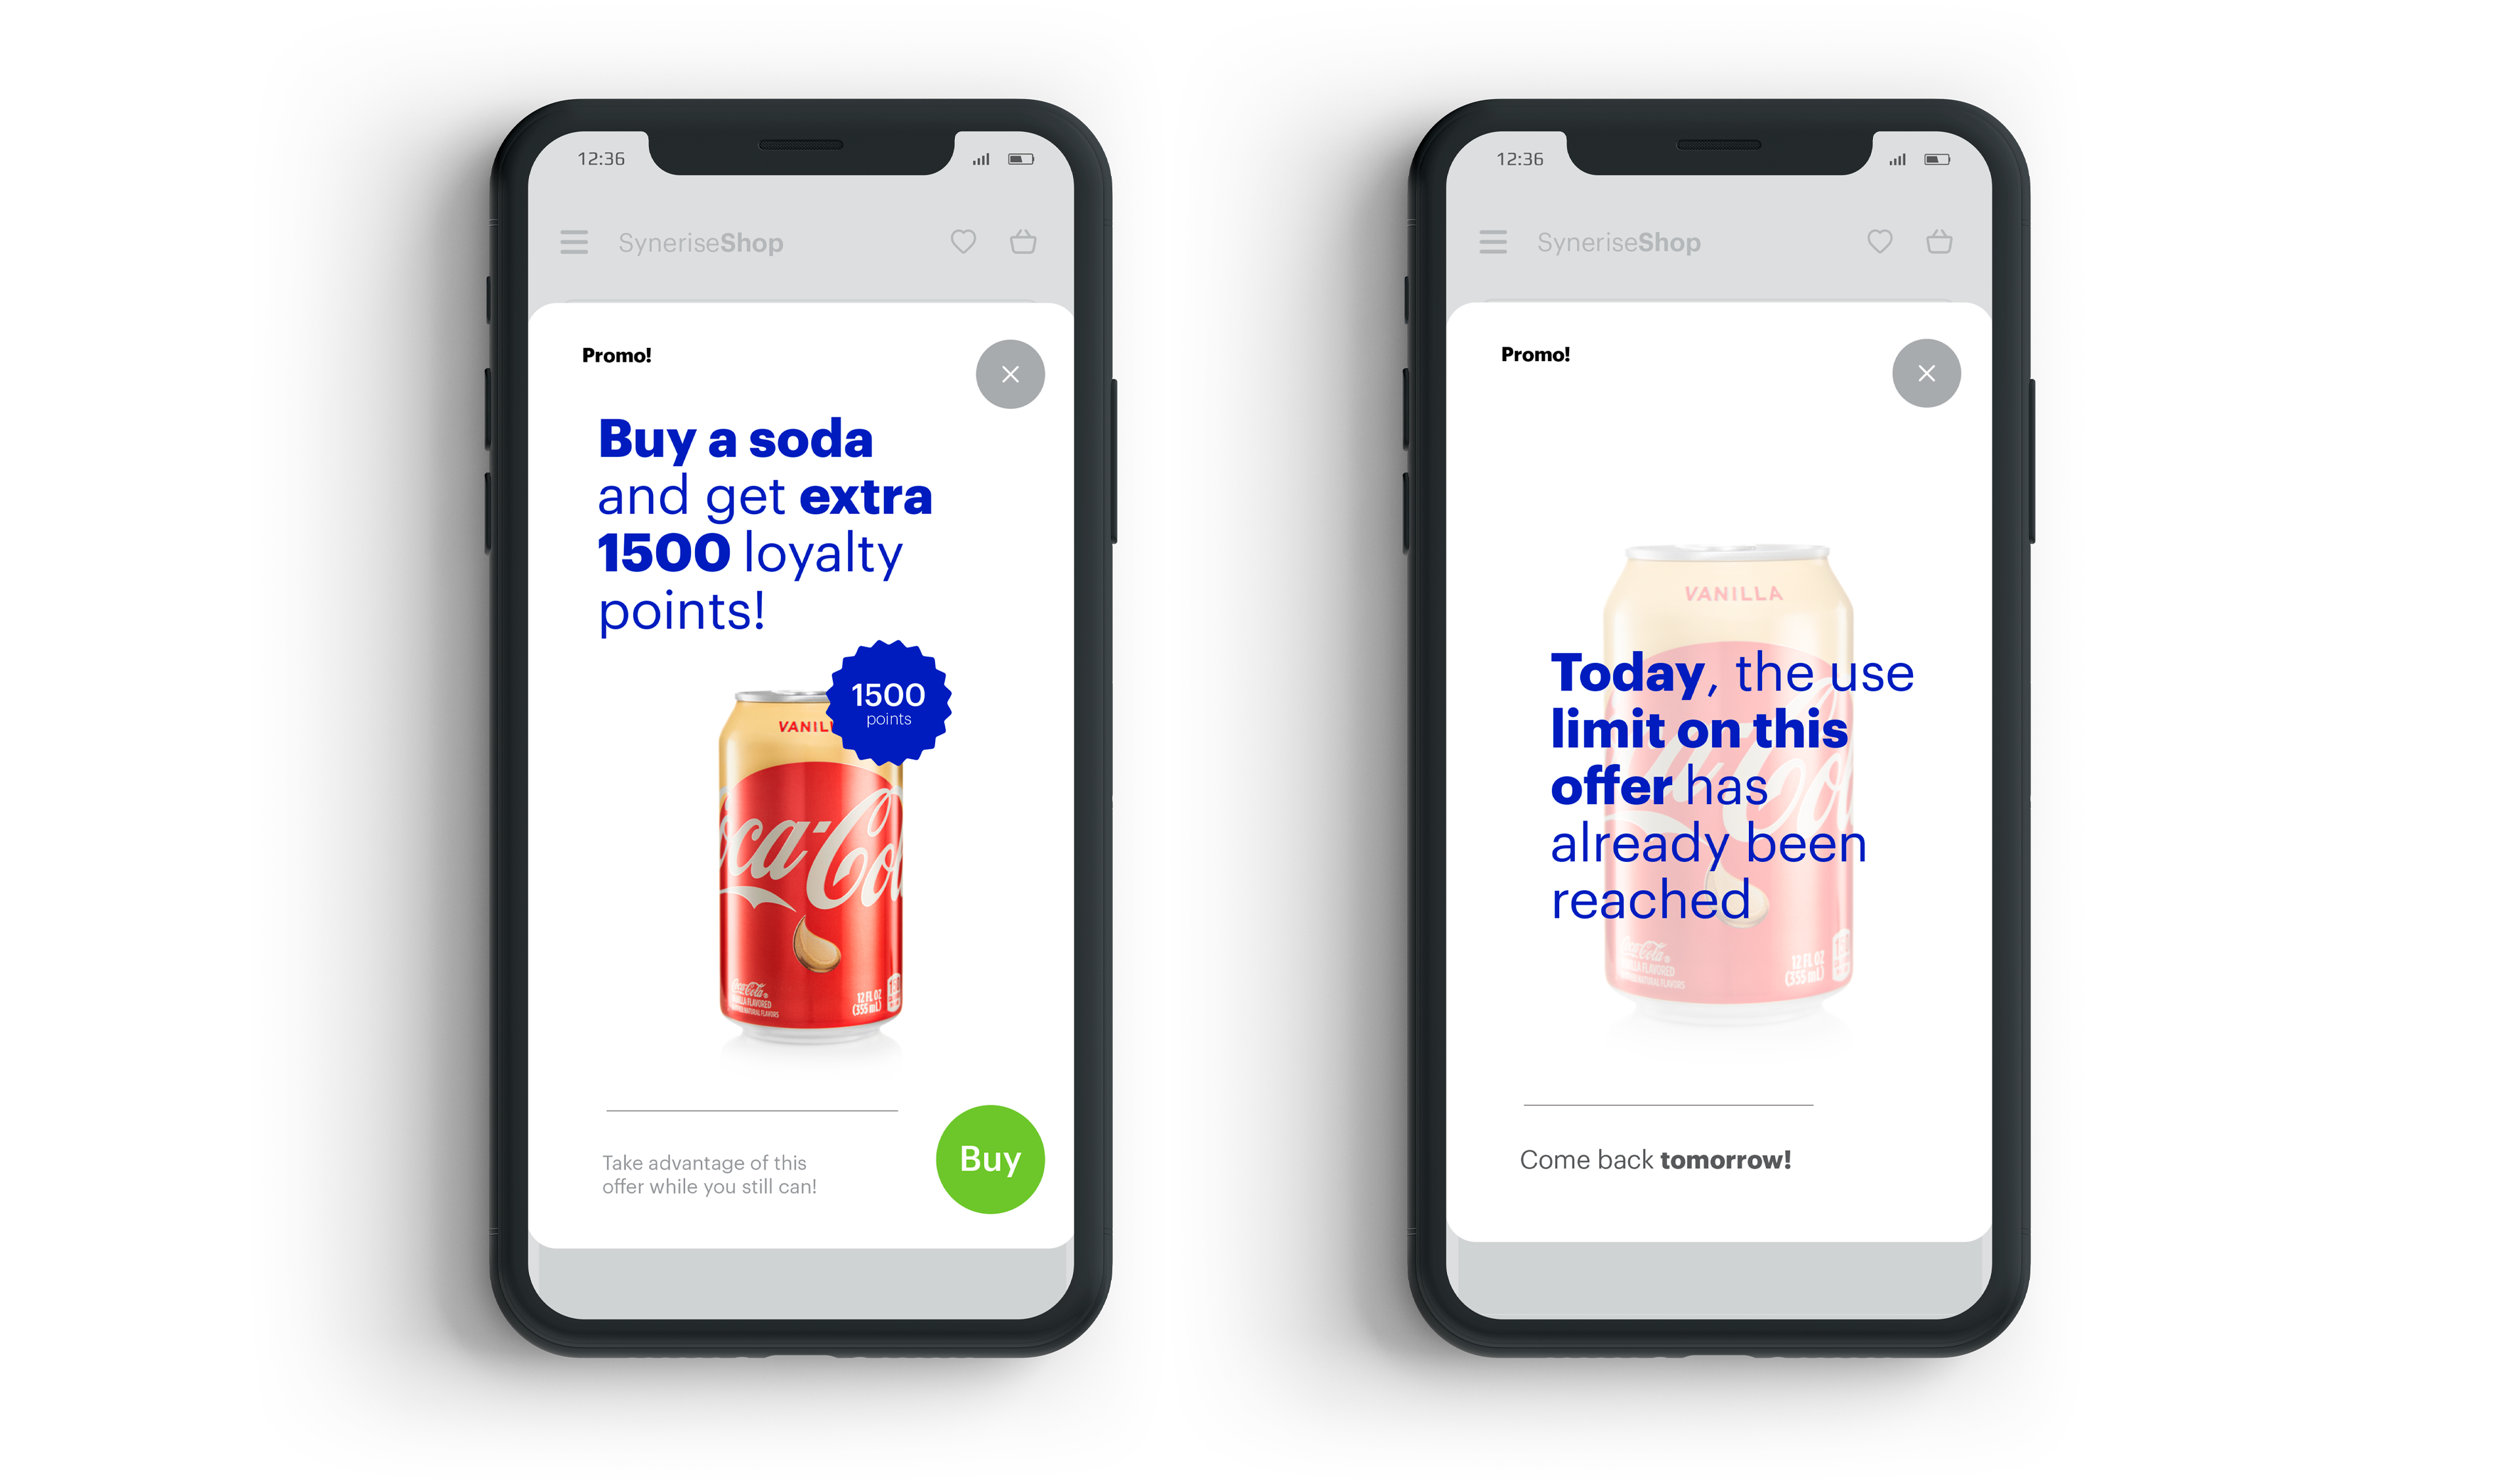
               "copy": "Today, the use limit on this offer has already been reached 😞 Come back tomorrow!"
               },
           "itemKey": "copyKey"
       }</code></pre>


   <div class="admonition admonition-note"><div class="admonition-icon"><svg xmlns="http://www.w3.org/2000/svg" fill="none" viewBox="0 0 24 24" stroke="currentColor" stroke-width="2.5"><path stroke-linecap="round" stroke-linejoin="round" d="M13 16h-1v-4h-1m1-4h.01M21 12a9 9 0 11-18 0 9 9 0 0118 0z" /></svg></div><div class="admonition-body"><div class="admonition-content">

   You can use this JSON code in your implementation, but change the names of the columns within the catalog and `copy` content according to your business needs.

   </div></div></div>


7. Click **Apply**.
8. Add the **End** node.

### Define Generate Event node
---
This **Generate event** node will be connected to the second **Event Filter** node. When the number of sold sodas is below 1000, the automation will generate an event granting extra loyalty points to the customers.

1. To the second **Event Filter**, add the **Generate Event** node.
2. In the **Define event** section:
    1. As the **Event name** choose `points.upcharge`.
    3. Enter the request body. For the form used in this case, the body is as follows:

        
       <pre><code class="language-json">{
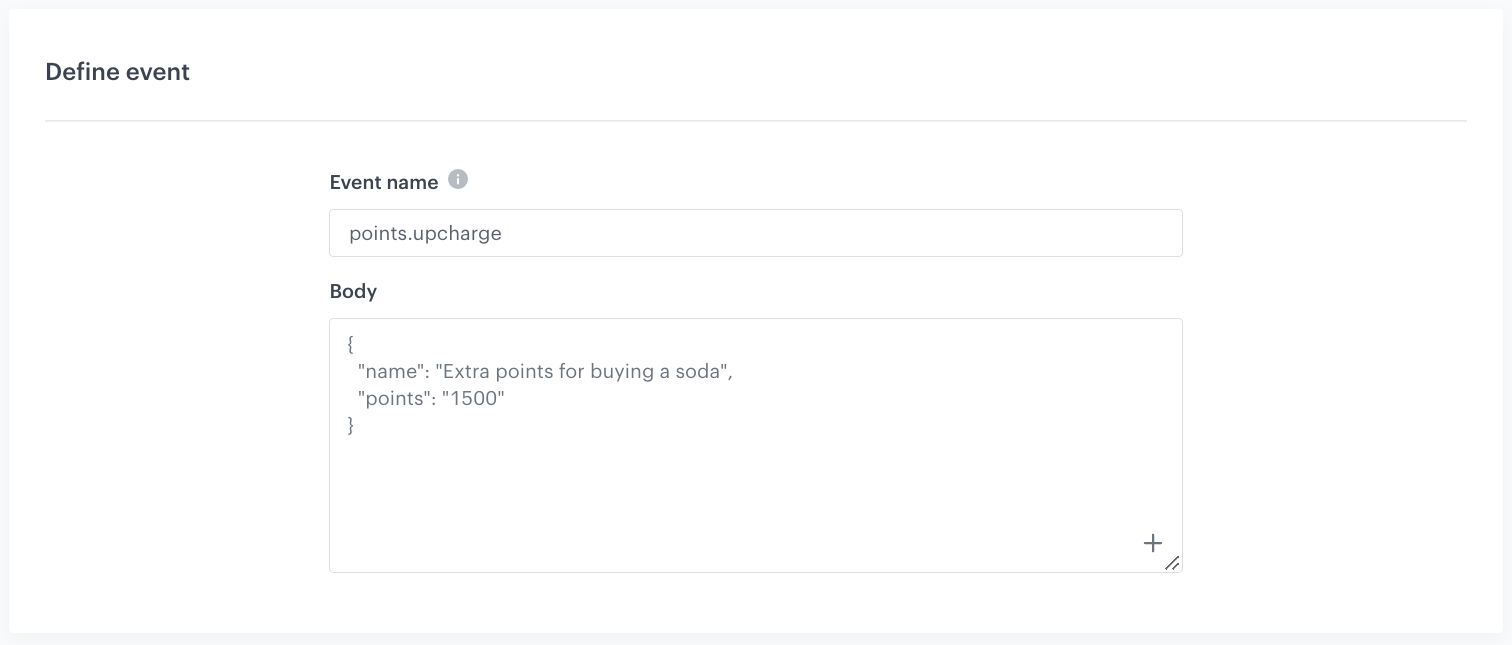
               "name": "Extra points for buying a soda",
               "points": "1500"
               }</code></pre>


3. Click **Apply**.
    <figure>
    <img src="/api/docs/image/54176ad07f146575310749eba44b7c2f42c1b327/use-cases/all-cases/_gfx/gen-ev.png" alt="The view of the Generate Event node configuration"  class="large">
    <figcaption>Configuration of the Generate Event node</figcaption>
    </figure> 
4. Add the **End** node.

**Result**:
<figure>
<img src="/api/docs/image/54176ad07f146575310749eba44b7c2f42c1b327/use-cases/all-cases/_gfx/full-auto.png" alt="The view of the automation updating the catalog copy or awarding points"  class="full">
<figcaption>Automation updating the catalog copy or awarding points</figcaption>
</figure> 

## Create an automation updating the catalog content to the default value
---
In this part of the process, you will create a workflow which triggers at midnight every day and changes the message in the catalog to its default value: information that you can buy a soda and get extra loyalty points. 

1. Go to <img src="/api/docs/image/54176ad07f146575310749eba44b7c2f42c1b327/icons/automation-hub-icon.svg" alt="Automation Hub icon" class="icon" > **Automation Hub > Workflows > New workflow**.  
2. Enter the name of the workflow.
3. As the trigger node, add **Scheduled Run**.
4. In the configuration of the node: 
    1. Leave the **Run trigger** setting at default (**all time**).
    2. In the **Repeat runs** section, set your **Timezone**, then choose **Everyday** and set the time to `0:00`.
    3. Click **Apply**.
5. Add the **Outgoing Integration** node.
6. In the configuration of the node:
    1. As your method of authorization, select **Synerise API key**.
        1. From the dropdown list below, select your **API key**.
    2. In the **Webhook name**, field enter name for the webhook. In this case, it's `change.documentCopy`.
    3. Optionally, in the **Webhook event name** field, choose an action name for the event that will be generated when Synerise receives a response from your selected endpoint.
    4. In the **URL** section, select the **POST** method.
        1. In the URL of the endpoint, enter `https://api.synerise.com/catalogs/bags/ID/items`, where the **ID** is the ID of your [catalog created earlier](#create-a-catalog).
    5. Enter the request body. For the form used in this case, the body is as follows:

        
       <pre><code class="language-json">{
                   "value": {
                       "key": "copyKey",
                       "copy": "Buy a soda and get extra 1500 loyalty points! 
                       Take advantage of this offer while you still can!"
                       },
                   "itemKey": "copyKey"
               }</code></pre>


       <div class="admonition admonition-note"><div class="admonition-icon"><svg xmlns="http://www.w3.org/2000/svg" fill="none" viewBox="0 0 24 24" stroke="currentColor" stroke-width="2.5"><path stroke-linecap="round" stroke-linejoin="round" d="M13 16h-1v-4h-1m1-4h.01M21 12a9 9 0 11-18 0 9 9 0 0118 0z" /></svg></div><div class="admonition-body"><div class="admonition-content">

       You can use this JSON code in your implementation, but change the names of the columns within the catalog and `copy` content according to your business needs.

       </div></div></div>

    8. Click **Apply**.
7. Add the **End** node.

**Result**:
<figure>
<img src="/api/docs/image/54176ad07f146575310749eba44b7c2f42c1b327/use-cases/all-cases/_gfx/lim_promo_aut2.png" alt="The view of the workflow updating the catalog to the default value"  class="large">
<figcaption>Workflow updating the message in the catalog to the default value</figcaption>
</figure> 

## Create a document with a catalog
---
In the final step of this process, you will create a document with [the catalog created earlier](#create-a-catalog) in order to be able to return the catalog content to the mobile application. This will let you display information for the customer whether they can still use the promotion or not.

1. Go to <img src="/api/docs/image/54176ad07f146575310749eba44b7c2f42c1b327/icons/data-modeling-hub-icon.svg" alt="Data Modeling Hub icon" class="icon"> **Data Modeling Hub > Documents > Add document**.
2. Enter the name for your document. 
A slug (the ID of the document) is filled in automatically.
3. To select the type of schema, in the **Type** section, open the dropdown list.
A schema defines the method of validating the data included in the document.
4. Optionally, in the **Description** field, you can add a description of the document.
5. In the **Content (JSON)** section, paste the JSON code:
    
   <pre><code class="language-json">{
   "copy": "{% set key = 'copyKey' %}{% catalog.UC-limited-promotion(key).copy %}"
   }</code></pre>


   <div class="admonition admonition-note"><div class="admonition-icon"><svg xmlns="http://www.w3.org/2000/svg" fill="none" viewBox="0 0 24 24" stroke="currentColor" stroke-width="2.5"><path stroke-linecap="round" stroke-linejoin="round" d="M13 16h-1v-4h-1m1-4h.01M21 12a9 9 0 11-18 0 9 9 0 0118 0z" /></svg></div><div class="admonition-body"><div class="admonition-content">

   The above code contains the JSON object that will be returned to your mobile app. It contains one field (`copy`) with the value of message that should be displayed to the customer. This value is retreived using [the Jinjava insert](/developers/inserts/insert-usage#extracting-values-from-catalogs) that enables to extract values form catalogs. You can use the code in your implementation but change the name of the catalog to the one you have created, as well as the names of the columns within it.

   </div></div></div>


6. Click **Apply** to save the document.

<figure>
<img src="/api/docs/image/54176ad07f146575310749eba44b7c2f42c1b327/use-cases/all-cases/_gfx/lim_promo_docu.png" alt="The view of the document configuration"  class="large">
<figcaption>Configuration of the document</figcaption>
</figure> 

## What's next 
---
For this business scenario and automation to work, creating a document with a catalog is crucial. The mobile application will be able to retrieve the document with the current copy content, with the download document method ([Android](/developers/mobile-sdk/method-reference/android/content#generate-document), [iOS](/developers/mobile-sdk/method-reference/ios/content#generate-document), [React Native](/developers/mobile-sdk/method-reference/react-native/content#generate-document)). Then, a JSON file with the raw content will be returned, which the app must properly display to the customer.

## Check the use case set up on the Synerise Demo workspace
---
You can check the:
- [catalog](https://app.synerise.com/assets/catalogs/14170) 
- [metric](https://app.synerise.com/analytics/metrics/5f7a2aff-27bd-4045-9d9b-e88837d41d25)
- [automation updating the catalog copy or awarding points](https://app.synerise.com/automations/automation-diagram/271368bf-51f3-49a8-b172-b5509104f8e4) 
- [automation updating the catalog to the default value](https://app.synerise.com/automations/automation-diagram/dce35c9c-926a-4306-9404-28fffd40229c)
- [document](https://app.synerise.com/assets/documents/a2cc179a-8d44-4555-9ac2-6d4c0723ccbb)
configurations directly in the Synerise Demo workspace. 

If you’re our partner or client, you already have automatic access to the **Synerise Demo workspace (1590)**, where you can explore all the configured elements of this use case and copy them to your workspace.  

If you’re not a partner or client yet, we encourage you to fill out the contact [form](https://demo.synerise.com/request) to schedule a meeting with our representatives. They’ll be happy to show you how our demo works and discuss how you can apply this use case in your business. 

## Read more
---

- [Automation Hub](/docs/automation)
- [Catalogs](/docs/assets/catalogs/introduction-to-catalogs)
- [Documents](/docs/assets/documents/introduction-to-documents)
- [Metrics](/docs/analytics/metrics)

