
The pre-Christmas period is a very suitable moment for temporary actions to diversify basic loyalty programs, as it usually works well for your customers who have promised to themselves to buy a gift. You can launch a special time-limited promotion for a selected product category during the weekend right before Christmas for the purchase of which the customer can gain twice as many points.

In this use case, we will present an example of an action that doubles points for the purchase of all products from the `Christmas` category during the pre-Christmas weekend. Customers who make such a purchase will receive an email with information about doubling of points for the specific purchase and the current points balance.

## Prerequisites 
---
- [Create an email account](/docs/campaign/e-mail/creating-email-campaigns).
- Implement transaction events using [SDK](/developers/web/transactions-sdk) or [API](https://developers.synerise.com/DataManagement/DataManagement.html#operation/CreateATransaction). 
- Implement basic [loyalty program](/use-cases/loyalty-programs-basics) based on which you granted customers with 1 point for every 1 PLN spent.
- Create an [email template](/docs/campaign/e-mail) with the information about current point balance. 

    
  <div class="admonition admonition-note"><div class="admonition-icon"><svg xmlns="http://www.w3.org/2000/svg" fill="none" viewBox="0 0 24 24" stroke="currentColor" stroke-width="2.5"><path stroke-linecap="round" stroke-linejoin="round" d="M13 16h-1v-4h-1m1-4h.01M21 12a9 9 0 11-18 0 9 9 0 0118 0z" /></svg></div><div class="admonition-body"><div class="admonition-content">

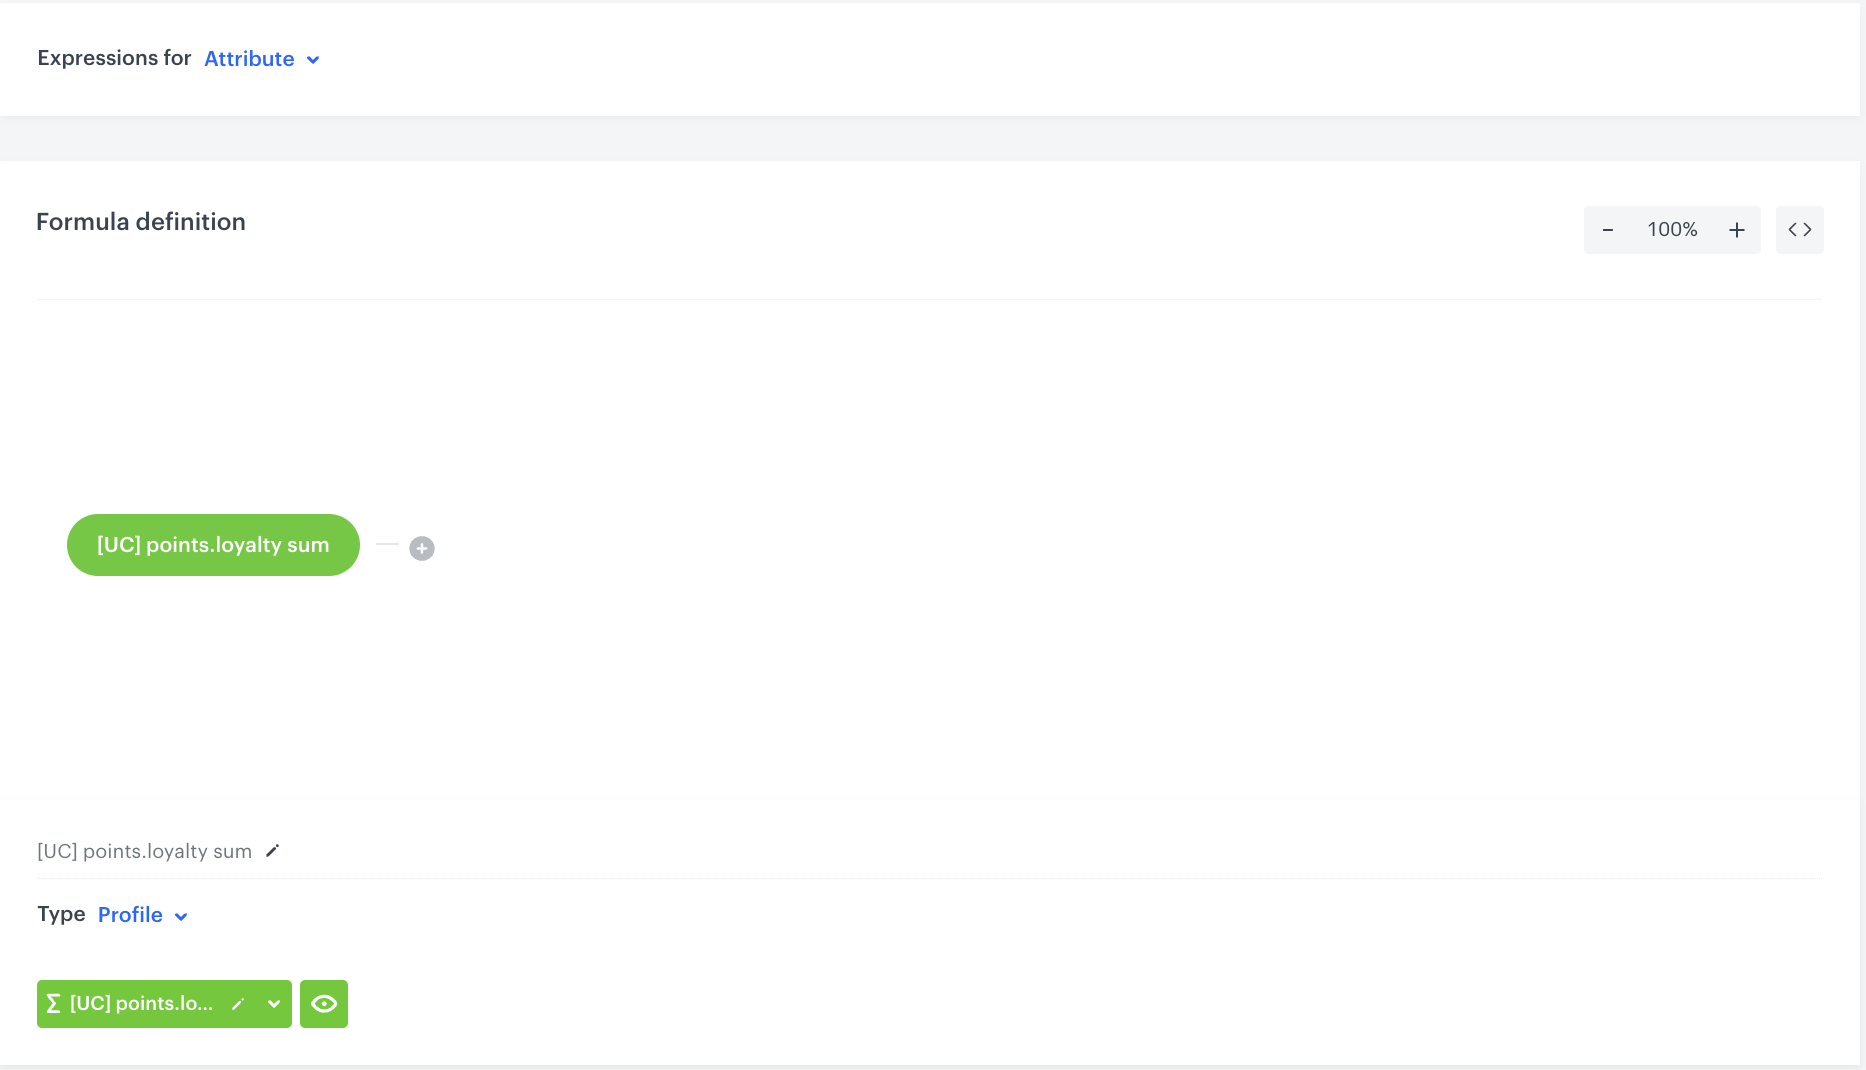
  To add the current point balance dynamically to your email template, use the [expression insert](/developers/inserts/insert-usage#expressions) and use the ID of the [expression created in the next step](/use-cases/loyalty-points-for-category#create-an-expression-with-points-balance). The example usage of the expression insert: Your current loyalty points balance is {% expression %}EXPRESSION ID{% endexpression %} points.

  </div></div></div>


## Security configuration
---
Before you start working with this hub, if you are a Synerise customer or partner, consider reading [the section about denylisting events](/docs/settings/tool/api#denylist). This natively accessible configuration will allow you to manage the restrictions in points management that may help you prevent fraud.

## Process 
---
1. [Create an aggregate](/use-cases/loyalty-points-for-category#create-an-aggregate) that returns the sum of loyalty points for an individual customer.
2. [Create an expression with points balance](/use-cases/loyalty-points-for-category#create-an-expression-with-points-balance).
3. [Create a workflow](/use-cases/loyalty-points-for-category#create-a-workflow) which doubles the points for every product from the `Christmas` category purchased during the specific weekend and sends the email with the final point status.

## Create an aggregate
---
Create an aggregate that returns the sum of loyalty points for an individual customer. 

1. Go to <img src="/api/docs/image/54176ad07f146575310749eba44b7c2f42c1b327/icons/behavioral-data-hub-icon.svg" alt="Behavioral Data Hub icon" class="icon"> **Behavioral Data Hub > Live Aggregates > Create aggregate**.
2. As the aggregate type, select **Profile**.  
2. Enter a meaningful name of the aggregate.  
3. Set the **Analyze profiles by** option to **Sum**.  
4. Click the **Choose event** dropdown list.  
5. From the dropdown list, select the event that is generated every time the customer is awarded with loyalty points, in this use case it's the `points.loyalty` event.
6. From the **+ where** dropdown list, select the `points` parameter.
7. Using the date picker in the lower-right corner, set the time range to **Lifetime**.  
8. Save the aggregate.
        <figure>
        <img src="/api/docs/image/54176ad07f146575310749eba44b7c2f42c1b327/use-cases/all-cases/_gfx/aggregate-transfer.png" alt="The aggregate that sums points from the points.loyalty event" class="full">
        <figcaption> The aggregate that sums points from the points.loyalty event </figcaption>
        </figure> 

## Create an expression with points balance
---
In this part of the process, create an [expression](/docs/analytics/expressions) which will be used to calculate points balance for the customer.  

In this use case, the expression is built based on the aggregate that returns the sum of loyalty points gained. 


<div class="admonition admonition-note"><div class="admonition-icon"><svg xmlns="http://www.w3.org/2000/svg" fill="none" viewBox="0 0 24 24" stroke="currentColor" stroke-width="2.5"><path stroke-linecap="round" stroke-linejoin="round" d="M13 16h-1v-4h-1m1-4h.01M21 12a9 9 0 11-18 0 9 9 0 0118 0z" /></svg></div><div class="admonition-body"><div class="admonition-content">

The described expression configuration is just an example. You can define additional conditions such as burned points or points added additionally for completing some other extra activity. It all depends on your business requirements and how your loyalty program is implemented.

</div></div></div>


1. Go to <img src="/api/docs/image/54176ad07f146575310749eba44b7c2f42c1b327/icons/behavioral-data-hub-icon.svg" alt="Behavioral Data Hub icon" class="icon">  **Behavioral Data Hub > Expressions > New expression**.
2. Enter a meaningful name of the expression.  
3. Leave the expression type at default (**Attribute**).  
4. Build the formula of the expression.
    1. Click the **Select** node.  
    2. From the dropdown list, select **Profile**.  
    3. Click the **unnamed** node that appeared on the canvas.  
    4. Scroll down the page and click **Choose attribute**.  
    5. On the dropdown list, select the aggregate for `points.loyalty` that you created [earlier](/use-cases/in-app-point-balance-reminder#create-an-aggregate). 
    6. Save the expression.
        <figure>
        <img src="/api/docs/image/54176ad07f146575310749eba44b7c2f42c1b327/use-cases/all-cases/_gfx/expression-points.loyalty.png" alt="The configuration of the expression" class="full">
        <figcaption> The configuration of the expression </figcaption>
         </figure> 

## Create a workflow
---
Create a workflow which:
- doubles the points for the purchase of every product from the `Christmas` category during the specific weekend,
- sends the email message with the current point balance

1. Go to <img src="/api/docs/image/54176ad07f146575310749eba44b7c2f42c1b327/icons/automation-hub-icon.svg" alt="Automation Hub icon" class="icon" > **Automation Hub > Workflows > New workflow**.  
2. Enter the name of the workflow.

### Define the Profile Event trigger node
At this stage, we will configure the conditions that launch the workflow. As a trigger, we will use the `product.buy` event.

1. As the first node of the workflow, add **Profile Event**. In the configuration of the node: 
2. From **Choose event** dropdown menu, choose the `product.buy` event.  
3. Click the **+ where** button and from the dropdown list, choose **category**.  
4. From the **Choose operator** dropdown, select **Equal**.
5. In the text field, type the name of the category. In our case it will be `Christmas`.
6. Click the **+ where** button and from the dropdown list, choose **TIMESTAMP**. 
7. From the **Choose operator** dropdown, choose **Custom (Date)**.
8. Click **Select date range**.
9. Set the time range in which your promotion is active. In this use case, it will be the weekend before Christmas.
6. Confirm by clicking **Apply**.

<figure>
<img src="/api/docs/image/54176ad07f146575310749eba44b7c2f42c1b327/use-cases/all-cases/_gfx/points-for-category1.png" alt= Profile Event trigger node"  class="full">
<figcaption>Profile Event trigger node</figcaption>
</figure> 

### Configure the Generate Event node

In this part of the process, you will create a node which generates a `points.loyalty` event which adds extra loyalty points. This event is created in addition to the regular `points.loyalty` event. In result, the customer receives points for a purchase from the `Christmas` category twice:
1. Points based on the [loyalty points schema](/use-cases/loyalty-programs-basics#prepare-the-points-schema) described as a part of prerequisites.
2. Extra points through this workflow.
The body of the additional event will contain the `points` parameter calculated by multiplying the value of the `$finalUnitPrice` and `$quantity` parameters from the `product.buy` event.

1. As the second node of the workflow, add **Generate Event**. 
2. In the **Event name**, enter `points.loyalty`.
4. In the **Body** section, define the parameters of this event, and click **Apply**.

  **Example content of **Body** section:**

    
   <pre><code class="language-json">{
     "points": "{{ event.params.$finalUnitPrice * event.params.$quantity }}",
     "promo": "ChristmasPromo"
   }</code></pre>


<div class="admonition admonition-note"><div class="admonition-icon"><svg xmlns="http://www.w3.org/2000/svg" fill="none" viewBox="0 0 24 24" stroke="currentColor" stroke-width="2.5"><path stroke-linecap="round" stroke-linejoin="round" d="M13 16h-1v-4h-1m1-4h.01M21 12a9 9 0 11-18 0 9 9 0 0118 0z" /></svg></div><div class="admonition-body"><div class="admonition-content">

The event body is an example. You can add more parameters or change the point calculation, perform any mathematical formula according to your business needs.

</div></div></div>


 <figure><img src="/api/docs/image/54176ad07f146575310749eba44b7c2f42c1b327/use-cases/all-cases/_gfx/points-for-category2.png" class="full" alt="Generate Event node configuration"><figcaption>Generate Event node configuration</figcaption></figure>

### Configure the Event Filter node
At this stage, we make sure the points have beed awarded to the customer before sending an email.

1. Add the **Event Filter** node.
2. Check **without limits**.
3. From the **Choose event** dropdown list, select the `points.loyalty` event (the same you generated in the [previous step](/use-cases/loyalty-points-for-category#configure-the-generate-event-node).
4. As the event parameter, select **promo** (the same parameter as in the body of the **Generate Event** node).
5. From the **Choose operator** dropdown list, select **Equal**.
6. As the value, enter `ChristmasPromo` which is the value of the `promo` parameter from the body of the **Generate Event** node. This way you make sure that a customer got extra points for the purchase. 
7. Confirm by clicking **Apply**. 

 <figure><img src="/api/docs/image/54176ad07f146575310749eba44b7c2f42c1b327/use-cases/all-cases/_gfx/points-for-category.png" class="full" alt="Event Filter node configuration"><figcaption>Event Filter node configuration</figcaption></figure>

### Configure the Send Email node
---

1. Add a **Send Email** node to the **matched** path. 
2. In the settings of the node:  
    1. Define the settings of the **Sender details** section.
    2. In the **Content** section, enter the subject of the email and select choose the template of the email you have prepared as a part of the prerequisites.
    3. Optionally define the settings in the **UTM & URL parameters** and **Additional parameters** sections.
2. Click **Apply**.

### Prepare the final settings 
---

1. After **Send Email**, add the **End** node as well as to the **NOT MATCHED** path.
2. Optionally, define **capping**.
3. Optionally, add titles to each node so the workflow will be more understandable to your colleagues.
4. Activate the workflow by clicking **Save & Run**.

 <figure><img src="/api/docs/image/54176ad07f146575310749eba44b7c2f42c1b327/use-cases/all-cases/_gfx/points-for-category3.png" class="full" alt="The workflow configuration"><figcaption>The workflow configuration</figcaption></figure>

## Check the use case set up on the Synerise Demo workspace
---
You can check the configuration of the:
- [aggregate with the points balance](https://app.synerise.com/analytics/aggregates/174ba14c-b0d7-372d-acb2-8f1365af3083)
- [expression with the points balance](https://app.synerise.com/analytics/expressions/2d4c0862-31ac-43c7-a991-97a1e5455e8a)
- [workflow doubling the points](https://app.synerise.com/automations/automation-diagram/db6e214d-59ee-49e1-ac73-62341017f825)
directly in Synerise Demo workspace. 

If you’re our partner or client, you already have automatic access to the **Synerise Demo workspace (1590)**, where you can explore all the configured elements of this use case and copy them to your workspace.  

If you’re not a partner or client yet, we encourage you to fill out the contact [form](https://demo.synerise.com/request) to schedule a meeting with our representatives. They’ll be happy to show you how our demo works and discuss how you can apply this use case in your business. 

## Read more
---

- [Automation Hub](/docs/automation)
- [Email campaigns](/docs/campaign/e-mail)
- [Expressions](/docs/analytics/expressions)
- [Jinjava inserts](/developers/inserts)
- [Loyalty programs basics](/use-cases/loyalty-programs-basics)
